AirDrop is a fantastic feature for Apple users, allowing you to seamlessly share photos, videos, documents, and more with nearby iPhones, iPads, and Macs. If you’re wondering, “How Do I Airdrop A Photo?”, you’ve come to the right place. This guide will walk you through everything you need to know to effortlessly share your precious photo memories using AirDrop.
Before you start enjoying the convenience of AirDrop for sharing photos, there are a few essential prerequisites to ensure a smooth transfer process. Let’s quickly run through these to get you ready.
First, proximity is key. AirDrop relies on Bluetooth and Wi-Fi to create a peer-to-peer connection between devices. Therefore, make sure that the person you want to share photos with is physically nearby, within a short range of about 30 feet, and both of you have Bluetooth and Wi-Fi enabled. You don’t need to be on the same Wi-Fi network, but both radios need to be active.
Secondly, Personal Hotspot can sometimes interfere with AirDrop. If either you or the recipient has Personal Hotspot turned on, it’s best to temporarily disable it for a hassle-free AirDrop experience.
Lastly, and importantly, check the AirDrop receiving settings of the person you are sending the photo to. Apple provides different levels of privacy for AirDrop. If their AirDrop is set to “Contacts Only,” and you are not in their contacts, or if your Apple ID email or mobile number isn’t saved in their contact card, they won’t be able to receive your photo. In this case, they would need to temporarily set their AirDrop receiving setting to “Everyone” to receive the file from you. Don’t worry, they can always revert back to “Contacts Only” or even “Receiving Off” after the transfer for enhanced privacy.
Now that we’ve covered the prerequisites, let’s dive into the simple steps on how to actually AirDrop a photo from your iPhone or iPad.
-
Open the Photos App and Select Your Photo: Begin by opening the Photos app on your iPhone or iPad and navigate to the photo you wish to share. If you want to share multiple photos at once, which is a great time-saver, you can easily select them. In the Photos app, tap “Select” in the top right corner, then tap on each photo you want to include in your AirDrop transfer. A blue checkmark will appear on each selected photo.
-
Tap the Share Button: Once you’ve selected your photo or photos, look for the Share button, which is typically located in the bottom left corner of the screen. It’s the square icon with an arrow pointing upwards. Tap this button to bring up the Share Sheet.
-
Tap the AirDrop Button: In the Share Sheet that appears, you’ll see various sharing options. Look for the AirDrop button. It’s represented by a circle with radiating lines. Tap the AirDrop button to initiate the AirDrop process.
-
Select the AirDrop Recipient: After tapping the AirDrop button, your iPhone or iPad will start searching for nearby devices with AirDrop enabled. You will see a list of available AirDrop users. If the person you are sharing with is in your Contacts, their name and contact photo (if they have one set up) will appear. If they are not in your contacts, you will only see their name. Simply tap on the name of the person you want to AirDrop the photo to.
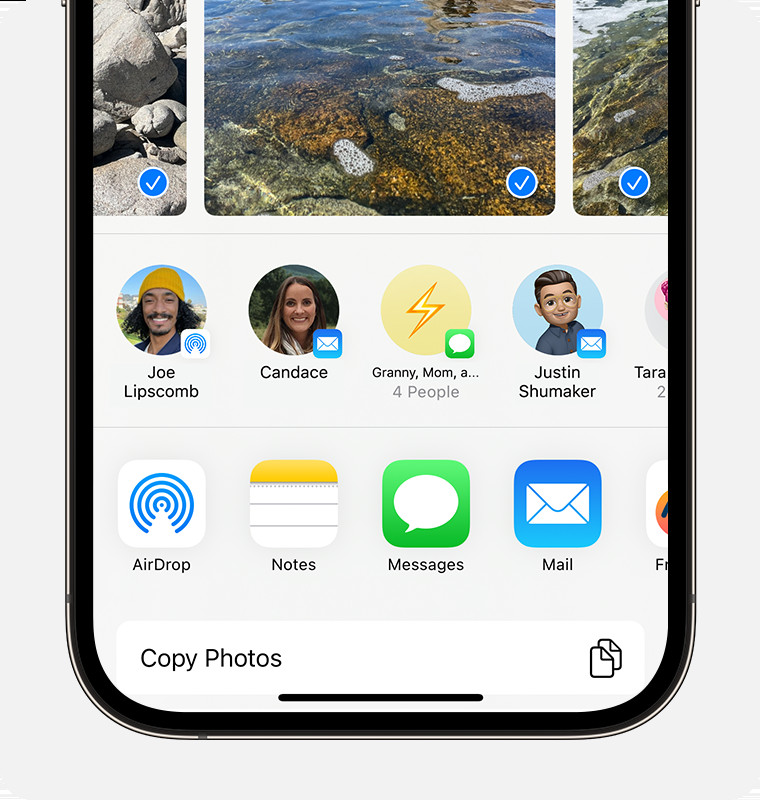 Share a photo via AirDrop on iPhone: Tap the AirDrop option in the share sheet after selecting your photo.
Alternatively, with iOS 17 and later, Apple introduced a more intuitive way to initiate AirDrop with people in your contacts. If the person you’re sharing with is in your Contacts and also using an iPhone with iOS 17, you can simply bring your iPhones close together. This proximity sharing method is a quick and convenient way to start an AirDrop transfer.
Once you’ve selected the recipient, the photo will begin transferring wirelessly via AirDrop. A progress circle will appear on your screen, and on the recipient’s device, they will receive a notification asking them to accept or decline the incoming photo.
When someone AirDrops a photo to you, a prominent alert will pop up on your iPhone or iPad screen. This alert will give you two choices: “Accept” or “Decline”.
If you want to receive the photo, simply tap “Accept”. The AirDropped photo will then be seamlessly saved to your Photos app, appearing in your Recents album and within the date it was taken in your library.
If you decide you don’t want the photo, or if you received it by mistake, just tap “Decline”. The AirDrop transfer will be cancelled, and the sender will be notified.
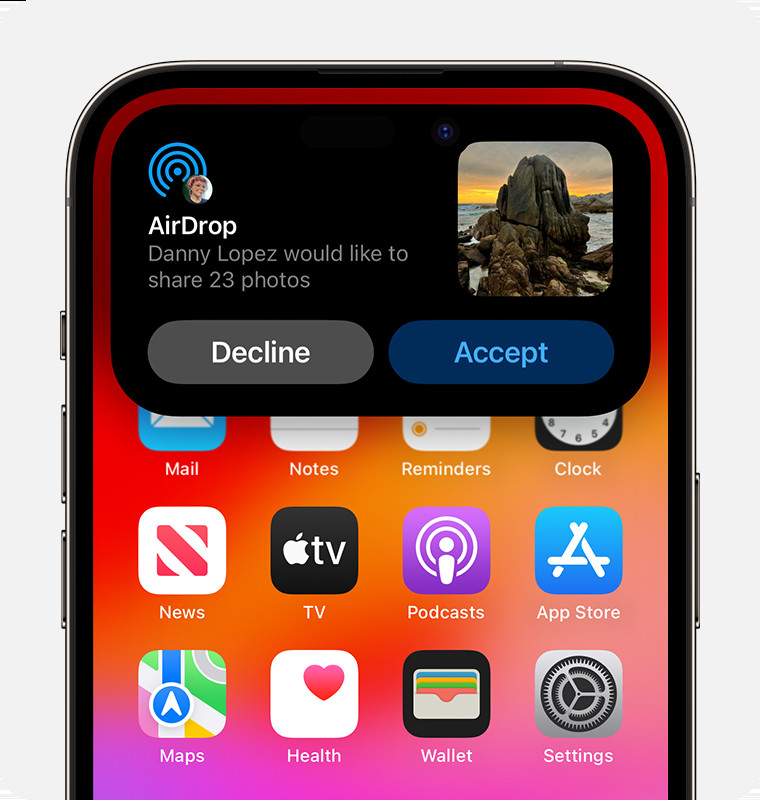 Accept or Decline AirDrop Photo: An alert appears on your iPhone when someone AirDrops you a photo, prompting you to accept or decline.
An important thing to note is when you AirDrop a photo to yourself, for example, from your iPhone to your iPad or Mac, and both devices are logged in with the same Apple ID, the transfer is even more streamlined. In this case, you won’t see the “Accept” or “Decline” prompt. The photo will automatically be sent and saved to your other device. This makes it incredibly easy to move photos and files between your own Apple devices.
Apple provides you with control over who can see your device and send you content via AirDrop. You can adjust these settings to suit your privacy preferences. Here’s how to customize your AirDrop settings:
-
Open Settings App: Go to the Settings app on your iPhone or iPad.
-
Tap General: Scroll down and tap on “General”.
-
Tap AirDrop: In the General settings, find and tap on “AirDrop”. This will take you to the AirDrop settings screen.
Here, you’ll see three options to choose from:
-
Receiving Off: If you select “Receiving Off,” you will not receive any AirDrop requests. Your device will not be discoverable via AirDrop to others. Choose this option when you want to completely disable AirDrop and prevent unwanted file transfers.
-
Contacts Only: When set to “Contacts Only,” only people who are in your Contacts app can see your device and AirDrop content to you. This is a more private setting, ensuring that only known individuals can send you files. For “Contacts Only” to work, the sender must be in your contacts, and you must have their Apple ID email address or phone number saved in their contact card.
-
Everyone: Selecting “Everyone” makes your device visible to all nearby Apple devices using AirDrop, regardless of whether they are in your contacts or not. This is the most open setting, allowing anyone nearby to AirDrop files to you. For increased security, especially in public places, Apple has introduced a temporary “Everyone for 10 Minutes” option in iOS 16.2 and later. When you choose this, your AirDrop setting will revert to “Contacts Only” automatically after 10 minutes.
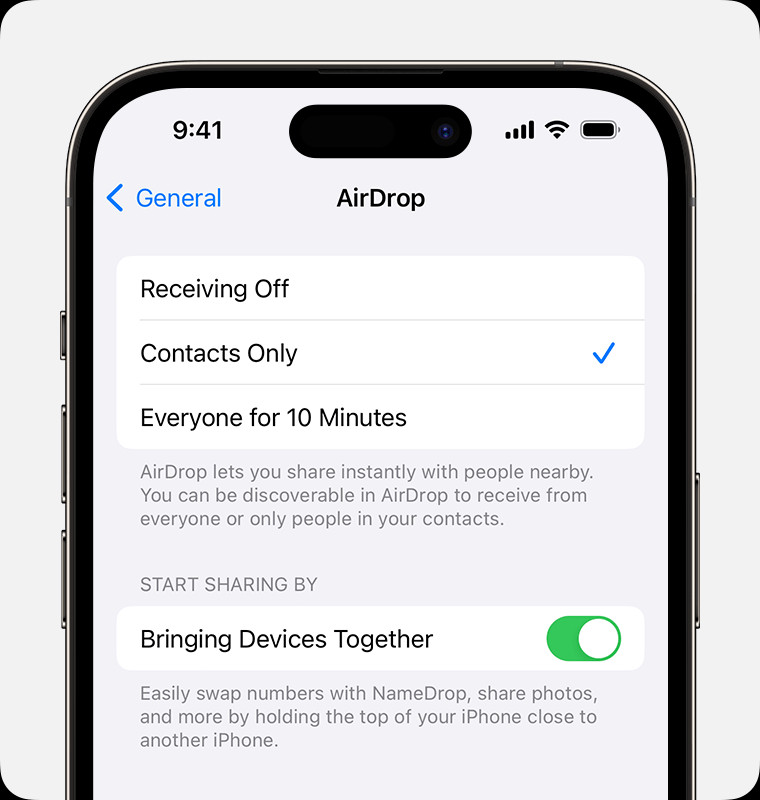 AirDrop Settings on iPhone: Choose 'Contacts Only' or 'Everyone' in AirDrop settings to control who can send you photos.
You can also quickly access and change your AirDrop settings from the Control Center.
-
Open Control Center: On iPhone X or later and iPads with iOS 12 or later, swipe down from the upper-right corner of the screen to open Control Center. On iPhone 8 or earlier, swipe up from the bottom of the screen.
-
Force Touch or Long Press Network Settings Card: In the upper-left corner of Control Center, you’ll see a card with network settings (Airplane Mode, Wi-Fi, Bluetooth, Cellular). Force Touch (press firmly) or touch and hold this card to expand it.
-
Touch and Hold AirDrop Button: In the expanded network settings card, you will see the AirDrop button. Touch and hold the AirDrop button.
-
Choose Your Option: A menu will pop up, allowing you to quickly choose between “Receiving Off,” “Contacts Only,” and “Everyone.” Select your desired AirDrop setting.
If you find that your AirDrop is set to “Receiving Off” and you are unable to change it, it might be due to Screen Time restrictions. To check and resolve this:
- Go to Settings > Screen Time.
- Tap Content & Privacy Restrictions.
- Tap Allowed Apps.
- Ensure AirDrop is Turned On: Make sure that the toggle next to “AirDrop” is switched on (green). If it’s off, tap the toggle to enable AirDrop.
AirDrop is an incredibly convenient and efficient way to share photos and other files between Apple devices. By understanding how to use AirDrop and customize its settings, you can seamlessly share your photos with friends, family, and your own devices, all while maintaining your desired level of privacy. So next time you want to quickly share a photo with someone nearby, remember the ease and speed of AirDrop!