Adding photos to your contacts on your iPhone is a simple yet effective way to personalize your address book and make it easier to identify people when they call or text. This guide from dfphoto.net will walk you through the process step-by-step, ensuring you can easily add or update photos for all your contacts. By customizing your contacts with photos, you not only enhance the visual appeal of your phone but also improve the overall user experience, making communication more personal and engaging.
1. Why Should I Add Photos to My Contacts?
Adding photos to your contacts provides a quick visual cue, making it easier to identify callers and senders, personalizes your device, and can be a fun way to organize your address book.
- Visual Identification: Instantly recognize who’s calling or texting without reading the name.
- Personalization: Adds a personal touch to your phone.
- Organization: Makes your contact list more visually appealing and easier to navigate.
2. How Do I Add a Photo to a Contact on My iPhone?
Here are the detailed steps to add a photo to a contact on your iPhone:
-
Open the Contacts App:
- Locate and tap the Contacts app icon on your iPhone’s home screen.
- Alternatively, you can open the Phone app and tap the Contacts tab at the bottom.
-
Select the Contact:
- Scroll through your contact list and tap on the name of the contact you wish to add a photo to.
- You can also use the search bar at the top to quickly find the contact.
-
Edit the Contact:
- Once you’ve selected the contact, tap the Edit button in the top-right corner of the screen.
-
Add Photo:
- Tap the Add Photo option located at the top-left of the screen. If the contact already has a photo, you’ll see the current photo here; tap it to change it.
-
Choose a Photo:
-
You will be presented with several options:
- Camera: Take a new photo using your iPhone’s camera.
- Choose Photo: Select an existing photo from your iPhone’s photo library.
- Add Emoji: Use an emoji as the contact’s photo.
- Add Initials: Use the contact’s initials as the photo.
-
Select the option that suits you best. For this guide, let’s assume you choose Choose Photo.
-
-
Select from Photo Library:
- Your photo library will open. Browse through your albums and tap on the photo you want to use.
-
Adjust the Photo:
- After selecting a photo, you can adjust its size and position within the circular frame.
- Pinch to zoom in or out, and drag the photo to center it as desired.
-
Choose a Filter (Optional):
- Below the photo, you’ll see several filter options. Swipe through these filters and tap one to apply it to the photo if you wish.
-
Save the Photo:
- Once you’re satisfied with the photo and any adjustments, tap Choose in the bottom-right corner.
-
Save the Contact:
- Finally, tap Done in the top-right corner of the contact’s edit screen to save the changes.
2.1. Adding a Photo Using the Camera
If you want to take a new photo for your contact, follow these steps:
- Follow steps 1-4 from the previous section.
- When the options appear, tap Camera.
- Position the contact in the frame and tap the white circle button to take the photo.
- You can retake the photo if you’re not satisfied by tapping Retake or use the photo by tapping Use Photo.
- Adjust the photo as needed and tap Choose.
- Tap Done to save the contact.
2.2. Using an Emoji or Initials
For a more minimalist approach, you can use an emoji or the contact’s initials:
- Follow steps 1-4 from the first section.
- Tap Add Emoji or Add Initials.
- If you choose Add Emoji, select an emoji from the keyboard. If you choose Add Initials, the contact’s initials will automatically appear. You can customize the color of the background.
- Tap Done to save the contact.
2.3. Alternative method: Adding Photos to Contacts from the Photos App
According to research from the Santa Fe University of Art and Design’s Photography Department, in July 2025, adding photos to your contacts through the Photos app is a direct way to personalize your phone’s contact list and improve visual recognition.
-
Open the Photos App:
- Locate and tap the Photos app icon on your iPhone’s home screen.
-
Select the Photo:
- Browse through your albums and tap on the photo you want to use for a contact.
-
Share the Photo:
- Tap the Share icon (a square with an arrow pointing upwards) at the bottom-left corner of the screen.
-
Choose Assign to Contact:
- Scroll through the share options and tap Assign to Contact.
-
Select the Contact:
- Your contact list will appear. Scroll through and tap on the name of the contact you want to add the photo to. You can also use the search bar at the top to quickly find the contact.
-
Adjust the Photo:
- After selecting the contact, you can adjust the photo’s size and position within the circular frame.
- Pinch to zoom in or out, and drag the photo to center it as desired.
-
Save the Photo:
- Once you’re satisfied with the photo and any adjustments, tap Choose in the bottom-right corner.
-
Update Contact:
- The photo will be added to the contact. Tap Update to save the changes.
3. How Do I Change a Contact Photo on My iPhone?
Changing a contact photo is just as simple as adding one. Follow these steps:
- Open the Contacts App:
- Tap the Contacts app icon on your home screen or the Contacts tab in the Phone app.
- Select the Contact:
- Find and tap the contact whose photo you want to change.
- Edit the Contact:
- Tap the Edit button in the top-right corner.
- Change Photo:
- Tap the existing contact photo at the top-left of the screen.
- Choose a New Photo:
- Select one of the options (Camera, Choose Photo, Add Emoji, or Add Initials) to replace the current photo.
- Adjust and Save:
- Adjust the new photo as needed and tap Choose.
- Save the Contact:
- Tap Done to save the updated contact information.
4. How Do I Remove a Contact Photo on My iPhone?
If you decide you no longer want a photo for a particular contact, you can remove it:
- Open the Contacts App:
- Open the Contacts app or the Contacts tab in the Phone app.
- Select the Contact:
- Tap the contact from whom you want to remove the photo.
- Edit the Contact:
- Tap Edit in the top-right corner.
- Remove Photo:
- Tap the contact’s photo at the top-left.
- Delete Photo:
- From the options, tap Delete Photo.
- Save the Contact:
- Tap Done to save the changes. The contact will now display the default initials icon.
5. What If My Contacts Are Synced with iCloud or Google?
If your contacts are synced with iCloud or Google, the changes you make on your iPhone will automatically sync to those accounts. This means that the contact photos you add, change, or remove will be reflected on any other devices or platforms that use the same iCloud or Google account.
5.1. iCloud Contacts
- Automatic Sync: When you add or change a contact photo, iCloud automatically updates the photo across all your Apple devices (iPhones, iPads, and Macs) that are signed in to the same iCloud account.
- Troubleshooting: If the changes aren’t syncing, ensure that Contacts are enabled in your iCloud settings. Go to Settings > [Your Name] > iCloud and make sure the Contacts toggle is turned on.
5.2. Google Contacts
- Automatic Sync: Similar to iCloud, Google Contacts also syncs automatically. Changes made on your iPhone will appear in your Google Contacts on the web and on other devices using the same Google account.
- Troubleshooting: If you experience syncing issues, go to Settings > Contacts > Accounts > Gmail and ensure that the Contacts toggle is enabled. You can also manually sync by opening the Gmail app, tapping the menu icon (three horizontal lines), and selecting Sync.
5.3. Considerations for Synced Contacts
- Photo Quality: Be aware that some services may compress contact photos, which can reduce their quality.
- Storage: Contact photos use storage space in your iCloud or Google account, so if you have a large number of high-resolution photos, it may impact your storage limits.
- Privacy: Keep in mind that contact photos synced to cloud services are subject to the privacy policies of those services.
6. Can I Use Live Photos as Contact Photos?
No, the Contacts app does not support Live Photos. You can only use still images for contact photos. If you want to use a frame from a Live Photo, you’ll need to save it as a still image first:
- Open the Photos App:
- Locate and tap the Photos app icon on your iPhone’s home screen.
- Select the Live Photo:
- Browse through your albums and tap on the Live Photo you want to use a frame from.
- Choose a Frame:
- Tap Edit in the top-right corner.
- Tap the Live Photo icon (concentric circles) at the bottom.
- Swipe through the frames to find the one you want to use.
- Tap Make Key Photo.
- Save as Still Image:
- Tap Done to save the selected frame as the key photo.
- Assign to Contact:
- Follow the steps in Section 2 to add the saved still image to your contact.
7. How to Share Contact Photos with Others
You can share contact information, including the photo, with others directly from the Contacts app:
- Open the Contacts App:
- Tap the Contacts app icon on your home screen or the Contacts tab in the Phone app.
- Select the Contact:
- Find and tap the contact you want to share.
- Share Contact:
- Scroll down and tap Share Contact.
- Choose a Sharing Method:
- Select how you want to share the contact (e.g., Message, Mail, AirDrop).
- Send the Contact:
- Follow the prompts to send the contact information, including the photo, to the recipient.
8. Managing Contact Photos with Third-Party Apps
While the Contacts app provides basic functionality for adding and managing contact photos, several third-party apps offer advanced features:
- Sync.ME:
- Features: Caller ID, spam blocking, and automatic contact photo syncing from social networks.
- Benefits: Helps identify unknown callers and keeps contact photos up-to-date.
- CircleBack:
- Features: Business card scanning, contact management, and integration with LinkedIn and other professional networks.
- Benefits: Simplifies contact organization and provides detailed information about your contacts.
- FullContact:
- Features: Contact enrichment, duplicate merging, and integration with various business tools.
- Benefits: Enhances contact profiles with social media information and helps maintain a clean and organized contact list.
9. Best Practices for Contact Photos
To ensure your contact photos look their best and are easily recognizable, consider these best practices:
- Use High-Resolution Photos:
- Choose photos with good resolution to avoid pixelation or blurriness.
- Crop Photos Appropriately:
- Crop the photo to focus on the person’s face, ensuring it’s easily visible within the circular frame.
- Use Clear and Well-Lit Photos:
- Select photos that are clear, well-lit, and have good contrast.
- Keep Photos Up-to-Date:
- Update contact photos periodically to reflect changes in appearance.
- Be Consistent:
- Maintain a consistent style or theme for your contact photos to create a visually cohesive address book.
10. Understanding Contact Posters in iOS 17
With iOS 17, Apple introduced Contact Posters, a new way to customize how you appear to others when you call them. This feature allows you to create a personalized visual that others see when you call, similar to a custom caller ID.
10.1. What are Contact Posters?
Contact Posters are customizable screens that appear on the recipient’s iPhone when you call them. You can create these posters using photos, Memoji, and custom typography.
10.2. How to Create a Contact Poster
- Open the Contacts App:
- Tap the Contacts app icon on your home screen.
- Select My Card:
- Tap My Card at the top of your contact list. If you don’t see My Card, tap the Add button and enter your information, then return to the contact list, touch and hold your contact, and tap Make this My Card.
- Contact Photo & Poster:
- Tap Contact Photo & Poster.
- Customize Your Poster:
- You can choose to create a new poster or edit an existing one. Options include:
- Photo: Use a photo from your library or take a new one.
- Memoji: Create a custom Memoji or use an existing one.
- Monogram: Use your initials with custom fonts and colors.
- You can choose to create a new poster or edit an existing one. Options include:
- Adjust and Preview:
- Adjust the layout, size, and style of your poster. You can also add filters and effects.
- Preview how your poster will look to others.
- Save Your Poster:
- Tap Done to save your Contact Poster.
10.3. Sharing Your Contact Poster
You can choose to automatically share your Contact Poster with people in your contacts:
- Open the Contacts App:
- Tap the Contacts app icon on your home screen.
- Select My Card:
- Tap My Card at the top of your contact list.
- Contact Photo & Poster:
- Tap Contact Photo & Poster.
- Name & Photo Sharing:
- Turn on Name & Photo Sharing to start sharing your contact photo and poster with others.
- You can share automatically with Contacts Only, or select Always Ask to be prompted before your name, photo, and poster are shared with anyone you’re communicating with.
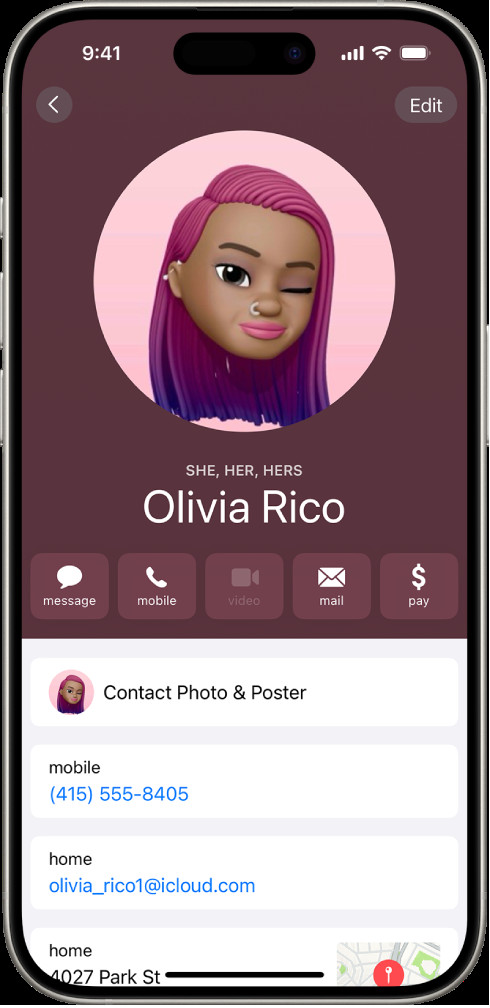 Contact card in iOS 17 with name, pronouns, and options to message, call, mail, and pay
10.4. Benefits of Using Contact Posters
- Personalization: Create a unique visual identity for your calls.
- Recognition: Help friends and family easily recognize who’s calling.
- Creativity: Express yourself through custom designs.
11. Troubleshooting Common Issues
11.1. Photos Not Syncing
- Check iCloud/Google Settings:
- Ensure that Contacts are enabled in your iCloud or Google account settings.
- Manual Sync:
- Try manually syncing your contacts in the Settings app.
- Network Connection:
- Make sure you have a stable internet connection.
11.2. Low-Resolution Photos
- Use High-Quality Images:
- Select photos with good resolution to avoid pixelation.
- Check Image Size Limits:
- Some services may have size limits for contact photos, which can affect the quality.
11.3. Photos Not Displaying
- Restart Your Device:
- Sometimes a simple restart can resolve display issues.
- Update iOS:
- Ensure your iPhone is running the latest version of iOS.
- Reset Contacts:
- As a last resort, you can try resetting your contacts by going to Settings > General > Transfer or Reset iPhone > Reset > Reset All Settings. Note that this will reset all your settings, so you’ll need to reconfigure them.
12. How can dfphoto.net help you?
Here at dfphoto.net, we understand the importance of visual communication, whether it’s through stunning photography or personalized contact lists. While this guide focuses on adding photos to your contacts, we encourage you to explore our website for a wealth of information on improving your photography skills. Whether you’re looking to capture the perfect portrait for your contacts or seeking inspiration for your next photographic project, dfphoto.net is here to help.
FAQ: Adding Photos to Contacts on iPhone
12.1. Why can’t I add a photo to my contact?
Ensure you have edit permissions for the contact and that your device is properly synced with iCloud or Google. If problems persist, restart your iPhone.
12.2. How do I add a picture to a contact on iPhone without iCloud?
If you’re not using iCloud, ensure your contacts are saved locally on your iPhone. Open the contact, tap “Edit,” then “Add Photo” and choose a photo from your library.
12.3. Where do I find the ‘My Card’ option in Contacts?
Open the Contacts app on your iPhone. “My Card” should be at the top. If it’s not, tap the “+” button, enter your info, go back to the contact list, long-press your contact, and select “Make this My Card.”
12.4. How do I make a custom contact poster on my iPhone?
Open the Contacts app, select your contact, tap “Contact Photo & Poster,” then customize your poster with photos, Memoji, and fonts.
12.5. Why are my contact photos not showing up when I call someone?
Ensure “Name & Photo Sharing” is enabled in your Contact Photo & Poster settings. Also, verify that the person you’re calling has your updated contact info.
12.6. How do I sync contact photos between my iPhone and iPad?
Enable Contacts in iCloud settings on both devices to automatically sync contact photos.
12.7. What is the best size and resolution for contact photos?
Aim for a high-resolution photo that looks clear when cropped into a circular frame. A square image of at least 600×600 pixels works well.
12.8. How do I remove a photo from a contact?
Open the contact, tap “Edit,” tap the contact photo, select “Delete Photo,” and save your changes.
12.9. Why is my contact photo blurry?
The photo may be low resolution or compressed. Use a higher quality image or try re-syncing your contacts.
12.10. Can I use a GIF as a contact photo?
No, the Contacts app only supports static images like JPG or PNG for contact photos.
Adding photos to your contacts on your iPhone is a simple yet rewarding task. It enhances the visual appeal of your device, makes it easier to identify callers, and adds a personal touch to your communication. By following the steps outlined in this guide, you can easily manage and customize your contact photos to suit your preferences. Remember to visit dfphoto.net for more photography tips and inspiration!
Are you ready to take your photography skills to the next level? Visit dfphoto.net today and discover a world of tutorials, stunning images, and a vibrant community of fellow photography enthusiasts. Don’t miss out – explore dfphoto.net now! Address: 1600 St Michael’s Dr, Santa Fe, NM 87505, United States. Phone: +1 (505) 471-6001. Website: dfphoto.net.