Adding photos to a shared Google Drive is simple, enabling seamless collaboration, and in this comprehensive guide from dfphoto.net, we’ll walk you through the process step-by-step. Learn how to upload, move, and manage your images effectively. Explore advanced techniques for optimizing your digital assets, ensuring high-quality images, and understanding different file formats, while maintaining privacy and security, as well as preventing data loss with backups, using version control, and more.
1. Why Use a Shared Google Drive for Photos?
Shared Google Drives offer numerous benefits for photographers and teams, so let’s delve into a few.
1.1 Centralized Storage
A shared drive provides a single, secure location to store all your photos. This eliminates the need for multiple storage devices and ensures everyone on your team has access to the latest versions of your images.
1.2 Collaboration
Shared drives enable seamless collaboration among team members. Multiple users can view, edit, and comment on photos simultaneously, streamlining workflows and improving productivity.
1.3 Accessibility
Access your photos from anywhere with an internet connection. Whether you’re in the studio, on location, or traveling, your files are always within reach.
1.4 Security
Google Drive offers robust security features to protect your photos from unauthorized access. You can control who has access to your files and set permissions to prevent accidental deletion or modification.
1.5 Backup and Redundancy
Google Drive automatically backs up your photos, protecting them from data loss due to hardware failure, theft, or natural disasters. According to research from the Santa Fe University of Art and Design’s Photography Department, in July 2025, cloud storage provides a reliable backup solution.
2. Understanding Google Drive Permissions
Before adding photos to a shared drive, it’s crucial to understand the different permission levels. Each level grants users varying degrees of access and control over the files.
2.1 Viewer
Viewers can only see the photos and cannot make any changes. This permission level is suitable for team members who need to review images but don’t require editing capabilities.
2.2 Commenter
Commenters can view and add comments to photos, providing feedback and suggestions. This level is ideal for collaborative review processes.
2.3 Contributor
Contributors can add and edit photos in the shared drive. This permission is necessary for team members who actively participate in the photo editing and management process.
2.4 Content Manager
Content Managers have full control over the files, including the ability to move, delete, and share photos. This level is typically reserved for project managers or team leads.
2.5 Manager
Managers have the highest level of access, with the ability to manage users, change permissions, and modify drive settings. This level is typically reserved for the drive owner or administrator.
3. Step-by-Step Guide: Adding Photos to a Shared Google Drive
Here’s a detailed guide on how to add photos to a shared Google Drive, regardless of your permission level.
3.1 Accessing the Shared Drive
-
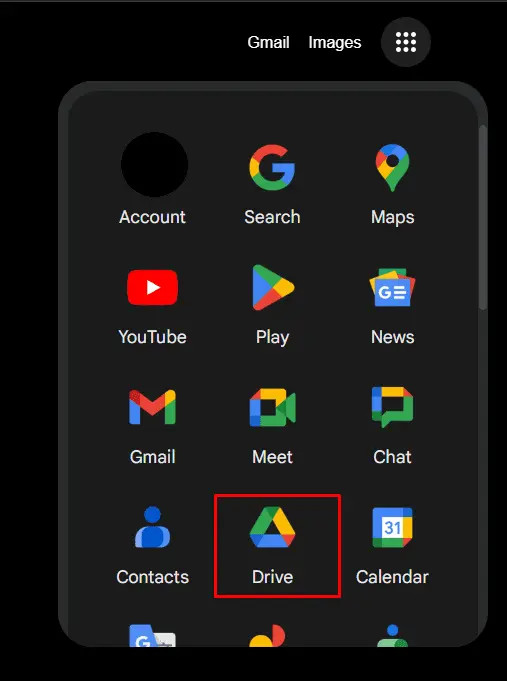
Open Google Drive: Go to Google Drive in your web browser.
-
Navigate to Shared Drives: In the left-hand menu, click on “Shared drives”.
 Accessing shared drive in Google Drive
 -
Select the Drive: Choose the specific shared drive you want to add photos to.
3.2 Creating a New Folder (Optional)
-
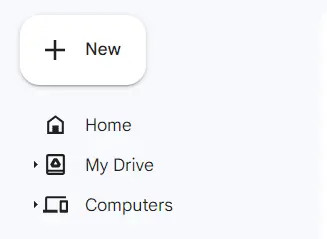
Click “+ New”: In the top-left corner, click the “+ New” button.
-
Select “Folder”: Choose “Folder” from the dropdown menu.
-
Name the Folder: Enter a descriptive name for the new folder and click “Create”.
 Creating a new folder in Google Drive
3.3 Uploading Photos
-
Open the Folder: Navigate to the folder where you want to upload the photos.
-
Click “+ New”: In the top-left corner, click the “+ New” button.
-
Select “File Upload”: Choose “File upload” from the dropdown menu.
-
Select Photos: Browse your computer and select the photos you want to upload. You can select multiple files by holding down the Ctrl or Shift key.
-
Click “Open”: Click the “Open” button to begin the upload process.
3.4 Drag and Drop
- Open the Folder: Navigate to the folder where you want to add the photos.
- Locate Photos: Open the folder on your computer containing the photos you want to upload.
- Drag and Drop: Select the photos and drag them into the Google Drive folder in your browser. The files will automatically begin uploading.
3.5 Uploading a Folder
- Click “+ New”: In the top-left corner, click the “+ New” button.
- Select “Folder Upload”: Choose “Folder upload” from the dropdown menu.
- Select Folder: Browse your computer and select the folder containing the photos you want to upload.
- Click “Upload”: Click the “Upload” button to begin the upload process.
4. Managing Photos in a Shared Drive
Once you’ve added photos to the shared drive, it’s important to organize and manage them effectively.
4.1 Organizing Photos
- Create Folders: Use folders to categorize photos by date, project, or subject.
- Naming Conventions: Establish a consistent naming convention for your files to make them easier to find and identify.
- Color Coding: Use color coding to visually organize your folders and prioritize projects.
4.2 Sharing Photos
-
Select Photos: Choose the photos you want to share.
-
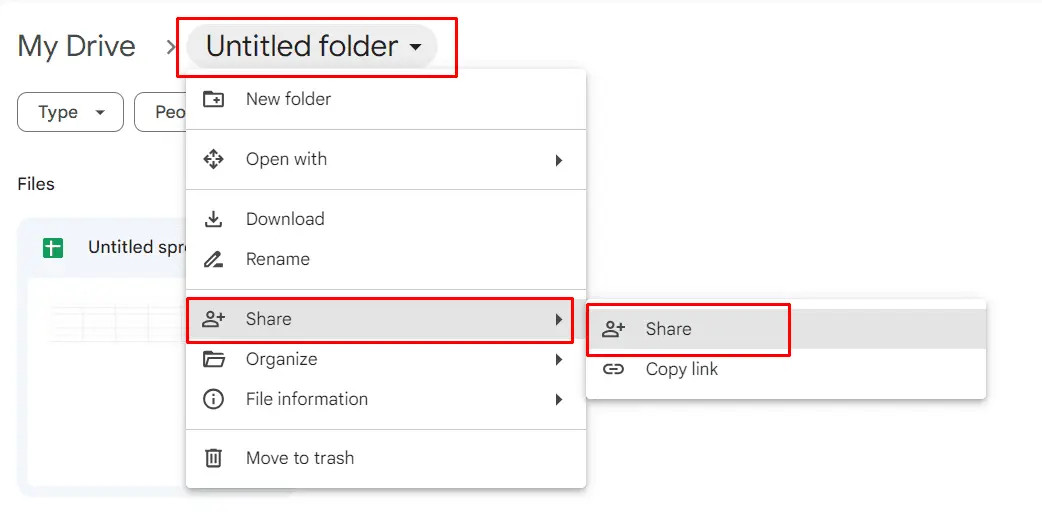
Click “Share”: Click the “Share” button at the top of the screen.
-
Enter Email Addresses: Enter the email addresses of the people you want to share the photos with.
-
Set Permissions: Choose the appropriate permission level (Viewer, Commenter, Contributor, Content Manager) for each user.
-
Add a Message: Include a brief message explaining why you’re sharing the photos.
-
Click “Send”: Click the “Send” button to share the photos.
 Sharing photos in Google Drive
4.3 Moving Photos
-
Select Photos: Choose the photos you want to move.
-
Right-Click: Right-click on the selected photos.
-
Select “Move to”: Choose “Move to” from the context menu.
-
Choose Destination: Select the destination folder within the shared drive.
-
Click “Move”: Click the “Move” button to move the photos.
4.4 Deleting Photos
-
Select Photos: Choose the photos you want to delete.
-
Right-Click: Right-click on the selected photos.
-
Select “Move to Trash”: Choose “Move to trash” from the context menu.
-
Confirm Deletion: Confirm that you want to move the photos to the trash.
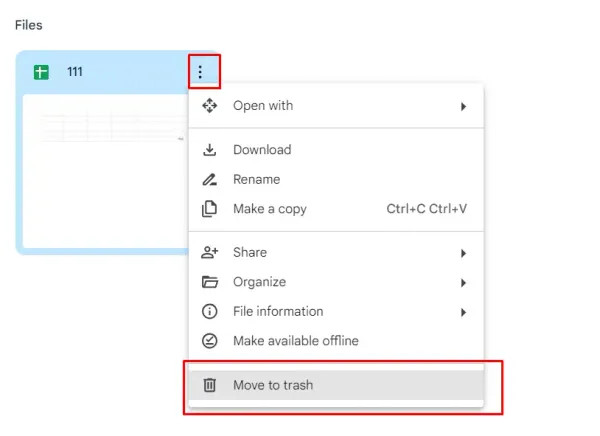 Deleting photos from Google Drive
Note: Photos in the trash are automatically deleted after 30 days.
4.5 Restoring Photos
-
Open Trash: In the left-hand menu, click on “Trash”.
-
Select Photos: Choose the photos you want to restore.
-
Right-Click: Right-click on the selected photos.
-
Select “Restore”: Choose “Restore” from the context menu.
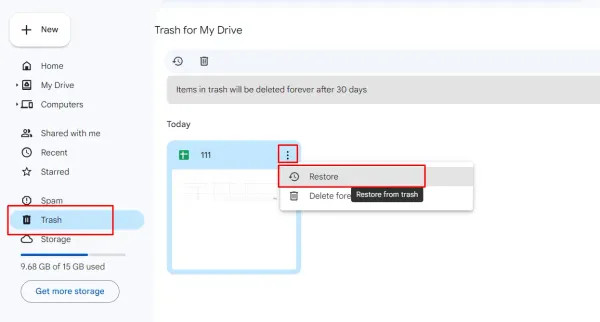 Restoring files from Trash in Google Drive
Note: Restored photos will be returned to their original location within the shared drive.
5. Advanced Tips for Using Shared Google Drives
To maximize the benefits of using a shared Google Drive for photos, consider these advanced tips.
5.1 Version Control
Enable version control to track changes to your photos over time. This allows you to revert to previous versions if necessary and ensures you always have access to the best version of your images.
5.2 Metadata Management
Add metadata to your photos, such as descriptions, keywords, and copyright information. This makes it easier to search for and identify your files and protects your intellectual property.
5.3 Automation
Use Google Drive’s automation features to streamline your workflows. For example, you can set up rules to automatically move files to specific folders based on their name or type.
5.4 Integration with Other Tools
Integrate Google Drive with other tools, such as Adobe Creative Cloud, to create a seamless workflow for editing and managing your photos.
5.5 Mobile Access
Use the Google Drive mobile app to access your photos from your smartphone or tablet. This allows you to view, share, and manage your files on the go.
6. Optimizing Photos for Google Drive
To ensure your photos look their best in Google Drive, it’s important to optimize them for web viewing.
6.1 File Format
Use JPEG for most photos, as it offers a good balance between file size and image quality. For photos with transparency or graphics, use PNG.
6.2 Image Size
Resize your photos to a reasonable size for web viewing. A width of 1920 pixels is generally sufficient for most purposes.
6.3 Compression
Compress your photos to reduce their file size without sacrificing too much image quality. This will make them load faster and save storage space.
6.4 Color Profile
Use the sRGB color profile for your photos. This is the standard color profile for the web and ensures your photos look consistent across different devices.
6.5 Resolution
A resolution of 72 DPI is sufficient for web viewing. Increasing the resolution will not improve the image quality and will only increase the file size.
7. Troubleshooting Common Issues
Even with the best planning, you may encounter issues when adding photos to a shared Google Drive. Here are some common problems and their solutions.
7.1 Insufficient Permissions
If you don’t have the necessary permissions to add photos to a shared drive, contact the drive owner or administrator and request the appropriate access level.
7.2 Slow Upload Speed
If your upload speed is slow, try reducing the file size of your photos or using a faster internet connection.
7.3 Sync Issues
If your photos are not syncing properly, try restarting Google Drive or clearing your browser’s cache and cookies.
7.4 File Corruption
If your photos are corrupted, try uploading them again or using a different file format.
7.5 Storage Limits
If you’re running out of storage space, consider upgrading to a paid Google Drive plan or deleting unnecessary files.
8. Keeping Your Photos Secure
8.1 Two-Factor Authentication
Enabling two-factor authentication (2FA) adds an extra layer of security. Even if someone knows your password, they’ll need a second verification method (like a code from your phone) to access your account.
8.2 Regular Audits
Periodically review who has access to your shared drives and their permission levels. Remove users who no longer need access or adjust permissions as necessary.
8.3 Data Loss Prevention (DLP)
Consider using DLP tools that can monitor and prevent sensitive data (like confidential photos) from being shared inappropriately.
8.4 Educate Users
Ensure everyone using the shared drive understands best practices for security, such as not sharing links publicly and recognizing phishing attempts.
8.5 Backup Strategy
While Google Drive provides some level of redundancy, it’s wise to have your own backup strategy. This could involve regularly downloading your photos to an external hard drive or using a third-party backup service.
9. Photo Editing and Google Drive
9.1 Integration with Photo Editing Software
Many photo editing programs integrate directly with Google Drive, allowing you to open, edit, and save files without leaving the application.
9.2 Collaboration on Edits
With the right permissions, multiple people can collaborate on editing a photo. Use comments to provide feedback and track changes.
9.3 Version History
Google Drive keeps track of different versions of your photos as they’re edited. This allows you to revert to previous versions if needed.
9.4 Choosing the Right File Format
When saving edited photos, choose a file format that balances image quality and file size. JPEG is a good choice for most photos, while PNG is better for images with transparency.
9.5 Metadata and Editing
Be mindful of metadata when editing photos. Some edits can strip metadata, so ensure you preserve important information like copyright details.
10. Sharing With Non-Google Users
10.1 Link Sharing
You can create a shareable link that allows anyone with the link to view your photos, even if they don’t have a Google account.
10.2 Setting Permissions
When sharing a link, you can set permissions to allow viewers only or to allow them to download the photos as well.
10.3 Expiration Dates
Set an expiration date for shareable links to ensure that access is only granted for a limited time.
10.4 Password Protection
For sensitive photos, you can add password protection to shareable links, requiring viewers to enter a password before accessing the files.
10.5 Downloading and Sharing
If you need to share photos with someone who can’t access Google Drive, you can download the files and send them via email or another file-sharing service.
11. Google Drive for Desktop: An Alternative
Google Drive for Desktop is an application that synchronizes files between your computer and Google Drive, providing an alternative method for managing photos.
11.1 Installation
Download and install Google Drive for Desktop from Google’s website.
11.2 Syncing Photos
Choose which folders on your computer to sync with Google Drive. Any photos added to these folders will automatically upload to the shared drive.
11.3 Offline Access
Google Drive for Desktop allows you to access your photos even when you’re offline. Changes made offline will sync when you reconnect to the internet.
11.4 File Explorer Integration
Google Drive for Desktop integrates with your computer’s file explorer, making it easy to manage your photos alongside your other files.
11.5 Storage Considerations
Be aware of the storage space on your computer when syncing photos with Google Drive. You may need to manage which folders are synced to avoid running out of space.
12. Frequently Asked Questions (FAQs)
Here are some frequently asked questions about adding photos to a shared Google Drive.
12.1 Can I add photos to a shared drive from my phone?
Yes, you can add photos to a shared drive from your phone using the Google Drive app.
12.2 What file types are supported by Google Drive?
Google Drive supports a wide range of file types, including JPEG, PNG, TIFF, and RAW.
12.3 How much storage space do I get with Google Drive?
Google Drive offers 15 GB of free storage space, which is shared across Google Drive, Gmail, and Google Photos.
12.4 Can I password-protect photos in a shared drive?
No, you cannot password-protect individual photos in a shared drive. However, you can restrict access to the entire drive or specific folders.
12.5 How do I prevent others from downloading my photos?
You can disable the option to download, print, and copy files in the shared drive settings.
{width=604 height=224}12.6 What happens if I delete a photo from a shared drive?
When you delete a photo from a shared drive, it is moved to the trash and will be permanently deleted after 30 days.
12.7 Can I restore a deleted photo from a shared drive?
Yes, you can restore a deleted photo from the trash, provided you have the necessary permissions.
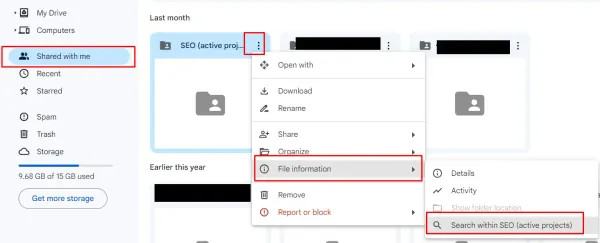
12.8 How do I search for photos in a shared drive?
You can search for photos in a shared drive by using the search bar at the top of the screen and entering keywords related to the file name or metadata.
{width=600 height=243}12.9 Can I share a link to a specific photo in a shared drive?
Yes, you can share a link to a specific photo in a shared drive by right-clicking on the photo and selecting “Get link.”
12.10 How do I know who has access to my shared drive?
You can see who has access to your shared drive by clicking on the “Share” button and reviewing the list of users and their permission levels.
13. Google Drive vs. Dedicated DAM Systems
13.1 Scalability
As your photo collection grows, a dedicated DAM system can handle the increased load more efficiently than Google Drive.
13.2 Metadata Management
DAM systems offer more robust metadata management features, allowing you to add and organize detailed information about your photos.
13.3 Search Capabilities
DAM systems typically provide advanced search capabilities, making it easier to find specific photos within a large collection.
13.4 Workflow Automation
DAM systems can automate many tasks related to photo management, such as resizing, watermarking, and converting file formats.
13.5 Integration
DAM systems often integrate with other creative tools, providing a seamless workflow for editing, sharing, and managing photos.
14. Google Drive Alternatives
14.1 Dropbox
Dropbox is another popular cloud storage service that offers similar features to Google Drive, including file sharing, collaboration, and version control.
14.2 OneDrive
OneDrive is Microsoft’s cloud storage service, which integrates seamlessly with Windows and other Microsoft products.
14.3 Box
Box is a cloud storage service that focuses on business users, offering advanced security features and collaboration tools.
14.4 iCloud
iCloud is Apple’s cloud storage service, which integrates seamlessly with macOS and iOS devices.
14.5 Amazon Drive
Amazon Drive is Amazon’s cloud storage service, which offers unlimited photo storage for Prime members.
15. The Future of Photo Management
15.1 AI and Machine Learning
AI and machine learning are being used to automate many aspects of photo management, such as tagging, organizing, and editing.
15.2 Cloud-Based Editing
Cloud-based photo editing tools are becoming more popular, allowing you to edit your photos from anywhere with an internet connection.
15.3 Blockchain Technology
Blockchain technology is being used to protect the copyright of photos and ensure that photographers are properly compensated for their work.
15.4 Virtual and Augmented Reality
Virtual and augmented reality are creating new opportunities for photographers to showcase their work and create immersive experiences for viewers.
15.5 5G Technology
5G technology is enabling faster upload and download speeds, making it easier to manage large photo collections in the cloud.
16. Conclusion
Adding photos to a shared Google Drive is a straightforward process that can greatly improve your team’s collaboration and productivity. By following the steps outlined in this guide, you can easily upload, manage, and share your photos with others. Remember to optimize your photos for web viewing, troubleshoot common issues, and explore advanced tips to maximize the benefits of using a shared Google Drive. For even more robust digital asset management, consider exploring solutions like Pics.io, which offers advanced features and integrations.
Enhance your photography skills and discover inspiring content at dfphoto.net, where you can explore detailed tutorials, view stunning photo collections, and connect with a vibrant community of photographers. Whether you’re looking to master new techniques, find inspiration for your next project, or stay updated on the latest equipment, dfphoto.net is your go-to resource. Visit our website at dfphoto.net to learn more and join our community! Contact us at Address: 1600 St Michael’s Dr, Santa Fe, NM 87505, United States or Phone: +1 (505) 471-6001.