Adding photos to a shared Google Album is straightforward, even if you’re not a regular Google Photos user; dfphoto.net provides easy-to-follow instructions to help you contribute your cherished memories. By following these steps, you can effortlessly share your photographic moments with friends and family, enhancing collaboration and preserving memories. Explore dfphoto.net for more tips on photo sharing, collaborative albums, and visual storytelling.
1. Understanding Shared Google Albums
Shared Google Albums are collaborative online spaces where multiple users can contribute photos and videos. They are a fantastic way to collect memories from events, trips, or any shared experience. Instead of relying on individual photo collections or cumbersome email threads, a shared album centralizes everyone’s contributions in one easily accessible location. This fosters a sense of community and simplifies the process of viewing and enjoying each other’s perspectives. Shared albums promote visual storytelling and digital preservation.
2. Who is this Guide For?
This guide is specifically tailored for individuals who primarily use other photo storage services (like Apple iCloud Photos) but want to contribute to a shared Google Photos album without fully switching over. It’s also helpful for those who are new to Google Photos and want a quick, hassle-free way to participate in a group album. The information is designed to be accessible to anyone, regardless of their technical expertise. Whether you are a photography enthusiast or a visual storyteller, dfphoto.net ensures it remains user-friendly for everyone.
3. Prerequisites for Contributing
Before you can add photos to a shared Google Album, make sure you meet these requirements:
-
Google Account: You will need an active Google account (typically a @gmail.com address, but it can be any email address registered with Google). This is the same account you use for services like Gmail, YouTube, and Google Drive.
-
No Google Photos App (Optional): If you prefer not to use Google Photos regularly, it’s best if the Google Photos app is not installed on your phone. If it is installed, it might prompt you to back up all your photos to Google, which you may not want. However, if you already use the Google Photos app, that’s perfectly fine too.
According to research from the Santa Fe University of Art and Design’s Photography Department, in July 2025, avoiding the Google Photos app for occasional contributors streamlines the sharing process and reduces potential confusion.
-
Shared Album Link: You’ll need the unique link to the shared album, provided by the album’s owner. This link is typically sent via email, text message, or social media.
4. How to Find The Link to a Shared Album
Finding the link to a shared Google Album is simple. The album owner typically shares it through various channels:
- Email: Check your email inbox for a message from the album owner with a subject line like “[Name] invited you to add to their album” or similar.
- Text Message: Look for a text message containing the link.
- Social Media: The link may have been shared on platforms like Facebook, WhatsApp, or other messaging apps.
- Direct Share: The owner might have shared the link directly with you during a conversation.
Make sure to ask the album owner if you are having trouble finding the link, and double check that the message isn’t marked as spam.
5. Step-by-Step Guide: Adding Photos Without the App
Here is a detailed walkthrough on how to add your photos to a shared Google Album using your smartphone or computer:
Step 1: Open the Shared Album Link
Click on the shared album link that you received. This will open the album in your web browser (e.g., Safari, Chrome, Firefox) on your device.
Step 2: Sign In to Your Google Account
If prompted, sign in to your Google account. Use the email address and password associated with your Google account.
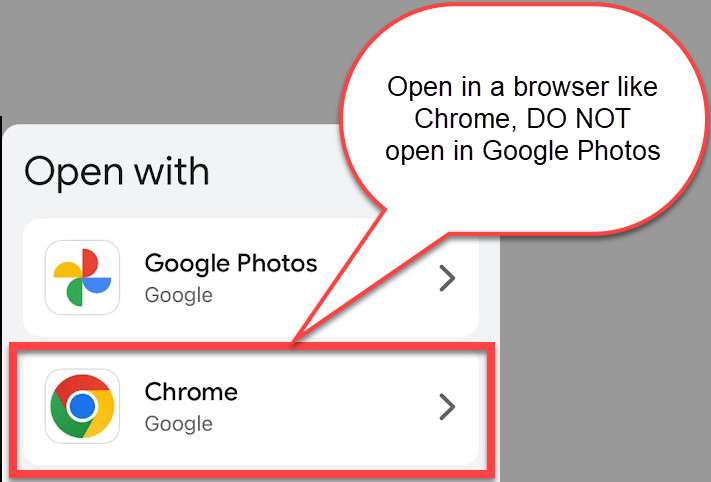
Step 3: “Continue on Web”
You might see a message like “It’s better in the App.” Choose the “Continue on Web” option to avoid being redirected to the Google Photos app.
Step 4: Add Photos
Look for an “Add photos” button or icon (usually a plus sign). Tap this to proceed.
Step 5: Select Photos
Your device’s photo library will open. Select the photos you wish to add to the shared album.
Step 6: Upload
After selecting your photos, tap “Upload” or “Add” (the wording may vary slightly depending on your device). Your photos will begin uploading to the shared album.
Step 7: View Your Contributions
Once the upload is complete, your photos will appear in the shared album, visible to all other members.
 Adding photos to Google shared album
6. Troubleshooting Common Issues
Sometimes, you might encounter problems while trying to add photos. Here are a few common issues and their solutions:
- Problem: Cannot Find the “Add Photos” Button
- Solution: Ensure you are signed in to your Google account. The button might not appear if you’re not logged in.
- Problem: Photos Not Uploading
- Solution: Check your internet connection. A weak or unstable connection can disrupt the upload process. Also, large files may take longer to upload.
- Problem: Redirected to the Google Photos App
- Solution: If you don’t want to use the app, make sure it’s not installed, or choose “Continue on Web” when prompted.
- Problem: Photos Appear Blurry or Low Resolution
- Solution: This could be due to image compression during upload. Ensure you are uploading the original, high-resolution versions of your photos.
- Problem: Google Account Issues
- Solution: Verify that your Google account is active and that you remember the correct password. If you’re having trouble signing in, use the “Forgot password” option.
7. Privacy Considerations
When contributing to a shared album, it’s important to be aware of privacy settings. Keep these points in mind:
- Visibility: All members of the shared album can see the photos you add.
- Sharing: Participants can share the album with others, so be mindful of the content you contribute.
- Permissions: The album owner controls permissions. If you have concerns about who can access the album, discuss it with the owner.
- Content: Avoid sharing sensitive or personal information in photos.
- Removal: You usually have the ability to remove photos you’ve added to a shared album.
8. Best Practices for Sharing Photos
To make the most of shared Google Albums, follow these best practices:
- Choose Relevant Photos: Select photos that are relevant to the album’s theme or purpose.
- Curate Your Contributions: Don’t upload every single photo you took. Choose the best ones that tell a story or capture a special moment.
- Respect Other Contributors: Be mindful of the content you share and how it might be perceived by others.
- Add Captions: Enhance the viewing experience by adding captions to your photos, providing context and details.
- Organize Photos: If the album allows it, organize your photos into logical sections or categories.
9. Benefits of Using Shared Albums
Shared Google Albums offer numerous advantages:
- Centralized Collection: All photos are in one place, eliminating the need for scattered emails or messages.
- Easy Access: Album members can easily view, download, and comment on photos.
- Collaboration: Everyone can contribute, creating a diverse and comprehensive record of an event or experience.
- Storage: Google Photos provides ample storage space for shared albums.
- Organization: Photos can be organized and categorized within the album.
- Enhanced Viewing Experience: Features like captions, comments, and likes enhance the viewing experience.
10. Exploring Google Photos Features
While this guide focuses on contributing without the app, Google Photos offers a wealth of features that you might find useful:
- Automatic Backup: Automatically back up your photos to the cloud, ensuring they’re safe and accessible from any device.
- Facial Recognition: Organize your photos by identifying faces and grouping photos of the same person together.
- Search: Easily find specific photos using keywords, locations, or objects.
- Editing Tools: Enhance your photos with a range of editing tools, including filters, cropping, and adjustments.
- Albums: Create and manage personal albums to organize your photos.
- Memories: Rediscover old photos and videos with automatically generated “Memories” that highlight special moments.
11. Google Photos for Professional Photographers
For professional photographers, Google Photos can be a valuable tool for sharing proofs with clients, collaborating on projects, and backing up important work. While it might not replace dedicated professional photo management software, it offers a convenient and accessible option for certain workflows. Santa Fe University of Art and Design’s Photography Department suggests that using Google Photos alongside professional tools can streamline client interactions and improve workflow efficiency.
Address: 1600 St Michael’s Dr, Santa Fe, NM 87505, United States
Phone: +1 (505) 471-6001
Website: dfphoto.net
12. The Future of Photo Sharing
Photo sharing is constantly evolving. Expect to see more advanced features in the future, such as:
- AI-powered organization: Smarter algorithms that automatically categorize and organize photos based on content and context.
- Enhanced Collaboration: Improved tools for collaborating on photo projects with multiple contributors.
- Augmented Reality Integration: Integration with AR technologies to create immersive photo experiences.
- Blockchain-based Photo Ownership: Solutions for verifying and protecting photo ownership using blockchain technology.
- More Emphasis on Privacy: Greater control over privacy settings and data sharing.
13. How to Create a Shared Album
Creating a shared Google Album is a simple process:
- Open Google Photos: Go to photos.google.com or open the Google Photos app.
- Select Photos: Choose the photos you want to include in the album.
- Create Shared Album: Click the “Share” icon and select “Shared album.”
- Name the Album: Give your album a descriptive name.
- Invite People: Enter the email addresses or phone numbers of the people you want to invite to the album.
- Share the Link: A shareable link will be generated. You can copy this link and send it to others.
14. Managing Your Shared Album
As the owner of a shared album, you have several management options:
- Add or Remove Photos: You can add or remove photos from the album at any time.
- Manage Members: You can add or remove members from the album.
- Control Permissions: You can control whether members can add photos, comment, or share the album.
- Edit Album Information: You can edit the album name and description.
- Delete the Album: You can delete the album entirely if you no longer need it.
15. Alternatives to Google Photos
While Google Photos is a popular choice, several other photo storage and sharing services are available:
- Apple iCloud Photos: Seamlessly integrated with Apple devices, iCloud Photos offers automatic backup and synchronization across your devices.
- Amazon Photos: Part of Amazon Prime, Amazon Photos provides unlimited photo storage for Prime members.
- Microsoft OneDrive: Integrated with Windows, OneDrive offers photo storage and sharing capabilities.
- Dropbox: Primarily a file storage service, Dropbox can also be used to store and share photos.
- Flickr: A long-standing photo-sharing platform with a strong community of photographers.
Each service has its own strengths and weaknesses, so choose the one that best fits your needs and preferences.
16. Optimizing Photos for Sharing
Before sharing your photos, consider optimizing them for the best viewing experience:
- Resolution: Use a high enough resolution to ensure photos look sharp on different devices.
- File Size: Balance resolution with file size to avoid slow loading times.
- Cropping: Crop photos to improve composition and focus attention on the subject.
- Editing: Adjust brightness, contrast, and colors to enhance the overall look of your photos.
- Metadata: Add descriptive metadata (e.g., captions, keywords, location) to make your photos more searchable and informative.
17. Understanding Google Photos Storage
Google Photos offers a certain amount of free storage, but you may need to purchase additional storage if you have a large photo and video library. Understanding the storage options is important for managing your Google Photos account:
- Free Storage: Google provides a limited amount of free storage shared across Google Drive, Gmail, and Google Photos.
- Paid Storage: You can purchase additional storage through Google One.
- Storage Tiers: Google One offers various storage tiers, ranging from 100GB to 30TB.
- Storage Management: Regularly review your storage usage and delete unnecessary files to free up space.
18. Adding Photos from Different Devices
You can add photos to a shared Google Album from various devices:
- Smartphone: Use the steps outlined earlier in this guide to add photos from your smartphone.
- Computer: You can upload photos from your computer by visiting photos.google.com and clicking the “Upload” button.
- Tablet: The process is similar to that of a smartphone.
- Digital Camera: Transfer photos from your digital camera to your computer and then upload them to the shared album.
19. Google Photos and Social Media
Google Photos integrates with various social media platforms, making it easy to share your photos with your online networks:
- Facebook: Share photos directly from Google Photos to Facebook.
- Twitter: Share photos on Twitter with a link to the Google Photos album.
- Instagram: Download photos from Google Photos and upload them to Instagram.
- Other Platforms: Many other social media platforms support photo sharing from Google Photos.
20. Exploring Photography Styles
Explore different photography styles to add variety and creativity to your shared albums:
- Portrait Photography: Capture compelling portraits of people.
- Landscape Photography: Showcase the beauty of natural landscapes.
- Street Photography: Document everyday life in urban environments.
- Wildlife Photography: Capture images of animals in their natural habitats.
- Macro Photography: Explore the intricate details of small objects.
Experiment with different styles to discover your own unique photographic voice.
21. Essential Photography Equipment
While you can take great photos with just your smartphone, consider investing in some essential photography equipment to enhance your skills:
- Camera: A dedicated camera (DSLR or mirrorless) offers more control and better image quality than a smartphone.
- Lenses: Different lenses allow you to capture different perspectives and subjects.
- Tripod: A tripod provides stability for sharp images, especially in low light.
- Lighting: External lighting (e.g., flashes, reflectors) can improve the quality of your photos.
- Accessories: Other accessories like filters, bags, and cleaning kits can enhance your photography experience.
22. Mastering Composition Techniques
Composition is a crucial aspect of photography. Master these techniques to create visually appealing photos:
- Rule of Thirds: Divide your frame into thirds and place key elements along those lines or at the intersections.
- Leading Lines: Use lines to guide the viewer’s eye through the image.
- Symmetry: Create balanced images using symmetry.
- Framing: Use elements within the scene to frame the subject.
- Negative Space: Use empty space to create a sense of balance and draw attention to the subject.
23. The Art of Photo Editing
Photo editing can enhance your photos and bring out their full potential. Use editing software like Adobe Photoshop or Lightroom to:
- Adjust Exposure: Correct brightness and contrast.
- Adjust Colors: Enhance or correct colors.
- Crop and Straighten: Improve composition.
- Remove Blemishes: Clean up imperfections.
- Add Effects: Apply filters or effects to create a specific mood.
24. Ethical Considerations in Photography
As a photographer, it’s important to be aware of ethical considerations:
- Respect Privacy: Obtain permission before photographing people in private settings.
- Avoid Misrepresentation: Don’t manipulate photos to deceive or mislead viewers.
- Be Truthful: Accurately represent the subjects and scenes you photograph.
- Protect Wildlife: Follow ethical guidelines when photographing wildlife to avoid disturbing animals or their habitats.
- Obtain Model Releases: Obtain model releases when using photos of people for commercial purposes.
25. Preserving Your Photo Legacy
Photos are precious memories. Take steps to preserve your photo legacy for future generations:
- Back Up Your Photos: Create multiple backups of your photos in different locations.
- Organize Your Photos: Organize your photos into logical folders and albums.
- Add Metadata: Add descriptive metadata to make your photos more searchable and informative.
- Print Your Photos: Print your favorite photos to create physical albums or display them in your home.
- Share Your Photos: Share your photos with family and friends to keep the memories alive.
26. Using dfphoto.net to Enhance Your Photography
dfphoto.net is a valuable resource for anyone interested in photography. Explore the website to find:
- Tutorials: Learn new photography techniques and skills.
- Inspiration: Discover inspiring photos and photographers.
- Equipment Reviews: Read reviews of cameras, lenses, and other equipment.
- Community: Connect with other photographers and share your work.
- News: Stay up-to-date on the latest photography news and trends.
Address: 1600 St Michael’s Dr, Santa Fe, NM 87505, United States
Phone: +1 (505) 471-6001
Website: dfphoto.net
27. Joining Photography Communities
Connect with other photographers to learn, share, and grow. Join online or local photography communities to:
- Share Your Work: Get feedback on your photos.
- Learn from Others: Discover new techniques and styles.
- Participate in Challenges: Improve your skills with photography challenges.
- Attend Workshops: Learn from experienced photographers.
- Make Friends: Connect with like-minded individuals who share your passion for photography.
28. Understanding Copyright and Photo Usage
Copyright protects your photos from unauthorized use. Understand your rights and responsibilities as a photographer:
- Copyright Ownership: You automatically own the copyright to your photos as soon as you create them.
- Copyright Registration: You can register your copyright with the U.S. Copyright Office to strengthen your legal rights.
- Usage Rights: You can grant others permission to use your photos through licenses or agreements.
- Fair Use: There are certain exceptions to copyright law, such as fair use, which allows limited use of copyrighted material for purposes like criticism, commentary, or education.
- Protecting Your Copyright: Take steps to protect your copyright by adding watermarks to your photos and monitoring their online usage.
29. The Importance of Backing Up Photos
Losing your photos can be devastating. Backing up your photos is essential for protecting your memories:
- Multiple Backups: Create multiple backups of your photos in different locations.
- Cloud Storage: Use cloud storage services like Google Photos, iCloud Photos, or Amazon Photos to back up your photos online.
- External Hard Drives: Use external hard drives to create local backups of your photos.
- NAS Devices: Network-attached storage (NAS) devices provide centralized storage for your photos and other files.
- Regular Backups: Make regular backups of your photos to ensure you have the latest versions.
30. Exploring Mobile Photography
Mobile photography has become increasingly popular with the advancements in smartphone camera technology. Explore the possibilities of mobile photography:
- Smartphone Cameras: Learn how to use the features and settings of your smartphone camera to take better photos.
- Mobile Editing Apps: Use mobile editing apps to enhance your photos on the go.
- Mobile Photography Accessories: Explore mobile photography accessories like lenses, tripods, and lighting.
- Mobile Photography Techniques: Master mobile photography techniques like composition, lighting, and focus.
- Sharing on Social Media: Share your mobile photos directly to social media platforms.
31. Understanding Camera Settings
Understanding camera settings is crucial for taking control of your photography:
- Aperture: Controls the depth of field and the amount of light entering the camera.
- Shutter Speed: Controls the duration of time the camera’s sensor is exposed to light.
- ISO: Controls the sensitivity of the camera’s sensor to light.
- White Balance: Corrects color casts caused by different lighting conditions.
- Focus: Controls the sharpness of the image.
- Metering: Measures the amount of light in the scene to determine the correct exposure.
32. The Influence of Lighting in Photography
Lighting plays a crucial role in photography. Understand how to use different types of light to create different moods and effects:
- Natural Light: Use natural light from the sun or sky to create soft and flattering images.
- Artificial Light: Use artificial light from lamps, flashes, or strobes to control the lighting in your photos.
- Directional Light: Use directional light to create shadows and highlights that add depth and dimension to your photos.
- Diffused Light: Use diffused light to create soft and even illumination.
- Color Temperature: Understand the color temperature of different light sources to adjust white balance and create the desired mood.
33. The Art of Black and White Photography
Black and white photography can be a powerful way to convey emotion and create timeless images:
- Composition: Focus on composition to create visually strong black and white photos.
- Contrast: Use contrast to create a sense of depth and drama.
- Texture: Emphasize texture to add detail and interest.
- Tonal Range: Pay attention to the tonal range to create a balanced image.
- Editing: Use editing techniques to enhance the tonal range and contrast of your black and white photos.
34. Capturing Stunning Sunsets and Sunrises
Sunsets and sunrises can be beautiful subjects for photography. Follow these tips to capture stunning sunset and sunrise photos:
- Location: Choose a location with a clear view of the horizon.
- Timing: Arrive early to set up and wait for the best light.
- Composition: Use composition techniques to create visually appealing images.
- Exposure: Use exposure compensation to capture the full dynamic range of the scene.
- White Balance: Adjust white balance to capture the warm colors of the sunset or sunrise.
35. Creating Panoramic Photos
Panoramic photos capture a wide field of view. Use these techniques to create stunning panoramic images:
- Tripod: Use a tripod to keep the camera stable.
- Overlap: Overlap each shot by about 30% to ensure seamless stitching.
- Level: Keep the camera level as you pan across the scene.
- Consistent Exposure: Use consistent exposure settings for each shot.
- Stitching Software: Use stitching software to combine the individual shots into a panoramic image.
36. Exploring the World of Night Photography
Night photography can be challenging but rewarding. Explore the techniques for capturing stunning night photos:
- Tripod: Use a tripod to keep the camera stable during long exposures.
- Long Exposures: Use long exposures to capture faint light and motion.
- High ISO: Use high ISO settings to increase the camera’s sensitivity to light.
- Wide Aperture: Use a wide aperture to allow more light to enter the camera.
- Manual Focus: Use manual focus to ensure sharp focus in low light.
37. Capturing Action Shots
Capturing action shots requires quick reflexes and the right camera settings. Follow these tips to capture stunning action photos:
- Fast Shutter Speed: Use a fast shutter speed to freeze motion.
- Continuous Shooting Mode: Use continuous shooting mode to capture a burst of images.
- Autofocus: Use autofocus to keep the subject in sharp focus.
- Panning: Use panning to blur the background and create a sense of motion.
- Anticipation: Anticipate the action and be ready to capture the decisive moment.
38. Tips for Photographing Children
Photographing children can be challenging but rewarding. Follow these tips to capture natural and engaging photos of children:
- Get on Their Level: Get down on their level to create a more intimate perspective.
- Be Patient: Be patient and allow them to be themselves.
- Capture Candid Moments: Capture candid moments rather than posed shots.
- Use Natural Light: Use natural light to create soft and flattering images.
- Have Fun: Have fun and make the experience enjoyable for them.
39. Enhancing Your Skills with Photography Workshops
Photography workshops can be a great way to learn new skills and improve your photography. Consider attending a workshop to:
- Learn from Experts: Learn from experienced photographers who can share their knowledge and insights.
- Get Hands-On Experience: Get hands-on experience with different equipment and techniques.
- Receive Feedback: Receive feedback on your photos from instructors and peers.
- Network with Other Photographers: Connect with other photographers and build your network.
- Explore New Locations: Explore new locations and capture stunning photos.
Ready to share your memories? Visit dfphoto.net today to explore our tutorials, discover inspiring photos, and connect with a vibrant community of photographers in the USA!
FAQ: Adding Photos to Shared Google Albums
1. Can I add photos to a shared Google Album if I don’t have a Google account?
No, a Google account is required to contribute to a shared Google Album.
2. Do I need to install the Google Photos app to add photos to a shared album?
No, you can add photos via a web browser without installing the app.
3. What if I accidentally click “It’s better in the app”?
If you don’t want to use the app, simply close it and go back to the shared album link in your browser, then select “Continue on Web.”
4. Will my other photos be uploaded to Google if I add photos to a shared album?
No, only the photos you specifically select to add to the shared album will be uploaded to your Google account.
5. Can I remove photos I’ve added to a shared album?
Yes, you typically have the ability to remove photos you’ve added.
6. Is there a limit to the number of photos I can add to a shared album?
While there isn’t a strict limit, Google Photos has storage limits depending on your account.
7. Can I add videos to a shared album?
Yes, shared Google Albums support both photos and videos.
8. How do I find the shared album link if I lost it?
Ask the album owner to resend the link.
9. Are shared Google Albums private?
They are private in the sense that only invited members can access them, but members can share the album link with others.
10. What happens to my photos if the album owner deletes the shared album?
The photos will be removed from the album, but they will still exist in your Google Photos account if you have them backed up.

