Adding photos to your email is a simple way to share visual content with friends, family, or colleagues, and dfphoto.net is here to guide you through the process seamlessly. Whether you’re using an iPhone or computer, learn how to attach, embed, and optimize images for email, ensuring they look great and reach your recipients without any hassle. Discover various image sharing strategies with easy attachments for a better sharing experience, and explore some visual communication tips and photography workflow optimizations.
1. What Are the Different Ways How Do I Add Photo to Email?
There are several ways to add a photo to an email, and the best method often depends on the size of the image and your desired presentation:
- Attachment: This is the most common method. The photo is sent as a separate file that the recipient can download.
- Inline Image: The photo is embedded directly into the body of the email, visible without needing to be downloaded.
- Link: Instead of sending the photo directly, you can upload it to a cloud storage service and include a link in your email.
2. How Do I Attach a Photo to an Email on My iPhone?
Attaching a photo to an email on your iPhone is straightforward. Here’s how:
- Open the Mail App: Start by opening the Mail app on your iPhone.
- Compose a New Email: Tap the compose button (usually a square with a pencil) to start a new email.
- Tap in the Email Body: Tap inside the body of the email where you want to insert the attachment.
- Show the Toolbar: Tap the expand toolbar button above the keyboard.
- Insert Photo or Video: Tap the photo icon to access your photo library, then choose the photo you want to attach. Tap Done to return to the message.
- Send the Email: Once the photo is attached, add your subject and recipient, and then tap send.
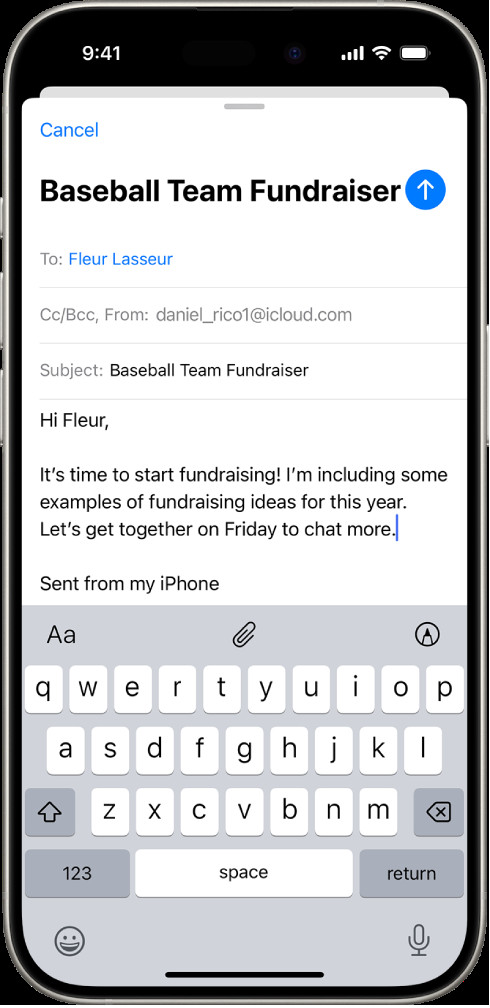 Compose email with attachment options above keyboard
This process allows you to easily send pictures directly from your iPhone’s photo library. According to Apple Support, this is the quickest way to share images without needing additional apps.
3. How Do I Embed a Photo Directly Into the Email Body on My iPhone?
Embedding a photo directly into the email body can make your email more visually appealing. Here’s how to do it:
- Open the Photos App: Go to your iPhone’s Photos app and select the photo you want to embed.
- Copy the Photo: Tap the share button (the square with an arrow pointing up), and then tap Copy Photo.
- Open the Mail App: Start a new email in the Mail app.
- Paste the Photo: Tap inside the body of the email where you want the photo to appear, then tap Paste.
Now, the photo will appear directly within the email body. Keep in mind that embedded images may appear differently on various email clients, so always test to ensure they display correctly.
4. How Do I Attach a Photo to an Email on My Computer (Windows/Mac)?
Attaching a photo to an email on your computer is just as simple. The process is similar whether you’re using Windows or Mac.
- Open Your Email Client: Start by opening your preferred email client (e.g., Gmail, Outlook, Apple Mail).
- Compose a New Email: Click the compose button to start a new email.
- Find the Attachment Button: Look for the attachment button, which usually looks like a paperclip icon.
- Select the Photo: Click the attachment button and navigate to the folder where your photo is saved. Select the photo and click Open.
- Send the Email: Once the photo is attached, add your subject and recipient, and then click send.
This method works for most email clients and is generally the most reliable way to send photos, especially if you’re sending multiple images.
5. What Are the Steps to Embed a Photo in the Email Body on My Computer?
Embedding a photo in the email body on your computer can add a professional touch to your emails. Here’s how to do it:
- Open Your Email Client: Open your email client and start a new email.
- Locate the Insert Image Option: Look for an option to insert an image directly into the email body. This is often found in the formatting toolbar (e.g., “Insert Photo,” “Insert Image Inline”).
- Select the Photo: Click the insert image option and navigate to the photo you want to embed. Select the photo and click Open.
- Adjust the Size (If Needed): Once the photo is inserted, you might want to adjust its size to fit well within the email. Click on the photo to resize it.
- Send the Email: Add your subject and recipient, and then click send.
Embedding photos this way can make your emails more engaging and visually appealing.
6. How Do I Send a Photo via a Link in an Email?
Sending a photo via a link can be useful when the file size is too large to attach directly to an email. Here’s how to do it:
- Upload the Photo to a Cloud Service: First, upload your photo to a cloud storage service like Google Drive, Dropbox, or iCloud.
- Get a Shareable Link: Once the photo is uploaded, get a shareable link. Make sure the link permissions are set so that anyone with the link can view the photo.
- Compose Your Email: Open your email client and start a new email.
- Insert the Link: In the body of your email, type a message and then paste the shareable link.
- Send the Email: Add your subject and recipient, and then click send.
Sending a link is a great way to share high-resolution photos without exceeding email size limits. It also allows the recipient to view the photo at their convenience and download it if they choose.
7. What Image Formats Are Best for Email?
Choosing the right image format is crucial for ensuring your photos look good and don’t take up too much space. Here are some common image formats and their best uses:
- JPEG (or JPG): This is the most common format for photographs. JPEGs offer good compression, which means smaller file sizes, but they can lose quality with excessive compression.
- PNG: PNGs are better for images with text, logos, or graphics because they support lossless compression, meaning no quality is lost. They are also great for images with transparency.
- GIF: GIFs are best for simple animations or small icons. They are not ideal for photographs due to their limited color palette.
For most photographs, JPEG is the preferred format due to its balance of quality and file size.
8. How Can I Reduce the File Size of a Photo Before Sending It in Email?
Reducing the file size of a photo before sending it can help ensure it’s delivered quickly and doesn’t exceed email size limits. Here are a few ways to reduce file size:
- Use Image Editing Software: Programs like Adobe Photoshop, GIMP, or even online tools like TinyPNG allow you to compress images.
- Reduce Dimensions: Reducing the dimensions (width and height) of the image can significantly reduce its file size. For email, an image that is 1000-1200 pixels wide is usually sufficient.
- Adjust Quality Settings: When saving a JPEG, you can adjust the quality settings. Lowering the quality slightly can reduce the file size without noticeably affecting the image.
According to the Santa Fe University of Art and Design’s Photography Department, using a combination of these techniques can reduce file sizes by up to 80% without significant loss of quality.
9. What Are the Maximum Attachment Size Limits for Popular Email Providers?
Knowing the attachment size limits for popular email providers can help you avoid delivery issues. Here are the limits for some common providers:
| Email Provider | Attachment Size Limit |
|---|---|
| Gmail | 25 MB |
| Outlook | 20 MB |
| Yahoo Mail | 25 MB |
| iCloud Mail | 20 MB |
If your photo exceeds these limits, consider using a link to share the photo instead.
10. How Do I Scan a Document and Attach It to an Email on My iPhone?
Scanning a document and attaching it to an email on your iPhone is a convenient way to share paper documents digitally. Here’s how:
- Open the Mail App: Start by opening the Mail app on your iPhone.
- Compose a New Email: Tap the compose button to start a new email.
- Tap in the Email Body: Tap inside the body of the email where you want to insert the scanned document.
- Show the Toolbar: Tap the expand toolbar button above the keyboard.
- Scan Document: Tap the Scan Document button above the keyboard.
- Position the Document: Position your iPhone so that the document page appears on the screen. Your iPhone will automatically capture the page.
- Adjust and Save: Tap Retake or Keep Scan, scan additional pages if needed, then tap Save when you’re done.
- Send the Email: Add your subject and recipient, and then tap send.
This process creates a PDF document that is attached to your email, making it easy to share paper documents digitally.
11. How Can I Annotate a Photo Before Sending It in Email?
Annotating a photo before sending it can be useful for providing feedback, highlighting important details, or adding notes. Here’s how:
- Open the Photo: Open the photo you want to annotate in your iPhone’s Photos app.
- Tap Edit: Tap the Edit button in the upper-right corner.
- Tap Markup: Tap the markup icon (usually a pen or pencil icon).
- Annotate the Photo: Use the markup tools to draw, write, or highlight on the photo.
- Save the Changes: Tap Done to save your changes.
- Attach to Email: Now, attach the annotated photo to your email as described earlier.
This allows you to easily add comments or highlights to your photos before sharing them.
12. How Do I Create a Drawing and Attach It to an Email on My iPhone?
Creating a drawing and attaching it to an email can be a great way to illustrate ideas that are hard to put into words. Here’s how:
- Open the Mail App: Start by opening the Mail app on your iPhone.
- Compose a New Email: Tap the compose button to start a new email.
- Tap in the Email Body: Tap inside the body of the email where you want to insert the drawing.
- Show the Toolbar: Tap the expand toolbar button above the keyboard.
- Markup Toolbar: Tap the markup icon to show the Markup toolbar.
- Create Your Drawing: Choose a drawing tool and color, then write or draw with your finger.
- Insert Drawing: When you’re finished, tap Done, then tap Insert Drawing.
- Send the Email: Add your subject and recipient, and then tap send.
Your drawing will be added to the message as an attachment for recipients to view and download.
13. What Are Some Best Practices for Sending Photos in Email?
Following some best practices can ensure your photos are received and viewed as intended. Here are a few tips:
- Resize Large Photos: Resize large photos to a reasonable size before sending them to avoid exceeding attachment limits.
- Use JPEG Format: Use JPEG format for photographs to balance quality and file size.
- Compress Images: Compress images to reduce file size without significant loss of quality.
- Consider Sending a Link: For high-resolution images, consider sending a link to a cloud storage service.
- Test Your Email: Send a test email to yourself to ensure the photos appear correctly in your email client.
By following these practices, you can ensure a smooth and effective photo-sharing experience.
14. How Do I Ensure My Photos Look Good in Email?
Ensuring your photos look good in email involves a few key considerations:
- Use High-Quality Images: Start with high-quality images that are well-lit and in focus.
- Optimize for Web: Optimize your images for web viewing by using the correct resolution (72 dpi is usually sufficient).
- Test on Different Devices: Test your email on different devices and email clients to ensure the photos display correctly.
- Adjust Brightness and Contrast: Adjust the brightness and contrast of your photos to ensure they look good on different screens.
Taking these steps can help ensure your photos look their best when viewed in email.
15. How Can I Protect the Copyright of My Photos When Sending Them in Email?
Protecting the copyright of your photos when sending them in email is important, especially if you are a professional photographer. Here are some steps you can take:
- Add a Watermark: Add a watermark to your photos with your name or copyright information.
- Reduce the Resolution: Send lower-resolution versions of your photos to make them less suitable for printing or large-scale reproduction.
- Include a Copyright Notice: Include a copyright notice in the body of your email.
- Use a Digital Signature: Use a digital signature to verify the authenticity of your photos.
These measures can help deter unauthorized use of your photos and protect your intellectual property.
16. How Do I Deal With Email Providers Blocking My Photo Attachments?
Sometimes, email providers may block photo attachments, especially if they are large or if the email is flagged as spam. Here’s how to deal with this:
- Reduce File Size: Reduce the file size of your photos as much as possible.
- Use a Different Format: Try using a different image format (e.g., PNG instead of JPEG).
- Send in Multiple Emails: If you have multiple photos, send them in separate emails.
- Use a Link: Send a link to a cloud storage service instead of attaching the photos directly.
- Check Spam Filters: Ask the recipient to check their spam filters to see if the email was mistakenly marked as spam.
By taking these steps, you can increase the chances of your photos being successfully delivered.
17. Can I Automatically Resize Photos When Attaching Them to Email on My iPhone?
While the iPhone doesn’t automatically resize photos when attaching them to email, you can choose from different sizes. When you tap to insert a photo, the Mail app may give you options like Small, Medium, Large, or Actual Size. Choose a smaller size to reduce the file size of the email.
This feature helps you manage the size of your attachments without needing to use a separate image editing app.
18. How Do I Send a Live Photo in Email?
Sending a Live Photo in email requires a few extra steps to ensure the recipient can view the animation. Here’s how:
- Share as a Video: The easiest way to send a Live Photo is to share it as a video. In the Photos app, select the Live Photo, tap the share button, and then tap Save as Video.
- Attach the Video to Email: Attach the video to your email as you would with any other video file.
This ensures the recipient can view the Live Photo as a moving image, regardless of whether they use an Apple device.
19. How Can I Use Email to Showcase My Photography Portfolio?
Email can be a powerful tool for showcasing your photography portfolio, especially when used strategically. Here’s how:
- Create a Compelling Email Design: Design an email template that showcases your photos in a visually appealing way.
- Include a Selection of Your Best Work: Choose a selection of your best photos to include in the email.
- Optimize Images for Web: Optimize your images for web viewing to ensure they load quickly and look good on different devices.
- Add a Link to Your Website: Include a link to your website or online portfolio so recipients can view more of your work.
- Write a Personalized Message: Write a personalized message to each recipient, highlighting your skills and experience.
By following these tips, you can create an effective email campaign to showcase your photography portfolio and attract new clients.
20. How Do I Send Multiple Photos in One Email?
Sending multiple photos in one email is a common requirement. Here are a few ways to do it efficiently:
- Attach Multiple Files: Most email clients allow you to attach multiple files at once. Simply select all the photos you want to attach and click Open.
- Create a Zip File: Compress the photos into a zip file before attaching it to the email. This can help reduce the overall file size and make it easier for the recipient to download the photos.
- Use a Cloud Service: Upload the photos to a cloud storage service and send a link in the email. This is a great option for sending a large number of photos or high-resolution images.
Choose the method that best suits your needs and the file sizes of your photos.
21. How Do I Troubleshoot Problems With Sending Photos in Email?
Encountering problems when sending photos in email can be frustrating. Here are some troubleshooting steps:
- Check File Size: Ensure the file size of your photos does not exceed the attachment limits of your email provider.
- Check Internet Connection: Make sure you have a stable internet connection.
- Try a Different Email Client: Try using a different email client to see if the problem persists.
- Update Your Email Client: Ensure your email client is up to date.
- Contact Your Email Provider: If the problem persists, contact your email provider for assistance.
By following these steps, you can often resolve common issues and successfully send your photos.
22. What Are the Privacy Considerations When Sending Photos in Email?
When sending photos in email, it’s important to consider privacy, as email is not always secure. To protect your privacy and the privacy of others:
- Be Mindful of Content: Ensure the photos you send do not contain sensitive or private information that you wouldn’t want to be shared.
- Use Encryption: If you’re sending highly sensitive photos, consider using email encryption.
- Get Consent: If the photos include other people, get their consent before sending them.
- Use Password Protection: If using a link to share photos, consider password-protecting the folder or album.
Taking these precautions can help protect your privacy and the privacy of others when sending photos in email.
23. What Are the Benefits of Using Mail Drop for Large Photo Attachments on iPhone?
Mail Drop is an Apple service that allows you to send large attachments, including photos, via iCloud. Here are some benefits of using Mail Drop on your iPhone:
- Send Large Files: Mail Drop allows you to send attachments up to 5 GB, which is much larger than the standard email attachment limits.
- Automatic Upload: When you attach a large file to an email, Mail automatically offers to use Mail Drop.
- Recipient Flexibility: Recipients can download the attachment for up to 30 days.
- Seamless Integration: Mail Drop is seamlessly integrated into the Mail app on your iPhone.
Using Mail Drop can be a convenient way to send large photo attachments without needing to use a third-party service.
24. How Do I Use Third-Party Apps to Send Photos via Email?
Several third-party apps can help you send photos via email more efficiently. Here are a few popular options:
- WeTransfer: WeTransfer is a simple and free service for sending large files.
- Dropbox: Dropbox allows you to upload photos and share a link via email.
- Google Drive: Google Drive offers similar functionality to Dropbox and is integrated with Gmail.
- SmugMug: SmugMug is a photo-sharing platform that allows you to easily send photos via email.
These apps can offer additional features and flexibility compared to sending photos directly through your email client.
25. How Can dfphoto.net Help Me Improve My Photography for Email Sharing?
dfphoto.net offers a wealth of resources to help you improve your photography skills and optimize your photos for email sharing. From detailed tutorials on composition and lighting to expert advice on image editing and file compression, dfphoto.net provides everything you need to create stunning images that look great in email.
- Techniques and Tutorials: Learn about various photography techniques such as exposure, aperture, and shutter speed through detailed guides.
- Equipment Advice: Get evaluations and comparisons of different cameras, lenses, and photography accessories.
- Famous Photographers: Get inspiration from renowned photographers and their works, sparking creativity.
- Editing Guides: Find instructions for using widely used photo editing programs such as Adobe Photoshop and Lightroom.
- Portfolio Building: Learn how to build a portfolio to promote your work and get recognized.
Explore dfphoto.net to discover resources that will take your photography to the next level and transform the way you share your images via email. Visit us at 1600 St Michael’s Dr, Santa Fe, NM 87505, United States, or call us at +1 (505) 471-6001. Explore dfphoto.net today and connect with a vibrant photography community. Enhance your skills, discover beautiful photos, and get inspired to see the world differently.
FAQ
1. How do I add a photo to an email on my iPhone?
To add a photo to an email on your iPhone, open the Mail app, start a new email, tap in the body of the email, tap the expand toolbar button above the keyboard, tap the photo icon, choose the photo, and tap Done. This attaches the photo to your email.
2. What is the best image format to use when sending photos in email?
JPEG (JPG) is generally the best image format for sending photos in email because it offers a good balance between image quality and file size. This helps ensure your emails don’t exceed attachment limits.
3. How can I reduce the file size of a photo before sending it in email?
You can reduce the file size of a photo by using image editing software to compress the image, reduce its dimensions (width and height), or adjust the quality settings when saving it as a JPEG.
4. What is the maximum attachment size for Gmail?
The maximum attachment size for Gmail is 25 MB. If your photo exceeds this limit, consider using Google Drive to share a link to the photo instead of attaching it directly.
5. How do I scan a document and attach it to an email on my iPhone?
To scan a document and attach it to an email, open the Mail app, start a new email, tap in the body, tap the expand toolbar button above the keyboard, tap the Scan Document button, position the document, and tap Keep Scan or Retake. Save the scan and then send the email.
6. How can I send a high-resolution photo without exceeding email size limits?
To send a high-resolution photo without exceeding email size limits, upload the photo to a cloud storage service like Google Drive or Dropbox, get a shareable link, and include that link in your email.
7. What is Mail Drop and how can it help with large photo attachments?
Mail Drop is an Apple service that allows you to send large attachments, up to 5 GB, via iCloud. When you attach a large photo to an email, Mail automatically offers to use Mail Drop, making it easier to send without size restrictions.
8. How do I embed a photo directly into the email body on my computer?
To embed a photo directly into the email body on your computer, open your email client, start a new email, look for an option to insert an image inline (usually in the formatting toolbar), select the photo, and insert it into the body of the email.
9. Can I send multiple photos in one email?
Yes, you can send multiple photos in one email by attaching multiple files at once, creating a zip file containing the photos, or using a cloud service to share a link to a folder containing the photos.
10. How can dfphoto.net help me improve my photography skills for email sharing?
dfphoto.net offers resources such as tutorials, equipment advice, inspiration from famous photographers, and editing guides to help you improve your photography skills. This helps ensure your photos look great when shared via email.