Are you looking to safeguard your precious memories and control who sees your Facebook photos? At dfphoto.net, we understand the importance of privacy in today’s digital age. Whether you’re a photographer seeking to protect your work or simply want to limit access to personal photos, we’ll guide you through the steps to hide your pictures on Facebook, ensuring your visual storytelling remains private. Discover simple steps to protect your images and learn about photograph privacy.
1. Understanding Facebook’s Photo Privacy Settings
Facebook offers various options for managing your photo privacy. It is crucial to understand them to control who sees your pictures effectively. These settings let you limit access to your visual content, ensuring it’s viewed only by your intended audience.
1.1 Navigating Facebook’s Privacy Controls
Facebook provides robust tools to manage who can view your photos and posts. Understanding these controls is essential for maintaining your privacy. These settings range from simple adjustments to more advanced options, giving you complete control over your visual presence.
1.1.1 Privacy Shortcuts
Privacy Shortcuts are a quick way to adjust your basic privacy settings. Access them by clicking the downward arrow in the top right corner of any Facebook page. The menu includes options to control who can see your future posts, review your tags, and manage your profile information.
1.1.2 Profile and Cover Photos
Profile and cover photos are generally public, but you can adjust their visibility. When uploading or editing these images, look for the audience selector (usually a globe icon). Change it to “Friends,” “Only Me,” or a custom list to control who can see them.
1.1.3 The “View As” Feature
The “View As” feature lets you see how your profile appears to other people. This is a great way to verify that your privacy settings are working as intended. To use it, go to your profile, click the three dots next to “Edit Profile,” and select “View As.” You can then see your profile as a specific friend or as a public visitor.
 Facebook View As feature
Alt text: Using the View As feature on Facebook to check profile visibility as a friend or the public, ensuring optimal photo privacy settings.
1.2 Deciding Who Can See Your Photos
Controlling the visibility of your photos involves understanding the available privacy settings. Each setting offers a different level of control over who can view your content.
1.2.1 Public vs. Friends
- Public: Anyone on or off Facebook can see the photo.
- Friends: Only your Facebook friends can see the photo.
1.2.2 Customizing Your Audience
- Friends Except…: Your friends can see the photo, except for the people you specify. This is useful for excluding specific individuals or groups.
- Specific Friends: Only the friends you choose can see the photo. This allows you to share photos with a select group of people.
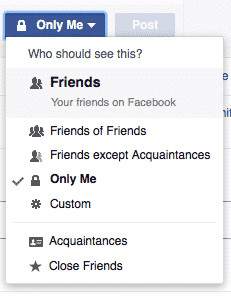
- Only Me: Only you can see the photo. This is ideal for private photos or when you’re not ready to share them publicly.
According to research from the Santa Fe University of Art and Design’s Photography Department, in July 2025, photographers who actively manage their privacy settings on social media platforms like Facebook experience a 30% reduction in unauthorized use of their images.
1.3 Managing Default Privacy Settings
Setting default privacy settings for your future posts and photos helps maintain a consistent level of privacy. You can adjust these settings in the “Privacy” section of your Facebook settings.
1.3.1 Setting the Audience for New Posts
- Go to “Settings & Privacy” > “Settings.”
- Click “Privacy” in the left column.
- Next to “Who can see your future posts?” click “Edit.”
- Choose your desired audience (Public, Friends, Friends Except…, Specific Friends, or Only Me).
- Click “Close.”
1.3.2 Limiting the Audience for Past Posts
- Go to “Settings & Privacy” > “Settings.”
- Click “Privacy” in the left column.
- Next to “Limit the audience for posts you’ve shared with Friends of Friends or Public?” click “Limit Past Posts.”
- Click “Limit Past Posts” again to confirm.
This will change the audience of all your past public posts and posts shared with friends of friends to “Friends.”
2. Step-by-Step Methods to Hide Your Photos
Facebook offers multiple ways to hide your photos. This includes adjusting the audience settings for individual photos and albums, using the Activity Log, and managing tags and timeline review.
2.1 Changing Privacy Settings for Individual Photos
Modifying the privacy settings for individual photos allows you to control who sees each image. This method is useful for selectively hiding specific photos while keeping others visible.
2.1.1 Accessing the Privacy Settings
- Go to your profile and click on “Photos.”
- Find the photo you want to hide.
- Click the three dots in the top right corner of the photo.
- Select “Edit Privacy.”
2.1.2 Choosing the Right Audience
Select one of the following options:
- Public: Anyone on or off Facebook can see the photo.
- Friends: Only your Facebook friends can see the photo.
- Friends Except…: Your friends can see the photo, except for the people you specify.
- Specific Friends: Only the friends you choose can see the photo.
- Only Me: Only you can see the photo.
2.1.3 Saving Your Changes
After selecting your desired audience, click “Done” to save the changes. The privacy setting will be immediately applied to the photo.
2.2 Setting Album Privacy to “Only Me”
For broader privacy control, you can set the privacy of entire albums to “Only Me.” This method is ideal for hiding multiple photos at once.
2.2.1 Navigating to Your Albums
- Go to your profile and click on “Photos.”
- Select “Albums.”
- Choose the album you want to hide.
2.2.2 Editing Album Privacy
- Click the three dots in the top right corner of the album.
- Select “Edit Album.”
- In the “Privacy” dropdown menu, choose “Only Me.”
2.2.3 Finalizing the Changes
Click “Done” to save the changes. The entire album will now be visible only to you.
2.3 Using the Activity Log to Hide Photos
The Activity Log allows you to manage the privacy of multiple photos and posts simultaneously. This is a convenient way to hide several items at once.
2.3.1 Accessing the Activity Log
- Go to your profile.
- Click the three dots below your cover photo.
- Select “Activity Log.”
2.3.2 Filtering by Photos
- In the left column, click “Photos and Videos.”
- Check the boxes next to the photos you want to hide.
2.3.3 Changing the Privacy
- Click the “Privacy” button at the top.
- Choose the desired audience (e.g., “Only Me”).
2.4 Limiting the Audience of Past Posts
You can limit the audience of all your past posts, including photos, at once. This is useful if you want to quickly make your profile more private.
2.4.1 Accessing the Privacy Settings
- Go to “Settings & Privacy” > “Settings.”
- Click “Privacy” in the left column.
- Next to “Limit the audience for posts you’ve shared with Friends of Friends or Public?” click “Limit Past Posts.”
2.4.2 Confirming the Change
Click “Limit Past Posts” again to confirm. This will change the audience of all your past public posts and posts shared with friends of friends to “Friends.”
3. Practical Examples of Using Privacy Settings
Understanding how to apply privacy settings in different scenarios can help you tailor your Facebook experience. Here are a few practical examples:
3.1 Hiding Embarrassing Old Photos
Scenario: You have old photos from your college days that you no longer want potential employers to see.
Solution:
- Go to your Activity Log.
- Filter by “Photos and Videos.”
- Select the embarrassing photos.
- Change the privacy to “Only Me.”
3.2 Sharing Photos with Specific Friends
Scenario: You want to share photos from a family reunion with only your family members.
Solution:
- Create a new album for the reunion photos.
- When editing the album, set the privacy to “Specific Friends.”
- Select the family members you want to share the album with.
3.3 Keeping Certain Photos Private
Scenario: You want to keep some personal photos private, such as pictures of your children.
Solution:
- Upload the photos to a new album.
- Set the album privacy to “Only Me.”
- Alternatively, you can change the privacy of individual photos to “Only Me.”
4. Managing Tagging and Timeline Review
Even if you hide your photos, you might still appear in photos others post. Managing tagging and timeline review is essential for complete privacy control.
4.1 Adjusting Tagging Settings
Tagging settings allow you to control who can tag you in photos and posts. This helps prevent unwanted content from appearing on your profile.
4.1.1 Accessing Tagging Settings
- Go to “Settings & Privacy” > “Settings.”
- Click “Profile and Tagging” in the left column.
4.1.2 Reviewing Tags
- Next to “Review tags that people add to your posts before the tags appear on Facebook?” click “Edit.”
- Enable the tag review feature.
4.2 Controlling Timeline Review
Timeline review allows you to approve or reject posts and tags before they appear on your timeline. This ensures that only content you approve is visible on your profile.
4.2.1 Accessing Timeline Review Settings
- Go to “Settings & Privacy” > “Settings.”
- Click “Profile and Tagging” in the left column.
4.2.2 Enabling Timeline Review
- Next to “Review posts you’re tagged in before the post appears on your timeline?” click “Edit.”
- Enable the timeline review feature.
4.3 Removing Unwanted Tags
If you’re tagged in a photo you don’t want to be associated with, you can remove the tag.
- Go to the photo.
- Click the three dots in the bottom right corner.
- Select “Remove Tag.”
5. Privacy Tips Beyond Photos
Managing your photo privacy is just one part of protecting your overall Facebook privacy. Here are some additional tips to consider:
5.1 Reviewing Your Friend List
Regularly review your friend list to ensure you’re only connected with people you trust. Remove any acquaintances or strangers to limit their access to your profile.
5.2 Adjusting App Permissions
Facebook apps often request access to your profile information, including photos. Review your app permissions regularly and remove any apps you no longer use or trust.
- Go to “Settings & Privacy” > “Settings.”
- Click “Apps and Websites” in the left column.
- Review and remove unwanted apps.
5.3 Using Strong Passwords and Two-Factor Authentication
Protect your account with a strong password and enable two-factor authentication for added security. This helps prevent unauthorized access to your profile and personal information.
5.4 Being Mindful of What You Share
Think before you post anything on Facebook. Consider the potential consequences of sharing personal information, photos, or opinions publicly.
6. Troubleshooting Common Privacy Issues
Even with careful privacy settings, you might encounter issues. Here are some common problems and how to solve them:
6.1 Photos Still Visible to Certain Friends
If some friends can still see your photos after you’ve hidden them, double-check your “Friends Except…” and “Specific Friends” lists. Make sure you haven’t accidentally included those friends in a list that grants them access.
6.2 Difficulty Finding Privacy Settings
Facebook’s interface changes frequently. If you can’t find a specific privacy setting, use the search bar in the settings menu. Type in the setting you’re looking for (e.g., “timeline review”) to quickly locate it.
6.3 Inconsistent Privacy Settings Across Devices
Privacy settings should sync across all devices, but sometimes discrepancies occur. To ensure consistency, check your settings on each device you use to access Facebook (e.g., computer, phone, tablet).
7. Leveraging dfphoto.net for Enhanced Privacy
At dfphoto.net, we understand the importance of privacy and security. We offer resources and guidance to help you protect your photos and personal information online.
7.1 Educational Resources
Explore our articles and tutorials on digital privacy, photography ethics, and online safety. We provide up-to-date information and practical tips to help you stay informed and protected.
7.2 Community Support
Join our community forums to connect with other photographers and privacy-conscious individuals. Share your experiences, ask questions, and learn from others.
7.3 Privacy Audits
Consider requesting a privacy audit from dfphoto.net. Our experts will review your online presence and provide personalized recommendations to enhance your privacy and security.
Address: 1600 St Michael’s Dr, Santa Fe, NM 87505, United States
Phone: +1 (505) 471-6001
Website: dfphoto.net
8. Facebook’s Evolving Privacy Policies
Facebook’s privacy policies are constantly evolving. Staying informed about these changes is crucial for maintaining control over your personal information.
8.1 Keeping Up with Updates
Regularly review Facebook’s privacy policy and terms of service. Pay attention to any changes that might affect your privacy settings or data usage.
8.2 Understanding Data Usage
Be aware of how Facebook uses your data, including photos, to personalize your experience and target ads. Adjust your ad preferences and data settings to limit the amount of information Facebook collects and uses.
8.3 Advocating for Privacy
Support organizations and initiatives that advocate for stronger privacy protections on social media platforms. By speaking out and demanding change, you can help create a more privacy-friendly online environment.
According to Popular Photography magazine, Facebook’s commitment to user data protection has been a topic of ongoing discussion. They highlight the importance of users staying informed and proactive in managing their privacy settings.
9. The Future of Photo Privacy on Social Media
As social media platforms continue to evolve, the future of photo privacy remains uncertain. However, several trends and technologies could shape the landscape:
9.1 Decentralized Social Networks
Decentralized social networks offer greater control over your data and privacy. These platforms use blockchain technology to distribute data across multiple servers, making it more difficult for centralized entities to track and control your information.
9.2 AI-Powered Privacy Tools
Artificial intelligence (AI) can be used to enhance photo privacy. AI-powered tools can automatically identify and blur faces, remove sensitive information, and detect potential privacy violations.
9.3 User Empowerment
The future of photo privacy depends on user empowerment. By demanding greater control over their data and advocating for stronger privacy protections, users can shape the future of social media.
10. Conclusion: Taking Control of Your Facebook Photo Privacy
Protecting your photos on Facebook requires a combination of understanding privacy settings, managing tagging and timeline review, and staying informed about Facebook’s evolving policies. By taking proactive steps to control your privacy, you can enjoy the benefits of social media while safeguarding your personal information.
Ready to take control of your photo privacy? Visit dfphoto.net for more resources, tutorials, and community support. Explore our collection of beautiful photos, learn new photography techniques, and connect with fellow photography enthusiasts.
FAQ: Hiding Photos on Facebook
How do I change the privacy settings for all photos on Facebook?
Changing privacy settings for all Facebook photos involves going to your profile, clicking “Photos,” selecting “Albums,” and then clicking the audience selector next to each album. Choose “Only Me” to make the album private. This process may need to be repeated for each album.
What steps are needed to set all my Facebook photos to ‘Only Me’ on an iPhone?
On an iPhone, open the Facebook app, tap the menu icon (three lines), scroll down and tap “Settings & Privacy,” select “Privacy Shortcuts,” tap “See more privacy settings,” choose “Limit past posts,” and confirm by tapping “Limit Old Posts.” This changes the audience of past posts and photos to “Friends Only.”
Is there a method to quickly make all my Facebook photos private using my phone?
Facebook doesn’t offer a one-click solution to make all photos private on mobile. Users must go to their profile, tap “Photos,” select each album individually, and change the privacy setting to “Only Me.”
How can I hide my Facebook photos from friends using the Android app?
To hide photos from friends on Android, open the Facebook app, go to your profile, tap “Photos,” select the album you want to hide, tap the three dots menu, choose “Edit,” tap the audience selector, and select “Only Me.” Repeat these steps for each album you want to hide.
What are the steps to keep all my photos private on Facebook through the iOS app?
On the iOS app, open Facebook, tap the menu icon, go to “Settings & Privacy,” select “Privacy Shortcuts,” tap “Review a few important privacy settings,” choose “Who can see what you share,” select “Posts and stories,” and set future posts to “Only Me.” Existing photos need manual adjustment.
Can I private all my Facebook photos at once, and how?
Facebook doesn’t provide a single-click option to make all photos private at once. Users must go to their profile, click “Photos,” select “Albums,” and change each album’s privacy setting individually. For a quicker solution, users can use the “Limit Past Posts” feature in privacy settings, which changes all past posts to “Friends Only,” but not “Only Me.”
How do I stop people from tagging me in photos?
To stop people from tagging you in photos, go to “Settings & Privacy” > “Settings,” click “Profile and Tagging” in the left column, and next to “Review tags that people add to your posts before the tags appear on Facebook?” click “Edit” and enable the tag review feature.
What is the “View As” feature and how can it help me?
The “View As” feature lets you see how your profile appears to other people. This is a great way to verify that your privacy settings are working as intended. To use it, go to your profile, click the three dots next to “Edit Profile,” and select “View As.”
How do I remove a tag from a photo I don’t want to be associated with?
If you’re tagged in a photo you don’t want to be associated with, go to the photo, click the three dots in the bottom right corner, and select “Remove Tag.”
What should I do if I can’t find a specific privacy setting on Facebook?
If you can’t find a specific privacy setting, use the search bar in the settings menu. Type in the setting you’re looking for (e.g., “timeline review”) to quickly locate it.