Unlocking the magic of photo editing is within your reach. At dfphoto.net, we’re dedicated to showing you exactly How Can We Edit Photos In Photoshop, transforming your images into stunning visual narratives through digital enhancement and visual storytelling. Dive into our comprehensive guide to discover the best photo editing techniques and advanced photo manipulation skills that will elevate your photography and unlock artistic potential.
1. What Is Photo Editing In Photoshop and Why Is It Important?
Photo editing in Photoshop refers to the process of altering or enhancing images using Adobe Photoshop software. It’s important because it allows photographers and designers to correct imperfections, enhance aesthetics, and create stunning visual effects.
Photo editing is a crucial aspect of modern photography and digital art. It involves manipulating images to improve their visual appeal, correct flaws, and achieve a desired artistic effect. According to research from the Santa Fe University of Art and Design’s Photography Department, photo editing is an integral part of the photographic process, allowing photographers to realize their artistic vision and communicate their message effectively. Whether it’s adjusting exposure, removing blemishes, or creating complex compositions, photo editing enhances visual storytelling. Digital photo enhancement can transform mundane snapshots into captivating works of art. Understanding the value and purpose of photo retouching and advanced image manipulation is the first step in unleashing creative potential.
2. What Are the Key Features Of Adobe Photoshop For Photo Editing?
Adobe Photoshop boasts an array of powerful features for photo editing, including layers, masks, selection tools, filters, and adjustment layers. These tools offer precise control and flexibility for enhancing and manipulating images.
Adobe Photoshop is the industry-standard software for photo editing, known for its extensive features and capabilities. It provides a comprehensive set of tools and functions that enable users to manipulate images with precision and creativity. Photoshop’s key features, such as layers, masks, and selection tools, are essential for making targeted adjustments and creating complex compositions. Adjustment layers allow for non-destructive editing, ensuring flexibility and control throughout the editing process. Filters and effects offer opportunities to enhance and stylize images, adding unique artistic flair. According to Adobe’s official documentation, Photoshop’s versatility makes it the go-to choice for professionals and enthusiasts alike.
2.1. What Can You Do With Layers in Photoshop?
Layers in Photoshop allow you to work on different elements of an image independently, making it easy to experiment with adjustments and effects without affecting the original image.
Layers are a fundamental aspect of Photoshop, enabling users to organize and manipulate different elements of an image separately. Each layer can contain unique content, adjustments, or effects, allowing for precise control over the final composition. Layer masks can be used to selectively reveal or hide portions of a layer, creating seamless blends and composite images. By working with layers, users can experiment with different editing techniques and effects without permanently altering the original image data. According to Scott Kelby, a renowned Photoshop expert, mastering layers is essential for achieving professional-level results in photo editing.
2.2. What Are Adjustment Layers And How To Use Them?
Adjustment layers are non-destructive editing tools in Photoshop that allow you to modify the color and tone of an image without permanently altering the original pixels.
Adjustment layers are non-destructive editing tools that allow you to modify the color and tone of an image without permanently altering the original pixels. These layers apply adjustments such as brightness, contrast, color balance, and curves, which can be easily tweaked or removed at any time. Adjustment layers offer flexibility and control over the editing process, making them an essential component of a professional workflow. By using adjustment layers, photographers can experiment with different looks and styles while preserving the integrity of the original image. As explained in “The Adobe Photoshop CC Book for Digital Photographers” by Scott Kelby, adjustment layers are a cornerstone of non-destructive editing in Photoshop.
2.3. How To Use Photoshop Selection Tools For Photo Editing?
Photoshop’s selection tools allow you to isolate specific areas of an image for editing, making it possible to apply targeted adjustments and effects with precision.
Photoshop’s selection tools enable users to isolate specific areas of an image for editing, allowing for precise and targeted adjustments. These tools include the Marquee, Lasso, Magic Wand, and Quick Selection tools, each offering unique capabilities for selecting different types of image elements. Once an area is selected, users can apply adjustments, filters, or effects exclusively to that region, leaving the rest of the image untouched. Selection tools are essential for tasks such as removing objects, refining edges, and creating composite images. According to the Adobe Photoshop User Guide, mastering selection tools is crucial for achieving accurate and professional-looking edits.
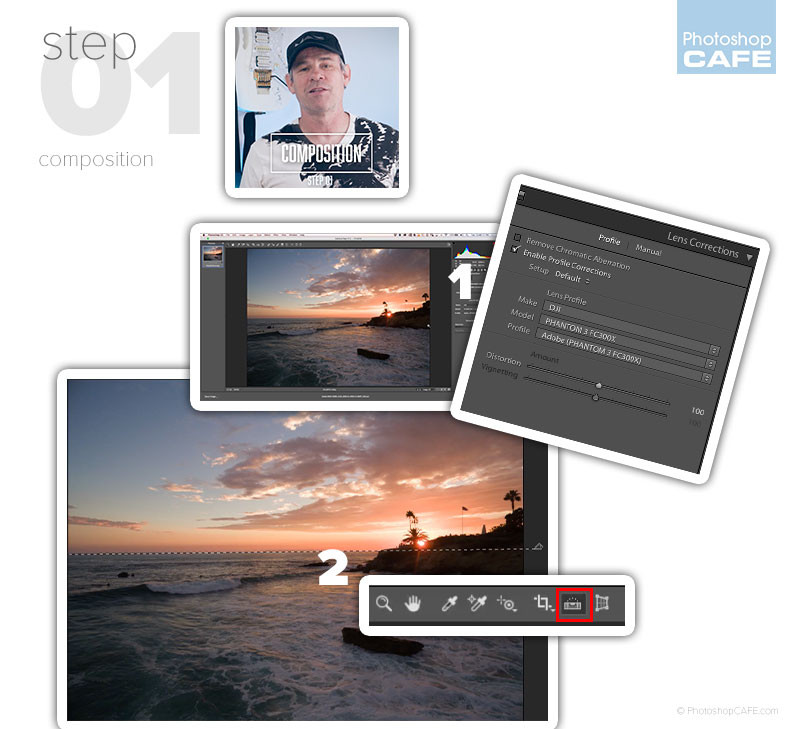 Composition. How to edit a photo in Photoshop
2.4. What Are Photoshop Filters And How To Use Them?
Photoshop filters are pre-designed effects that can be applied to images to quickly enhance their appearance, add artistic flair, or correct flaws.
Photoshop filters are pre-designed effects that can be applied to images to quickly enhance their appearance, add artistic flair, or correct flaws. These filters range from basic adjustments like sharpening and blurring to more complex effects like distortion and stylization. Filters can be applied to entire images or specific selections, offering versatility and creative possibilities. While filters can be a quick way to enhance an image, it’s important to use them judiciously and with a clear understanding of their effects. As emphasized in “Photoshop CC: The Missing Manual” by Lesa Snider, the key to using filters effectively is to experiment and understand how they interact with different types of images.
3. What Are the Fundamental Steps For Editing Photos In Photoshop?
The fundamental steps for editing photos in Photoshop typically include adjusting exposure, contrast, white balance, and color, as well as sharpening and noise reduction. These adjustments enhance the overall quality and appearance of the image.
The fundamental steps for editing photos in Photoshop involve a systematic approach to enhancing the image’s visual qualities. These steps typically include:
- Adjusting Exposure: Correcting the overall brightness of the image.
- Adjusting Contrast: Modifying the difference between the light and dark areas.
- Adjusting White Balance: Neutralizing color casts to ensure accurate colors.
- Adjusting Color: Enhancing or correcting individual colors.
- Sharpening: Increasing the clarity and detail of the image.
- Noise Reduction: Minimizing unwanted graininess or artifacts.
These adjustments form the foundation of photo editing and are essential for achieving a polished and professional look. According to Michael Freeman, author of “The Photographer’s Eye,” a solid understanding of these fundamental adjustments is critical for every photographer.
3.1. How To Adjust Exposure And Contrast In Photoshop?
To adjust exposure and contrast in Photoshop, use the Exposure and Contrast sliders in the Basic panel of Camera Raw or the Brightness/Contrast adjustment layer. Experiment with different settings to achieve the desired brightness and tonal range.
Adjusting exposure and contrast is crucial for achieving a balanced and visually appealing image. In Photoshop, you can use the Exposure and Contrast sliders in the Basic panel of Camera Raw or the Brightness/Contrast adjustment layer to make these adjustments. The Exposure slider controls the overall brightness of the image, while the Contrast slider adjusts the difference between the light and dark areas. Experimenting with different settings allows you to achieve the desired brightness and tonal range, bringing out details and creating a more dynamic image. As noted in “Adobe Photoshop Classroom in a Book,” mastering these adjustments is essential for correcting exposure issues and enhancing the overall impact of your photos.
3.2. What Is White Balance And How To Correct It In Photoshop?
White balance refers to the color temperature of an image, and correcting it in Photoshop involves adjusting the Temperature and Tint sliders to neutralize color casts and ensure accurate colors.
White balance refers to the color temperature of an image, which can affect how colors are perceived. Correcting white balance in Photoshop involves adjusting the Temperature and Tint sliders to neutralize color casts and ensure accurate colors. If an image appears too warm (yellowish), you can lower the Temperature slider to cool it down. If it appears too cool (bluish), you can raise the Temperature slider to warm it up. The Tint slider can be used to correct green or magenta casts. Achieving accurate white balance is crucial for ensuring that colors appear natural and true to life. According to Bryan Peterson, author of “Understanding Exposure,” paying attention to white balance is essential for capturing and editing high-quality images.
3.3. How To Adjust Color Vibrance And Saturation In Photoshop?
To adjust color vibrance and saturation in Photoshop, use the Vibrance and Saturation sliders in the Basic panel of Camera Raw or the Vibrance/Saturation adjustment layer. Vibrance enhances the intensity of muted colors, while Saturation adjusts the overall color intensity.
Adjusting color vibrance and saturation can significantly impact the mood and visual appeal of an image. In Photoshop, you can use the Vibrance and Saturation sliders in the Basic panel of Camera Raw or the Vibrance/Saturation adjustment layer to make these adjustments. Vibrance selectively enhances the intensity of muted colors, while Saturation adjusts the overall color intensity of all colors in the image. Using Vibrance can help bring out subtle colors without over saturating the image, while Saturation can be used to create bold and vibrant effects. Experimenting with these sliders allows you to achieve the desired color balance and create a visually stunning image. As explained in “Real World Color Management” by Bruce Fraser, understanding the difference between Vibrance and Saturation is crucial for achieving accurate and pleasing color in your photos.
3.4. What Are Sharpening And Noise Reduction, And How To Use Them In Photoshop?
Sharpening enhances the clarity and detail of an image, while noise reduction minimizes unwanted graininess or artifacts. In Photoshop, you can use the Sharpening and Noise Reduction sliders in Camera Raw or the Unsharp Mask filter and Reduce Noise filter to apply these effects.
Sharpening and noise reduction are essential steps in the photo editing process, used to enhance the clarity and reduce unwanted artifacts in an image. Sharpening enhances the edges and details, making the image appear crisper and more defined. Noise reduction minimizes graininess or artifacts, improving the overall smoothness and clarity of the image. In Photoshop, you can use the Sharpening and Noise Reduction sliders in Camera Raw or the Unsharp Mask filter and Reduce Noise filter to apply these effects. It’s important to use these tools judiciously, as over sharpening can lead to unwanted artifacts, while excessive noise reduction can result in a loss of detail. According to Jeff Schewe, co-author of “The Digital Negative,” mastering sharpening and noise reduction is crucial for achieving optimal image quality.
 how to make a photo look better in photoshop
4. What Are Some Advanced Photo Editing Techniques In Photoshop?
Advanced photo editing techniques in Photoshop include compositing, masking, dodging and burning, and color grading. These techniques allow for complex manipulations and creative effects.
Advanced photo editing techniques in Photoshop enable users to create complex manipulations and stunning visual effects. These techniques include:
- Compositing: Combining multiple images into a single composition.
- Masking: Selectively revealing or hiding portions of an image.
- Dodging and Burning: Lightening and darkening specific areas to enhance contrast and detail.
- Color Grading: Adjusting the colors of an image to create a specific mood or style.
These advanced techniques require skill and practice but offer limitless creative possibilities. According to industry experts, mastering these techniques is essential for photographers and designers looking to push the boundaries of visual expression.
4.1. How To Do Photo Compositing In Photoshop?
Photo compositing in Photoshop involves combining multiple images into a single composition by using layers, masks, and blending modes to seamlessly blend the images together.
Photo compositing involves combining multiple images into a single composition, creating surreal or imaginative scenes. This technique requires careful attention to detail and a strong understanding of Photoshop’s tools and features. By using layers, masks, and blending modes, you can seamlessly blend the images together, creating a cohesive and believable final result. Compositing allows you to create visual narratives and bring your creative visions to life. According to digital artist Julieanne Kost, photo compositing is a powerful way to express your unique artistic style and create captivating imagery.
4.2. How To Use Masks In Photoshop For Selective Editing?
Masks in Photoshop allow you to selectively edit specific areas of an image by creating a mask that hides or reveals portions of a layer, enabling precise control over adjustments and effects.
Masks are a powerful tool in Photoshop that allow you to selectively edit specific areas of an image. By creating a mask, you can hide or reveal portions of a layer, enabling precise control over adjustments and effects. Masks can be created using various methods, including selection tools, gradient tools, and brush tools. They are particularly useful for tasks such as blending images, refining edges, and creating complex compositions. According to Deke McClelland, author of “Photoshop CC 2018 One-on-One,” mastering masks is essential for achieving professional-level results in Photoshop.
4.3. What Is Dodging And Burning And How To Do It In Photoshop?
Dodging and burning are techniques used to lighten (dodge) and darken (burn) specific areas of an image to enhance contrast, create depth, and draw attention to key elements. In Photoshop, you can use the Dodge and Burn tools or create adjustment layers with masks to achieve these effects.
Dodging and burning are traditional darkroom techniques that involve selectively lightening (dodging) and darkening (burning) specific areas of an image to enhance contrast, create depth, and draw attention to key elements. In Photoshop, you can achieve these effects using the Dodge and Burn tools or by creating adjustment layers with masks. Dodging lightens areas, bringing out highlights and details, while burning darkens areas, adding shadows and definition. Mastering these techniques allows you to sculpt light and shadow, creating a more dynamic and visually appealing image. As explained in “The Art of Retouching” by Lincoln Barbour, dodging and burning are essential skills for any photographer or retoucher looking to enhance their images.
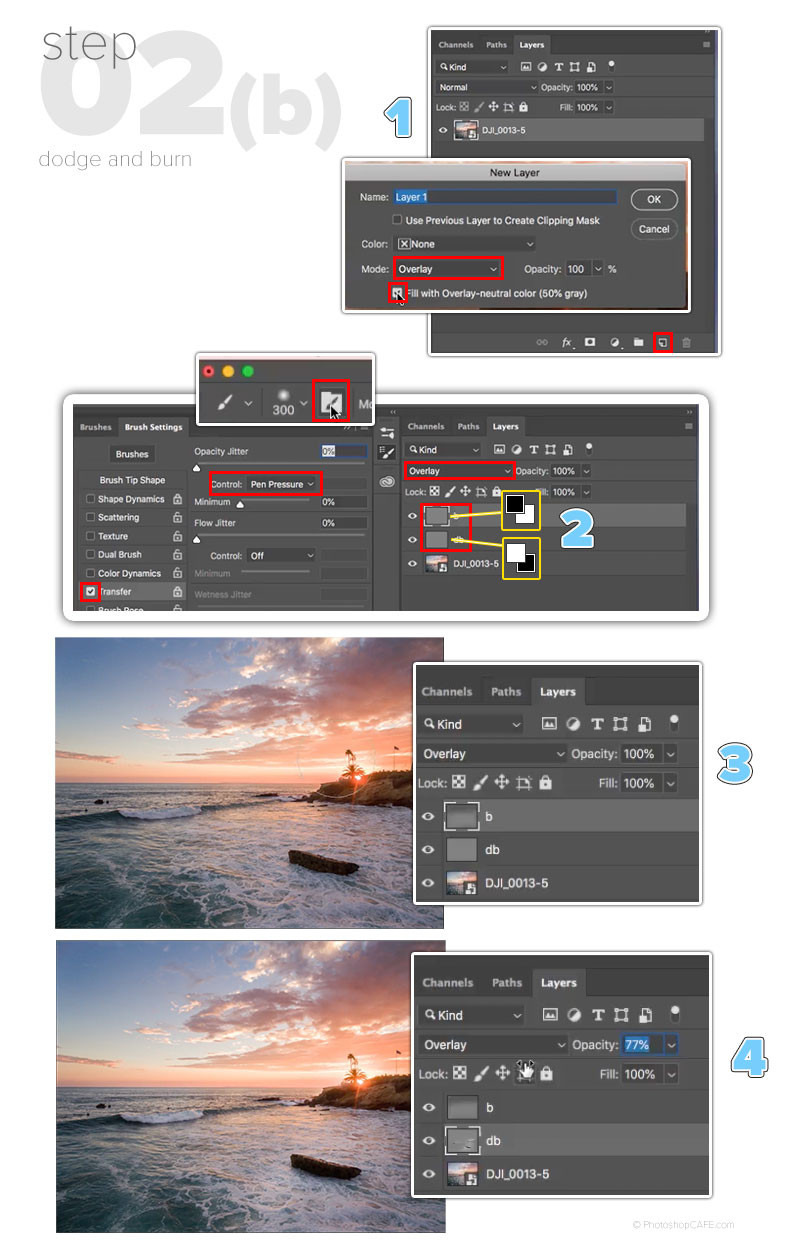 how to dodge and burn a photo in photoshop
4.4. How To Color Grade Photos In Photoshop?
Color grading in Photoshop involves adjusting the colors of an image to create a specific mood, style, or aesthetic. You can use adjustment layers such as Curves, Color Balance, and Selective Color to fine-tune the colors and achieve the desired look.
Color grading is the process of adjusting the colors of an image to create a specific mood, style, or aesthetic. This technique is widely used in film and photography to evoke emotions, enhance visual storytelling, and create a consistent look across a series of images. In Photoshop, you can use adjustment layers such as Curves, Color Balance, and Selective Color to fine-tune the colors and achieve the desired look. Experimenting with different color combinations and gradients can help you create unique and visually stunning images. According to expert Vincent Versace, color grading is a powerful tool for enhancing the emotional impact of your photos.
5. How Can You Optimize Your Photoshop Workflow For Photo Editing?
Optimizing your Photoshop workflow involves using keyboard shortcuts, creating custom actions, and organizing your workspace to improve efficiency and productivity.
Optimizing your Photoshop workflow can significantly improve your efficiency and productivity. Here are some tips for streamlining your photo editing process:
- Use Keyboard Shortcuts: Learn and use keyboard shortcuts for frequently used commands to save time and effort.
- Create Custom Actions: Automate repetitive tasks by creating custom actions that perform a series of steps with a single click.
- Organize Your Workspace: Customize your workspace by arranging panels and tools in a way that suits your workflow.
- Use Adjustment Layers: Utilize adjustment layers for non-destructive editing, allowing you to make changes without permanently altering the original image.
- Batch Processing: Process multiple images at once using batch processing to save time on repetitive tasks.
By implementing these strategies, you can optimize your Photoshop workflow and focus on the creative aspects of photo editing. According to industry professionals, a well-optimized workflow can make a significant difference in the quality and speed of your work.
5.1. What Are Some Useful Photoshop Keyboard Shortcuts For Photo Editing?
Useful Photoshop keyboard shortcuts for photo editing include Ctrl+Z (Undo), Ctrl+Shift+Z (Redo), Ctrl+S (Save), Ctrl+J (Duplicate Layer), and Ctrl+T (Free Transform).
Keyboard shortcuts can significantly speed up your workflow in Photoshop. Here are some useful keyboard shortcuts for photo editing:
- Ctrl+Z (Undo): Reverses the last action.
- Ctrl+Shift+Z (Redo): Redoes the last undone action.
- Ctrl+S (Save): Saves the current document.
- Ctrl+J (Duplicate Layer): Creates a duplicate of the selected layer.
- Ctrl+T (Free Transform): Activates the Free Transform tool for scaling, rotating, and distorting the selected layer or object.
By memorizing and using these keyboard shortcuts, you can streamline your editing process and save valuable time. According to Photoshop experts, mastering keyboard shortcuts is essential for efficient photo editing.
5.2. How To Create Custom Actions In Photoshop To Automate Tasks?
To create custom actions in Photoshop, open the Actions panel, click the Create New Action icon, name the action, and then record the steps you want to automate. Once recorded, you can play the action to quickly perform the same steps on other images.
Creating custom actions in Photoshop allows you to automate repetitive tasks, saving you time and effort. To create a custom action, follow these steps:
- Open the Actions Panel: Go to Window > Actions to open the Actions panel.
- Create New Action: Click the Create New Action icon (a page with a folded corner) at the bottom of the panel.
- Name the Action: Give your action a descriptive name and assign it a function key if desired.
- Record the Steps: Click the Record button to start recording the steps you want to automate.
- Perform the Tasks: Perform the tasks you want to include in the action, such as adjusting levels, applying filters, or resizing images.
- Stop Recording: Click the Stop button to stop recording.
- Play the Action: To play the action on another image, select the action in the Actions panel and click the Play button.
By creating custom actions, you can streamline your workflow and quickly perform complex tasks with a single click. According to Adobe’s official documentation, custom actions are a powerful way to automate repetitive tasks in Photoshop.
5.3. How To Organize Your Photoshop Workspace For Efficient Editing?
To organize your Photoshop workspace for efficient editing, customize the arrangement of panels and tools to suit your workflow, dock frequently used panels together, and save your workspace for future use.
Organizing your Photoshop workspace can significantly improve your efficiency and productivity. Here are some tips for creating an optimized workspace:
- Customize Panel Arrangement: Arrange panels in a way that makes sense for your workflow. Dock frequently used panels together to save space.
- Use Workspace Presets: Save your workspace layout as a preset so you can quickly switch between different setups for different types of tasks.
- Hide Unused Panels: Close or hide panels that you don’t use frequently to declutter your workspace.
- Utilize Screen Space: Maximize your screen space by using full-screen mode and hiding the menu bar when not needed.
By customizing your workspace, you can create a comfortable and efficient editing environment that allows you to focus on the creative aspects of your work. As recommended by industry experts, taking the time to organize your workspace is a worthwhile investment that can pay off in increased productivity and reduced frustration.
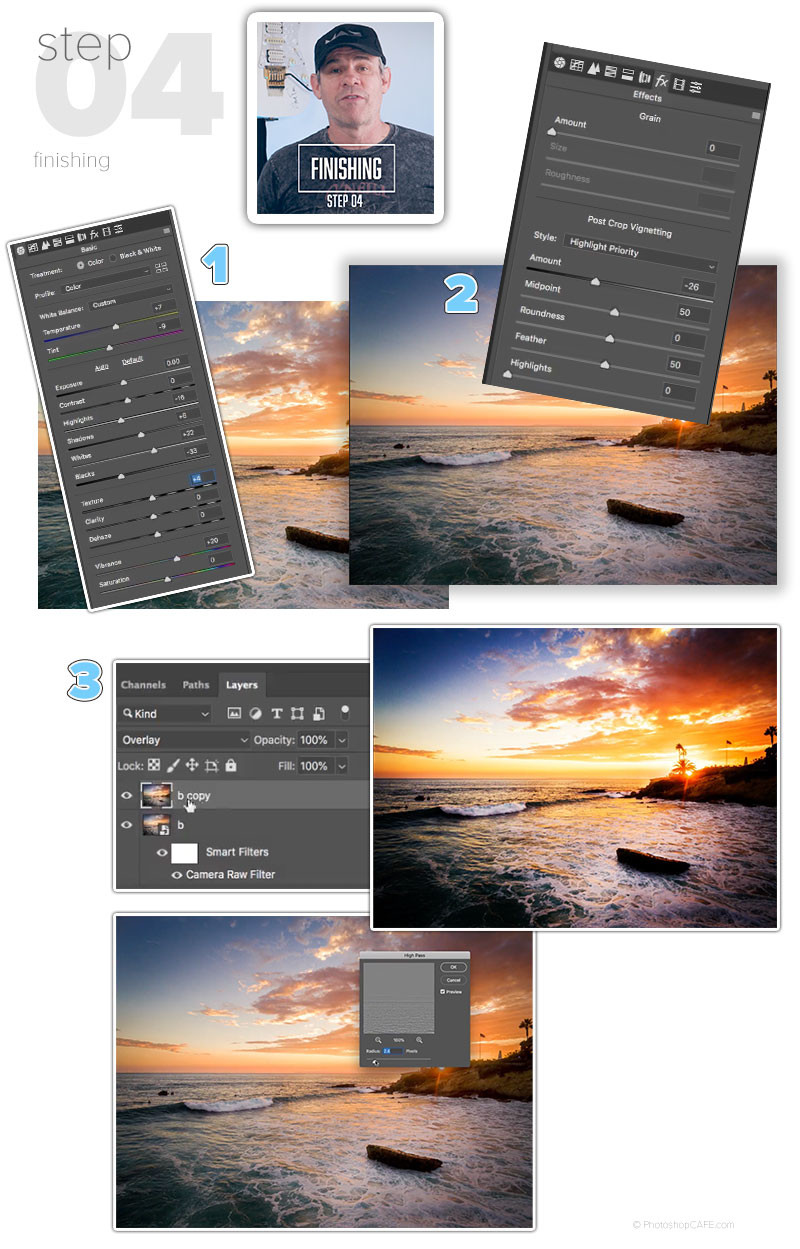
 How to enhance the color of a photo in photoshop
6. What Are Common Mistakes To Avoid When Editing Photos In Photoshop?
Common mistakes to avoid when editing photos in Photoshop include over-editing, excessive sharpening, and neglecting to save your work properly.
When editing photos in Photoshop, it’s important to be mindful of common mistakes that can detract from the final result. Here are some pitfalls to avoid:
- Over-Editing: Avoid excessive adjustments that make the image look unnatural or artificial.
- Excessive Sharpening: Be cautious when sharpening, as over sharpening can create unwanted artifacts and halos.
- Ignoring White Balance: Pay attention to white balance and correct any color casts to ensure accurate colors.
- Neglecting to Save Properly: Save your work frequently and in the correct format to avoid losing progress or compromising image quality.
- Not Using Adjustment Layers: Utilize adjustment layers for non-destructive editing to maintain flexibility and control over your adjustments.
By avoiding these common mistakes, you can ensure that your photo edits are subtle, effective, and professional-looking. According to experienced photographers, a light touch and attention to detail are key to successful photo editing.
6.1. How Much Editing Is Too Much When Adjusting Photos?
Knowing how much editing is too much when adjusting photos is subjective and depends on the desired outcome, but generally, it’s best to avoid extreme adjustments that make the image look unnatural or artificial.
Determining how much editing is too much is a subjective decision that depends on the desired outcome and personal taste. However, there are some general guidelines to follow:
- Aim for Naturalism: Avoid extreme adjustments that make the image look unnatural or artificial.
- Preserve Detail: Be careful not to over process the image to the point where details are lost or distorted.
- Consider the Context: Think about the intended use of the image and adjust accordingly. A subtle edit may be appropriate for a documentary photo, while a more stylized edit may be suitable for a creative project.
- Get Feedback: Ask for feedback from others to get a fresh perspective on your edits.
Ultimately, the goal of photo editing is to enhance the image while maintaining its integrity and authenticity. According to industry experts, less is often more when it comes to photo editing.
6.2. What Are The Consequences Of Over Sharpening An Image In Photoshop?
The consequences of over sharpening an image in Photoshop include the introduction of unwanted artifacts, halos around edges, and a loss of detail.
Over sharpening an image in Photoshop can have several negative consequences, including:
- Introduction of Artifacts: Over sharpening can create unwanted artifacts and distortions in the image, making it look unnatural.
- Halos Around Edges: Excessive sharpening can cause bright halos to appear around edges, drawing attention to the sharpening effect rather than the image itself.
- Loss of Detail: Over sharpening can actually reduce detail in the image by exaggerating noise and creating a harsh, pixelated appearance.
To avoid over sharpening, it’s important to use sharpening tools judiciously and to zoom in on the image to inspect the results closely. According to digital imaging experts, subtle sharpening is often more effective than aggressive sharpening.
6.3. Why Is Saving Your Work Properly Important In Photoshop?
Saving your work properly in Photoshop is important because it ensures that you don’t lose your progress, preserves image quality, and allows you to reopen and edit the file in the future.
Saving your work properly in Photoshop is crucial for several reasons:
- Preventing Data Loss: Saving your work frequently ensures that you don’t lose your progress in case of a software crash or power outage.
- Preserving Image Quality: Saving in the correct format (e.g., PSD, TIFF) preserves the image quality and allows you to make further edits without loss of detail.
- Enabling Future Editing: Saving your work in a layered format (e.g., PSD) allows you to reopen the file in Photoshop and continue editing the individual layers and adjustments.
To ensure that you save your work properly, it’s recommended to save frequently, use descriptive file names, and choose the appropriate file format for your needs. According to Adobe’s best practices, saving your work properly is essential for maintaining the integrity of your images and ensuring that you can access and edit them in the future.
7. How To Stay Updated With The Latest Photoshop Editing Techniques And Trends?
Staying updated with the latest Photoshop editing techniques and trends involves following industry blogs, attending workshops and conferences, and participating in online communities.
Staying updated with the latest Photoshop editing techniques and trends is essential for photographers and designers looking to stay competitive and push the boundaries of their creativity. Here are some strategies for staying in the know:
- Follow Industry Blogs: Subscribe to blogs and websites that cover Photoshop tutorials, tips, and news.
- Attend Workshops and Conferences: Attend workshops, seminars, and conferences to learn from industry experts and network with other professionals.
- Participate in Online Communities: Join online forums, social media groups, and communities dedicated to Photoshop and photo editing.
- Take Online Courses: Enroll in online courses and tutorials to learn new techniques and workflows.
- Experiment and Practice: Stay updated by experimenting with new features and techniques and practicing regularly.
By actively engaging in these activities, you can stay informed about the latest developments in Photoshop and continually improve your skills. According to industry leaders, lifelong learning is essential for success in the field of digital imaging.
7.1. What Are Some Reliable Online Resources For Learning Photoshop Editing?
Reliable online resources for learning Photoshop editing include Adobe’s official tutorials, websites like PhotoshopCAFE, and platforms like Skillshare and YouTube.
There are numerous online resources available for learning Photoshop editing, but some are more reliable and comprehensive than others. Here are some top recommendations:
- Adobe’s Official Tutorials: Adobe provides a wealth of tutorials, documentation, and support resources on its website.
- PhotoshopCAFE: PhotoshopCAFE offers a wide range of tutorials, tips, and tricks for Photoshop users of all skill levels.
- Skillshare: Skillshare offers a variety of Photoshop courses taught by industry professionals.
- YouTube: YouTube is a great resource for finding free Photoshop tutorials and demonstrations.
When choosing online resources, it’s important to look for reputable sources that provide accurate, up-to-date information and clear, easy-to-follow instructions. According to experienced Photoshop users, investing time in high-quality training resources can pay off in improved skills and greater confidence.
7.2. How Can Online Communities Help Improve Your Photoshop Skills?
Online communities can help improve your Photoshop skills by providing opportunities to learn from others, share your work, receive feedback, and stay motivated.
Online communities can be invaluable resources for improving your Photoshop skills. Here’s how they can help:
- Learning from Others: Online communities provide opportunities to learn from experienced Photoshop users, ask questions, and get advice.
- Sharing Your Work: Sharing your work with others allows you to get feedback and critique, helping you identify areas for improvement.
- Receiving Feedback: Constructive feedback from other community members can help you see your work from a fresh perspective and improve your skills.
- Staying Motivated: Participating in online communities can help you stay motivated and inspired by seeing the work of others and sharing your own progress.
By actively engaging in online communities, you can connect with like-minded individuals, learn new techniques, and grow as a Photoshop artist. According to community organizers, online communities are powerful platforms for collaboration, learning, and creative expression.
8. What Are The Ethical Considerations In Photo Editing?
Ethical considerations in photo editing involve maintaining honesty and transparency, avoiding manipulation that misrepresents reality, and respecting the privacy and rights of individuals in the images.
Ethical considerations play a crucial role in photo editing, ensuring that images are manipulated responsibly and with integrity. Here are some key ethical principles to consider:
- Honesty and Transparency: Be honest about the extent to which an image has been altered and avoid making changes that misrepresent reality.
- Respect for Privacy: Respect the privacy and rights of individuals in the images and avoid using photo editing to create defamatory or harmful content.
- Avoiding Manipulation: Avoid manipulating images in a way that deceives or misleads viewers, especially in journalistic or documentary contexts.
- Attribution: Give credit to the original photographer and any other contributors involved in the creation of the image.
By adhering to these ethical principles, you can ensure that your photo editing practices are responsible, transparent, and respectful. According to media ethics experts, ethical photo editing is essential for maintaining trust and credibility in the digital age.
8.1. What Is The Difference Between Ethical And Unethical Photo Manipulation?
The difference between ethical and unethical photo manipulation lies in the intent and impact of the changes made. Ethical manipulation enhances or corrects the image without misrepresenting reality, while unethical manipulation deceives or misleads viewers.
The distinction between ethical and unethical photo manipulation lies in the intent and impact of the changes made. Ethical photo manipulation enhances or corrects the image without misrepresenting reality, while unethical photo manipulation deceives or misleads viewers. Examples of ethical manipulation include adjusting exposure, contrast, and color balance to improve the overall quality of the image. Examples of unethical manipulation include adding or removing objects, altering facial features, or creating false narratives. According to media ethics experts, the key to ethical photo manipulation is to be transparent about the changes made and to avoid using images to deceive or harm others.
8.2. How To Ensure Authenticity And Avoid Misrepresentation In Photo Editing?
To ensure authenticity and avoid misrepresentation in photo editing, document your editing process, avoid making drastic changes that alter the original context, and disclose any significant manipulations to viewers.
Ensuring authenticity and avoiding misrepresentation in photo editing is crucial for maintaining trust and credibility. Here are some strategies for upholding ethical standards:
- Document Your Editing Process: Keep a record of the changes you make to an image so you can demonstrate the extent of your manipulations.
- Avoid Drastic Changes: Refrain from making extreme alterations that fundamentally change the original context or meaning of the image.
- Disclose Manipulations: Be transparent about any significant manipulations you’ve made to the image, especially in journalistic or documentary contexts.
By following these guidelines, you can ensure that your photo editing practices are responsible, transparent, and respectful of the truth. According to media ethics experts, authenticity is paramount in visual communication.
9. How Does Photoshop Integrate With Other Adobe Creative Cloud Apps?
Photoshop seamlessly integrates with other Adobe Creative Cloud apps like Lightroom, Illustrator, and InDesign, allowing for a smooth workflow across different creative tasks.
Photoshop’s integration with other Adobe Creative Cloud apps enhances the overall creative workflow, enabling seamless collaboration and efficient project management. Here are some key integration points:
- Lightroom: Photoshop and Lightroom work together to streamline the photo editing process. You can easily move images between the two apps for raw processing, retouching, and advanced editing.
- Illustrator: Photoshop integrates with Illustrator for creating composite images, adding raster effects to vector graphics, and preparing designs for print or web.
- InDesign: Photoshop integrates with InDesign for creating layouts, brochures, and other print materials. You can place Photoshop images directly into InDesign documents and maintain a dynamic link between the two apps.
This integration streamlines the creative process, allowing you to leverage the strengths of each application and create stunning visual content. According to Adobe’s official documentation, the integration between Creative Cloud apps is designed to enhance productivity and creativity.
9.1. How To Use Photoshop And Lightroom Together For Photo Editing?
To use Photoshop and Lightroom together for photo editing, start by organizing and making initial adjustments in Lightroom, then seamlessly transition to Photoshop for advanced retouching and complex manipulations before returning to Lightroom for final adjustments and export.
Photoshop and Lightroom are powerful tools that can be used together to create stunning images. Here’s a typical workflow:
- Organize and Import in Lightroom: Start by importing and organizing your photos in Lightroom, adding metadata, and making initial adjustments to exposure, contrast, and white balance.
- Edit in Photoshop: For advanced retouching, complex manipulations, or tasks that require layers and masks, seamlessly transition to Photoshop by selecting “Edit in Photoshop” from Lightroom.
- Retouch and Manipulate: In Photoshop, perform advanced editing tasks such as removing blemishes, compositing images, and applying artistic effects.
- Save and Return to Lightroom: Save your changes in Photoshop and return to Lightroom, where the edited image will automatically appear in your library.
- Final Adjustments and Export: Make any final adjustments in Lightroom and export the image in the desired format for print or web.
By using Photoshop and Lightroom together, you can leverage the strengths of each application and create polished, professional-looking images. According to Adobe’s experts, this workflow is ideal for photographers who want to combine the organizational and raw processing capabilities of Lightroom with the advanced editing features of Photoshop.
9.2. How To Import Photoshop Files Into Illustrator And InDesign?
To import Photoshop files into Illustrator and InDesign, use the Place command to insert the files into your documents, maintaining flexibility and control over the image’s appearance and linking options.
Importing Photoshop files into Illustrator and InDesign is a straightforward process that allows you to integrate raster images into vector-based designs and layouts. Here’s how:
- Illustrator: In Illustrator, go to File > Place and select the Photoshop file you want to import. You can choose to embed the image or link to it. Embedding the image adds it to the Illustrator document, while linking keeps the image as a separate file that is referenced by the Illustrator document.
- InDesign: In InDesign, go to File > Place and select the Photoshop file you want to import. You can also drag and drop the Photoshop file directly into the InDesign document. Like Illustrator, you can choose to embed the image or link to it.
When importing Photoshop files into Illustrator and InDesign, it’s important to consider factors such as image resolution, color mode, and file format to ensure optimal results. According to Adobe’s documentation, linking to Photoshop files is generally recommended for collaborative workflows, as it allows you to update the image in Photoshop and have the changes automatically reflected in the Illustrator or InDesign document.
10. What Are The Hardware And Software Requirements For Photo Editing In Photoshop?
The hardware and software requirements for photo editing in Photoshop include a computer with a powerful processor, ample RAM, a dedicated graphics card, and a high-resolution monitor, as well as a licensed copy of Adobe Photoshop.
To ensure a smooth and efficient photo editing experience in Photoshop, it’s important to have a computer that meets the recommended hardware and software requirements. Here’s a breakdown of the key specifications:
- Processor: A multi-core processor with a high clock speed is essential for handling complex editing tasks.
- RAM: Ample RAM (16GB or more) is needed to prevent slowdowns and ensure smooth performance, especially when working with large images.
- Graphics Card: A dedicated graphics card with its own memory can significantly improve performance, especially when using GPU-accelerated features.
- Monitor: A high-resolution monitor with accurate color reproduction is crucial for making precise edits and evaluating the final result.
In addition to hardware, you’ll also need a licensed copy of Adobe Photoshop, which can be obtained through a subscription to Adobe Creative Cloud. According to Adobe’s official system requirements, meeting or exceeding these specifications will ensure that you can take full advantage of Photoshop’s features and capabilities.
Frequently Asked Questions (FAQs)
1. What Is The Best Way To Learn Photoshop For Photo Editing?
The best way to learn Photoshop for photo editing is to combine structured learning resources with hands-on practice, focusing on the tools and techniques that are most relevant to your goals.
2. Can I Use Photoshop On My Mobile Device For Photo Editing?
Yes, Adobe offers mobile versions of Photoshop, such as Photoshop Express and Photoshop Mix, which allow you to perform basic photo editing tasks on your mobile device.
3. How Do I Remove Blemishes And Imperfections In Photoshop?
You can remove blemishes and imperfections in Photoshop using tools like the Spot Healing Brush, Healing Brush, and Clone Stamp.
4. What Is The Best File Format To Save My Edited Photos In Photoshop?
The best file format to save your edited photos in Photoshop depends on your needs. PSD is ideal for preserving layers and future editing, JPEG is suitable for web use and sharing, and TIFF is recommended for high-quality printing.
5. How Can I Resize Images In Photoshop Without Losing Quality?
You can resize images in Photoshop without losing quality by using the Image Size dialog box and choosing an appropriate resampling method, such as Bicubic Smoother for enlargement or Bicubic Sharper for reduction.
6. How To Straighten A Photo In Photoshop?
To straighten a photo in Photoshop, use the Crop Tool and rotate the image until the horizon is level, or use the Ruler Tool to draw a line along the horizon and then choose Image > Image Rotation > Arbitrary.
7. What Is Content-Aware Fill In Photoshop And How Does It Work?
Content-Aware Fill in Photoshop is a feature that allows you to seamlessly remove unwanted objects from an image by filling the selected area with surrounding pixels. It works by analyzing the surrounding content and generating new pixels that blend seamlessly with the existing image.
8. How Can I Create A Black And White Photo In Photoshop?
You can create a black and white photo in Photoshop by using the Black & White adjustment layer, which allows you to fine-tune the