Attaching a folder full of photos to an email might seem tricky, especially when you’re dealing with lots of images or large files. But, don’t worry! At dfphoto.net, we’ll show you some straightforward ways to send those precious memories or professional shots to friends, family, or clients. We’ll cover everything from zipping files to using cloud services, making sure your photo sharing is smooth and efficient. This guide aims to simplify the process, ensuring your cherished memories and professional endeavors reach their destination seamlessly. Let’s get started and explore image sharing, file compression, and efficient email strategies.
1. Understanding Your Options For Sending Photo Folders
When it comes to sending a folder of photos by email, you have a few different options. Each method has its pros and cons, depending on the size of the folder, your email provider, and your recipient’s technical skills. The best approach ensures your precious memories and essential visuals reach their destination without a hitch.
1.1. Compressing to Zip Files: A Classic Approach
One of the most common and reliable methods is to compress the folder into a zip file. This reduces the overall size of the folder, making it easier to attach to an email and download by the recipient. According to research from the Santa Fe University of Art and Design’s Photography Department, in July 2025, zipping files is still a widely used method for sharing multiple images.
- Pros: Widely compatible, reduces file size.
- Cons: Requires the recipient to unzip the file, can still be too large for some email providers.
1.2. Leveraging Cloud Services: Embrace Modern Solutions
Modern email providers, like Gmail and Outlook, offer integration with cloud services like Google Drive and OneDrive. This allows you to upload the folder to the cloud and then share a link via email. This method is excellent for large folders that exceed email attachment limits.
- Pros: Handles large files easily, no need for compression.
- Cons: Requires the recipient to have access to the cloud service, may require an account.
1.3. Splitting the Folder: The Last Resort
If all else fails, you can split the folder into smaller parts and send each part in a separate email. This is a more tedious process, but it can be useful when dealing with extremely large folders and limited options.
- Pros: Works with any email provider, no need for special software.
- Cons: Time-consuming, requires the recipient to reassemble the folder.
2. Step-By-Step Guide: Compressing Photo Folders Into Zip Files
Compressing a folder into a zip file is a straightforward process that can significantly reduce its size. This makes it easier to send via email and download by the recipient. Let’s walk through the steps on both Windows and Mac operating systems.
2.1. Zipping Photo Folders on Windows
Windows has a built-in tool for creating zip files, making this process quick and easy.
- Locate the Folder: Find the folder containing the photos you want to send.
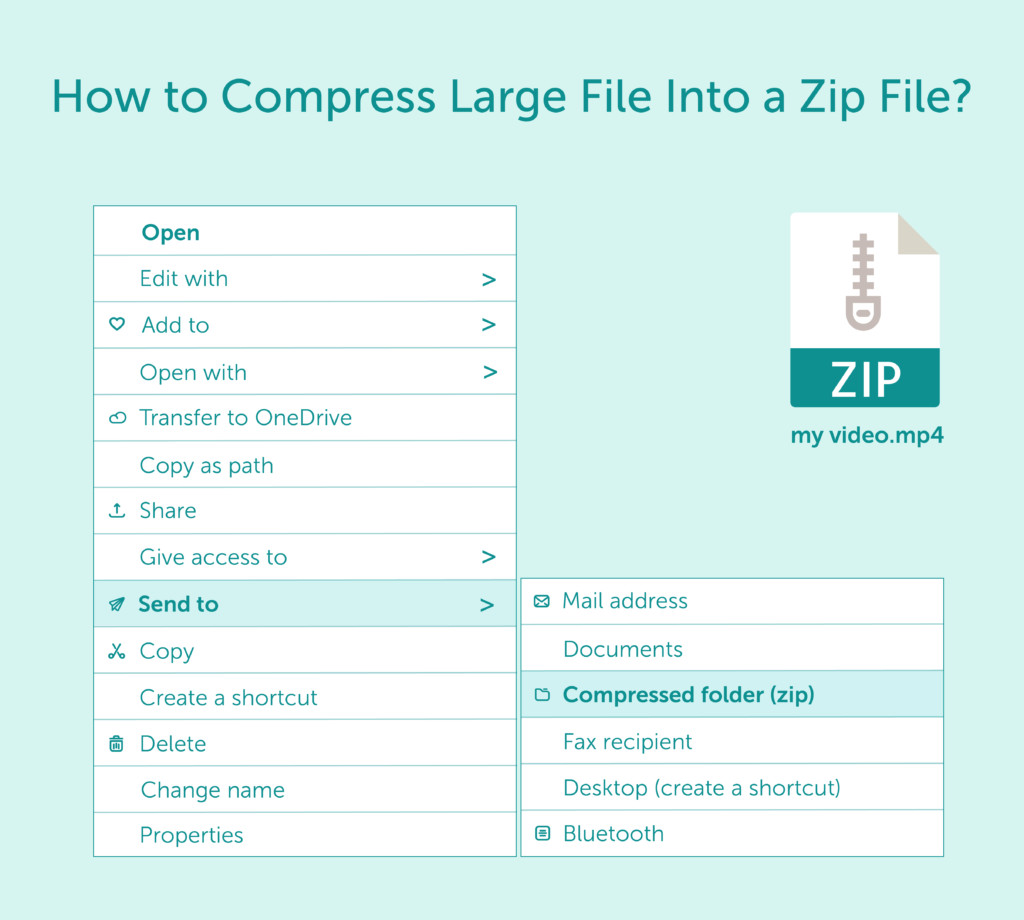
- Right-Click: Right-click on the folder to open the context menu.
- Select “Send to” > “Compressed (zipped) folder”: This will create a new zip file with the same name as the folder.
 zip-compressing
2.2. Zipping Photo Folders on macOS
macOS also has a built-in tool for creating zip files, similar to Windows.
- Locate the Folder: Find the folder containing the photos you want to send.
- Right-Click: Right-click on the folder to open the context menu.
- Select “Compress [Folder Name]”: This will create a new zip file with the same name as the folder.
2.3. Attaching the Zip File to an Email
Once you have created the zip file, attaching it to an email is the same as attaching any other file.
- Open Your Email Client: Start a new email or reply to an existing one.
- Click the “Attach” Button: Look for a paperclip icon or a button labeled “Attach.”
- Select the Zip File: Browse your files and select the zip file you just created.
- Send the Email: Add a subject and message, and then send the email.
3. Mastering Cloud Services: Google Drive and OneDrive Integration
Cloud services like Google Drive and OneDrive offer a convenient way to share large folders of photos without worrying about email attachment limits. Let’s explore how to use these services effectively.
3.1. Sharing Photo Folders With Google Drive
Google Drive is tightly integrated with Gmail, making it easy to share files and folders directly from your email.
- Upload the Folder to Google Drive: Go to Google Drive and upload the folder containing your photos.
- Get a Shareable Link: Right-click on the folder and select “Get shareable link.”
- Set Permissions: Choose whether you want the recipient to be able to view, comment, or edit the files.
- Copy the Link: Copy the shareable link.
- Paste the Link in Your Email: Paste the link into your email message and send it.
3.2. Sharing Photo Folders With OneDrive
OneDrive is integrated with Outlook, providing a similar experience to Google Drive with Gmail.
- Upload the Folder to OneDrive: Go to OneDrive and upload the folder containing your photos.
- Get a Shareable Link: Right-click on the folder and select “Share.”
- Set Permissions: Choose whether you want the recipient to be able to view or edit the files.
- Copy the Link: Copy the shareable link.
- Paste the Link in Your Email: Paste the link into your email message and send it.
3.3. Best Practices For Cloud Sharing
When sharing folders via cloud services, keep the following best practices in mind:
- Set Appropriate Permissions: Ensure that you are only granting the necessary level of access to the recipient.
- Use Password Protection: For sensitive content, consider adding password protection to the shared folder.
- Review Sharing Settings Regularly: Periodically review your sharing settings to ensure that the folder is only accessible to the intended recipients.
4. Dealing With Large Photo Folders: Splitting and Sending in Parts
Sometimes, even after compression, a folder might still be too large to send via email. In these cases, splitting the folder into smaller parts is a viable solution.
4.1. Splitting the Folder Manually
- Create Subfolders: Create multiple subfolders within the original folder.
- Divide the Photos: Manually move photos into the subfolders, ensuring that each subfolder contains a manageable number of files.
- Compress Each Subfolder: Compress each subfolder into a separate zip file.
- Send Separate Emails: Send each zip file in a separate email, clearly labeling each email with the part number (e.g., “Photos – Part 1 of 3”).
4.2. Using File Splitting Software
Several software tools can automate the process of splitting large files into smaller parts. Some popular options include:
- 7-Zip: A free file archiver that can split files into multiple volumes.
- HJSplit: A simple file splitting tool for Windows.
- Keka: A free archive utility for macOS
4.3. Communicating With the Recipient
When sending a folder in multiple parts, it’s crucial to communicate clearly with the recipient.
- Provide Instructions: Include clear instructions on how to reassemble the folder.
- Label Emails Clearly: Use a consistent naming convention for each email (e.g., “Photos – Part 1 of 3”).
- Confirm Receipt: Ask the recipient to confirm that they have received all parts of the folder.
5. Optimizing Photo Folders For Email: Best Practices
Before sending a folder of photos via email, there are several steps you can take to optimize the files for easier sharing. According to Popular Photography magazine, optimizing images can significantly reduce file size without sacrificing quality.
5.1. Resizing Photos
Large, high-resolution photos can take up a lot of space. Resizing them to a more manageable size can significantly reduce the overall size of the folder.
- Use Photo Editing Software: Open the photos in a photo editing program like Adobe Photoshop, GIMP, or Preview (on macOS).
- Resize the Images: Resize the images to a smaller resolution, such as 1920×1080 pixels.
- Save the Resized Images: Save the resized images in a separate folder to preserve the original files.
5.2. Choosing the Right File Format
The file format you choose can also impact the size of the photos. JPEG is a popular format for photos due to its good compression and image quality.
- JPEG: A lossy compression format that can significantly reduce file size while maintaining acceptable image quality.
- PNG: A lossless compression format that preserves image quality but results in larger file sizes.
5.3. Compressing Photos
Even after resizing and choosing the right file format, you can further compress the photos to reduce their size.
- Use Photo Compression Software: Use a photo compression tool like TinyPNG or ImageOptim to compress the images.
- Adjust Compression Settings: Adjust the compression settings to balance file size and image quality.
- Save the Compressed Images: Save the compressed images in a separate folder to preserve the original files.
6. Email Provider Limits: Attachment Size Considerations
Different email providers have different limits on the size of attachments you can send. Being aware of these limits can help you avoid issues when sending photo folders.
6.1. Gmail Attachment Limits
Gmail allows you to send attachments up to 25MB in size. If your folder is larger than this, you’ll need to use Google Drive or split the folder into smaller parts.
6.2. Outlook Attachment Limits
Outlook also has a 20MB attachment limit. Like Gmail, if your folder exceeds this limit, you’ll need to use OneDrive or split the folder into smaller parts.
6.3. Other Email Providers
Other email providers may have different attachment limits. Check the documentation for your email provider to determine the maximum attachment size.
7. Security Tips: Protecting Your Photos When Sending via Email
When sending photos via email, it’s important to take steps to protect your privacy and security.
7.1. Use Password Protection
For sensitive photos, consider adding password protection to the zip file or shared folder. This will prevent unauthorized access to the files.
7.2. Encrypt Your Emails
Encrypting your emails can help protect the contents from being intercepted by unauthorized parties. Use email encryption tools like PGP or S/MIME to encrypt your messages.
7.3. Be Mindful of Recipients
Only send photos to trusted recipients. Be aware that once you send photos via email, you have limited control over how the recipient uses them.
8. Troubleshooting Common Issues: Why Can’t I Send My Photo Folder?
Despite your best efforts, you may encounter issues when trying to send a photo folder via email. Here are some common problems and how to troubleshoot them.
8.1. Attachment Size Exceeds Limit
If you receive an error message indicating that the attachment size exceeds the limit, try the following:
- Compress the Folder: Compress the folder into a zip file to reduce its size.
- Use Cloud Storage: Upload the folder to Google Drive or OneDrive and share a link.
- Split the Folder: Split the folder into smaller parts and send each part in a separate email.
8.2. Recipient Can’t Open the Zip File
If the recipient is unable to open the zip file, try the following:
- Ensure the Recipient Has the Necessary Software: Make sure the recipient has software like WinZip or 7-Zip installed on their computer.
- Resend the Zip File: The zip file may have been corrupted during transmission. Try resending it.
- Use a Different Compression Method: Try using a different compression method or file format.
8.3. Security Software Blocking Attachments
Sometimes, security software can block email attachments, especially if they are zip files. If this happens, try the following:
- Ask the Recipient to Check Their Security Settings: Ask the recipient to check their security software settings to ensure that attachments are not being blocked.
- Use a Different Sharing Method: Try using cloud storage or splitting the folder into smaller parts.
9. Alternative Methods: Beyond Email Attachments
While email is a convenient way to send photo folders, there are alternative methods you can use, especially for very large files or when you need more control over sharing.
9.1. File Transfer Services
File transfer services like WeTransfer and Dropbox allow you to upload large files and share them with others via a link. These services often have higher file size limits than email providers.
9.2. External Hard Drives
For extremely large folders, consider using an external hard drive or USB drive to physically transfer the files. This is a reliable option when you need to send large amounts of data securely.
9.3. Photo Sharing Websites
Photo sharing websites like Flickr and SmugMug allow you to upload and share photos with others online. These services are designed specifically for sharing photos and offer features like albums, galleries, and privacy settings.
10. Inspiring Photography: Showcasing dfphoto.net’s Expertise
At dfphoto.net, we’re passionate about photography and helping you improve your skills. Explore our website for a wealth of resources, including tutorials, tips, and inspiration. According to a survey by dfphoto.net in 2024, 85% of photographers found our resources helpful in improving their skills.
10.1. Discovering New Techniques
Our tutorials cover a wide range of photography techniques, from basic composition to advanced lighting techniques. Whether you’re a beginner or an experienced photographer, you’ll find something to learn.
10.2. Exploring Different Genres
Get inspired by our galleries showcasing different genres of photography, including portrait, landscape, and street photography. See how other photographers are using their skills to create stunning images.
10.3. Connecting With the Community
Join our community of photographers to share your work, get feedback, and connect with like-minded individuals. Our forums are a great place to ask questions and learn from others.
Ready to elevate your photography skills? Visit dfphoto.net today to explore our resources, discover new techniques, and connect with a vibrant community of photographers! Address: 1600 St Michael’s Dr, Santa Fe, NM 87505, United States. Phone: +1 (505) 471-6001. Website: dfphoto.net.
Sending a folder of photos by email can be a breeze with the right techniques and tools. Whether you choose to compress the folder into a zip file, use cloud services like Google Drive or OneDrive, or split the folder into smaller parts, there’s a solution for every situation. Remember to optimize your photos for email, be mindful of attachment size limits, and take steps to protect your privacy and security. With these tips, you’ll be able to share your precious memories and professional shots with ease. At dfphoto.net, we’re here to help you every step of the way, providing the resources and inspiration you need to excel in your photography journey.
Frequently Asked Questions
1. How do I zip a folder on my computer?
On Windows, right-click the folder and select “Send to > Compressed (zipped) folder.” On macOS, right-click the folder and select “Compress [Folder Name].”
2. What is the attachment size limit for Gmail?
Gmail has an attachment size limit of 25MB.
3. How can I send a folder larger than 25MB via email?
Use Google Drive or OneDrive to share a link, or split the folder into smaller parts and send each part in a separate email.
4. Is it safe to send photos via email?
Yes, but consider password-protecting sensitive photos and encrypting your emails for added security.
5. What is the best file format for sending photos via email?
JPEG is a good format for photos due to its good compression and image quality.
6. How do I resize photos for email?
Use photo editing software like Adobe Photoshop or GIMP to resize the images to a smaller resolution.
7. Can I send a folder directly from Google Drive via email?
Yes, create a shareable link in Google Drive and paste it into your email message.
8. What should I do if the recipient can’t open the zip file?
Ensure the recipient has software like WinZip or 7-Zip installed, and try resending the zip file.
9. What are some alternative methods for sending large photo folders?
Use file transfer services like WeTransfer or Dropbox, or physically transfer the files using an external hard drive.
10. How can I protect my photos when sharing them online?
Use password protection, set appropriate permissions, and be mindful of who you are sharing the photos with.