Want to free up space on your Android device and safeguard your precious memories? Saving photos to an SD card is a fantastic solution, and dfphoto.net is here to guide you through the process. This article explores various methods for transferring your images, ensuring they’re safely stored and easily accessible. Discover techniques to manage your digital assets effectively, implement automatic photo backups, and delve into data security for your peace of mind.
1. Why Save Photos to an SD Card?
Saving photos to an SD card offers several compelling advantages, especially for photography enthusiasts and those who cherish their visual memories.
- Increased Storage Capacity: SD cards provide additional storage space, allowing you to capture more high-resolution photos and videos without worrying about running out of space on your device.
- Backup and Security: SD cards act as a secure backup for your precious photos, protecting them from accidental deletion, device malfunction, or data loss.
- Easy Transfer: SD cards make it simple to transfer photos between devices, such as your phone, camera, and computer, streamlining your workflow.
- Organization: SD cards allow you to organize your photos into folders and albums, making it easier to find and manage your collection.
2. Understanding SD Card Basics
Before diving into the methods of saving photos to an SD card, it’s essential to understand the basics.
- SD Card Types: SD cards come in various types, including SD, SDHC, and SDXC, each with different storage capacities. SD cards range from 2GB, SDHC cards from 2GB to 32GB, and SDXC cards from 32GB to 2TB.
- Speed Class: SD cards have speed classes that indicate their minimum write speed. Higher speed classes are ideal for recording high-resolution videos and capturing burst photos. The classes are rated from Class 2 (slowest) to Class 10 (fastest). UHS (Ultra High Speed) ratings are another class. UHS-I and UHS-II cards are even faster, supporting faster data transfer rates.
- Compatibility: Ensure that your device supports the type and capacity of SD card you choose. Check your device’s manual for compatibility information.
3. Methods for Saving Photos to an SD Card
There are several methods for saving photos to an SD card, each with its own advantages and considerations.
3.1. Direct Transfer Using Android’s File Manager
Most Android devices have a built-in file manager app that allows you to directly transfer photos to an SD card.
-
Insert the SD Card: Ensure your SD card is properly inserted into your Android device’s SD card slot.
-
Open the File Manager: Locate and open the file manager app on your device (often named “Files” or “File Manager”).
-
Navigate to Internal Storage: In the file manager, navigate to the internal storage where your photos are stored (usually the “DCIM” folder).
Navigating to Internal Storage on Android allows users to locate and manage photos saved directly on their device.
-
Select Photos: Select the photos you want to transfer to the SD card. You can usually select multiple photos by tapping and holding on each one.
-
Move or Copy: Tap the “Move” or “Copy” option (the specific wording may vary depending on your device).
-
Navigate to SD Card: In the file manager, navigate to your SD card and choose a destination folder (you can create a new folder if needed).
-
Paste or Transfer: Tap the “Paste” or “Transfer” option to move or copy the selected photos to the SD card.
Pros:
- Simple and straightforward
- No computer required
- Direct control over which photos are transferred
Cons:
- Can be time-consuming for large numbers of photos
- Album structure and date order might not be preserved
3.2. Changing the Default Camera Save Location
To automatically save new photos directly to your SD card, you can change the default camera save location in your camera app’s settings.
-
Open the Camera App: Launch your device’s camera app.
-
Open Settings: Look for the settings icon (usually a gear or three dots) and tap it to open the camera settings.
-
Find Storage Settings: Look for a setting related to storage, such as “Storage Location,” “Save Location,” or “Data Storage.”
Changing the default camera save location on Android ensures that new photos are automatically stored on the SD card, saving internal storage.
-
Select SD Card: Choose “SD Card” or “Memory Card” as the default storage location.
-
Take Photos: New photos you take will now be automatically saved to the SD card.
Pros:
- Photos are automatically saved to the SD card
- No manual transfer required
- Saves time and effort
Cons:
- Requires toggling the setting if you sometimes want to save to internal storage
- Not all Android phones allow changing the default save location
3.3. Using an SD Card Reader
An SD card reader allows you to connect an SD card directly to your Android device via a USB port.
-
Get an SD Card Reader: Purchase a USB to SD card reader that is compatible with your Android device (USB-C or Micro-USB).
-
Insert the SD Card: Insert your SD card into the SD card reader.
-
Connect to Device: Plug the SD card reader into your Android device’s USB port.
-
Open the File Manager: Open the file manager app on your device.
-
Navigate to SD Card: In the file manager, you should see the SD card as an external storage device.
-
Transfer Photos: Transfer photos between your internal storage and the SD card using the “Move” or “Copy” options, as described in the “Direct Transfer” method.
Moving photos from Android to an external SD card via an adapter enables users to manage their files efficiently.
Pros:
- Works with devices that don’t have built-in SD card slots
- Fast transfer speeds
- No computer required
Cons:
- Requires purchasing an SD card reader
- Need to manage the SD card reader and the SD card
3.4. Using a Computer
You can also transfer photos to an SD card using a computer.
- Connect SD Card to Computer: Insert the SD card into your computer’s SD card slot or use an SD card reader.
- Connect Android to Computer: Connect your Android device to your computer using a USB cable.
- Open File Explorer (Windows) or Finder (Mac): Open the file explorer on your computer.
- Locate Android Device: Your Android device should appear as a connected device in the file explorer.
- Navigate to Photos: Navigate to the folder on your Android device where your photos are stored (usually the “DCIM” folder).
- Copy Photos: Copy the photos you want to transfer to your computer.
- Paste to SD Card: Open the SD card in the file explorer and paste the copied photos into a folder on the SD card.
Pros:
- Convenient for transferring large numbers of photos
- Can use computer’s file management tools for organization
- Allows backing up photos to both the SD card and computer
Cons:
- Requires a computer and USB cable
- Can be slower than direct transfer methods
4. Using Droid Transfer to Save Photos to SD Card via PC
For a seamless and efficient way to transfer photos from your Android device to an SD card, consider using Droid Transfer. This software simplifies the process with a user-friendly interface and advanced features.
-
Connect the SD Card to Your Computer: Ensure your SD card is connected to your computer, either through a built-in slot or an SD card reader.
-
Download and Install Droid Transfer: Download and install the Droid Transfer software on your computer from the Wide Angle Software website. Also, download the free Transfer Companion app on your Android device.
Droid Transferfor Windows DOWNLOAD Droid Transfer
Transfer Companionfor Android -
Launch Droid Transfer and Connect Your Android Device: Open Droid Transfer on your computer and follow the on-screen instructions to connect your Android device via Wi-Fi. This usually involves scanning a QR code with the Transfer Companion app on your phone.
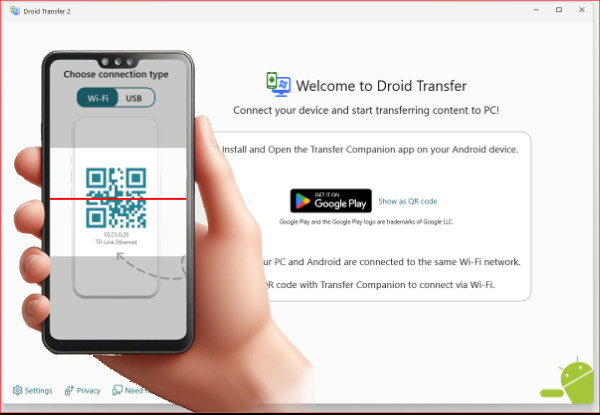 Connect Android to PC via Wifi
Connecting Android to PC via Wi-Fi enhances the convenience of transferring files.
-
Select Photos: In Droid Transfer, click on the “Photos” tab to view all the photos on your Android device.
Selecting the photos feature in Droid Transfer simplifies photo management and transfer.
-
Choose Photos to Transfer: Select the specific photos you want to transfer to your SD card. You can filter by photos, videos, and albums.
Selecting specific photos to copy in Droid Transfer allows for efficient file management.
-
Save to PC: Click the “Save to PC” button and choose the SD card as the destination. Select the specific location on your SD card where you want to save the photos.
With Droid Transfer, you can also back up photos from SMS and MMS messages, transfer other types of files, and even copy only new photos to your SD card, avoiding duplicates.
Pros:
- Organizes media files into albums and categories for effortless navigation and transfer.
- Ability to filter by photos, videos, and albums
- Preserves album structure
- Can copy only new photos
- Can copy photos from SMS and MMS messages
- Can transfer other types of files
Cons:
- Requires a computer
- Requires installing software
5. Tips for Managing Photos on Your SD Card
Once you’ve saved your photos to an SD card, here are some tips for managing them effectively:
- Create Folders: Organize your photos into folders based on date, event, or category. This makes it easier to find specific photos later.
- Rename Files: Rename your photo files with descriptive names that include the date, event, or subject. This helps with searching and organization.
- Backup Your SD Card: Consider creating a backup of your SD card on your computer or an external hard drive. This provides an extra layer of protection against data loss.
- Regularly Review and Delete: Periodically review the photos on your SD card and delete any duplicates, blurry images, or unwanted files. This helps free up space and keep your collection organized.
- Use Cloud Storage in Combination: Services such as Google Photos and iCloud allow you to set up auto-syncing and save your content to the cloud in tandem with your SD card.
6. Troubleshooting Common Issues
Here are some common issues you might encounter when saving photos to an SD card and how to troubleshoot them:
- SD Card Not Recognized: If your device doesn’t recognize the SD card, try removing and reinserting it. Also, make sure the SD card is compatible with your device.
- Insufficient Storage Space: If you run out of storage space on your SD card, consider upgrading to a larger capacity card or deleting unnecessary files.
- Slow Transfer Speeds: Slow transfer speeds can be caused by a slow SD card or a slow connection between your device and the SD card. Try using a faster SD card or a different transfer method.
- Photos Not Showing Up: If your photos don’t show up after transferring them to the SD card, make sure they are in a supported format (such as JPEG or PNG) and that they are located in a folder that your device can access.
7. Data Security
Data security is paramount when storing your photos on an SD card. Follow these steps to ensure your data is protected.
- Encryption: Encrypt your SD card to protect your photos from unauthorized access. Most Android devices have a built-in encryption feature that you can enable in the settings.
- Physical Security: Keep your SD card in a safe place to prevent it from being lost or stolen.
- Regular Backups: Regularly back up your SD card to a secure location, such as a computer or cloud storage service. This ensures that you have a copy of your photos in case the SD card is lost, damaged, or corrupted.
8. Understanding SD Card Maintenance
Proper maintenance of your SD card is crucial for longevity and reliability.
- Avoid Extreme Temperatures: Don’t expose your SD card to extreme temperatures.
- Safeguard Against Moisture: Keep your SD card away from moisture.
- Handle With Care: Handle your SD card with care to prevent physical damage.
- Regularly Format: Format your SD card periodically to optimize performance.
- Avoid Full Storage: Prevent storing the memory card at full capacity.
9. Exploring Photography Techniques
While managing storage is essential, enhancing your photography skills can elevate your images. Consider exploring the following techniques:
-
Rule of Thirds: A basic rule of composition.
-
Leading Lines: Use lines to draw the viewer’s eye.
-
Depth of Field: Control the focus to create stunning effects.
-
Exposure: Adjust the brightness and darkness of your photos.
-
White Balance: Correct the color temperature.
10. Keeping Up With Trends in Photography
Stay informed about the latest trends in photography.
- Smartphone Photography: Mobile photography is becoming increasingly popular.
- Drone Photography: Capture aerial perspectives.
- Virtual Reality (VR) Photography: Create immersive experiences.
- Artificial Intelligence (AI) Photography: Use AI to enhance your photos.
- Portrait Photography: Capture expressive images of people.
- Landscape Photography: Explore stunning outdoor settings.
FAQ: Saving Photos to SD Cards
- Question 1: How can I automatically save new photos to my SD card?
Answer: You can automatically save new photos to your SD card by changing the default camera save location in your camera app’s settings. Look for the “Storage Location” or “Save Location” option and select “SD Card”. - Question 2: Can I transfer photos to my SD card without a computer?
Answer: Yes, you can transfer photos to your SD card without a computer by using Android’s file manager app or an SD card reader. - Question 3: What should I do if my SD card is not recognized by my Android device?
Answer: If your SD card is not recognized, try removing and reinserting it. Also, make sure the SD card is compatible with your device and that it is properly formatted. - Question 4: How do I encrypt my SD card to protect my photos?
Answer: You can encrypt your SD card in your Android device’s settings. Look for the “Encryption” or “Security” option and follow the on-screen instructions. - Question 5: What is the best way to organize my photos on an SD card?
Answer: The best way to organize your photos is to create folders based on date, event, or category. You can also rename your photo files with descriptive names. - Question 6: How often should I back up my SD card?
Answer: You should back up your SD card regularly, ideally every few weeks or months, depending on how frequently you take photos. - Question 7: What should I do if my SD card becomes corrupted?
Answer: If your SD card becomes corrupted, you can try using data recovery software to recover your photos. However, data recovery is not always guaranteed. - Question 8: What is the difference between SD, SDHC, and SDXC cards?
Answer: SD cards have a maximum capacity of 2GB, SDHC cards range from 2GB to 32GB, and SDXC cards range from 32GB to 2TB. SDXC cards generally offer faster transfer speeds than SD and SDHC cards. - Question 9: Can I use an SD card reader with any Android device?
Answer: Most Android devices that support USB OTG (On-The-Go) can use an SD card reader. However, it is important to check your device’s specifications to ensure compatibility. - Question 10: Will saving photos to my SD card improve my phone’s performance?
Answer: Yes, saving photos to your SD card can improve your phone’s performance by freeing up internal storage space. This can help your phone run faster and more smoothly.
Conclusion
Saving photos to an SD card is a simple and effective way to expand your device’s storage capacity, back up your precious memories, and easily transfer photos between devices. Whether you prefer to transfer photos directly using Android’s file manager, change the default camera save location, use an SD card reader, or leverage the power of Droid Transfer, there’s a method that’s right for you.
By following the tips and troubleshooting advice in this guide, you can ensure that your photos are safely stored, well-organized, and easily accessible. Visit dfphoto.net to discover even more photography tips, explore stunning galleries, and connect with a vibrant community of photography enthusiasts. Let your creativity flourish, and capture the world through your lens!
Address: 1600 St Michael’s Dr, Santa Fe, NM 87505, United States.
Phone: +1 (505) 471-6001.
Website: dfphoto.net.