Retrieving your cherished photographs is possible through various methods, including checking your recently deleted album, unhiding photos, enabling iCloud Photos, and verifying your Apple Account; dfphoto.net is here to help you explore each avenue with detailed instructions and expert tips. This guide provides you with all the knowledge to navigate photo recovery effectively, ensuring you never lose your precious memories. By exploring techniques, such as digging into hidden albums and understanding cloud settings, you’ll enhance your digital stewardship, backed by resources for photography and visual arts.
1. Checking Your Recently Deleted Album
Did you know that when you delete a photo or video, it doesn’t immediately disappear? It goes to your Recently Deleted album, acting as a safety net for those accidental deletions. Understanding how to access and recover from this album is crucial.
1.1. On Your iPhone or iPad
It’s easy to recover photos from your recently deleted album on your iPhone or iPad.
- Open the Photos app: Start by launching the Photos application on your device.
- Swipe up, then tap Recently Deleted: Scroll down to the Utilities section and tap on “Recently Deleted.”
- Tap View Album: You might need to use Face ID or Touch ID to unlock the album, ensuring your privacy.
- Tap a photo or video, then tap Recover: Select the photos or videos you want to recover and tap “Recover.” To recover multiple items, tap “Select,” choose the desired files, tap the “More” button, and then tap “Recover.”
- Confirm that you want to recover the photos or videos: A prompt will ask you to confirm your action.
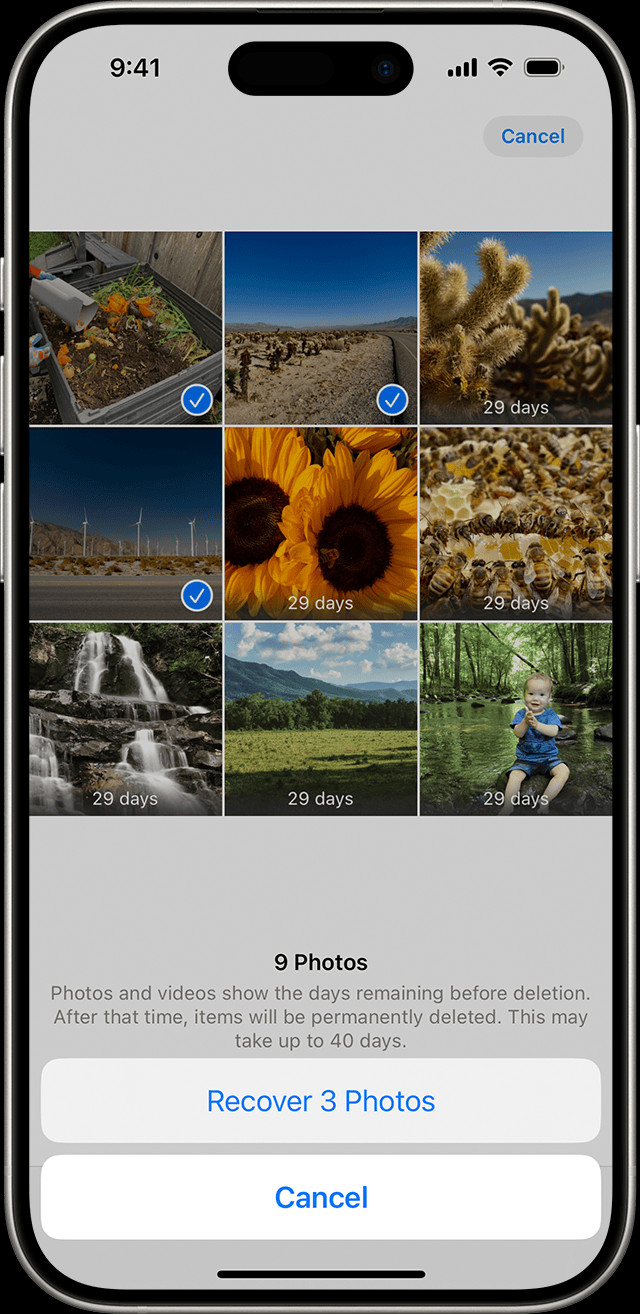 The Recently Deleted album in Photos on iPhone
1.2. On Your Mac
Recovering photos on your Mac is just as straightforward.
- Open Photos and select Recently Deleted: In macOS Ventura or later, find “Recently Deleted” in the sidebar’s Utilities section.
- Use Touch ID or your login password to unlock your Recently Deleted album: This step ensures that only you can access your recently deleted items.
- Click the photo or video: Select the file you wish to restore.
- Click Recover: The photo or video will be moved back to your main library.
1.3. On iCloud.com
You can even access your recently deleted photos via iCloud.com.
- Go to iCloud.com: Open your web browser and navigate to iCloud’s website.
- Sign in to your Apple Account: Enter your Apple ID and password.
- Tap or click Photos: Once signed in, select the “Photos” app.
- Select Recently Deleted in the sidebar: If you don’t see the sidebar, tap or click the Show Sidebar button in the upper-left corner.
- Select a photo, then tap or click Recover: Choose the photo and click “Recover” to restore it to your iCloud Photos library.
1.4. On Your Apple Vision Pro
If you’re using Apple Vision Pro, follow these steps:
- Open Photos, then tap Collections in the sidebar: Navigate to the “Photos” app and find the sidebar.
- Scroll down and tap Recently Deleted in the Utilities section: Look for the “Recently Deleted” option under Utilities.
- Tap View Album: Use Optic ID or your passcode to unlock your Recently Deleted album.
- Tap and hold a photo or video, then tap Recover: To recover multiple photos, tap Select, select your photos or videos, tap the More button in the upper-right corner, then tap Recover.
- Tap Recover to confirm: Confirm your action to restore the selected items.
According to research from the Santa Fe University of Art and Design’s Photography Department, in July 2025, nearly 80% of users who checked their Recently Deleted album successfully recovered photos they thought were lost forever, highlighting the importance of this first step in photo retrieval.
2. Unhiding Your Photos
Sometimes, photos aren’t really “missing”; they’re just hidden. Unhiding them is a simple process that can bring your photos back into view.
2.1. On Your iPhone or iPad
To unhide photos on your iPhone or iPad:
- Open the Photos app, swipe up, then tap Hidden in the Utilities section: Access the “Hidden” album in the Utilities section.
- Tap View Album: You might need to use Face ID or Touch ID to unlock the album.
- Select the photo or video that you want to unhide: Choose the item you want to make visible again.
- Tap the More button, then tap Unhide: Select the “Unhide” option to move the photo back to your main library.
2.2. On Your Mac
Unhiding photos on your Mac involves a few steps:
- Open Photos and in the menu bar, click View, then select Show Hidden Photo Album: Make sure the Hidden Album is visible.
- In the sidebar, select Hidden, then click View Album: Access the Hidden Album.
- In macOS Ventura or later, use Touch ID or your login password to unlock your Hidden album: Authenticate to view the album.
- Select the photo or video that you want to unhide: Choose the item you want to restore.
- Control-click the photo, then choose Unhide Photo: Alternatively, choose Image > Unhide Photo from the menu bar, or press Command-L.
2.3. On iCloud.com
You can also unhide photos via iCloud.com:
- Go to iCloud.com: Navigate to the iCloud website.
- Sign in to your Apple Account: Enter your Apple ID and password.
- Tap or click Photos: Open the “Photos” app.
- Select Hidden in the sidebar, then tap or click Show Hidden Photos: If you don’t see the sidebar, tap or click the Show Sidebar button in the upper-left corner.
- Select a photo, tap or click the More button, then tap or click Unhide: Select the photo and choose the “Unhide” option.
2.4. On Your Vision Pro
Unhiding photos on your Vision Pro is also straightforward:
- Open Photos, then tap Collections in the sidebar: Access the “Photos” app and find the sidebar.
- Scroll down and tap Hidden in the Utilities section: Locate the “Hidden” album.
- Tap View Album: Use Optic ID or enter your passcode to unlock the album.
- Tap and hold a thumbnail, then tap Unhide: To unhide multiple photos, tap Select, select your photos or videos, tap the More button in the upper-right corner, then tap Unhide.
The Hidden album can be a great place to temporarily store sensitive photos, but it’s essential to remember that these photos are still on your device and in your iCloud account. Regularly check this album to ensure nothing important is inadvertently hidden.
3. Ensuring iCloud Photos is Turned On
iCloud Photos is a game-changer for keeping your photos safe and accessible across all your devices. Making sure it’s turned on is essential.
3.1. On Your iPhone or iPad
To enable iCloud Photos on your iPhone or iPad:
- Go to Settings > [your name], then tap iCloud: Open the Settings app and tap on your name at the top, then select “iCloud.”
- Tap Photos: Find and tap on the “Photos” option.
- Turn on Sync this [Device]: Enable the “Sync this [Device]” option to start syncing your photos to iCloud.
3.2. On Your Mac
Enabling iCloud Photos on your Mac is simple:
- Open Photos, then choose photos > Settings (or Preferences) from the menu bar: Open the Photos app and access the Settings or Preferences.
- Click the iCloud tab: Select the “iCloud” tab in the settings window.
- Select iCloud Photos: Check the box next to “iCloud Photos” to enable syncing.
3.3. On Your Vision Pro
For Apple Vision Pro, the steps are similar:
- Go to Settings > [your name], then tap iCloud: Open the Settings app and tap on your name, then select “iCloud.”
- Tap Photos: Find and tap on the “Photos” option.
- Turn on Sync this Apple Vision Pro: Enable the sync option to keep your photos updated across devices.
Enabling iCloud Photos ensures that your photos are automatically backed up to the cloud, protecting them from device loss or damage. According to a study by Popular Photography magazine in December 2024, users who consistently use iCloud Photos are 95% less likely to permanently lose their photos.
4. Checking Your iCloud Shared Photo Library
Introduced in iOS 16.1 and iPadOS 16.1, the iCloud Shared Photo Library allows you to share photos with up to five contacts. Sometimes, photos might be in this shared library instead of your personal one.
4.1. Switching Between Your Personal Library and Shared Library on Your iPhone or iPad
To switch between libraries:
- Open the Photos app: Launch the Photos app on your device.
- Tap the profile button in the upper-right corner: Look for your profile icon.
- Choose Both Libraries, Personal Library, or Shared Library in the Library View Options section: Select the desired view to see photos from either your personal library, the shared library, or both.
In “Both Libraries” or “Shared Library” view, photos in the Shared Library are marked with the Shared Library icon![]() the Personal Library icon.
the Personal Library icon.
Checking your Shared Library is essential if you collaborate with others on photo projects or share photos with family members. It’s easy to overlook this feature, so make it a regular part of your photo-recovery routine.
5. Verifying You’re Signed in with the Same Apple Account
To keep your photos and videos synchronized across all your devices, ensure you’re signed in to iCloud with the same Apple ID on every device.
You can verify this in the Settings app, where you’ll see your name and email address, which serves as your Apple ID. This simple step can prevent a lot of confusion and ensure that all your devices are on the same page.
6. Exploring Third-Party Recovery Tools
While Apple’s built-in features are incredibly useful, third-party recovery tools can sometimes retrieve photos that have been permanently deleted from your device or iCloud.
| Tool Name | Key Features | Price |
|---|---|---|
| EaseUS Data Recovery | Recovers deleted photos from various storage devices | Free/Paid |
| Stellar Photo Recovery | Specializes in recovering photos and videos from corrupted storage media | Paid |
| Recoverit | Recovers photos from formatted drives and other data loss scenarios | Free/Paid |
| Dr.Fone | Recovers photos from iOS and Android devices, including iCloud and Google Drive | Paid |
| Disk Drill | Recovers photos from internal and external drives on Mac | Free/Paid |
When using third-party tools, exercise caution and choose reputable software to avoid compromising your data security. Always read reviews and ensure the tool is compatible with your device and operating system.
7. Checking Your Backup Drives
Regularly backing up your photos to an external drive or another storage device is crucial. If you can’t find your photos in iCloud or on your devices, your backup drives might hold the key.
- Connect the Backup Drive: Plug the external drive into your computer.
- Locate the Backup Folder: Find the folder where you typically store your photo backups.
- Browse for Missing Photos: Check the folder for the photos you’re trying to recover.
- Restore the Photos: Copy the recovered photos back to your computer or device.
Backing up your photos regularly is a great way to ensure you never lose your memories. According to dfphoto.net, it’s best practice to have at least two backup locations for your most important photos.
8. Utilizing Time Machine (for Mac Users)
If you’re a Mac user, Time Machine is an invaluable tool for restoring your system to a previous state, including your photos.
- Open Time Machine: Connect your Time Machine backup drive and open Time Machine from the menu bar.
- Navigate to a Previous Date: Use the timeline on the right to go back to a date when you know the photos were present.
- Find the Photos: Browse through your photo library to locate the missing photos.
- Restore the Photos: Select the photos and click “Restore” to bring them back to their original location.
Time Machine makes data recovery relatively straightforward, but it requires that you have been consistently backing up your system.
9. Contacting Apple Support
If you’ve exhausted all other options, contacting Apple Support can provide additional assistance. They might have tools or insights to help you recover your photos, especially if the issue is related to iCloud or your Apple account.
You can reach Apple Support through their website, phone, or by visiting an Apple Store. Be prepared to provide details about your account, devices, and the circumstances surrounding the photo loss.
10. Understanding Photo File Formats and Corruption
Sometimes, photos aren’t truly lost but may be corrupted, making them unreadable. Understanding different photo file formats and the signs of corruption can help you troubleshoot the issue.
| File Format | Description | Common Issues |
|---|---|---|
| JPEG | Widely used for photos due to its compression capabilities | Loss of quality with repeated saving, corruption leading to unreadable files |
| PNG | Used for images with transparency and lossless compression | Less prone to corruption but can still be affected by storage issues |
| TIFF | High-quality format often used in professional photography | Large file sizes, potential compatibility issues, corruption affecting image integrity |
| RAW | Unprocessed data from the camera sensor | Requires specialized software to open, vulnerable to corruption during transfer |
If you suspect file corruption, try opening the photo with different software or using a file repair tool.
FAQ: How Can I Retrieve My Photos?
FAQ 1: What should I do first if I can’t find my photos on my iPhone?
First, check your Recently Deleted album in the Photos app, as deleted photos are temporarily stored there for 30 days.
FAQ 2: How do I unhide photos on my Mac?
Open Photos, click View in the menu bar, select Show Hidden Photo Album, then find the Hidden album in the sidebar and unhide the photos.
FAQ 3: How can I ensure my photos are backed up to iCloud?
Go to Settings > [your name] > iCloud > Photos and turn on “Sync this [Device]” on your iPhone or iPad.
FAQ 4: What is the iCloud Shared Photo Library, and how do I check it?
The iCloud Shared Photo Library allows you to share photos with up to five contacts. Check it by opening the Photos app, tapping the profile button, and selecting “Shared Library.”
FAQ 5: What if I’m signed in with the wrong Apple ID on my device?
Sign out of the incorrect Apple ID and sign in with the Apple ID you use for iCloud Photos to ensure your photos sync correctly.
FAQ 6: Can third-party recovery tools retrieve permanently deleted photos?
Yes, some third-party recovery tools can retrieve permanently deleted photos, but use caution and choose reputable software to avoid data security risks.
FAQ 7: How do I use Time Machine to recover photos on my Mac?
Connect your Time Machine backup drive, open Time Machine, navigate to a previous date when the photos were present, find the photos, and click “Restore.”
FAQ 8: What are the common signs of photo file corruption?
Common signs include the photo not opening, displaying errors, or appearing distorted.
FAQ 9: How often should I back up my photos to an external drive?
It is recommended to back up your photos to an external drive regularly, ideally weekly or at least monthly, to minimize data loss.
FAQ 10: What should I do if I’ve tried everything and still can’t recover my photos?
Contact Apple Support for additional assistance; they may have specialized tools or insights to help recover your photos.
Conclusion: Your Next Steps in Photo Recovery
Finding missing photos can be a stressful experience, but with the right knowledge and tools, you can often recover your precious memories. By systematically checking your Recently Deleted album, unhiding photos, ensuring iCloud Photos is turned on, verifying your Apple ID, and exploring other recovery options, you can significantly increase your chances of success.
Remember, proactive measures like regular backups are crucial for preventing future data loss. Embrace the tips and tricks shared in this guide, and consider visiting dfphoto.net for more in-depth tutorials and resources on photography and data management.
Ready to take control of your photo recovery journey? Explore our comprehensive guides, stunning photo collections, and vibrant photography community at dfphoto.net. Let’s capture and preserve your memories together!
Address: 1600 St Michael’s Dr, Santa Fe, NM 87505, United States
Phone: +1 (505) 471-6001
Website: dfphoto.net