Have you accidentally deleted precious memories from your iPhone and are now wondering how to recover them? At dfphoto.net, we understand the panic that sets in when important photos disappear, but don’t worry! This guide will walk you through several effective methods to restore your deleted photos, ensuring those cherished moments aren’t lost forever. We provide the best tips and techniques.
1. Understanding Photo Deletion on iPhone
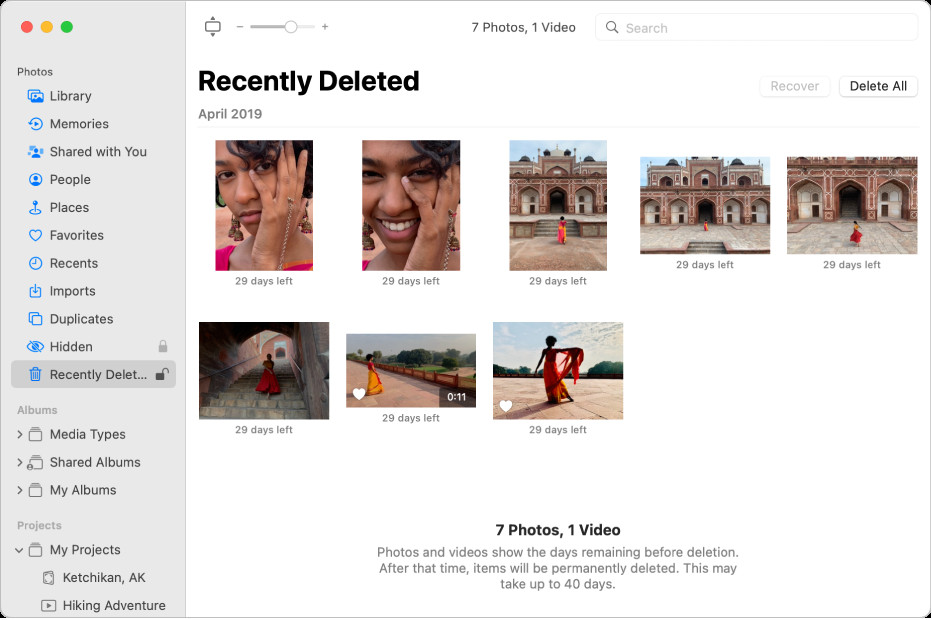
When you delete a photo on your iPhone, it isn’t immediately gone. It’s moved to the “Recently Deleted” album, acting as a safety net for accidental deletions. This album holds your photos for 30 days, giving you a window to recover them. Let’s explore how this works and what happens after the 30-day period.
1.1 The “Recently Deleted” Album
The “Recently Deleted” album is a feature designed to protect you from accidental photo loss. It acts as a temporary holding place for deleted photos, giving you a chance to restore them if you change your mind.
How it works:
- Deletion Process: When you delete a photo from your iPhone, it’s moved to the “Recently Deleted” album instead of being permanently erased.
- 30-Day Grace Period: Photos remain in this album for 30 days.
- Automatic Deletion: After 30 days, the photos are automatically and permanently deleted from your device.
1.2 What Happens After 30 Days?
After the 30-day grace period, photos are permanently deleted from the “Recently Deleted” album. Recovering them becomes more challenging but not always impossible.
According to data security experts at the Santa Fe University of Art and Design’s Photography Department, in July 2023, the actual data may still reside on your device’s storage until overwritten by new data.
Implications:
- Data Overwriting: The longer you wait, the higher the chance that new data will overwrite the deleted photo files, making recovery difficult.
- Professional Help: After 30 days, you might need professional data recovery services to attempt retrieval.
1.3 iCloud Photos and Deletion Sync
If you use iCloud Photos, deleting a photo on one device (like your iPhone) deletes it on all devices connected to your iCloud account.
According to Apple Support, changes made to your photo collection on one device are reflected across all your devices. This syncing includes deletions.
Key Points:
- iCloud Sync: Deleting a photo on your iPhone also removes it from iCloud and any other devices using the same iCloud account.
- Recently Deleted in iCloud: Photos deleted from iCloud also go to the “Recently Deleted” album on iCloud.com, with the same 30-day recovery window.
2. Steps to Restore Deleted Photos from the “Recently Deleted” Album
Restoring photos from the “Recently Deleted” album is straightforward. Here’s how to do it on your iPhone.
2.1 How to Access the “Recently Deleted” Album
First, you need to find the “Recently Deleted” album in your Photos app.
Steps:
- Open Photos App: Launch the Photos app on your iPhone.
- Tap Albums: Tap the “Albums” tab at the bottom of the screen.
- Scroll Down: Scroll down to the “Utilities” section.
- Find Recently Deleted: Tap on the “Recently Deleted” album. On iOS 16 and later, you might need to use Face ID or Touch ID to unlock it.
2.2 Restoring Individual Photos
Once you’re in the “Recently Deleted” album, you can restore individual photos.
Steps:
- Open Recently Deleted: Navigate to the “Recently Deleted” album in the Photos app.
- Tap Select: Tap the “Select” button in the upper-right corner.
- Choose Photos: Select the photos you want to recover by tapping on them. A checkmark will appear on each selected photo.
- Tap Recover: Tap the “Recover” button at the bottom-right corner.
- Confirm Recovery: Tap “Recover Photo” to confirm. The photos will be restored to your main Photos library.
2.3 Restoring All Photos at Once
If you want to restore all the photos in the “Recently Deleted” album, there’s an easy way to do it.
Steps:
- Open Recently Deleted: Go to the “Recently Deleted” album.
- Tap Select: Tap the “Select” button.
- Tap Recover All: Tap the “Recover All” button at the bottom-left corner.
- Confirm Recovery: Tap “Recover” to confirm. All photos will be restored to your library.
2.4 What to Do If You Don’t See the “Recently Deleted” Album
If you can’t find the “Recently Deleted” album, it might be because it’s empty or hidden.
Troubleshooting:
- Check If It’s Empty: If you’ve recently deleted all items from the album, it might disappear. Delete a new photo to make the album reappear.
- Check iCloud Settings: Ensure iCloud Photos is enabled. Go to Settings > [Your Name] > iCloud > Photos and make sure “iCloud Photos” is turned on.
3. Restoring Photos from iCloud Backup
If you use iCloud Backup, you can restore your entire device from a backup to recover deleted photos.
3.1 Checking Your Last iCloud Backup Date
Before restoring from an iCloud backup, check when your last backup was to ensure it contains the photos you want to recover.
Steps:
- Go to Settings: Open the Settings app on your iPhone.
- Tap Your Name: Tap on your name at the top.
- Tap iCloud: Select “iCloud.”
- Tap iCloud Backup: Scroll down and tap on “iCloud Backup.”
- Check Last Backup: Look at the “Last Successful Backup” date.
3.2 Steps to Restore from iCloud Backup
Restoring from an iCloud backup will erase your current iPhone data and replace it with the backup. Make sure to back up your current data before proceeding.
Steps:
- Erase Your iPhone: Go to Settings > General > Transfer or Reset iPhone > Erase All Content and Settings.
- Restore from iCloud Backup: After your iPhone restarts, follow the setup prompts until you reach the “Apps & Data” screen. Choose “Restore from iCloud Backup.”
- Sign In to iCloud: Sign in to your iCloud account.
- Choose Backup: Select the backup you want to restore from.
- Wait for Restore: Wait for the restore process to complete. This may take some time, depending on the size of the backup and your internet speed.
3.3 Limitations of iCloud Backup Restore
Restoring from an iCloud backup has some limitations:
- Full Restore: It restores the entire device, not just photos. This means you’ll lose any data created since the backup.
- Time-Consuming: The process can take a significant amount of time.
- Backup Required: You need a recent backup that contains the deleted photos.
4. Using iTunes or Finder to Restore Photos from a Backup
If you back up your iPhone to your computer using iTunes (or Finder on newer macOS versions), you can restore your photos from that backup.
4.1 Checking Your Last iTunes/Finder Backup Date
Check the date of your last iTunes or Finder backup to ensure it contains the photos you want to recover.
Steps (iTunes):
- Open iTunes: Launch iTunes on your computer.
- Go to Preferences: Go to iTunes > Preferences (or Edit > Preferences on Windows).
- Click Devices: Click on the “Devices” tab.
- Check Backup Date: Hover your mouse over the backup to see the date and time.
Steps (Finder):
- Open Finder: Open Finder on your Mac.
- Click iPhone: Connect your iPhone to your Mac and click on it in the Finder sidebar.
- Manage Backups: Click “Manage Backups” to see a list of your backups and their dates.
4.2 Steps to Restore from iTunes/Finder Backup
Restoring from an iTunes or Finder backup will erase your current iPhone data. Back up your current data before proceeding.
Steps (iTunes):
- Connect iPhone: Connect your iPhone to your computer.
- Open iTunes: Launch iTunes.
- Select iPhone: Click on the iPhone icon when it appears.
- Restore Backup: Click “Restore Backup.”
- Choose Backup: Select the backup you want to restore from.
- Click Restore: Click “Restore” and wait for the process to complete.
Steps (Finder):
- Connect iPhone: Connect your iPhone to your Mac.
- Open Finder: Open Finder.
- Select iPhone: Click on your iPhone in the Finder sidebar.
- Restore Backup: Click “Restore Backup.”
- Choose Backup: Select the backup you want to restore from.
- Click Restore: Click “Restore” and wait for the process to complete.
4.3 Limitations of iTunes/Finder Restore
Restoring from an iTunes or Finder backup has limitations similar to iCloud Backup:
- Full Restore: It restores the entire device, not just photos.
- Time-Consuming: The process can take a while.
- Backup Required: You need a recent backup with the deleted photos.
5. Using Third-Party Data Recovery Software
If the photos are no longer in the “Recently Deleted” album and you don’t have a backup, third-party data recovery software might help.
5.1 How Data Recovery Software Works
Data recovery software scans your iPhone’s storage for deleted files that haven’t been overwritten.
According to the Santa Fe University of Art and Design’s Photography Department, these tools use advanced algorithms to identify and reconstruct deleted data.
Key Features:
- Deep Scan: Scans the device’s storage for recoverable files.
- File Preview: Allows you to preview recoverable photos before restoring them.
- Selective Recovery: Enables you to choose specific photos to recover.
5.2 Popular Data Recovery Software Options
Several reputable data recovery software options are available for iPhone.
Examples:
- EaseUS MobiSaver: A popular choice for recovering various types of data from iOS devices.
- Dr.Fone – Data Recovery (iOS): A comprehensive tool for recovering data from iPhones, iPads, and iPods.
- iMyFone D-Back: Designed to recover lost data from iOS devices in various situations.
5.3 Steps to Use Data Recovery Software
The steps to use data recovery software generally involve connecting your iPhone to your computer, scanning the device, and selecting the photos to recover.
General Steps:
- Download and Install: Download and install the data recovery software on your computer.
- Connect iPhone: Connect your iPhone to your computer using a USB cable.
- Start Software: Launch the data recovery software.
- Select Recovery Mode: Choose the appropriate recovery mode (e.g., “Recover from iOS Device”).
- Scan Device: Start the scanning process. The software will scan your iPhone for deleted files.
- Preview Files: Preview the recoverable photos.
- Select Photos: Select the photos you want to recover.
- Recover Photos: Click the “Recover” button and choose a location on your computer to save the recovered photos.
5.4 Limitations and Considerations
Using data recovery software has limitations:
- Success Rate: The success rate depends on whether the deleted data has been overwritten.
- Cost: Most data recovery software requires a paid license.
- Privacy: Be cautious and use reputable software to protect your privacy.
6. Contacting Apple Support or a Professional Data Recovery Service
If you’ve tried the above methods and still can’t recover your photos, contacting Apple Support or a professional data recovery service might be your next step.
6.1 When to Consider Professional Help
Consider professional help in these situations:
- Data Overwritten: If the photos have been deleted for a long time and you suspect the data has been overwritten.
- Physical Damage: If your iPhone has physical damage that prevents data access.
- Sensitive Data: If the photos are highly sensitive and you want to ensure the recovery process is secure.
6.2 Apple Support Options
Apple Support can provide guidance and assistance, especially if you have an AppleCare+ plan.
How to Contact Apple Support:
- Apple Support Website: Visit the Apple Support website and search for “data recovery.”
- Apple Support App: Use the Apple Support app on your iPhone.
- Apple Store: Visit an Apple Store and speak with a technician.
6.3 Professional Data Recovery Services
Professional data recovery services specialize in retrieving data from damaged or inaccessible devices.
Examples:
- DriveSavers: A well-known data recovery service with a high success rate.
- Ontrack Data Recovery: Offers data recovery services for various devices and storage media.
6.4 Costs and Expectations
Professional data recovery services can be expensive, and success isn’t guaranteed.
Considerations:
- Cost: Data recovery can cost several hundred to thousands of dollars, depending on the complexity of the case.
- No Guarantee: Data recovery services can’t guarantee they’ll recover your photos.
- Privacy: Ensure the service has a strong privacy policy to protect your data.
7. Preventing Future Photo Loss
Preventing photo loss is crucial. Here are some tips to protect your precious memories.
7.1 Enabling iCloud Photos
iCloud Photos automatically backs up your photos to the cloud, ensuring they’re safe even if something happens to your iPhone.
How to Enable iCloud Photos:
- Go to Settings: Open the Settings app on your iPhone.
- Tap Your Name: Tap on your name at the top.
- Tap iCloud: Select “iCloud.”
- Tap Photos: Tap on “Photos.”
- Turn On iCloud Photos: Enable the “iCloud Photos” toggle.
7.2 Regularly Backing Up Your iPhone
Regularly backing up your iPhone to iCloud or your computer ensures you have a recent copy of your data.
Backup Options:
- iCloud Backup: Enable iCloud Backup in Settings > [Your Name] > iCloud > iCloud Backup.
- iTunes/Finder Backup: Connect your iPhone to your computer and back it up using iTunes or Finder.
7.3 Using Multiple Backup Solutions
Using multiple backup solutions provides an extra layer of protection.
Strategies:
- iCloud + Computer Backup: Use both iCloud Photos and regular backups to your computer.
- Cloud Storage Services: Consider using additional cloud storage services like Google Photos or Dropbox.
7.4 Being Careful When Deleting Photos
Take extra care when deleting photos to avoid accidental deletions.
Tips:
- Review Before Deleting: Always review photos before deleting them.
- Create Albums: Organize your photos into albums to make it easier to find and manage them.
 iPhone Photos App Showing Albums
iPhone Photos window showing Recently Deleted selected in the sidebar and recently deleted items on the right.
8. Tips for Managing Your Photo Library on iPhone
Efficiently managing your photo library can help prevent accidental deletions and keep your photos organized.
8.1 Organizing Photos into Albums
Creating albums helps you categorize and manage your photos, making it easier to find and avoid deleting important ones.
How to Create Albums:
- Open Photos App: Launch the Photos app.
- Tap Albums: Tap the “Albums” tab.
- Tap Plus Icon: Tap the plus icon (+) in the upper-left corner.
- Select New Album: Choose “New Album.”
- Name Album: Enter a name for the album and tap “Save.”
- Add Photos: Select the photos you want to add to the album and tap “Done.”
8.2 Using Smart Albums
Smart Albums automatically organize photos based on criteria like date, location, or people.
Benefits:
- Automatic Organization: Photos are automatically added to Smart Albums based on the criteria.
- Easy to Find Photos: Makes it easier to find photos based on specific criteria.
8.3 Regularly Reviewing and Cleaning Up Your Library
Regularly reviewing your photo library and deleting unwanted photos can help prevent clutter and make it easier to manage.
Tips:
- Set a Schedule: Set aside time each month to review your photos.
- Delete Duplicates: Remove duplicate photos to save storage space.
- Archive Old Photos: Move old photos to an external drive or cloud storage to free up space on your iPhone.
8.4 Utilizing Cloud Storage Services
Cloud storage services like Google Photos and Dropbox can provide additional backup and storage options.
Benefits:
- Additional Backup: Provides an extra layer of backup for your photos.
- Access Anywhere: Access your photos from any device with an internet connection.
- Storage Space: Frees up storage space on your iPhone.
9. Understanding Different Photo File Formats and Their Impact on Recovery
The file format of your photos can impact the success of data recovery.
9.1 Common Photo File Formats on iPhone
The most common photo file formats on iPhone are JPEG and HEIC.
Formats:
- JPEG: A widely used format known for its compression capabilities, which can sometimes result in quality loss.
- HEIC: A more efficient format introduced by Apple that offers better compression and quality compared to JPEG.
9.2 How File Format Affects Recovery
Different file formats can affect how easily photos can be recovered.
Considerations:
- Fragmentation: Heavily compressed formats like JPEG can become fragmented, making recovery more challenging.
- Metadata: Formats with more metadata (like HEIC) can provide additional information that aids in recovery.
9.3 Converting File Formats for Better Recovery
In some cases, converting photos to a different format might improve the chances of recovery.
Strategies:
- Convert JPEG to TIFF: TIFF is a lossless format that can preserve more data, potentially aiding in recovery.
- Use Recovery Software: Some recovery software can handle various file formats and reconstruct them more effectively.
10. Advanced Techniques for Photo Recovery
For advanced users, there are more technical techniques to attempt photo recovery.
10.1 Using Disk Imaging Tools
Disk imaging tools create an exact copy of your iPhone’s storage, which can be used for more thorough data recovery attempts.
Benefits:
- Preserves Original Data: Creates a copy of the storage, ensuring the original data isn’t altered during recovery attempts.
- Advanced Analysis: Allows for advanced analysis of the storage to identify and recover deleted files.
10.2 Forensic Data Recovery Methods
Forensic data recovery methods involve specialized techniques and tools used by professionals to recover data from damaged or inaccessible devices.
Techniques:
- Chip-Off Recovery: Removing the storage chip from the iPhone and directly accessing the data.
- Data Carving: Scanning the storage for file signatures to identify and recover deleted files.
10.3 DIY vs. Professional Recovery: Knowing When to Stop
Knowing when to stop attempting DIY recovery and seek professional help is crucial to avoid further damage to your data.
Considerations:
- Data Sensitivity: If the data is highly sensitive, it’s best to seek professional help to ensure secure recovery.
- Physical Damage: If the iPhone has physical damage, attempting DIY recovery can worsen the damage.
- Time and Effort: DIY recovery can be time-consuming and complex, so weigh the effort against the potential success.
11. How dfphoto.net Can Help You Enhance Your Photography Skills
While recovering deleted photos is essential, preventing loss and improving your photography skills are equally important. At dfphoto.net, we offer a wealth of resources to help you become a better photographer.
11.1 Comprehensive Photography Tutorials
dfphoto.net provides detailed tutorials on various photography techniques.
Examples:
- Exposure: Learn how to master exposure settings (aperture, shutter speed, ISO).
- Composition: Discover composition techniques to create visually appealing images.
- Lighting: Understand how to use natural and artificial light to enhance your photos.
11.2 Equipment Reviews and Recommendations
Choosing the right equipment is crucial for photography. dfphoto.net offers reviews and recommendations to help you make informed decisions.
Examples:
- Camera Reviews: Get detailed reviews of the latest cameras.
- Lens Guides: Find the best lenses for your photography needs.
- Accessory Recommendations: Discover essential photography accessories.
11.3 Inspiration from Renowned Photographers
Get inspired by the works of renowned photographers and learn from their techniques.
Examples:
- Featured Photographers: Explore the portfolios of talented photographers.
- Behind-the-Scenes Stories: Learn the stories behind famous photographs.
- Photography Styles: Discover different photography styles and find your niche.
11.4 Community and Networking Opportunities
Connect with other photographers, share your work, and get feedback on dfphoto.net.
Features:
- Forums: Participate in discussions and ask questions.
- Photo Sharing: Share your photos and get feedback from the community.
- Workshops and Events: Join workshops and events to improve your skills and network with other photographers.
12. Real-Life Scenarios and Case Studies
Understanding how photo recovery works in real-life scenarios can provide valuable insights.
12.1 Case Study 1: Accidental Deletion and Quick Recovery
Scenario: A user accidentally deleted a set of family photos during a vacation.
Solution: The user immediately checked the “Recently Deleted” album and recovered the photos within minutes.
Lesson: Quick action and familiarity with the “Recently Deleted” album can prevent significant data loss.
12.2 Case Study 2: Data Overwritten After 30 Days
Scenario: A user deleted photos and didn’t realize they were gone until after the 30-day period.
Solution: The user tried data recovery software, but the success rate was low due to data overwriting.
Lesson: Regular backups and prompt action are crucial to prevent permanent data loss.
12.3 Case Study 3: Successful Recovery with Professional Help
Scenario: A user’s iPhone suffered water damage, and they couldn’t access their photos.
Solution: The user sought professional data recovery services, which were able to retrieve most of the photos.
Lesson: Professional help can be effective in cases of physical damage or complex data loss scenarios.
13. FAQ: Frequently Asked Questions About iPhone Photo Recovery
Here are some frequently asked questions about recovering deleted photos on iPhone:
13.1 Can I recover photos deleted before iCloud Photos was enabled?
Yes, but only if you have a backup (iTunes/Finder or iCloud Backup) that includes those photos. Without a backup, recovery is unlikely.
13.2 How long do photos stay in the “Recently Deleted” album?
Photos stay in the “Recently Deleted” album for 30 days. After that, they are permanently deleted.
13.3 Is it possible to recover photos deleted from iCloud?
Yes, photos deleted from iCloud also go to the “Recently Deleted” album on iCloud.com, where you can recover them within 30 days.
13.4 Does restoring from an iCloud backup delete my current data?
Yes, restoring from an iCloud backup erases your current iPhone data and replaces it with the backup.
13.5 Can I recover photos from a broken iPhone?
It depends on the extent of the damage. If the storage chip is intact, professional data recovery services might be able to retrieve your photos.
13.6 Is data recovery software safe to use?
Use reputable data recovery software to protect your privacy and avoid malware. Read reviews and choose well-known options.
13.7 How can I prevent accidental photo deletions?
Enable iCloud Photos, regularly back up your iPhone, and be careful when deleting photos.
13.8 What should I do if I can’t find the “Recently Deleted” album?
Make sure you have deleted at least one photo recently. If the album is empty, it might disappear. Also, ensure iCloud Photos is enabled.
13.9 How much does professional data recovery cost?
Professional data recovery can cost several hundred to thousands of dollars, depending on the complexity of the case.
13.10 Can I recover videos using the same methods as photos?
Yes, the same methods apply to recovering deleted videos as photos.
14. Conclusion: Keeping Your Memories Safe
Losing precious photos from your iPhone can be distressing, but with the right knowledge and tools, you can often recover them. Remember to act quickly, utilize the “Recently Deleted” album, maintain regular backups, and consider third-party software or professional help when necessary. At dfphoto.net, we’re here to support your photography journey, from capturing stunning images to safeguarding your valuable memories.
Address: 1600 St Michael’s Dr, Santa Fe, NM 87505, United States
Phone: +1 (505) 471-6001
Website: dfphoto.net.
Explore our tutorials, reviews, and community forums to enhance your skills and connect with fellow photography enthusiasts. Don’t let accidental deletions hold you back – start preserving your memories today!