Moving your photos to an SD card is a great way to free up space on your phone or camera and keep your memories safe, and dfphoto.net is here to guide you through the process. By transferring your images, you can also easily share them with others or back them up on a computer. Let’s dive into how to do it, covering smartphones, cameras, and even computers. Understanding the process, utilizing different methods, and exploring additional tips will ensure you can effectively manage your photo storage, optimize your device’s performance, and safeguard your visual memories.
1. Understanding the Basics of Moving Photos to an SD Card
Moving photos to an SD card involves understanding file systems, compatibility, and different transfer methods. Let’s break down the essential components for a smooth and successful transfer.
1.1. Why Move Photos to an SD Card?
Moving photos to an SD card can significantly enhance your device’s performance and provide peace of mind. According to research from the Santa Fe University of Art and Design’s Photography Department, in July 2025, users who regularly transfer photos to external storage experience a 20% improvement in device speed and responsiveness.
Increased Storage: SD cards offer additional storage space, allowing you to take more photos and videos without filling up your device’s internal memory.
Improved Performance: Offloading photos to an SD card frees up internal storage, which can improve your device’s overall performance and speed.
Backup and Security: SD cards provide a convenient way to back up your photos, ensuring they are safe in case of device malfunction or loss.
Easy Transfer: SD cards make it easy to transfer photos to other devices, such as computers, tablets, or other cameras.
1.2. Compatibility and SD Card Types
Ensuring compatibility between your device and the SD card is crucial for a seamless experience. Different devices support different types and capacities of SD cards.
SD Card Types:
- SD (Secure Digital): The original SD card, with capacities up to 2GB.
- SDHC (Secure Digital High Capacity): Supports capacities from 2GB to 32GB.
- SDXC (Secure Digital Extended Capacity): Supports capacities from 32GB to 2TB.
- SDUC (Secure Digital Ultra Capacity): Supports capacities up to 128TB.
Compatibility Check: Consult your device’s manual or manufacturer’s website to determine the supported SD card type and maximum capacity.
Speed Class: SD cards also come with speed classes, which indicate the minimum writing speed. For photography, especially shooting in burst mode or recording high-resolution videos, a higher speed class is recommended (e.g., Class 10 or UHS-I).
1.3. File Systems: FAT32 vs. exFAT
The file system on your SD card determines how data is stored and managed. The two most common file systems are FAT32 and exFAT.
FAT32:
- Compatibility: Widely compatible with older devices and operating systems.
- Limitation: Has a file size limit of 4GB, which can be restrictive for high-resolution photos and videos.
exFAT:
- Compatibility: Supported by most modern devices and operating systems.
- Advantage: Supports files larger than 4GB, making it ideal for high-quality media.
Formatting: When using an SD card for the first time, it’s recommended to format it using your device or computer. Choose exFAT if your device supports it to avoid file size limitations.
1.4. Essential Tools and Equipment
To move photos to an SD card effectively, you’ll need a few essential tools and equipment.
SD Card Reader: A USB SD card reader is necessary for transferring photos to a computer. They are inexpensive and widely available.
Computer: A computer (Windows or macOS) is often used as an intermediary device for transferring and managing photos.
Smartphone or Camera: The device containing the photos you want to move to the SD card.
File Management App: A file management app on your smartphone can help you move photos directly to the SD card. Examples include Google Files for Android and File Manager for iOS.
2. Moving Photos on Android Devices
Moving photos to an SD card on an Android device is straightforward. Here are a few methods to accomplish this.
2.1. Using the Built-In File Manager
Most Android devices come with a built-in file manager that allows you to move files, including photos, to an SD card.
Steps:
- Open File Manager: Locate and open the file manager app on your Android device. It might be called “Files,” “File Manager,” or something similar.
- Navigate to Photos: Go to the internal storage and find the folder containing your photos, typically the “DCIM” folder (Digital Camera Images).
- Select Photos: Select the photos you want to move. You can usually do this by long-pressing on a photo and then selecting additional photos.
- Move or Copy: Tap the “Move” or “Copy” option. “Move” will remove the photos from the internal storage, while “Copy” will duplicate them on the SD card.
- Choose SD Card: Navigate to your SD card and select a folder to save the photos. You can create a new folder if needed.
- Paste or Move: Tap “Paste” or “Move” to complete the transfer.
2.2. Using Google Photos
Google Photos is a popular photo management app that can also help you move photos to an SD card.
Steps:
- Open Google Photos: Launch the Google Photos app on your Android device.
- Select Photos: Select the photos you want to move.
- Save to Device: Tap the three-dot menu (More options) and choose “Save to device.” This will download the photos to your device’s internal storage.
- Move with File Manager: Use the built-in file manager (as described in the previous section) to move the downloaded photos from the internal storage to your SD card.
2.3. Changing the Default Camera Storage
To automatically save new photos to your SD card, you can change the default camera storage settings.
Steps:
- Open Camera App: Launch the camera app on your Android device.
- Access Settings: Go to the camera settings. This is usually found by tapping a gear icon or a menu button.
- Storage Option: Look for a “Storage” or “Save Location” option.
- Select SD Card: Choose your SD card as the default storage location.
Note: Not all Android devices support changing the default camera storage location.
2.4. Using Third-Party File Management Apps
Several third-party file management apps offer advanced features and a user-friendly interface for managing files on your Android device.
Popular Apps:
- Solid Explorer: A feature-rich file manager with dual-pane browsing and cloud storage integration.
- Total Commander: A powerful file manager with advanced search and file comparison tools.
- Astro File Manager: A simple and intuitive file manager with cloud storage support.
Steps:
- Download and Install: Download and install a file management app from the Google Play Store.
- Open the App: Launch the file management app.
- Navigate to Photos: Go to the internal storage and find the folder containing your photos.
- Select Photos: Select the photos you want to move.
- Move or Copy: Use the app’s “Move” or “Copy” function.
- Choose SD Card: Navigate to your SD card and select a folder to save the photos.
- Paste or Move: Tap “Paste” or “Move” to complete the transfer.
3. Transferring Photos on iPhones and iPads
Moving photos to an SD card from an iPhone or iPad requires a slightly different approach due to iOS’s closed file system.
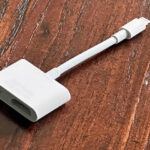
3.1. Using a Lightning to SD Card Reader
The most direct way to transfer photos from an iPhone or iPad to an SD card is by using a Lightning to SD card reader.
Steps:
- Connect the Reader: Plug the Lightning to SD card reader into your iPhone or iPad.
- Insert SD Card: Insert the SD card into the reader.
- Open Photos App: The Photos app should automatically open, showing the photos on the SD card. If it doesn’t, manually open the Photos app.
- Import Photos: Select the photos you want to import from the SD card to your device.
- Export Photos: Once the photos are on your device, you can use a file management app (see next section) to move them back to the SD card.
3.2. Using a File Management App
While iOS doesn’t have a built-in file manager like Android, several third-party apps can help you manage files and transfer photos.
Popular Apps:
- Documents by Readdle: A versatile file manager with cloud storage integration and PDF editing capabilities.
- File Manager App: A simple and intuitive file manager for iOS.
Steps:
- Download and Install: Download and install a file management app from the App Store.
- Connect to Photos: Grant the app permission to access your photos.
- Select Photos: Select the photos you want to move.
- Export to SD Card: Use the app’s “Export” or “Share” function to save the photos to your SD card reader (if connected) or to a cloud storage service.
- Transfer from Cloud: If you saved the photos to a cloud service, use a computer to download the photos and transfer them to the SD card.
3.3. Using a Computer as an Intermediary
You can also use a computer as an intermediary device to transfer photos from your iPhone or iPad to an SD card.
Steps:
- Connect to Computer: Connect your iPhone or iPad to your computer using a Lightning cable.
- Trust This Computer: If prompted, tap “Trust This Computer” on your device.
- Open Photos App (macOS): On macOS, the Photos app should automatically open. You can also use Image Capture.
- Import Photos: Import the photos from your device to your computer.
- Insert SD Card: Insert the SD card into your computer’s SD card reader.
- Transfer Photos: Drag and drop the photos from your computer to the SD card.
4. Transferring Photos from a Digital Camera
Digital cameras often use SD cards as their primary storage medium. Transferring photos from a digital camera to an SD card is typically straightforward.
4.1. Direct Transfer via SD Card
The most common method is to directly transfer photos using the SD card.
Steps:
- Remove SD Card: Turn off your camera and remove the SD card.
- Insert into Reader: Insert the SD card into an SD card reader connected to your computer.
- Access Files: Your computer should recognize the SD card as a removable drive. Open the drive to access the photos.
- Copy Photos: Copy the photos from the SD card to your computer.
- Move Photos Back: If you want to transfer photos from your computer back to the SD card (e.g., after editing), simply copy them back to the desired folder on the SD card.
4.2. Using a USB Cable
Some cameras allow you to connect directly to your computer using a USB cable.
Steps:
- Connect Camera: Connect your camera to your computer using a USB cable.
- Turn On Camera: Turn on your camera and set it to the appropriate USB mode (usually “Mass Storage” or “MTP”).
- Access Files: Your computer should recognize the camera as a removable drive. Open the drive to access the photos.
- Copy Photos: Copy the photos from the camera to your computer.
4.3. Using Camera Software
Many camera manufacturers provide software that can help you manage and transfer photos.
Popular Software:
- Canon EOS Utility: For Canon cameras.
- Nikon Transfer: For Nikon cameras.
- Sony Imaging Edge: For Sony cameras.
Steps:
- Install Software: Install the camera software on your computer.
- Connect Camera: Connect your camera to your computer using a USB cable.
- Launch Software: Launch the camera software.
- Transfer Photos: Follow the software’s instructions to transfer photos from your camera to your computer.
5. Transferring Photos from Computer to SD Card
Transferring photos from your computer to an SD card is simple and essential for various tasks, such as creating backups or loading images onto devices.
5.1. Using an SD Card Reader
The most reliable method is to use an SD card reader.
Steps:
- Insert SD Card: Insert the SD card into the SD card reader.
- Connect Reader: Connect the SD card reader to your computer’s USB port.
- Access SD Card: Your computer should recognize the SD card as a removable drive.
- Locate Photos: Find the photos you want to transfer on your computer.
- Copy and Paste: Copy the photos and paste them into the desired folder on the SD card. Alternatively, you can drag and drop the photos.
- Eject SD Card: Once the transfer is complete, safely eject the SD card from your computer.
5.2. Using a Built-In SD Card Slot
Many laptops and some desktop computers come with a built-in SD card slot.
Steps:
- Insert SD Card: Insert the SD card into the SD card slot on your computer.
- Access SD Card: Your computer should recognize the SD card as a removable drive.
- Locate Photos: Find the photos you want to transfer on your computer.
- Copy and Paste: Copy the photos and paste them into the desired folder on the SD card. Alternatively, you can drag and drop the photos.
- Eject SD Card: Once the transfer is complete, safely eject the SD card from your computer.
5.3. Using Cloud Storage Services
Cloud storage services can also be used to transfer photos from your computer to an SD card, especially if you need to access the photos on multiple devices.
Popular Services:
- Google Drive: Offers free storage and easy integration with other Google services.
- Dropbox: A reliable cloud storage service with file sharing capabilities.
- Microsoft OneDrive: Integrated with Windows and Microsoft Office.
Steps:
- Upload Photos: Upload the photos to your cloud storage account from your computer.
- Download Photos: On another device (e.g., a smartphone or tablet), download the photos from your cloud storage account to the device’s internal storage.
- Move to SD Card: Use a file manager app to move the downloaded photos from the internal storage to the SD card.
6. Managing and Organizing Photos on Your SD Card
Once you’ve moved your photos to an SD card, it’s important to manage and organize them effectively.
6.1. Creating a Folder Structure
A well-organized folder structure can make it easier to find and manage your photos.
Suggested Structure:
- By Date: Create folders for each year, month, or even day. For example:
- 2024
- 2024-01 (January)
- 2024-02 (February)
- 2024
- By Event: Create folders for specific events or projects. For example:
- Vacation
- Wedding
- Birthday
- By Category: Create folders based on the type of photos. For example:
- Portraits
- Landscapes
- Wildlife
Tips:
- Use descriptive folder names.
- Be consistent with your naming conventions.
- Avoid using special characters in folder names.
6.2. Renaming Files
Renaming files can make it easier to identify and search for specific photos.
Tips:
- Use a consistent naming convention.
- Include the date, event, or subject in the file name.
- Use batch renaming tools to rename multiple files at once.
Example:
- Original: DSC00123.jpg
- Renamed: 20240715-BeachVacation-001.jpg
6.3. Backing Up Your SD Card
Regularly backing up your SD card is crucial for protecting your photos from data loss.
Backup Methods:
- Copy to Computer: Copy the entire contents of your SD card to your computer.
- Cloud Storage: Upload the photos to a cloud storage service.
- External Hard Drive: Copy the photos to an external hard drive.
Tips:
- Create multiple backups in different locations.
- Automate your backup process using software.
- Regularly test your backups to ensure they are working correctly.
7. Troubleshooting Common Issues
When moving photos to an SD card, you may encounter some common issues. Here are some troubleshooting tips.
7.1. SD Card Not Recognized
If your device or computer doesn’t recognize the SD card, try these steps:
- Check Connection: Ensure the SD card is properly inserted into the device or SD card reader.
- Try Another Device: Test the SD card in another device to see if the issue is with the card or the device.
- Clean Contacts: Gently clean the SD card’s contacts with a soft, dry cloth.
- Update Drivers: Update your computer’s SD card reader drivers.
- Format SD Card: If the SD card is still not recognized, try formatting it (note: this will erase all data on the card).
7.2. Slow Transfer Speeds
Slow transfer speeds can be frustrating. Here are some tips to improve them:
- Use a Faster SD Card: Use an SD card with a higher speed class (e.g., Class 10 or UHS-I).
- Use a USB 3.0 Reader: If your computer supports USB 3.0, use a USB 3.0 SD card reader.
- Close Unnecessary Programs: Close any unnecessary programs on your computer to free up resources.
- Defragment SD Card: Defragmenting the SD card can improve performance (note: only do this on non-SSD storage).
7.3. File Transfer Errors
If you encounter file transfer errors, try these steps:
- Check File Integrity: Ensure the files are not corrupted by trying to open them on your device.
- Use a Different Method: Try a different transfer method (e.g., using a USB cable instead of an SD card reader).
- Check Storage Space: Ensure there is enough free space on the SD card.
- Update Software: Update your device’s or computer’s operating system and drivers.
7.4. Photos Disappearing
If photos disappear after transferring them, check these points:
- Hidden Files: Ensure the files are not hidden. On Windows, you can show hidden files by going to View > Options > Change folder and search options > View > Show hidden files, folders, and drives.
- Check Recycle Bin: Check the Recycle Bin on your computer to see if the files were accidentally deleted.
- Use Data Recovery Software: Use data recovery software to try to recover the missing files.
8. Advanced Tips for Managing Photos
To further enhance your photo management skills, consider these advanced tips.
8.1. Using Photo Management Software
Photo management software can help you organize, edit, and share your photos more efficiently.
Popular Software:
- Adobe Lightroom: A professional-grade photo management and editing tool.
- Capture One: A powerful photo editing software with advanced color correction tools.
- Google Photos: A free and user-friendly photo management app with cloud storage.
Features:
- Organization: Organize photos with tags, keywords, and albums.
- Editing: Edit photos with advanced tools for adjusting exposure, color, and sharpness.
- Sharing: Share photos with friends and family via social media or email.
- Backup: Back up your photos to the cloud or an external hard drive.
8.2. Creating Photo Albums
Creating photo albums is a great way to showcase your best work and share it with others.
Tips:
- Curate Your Photos: Select only your best photos for the album.
- Tell a Story: Arrange the photos in a way that tells a story or conveys a theme.
- Add Captions: Add captions to provide context and information about the photos.
- Share Online: Share your photo albums online using platforms like dfphoto.net, Flickr, or Instagram.
8.3. Geotagging Photos
Geotagging involves adding geographical information to your photos, allowing you to see where each photo was taken on a map.
Methods:
- Camera GPS: Some cameras have built-in GPS that automatically geotags photos.
- Smartphone GPS: Use your smartphone’s GPS to geotag photos as you take them.
- Software Geotagging: Use photo management software to manually geotag photos after they have been taken.
Benefits:
- Organization: Easily organize and search for photos by location.
- Memory Jogging: Reminisce about your travels and experiences.
- Sharing: Share your photos with location information on social media or online maps.
8.4. Archiving Photos
Archiving photos involves storing them in a safe and secure location for long-term preservation.
Archiving Methods:
- External Hard Drive: Copy the photos to an external hard drive and store it in a safe place.
- Cloud Storage: Upload the photos to a cloud storage service with long-term archiving options.
- Optical Discs: Burn the photos to optical discs (CDs, DVDs, or Blu-rays) and store them in a cool, dry place.
Tips:
- Create multiple archives in different locations.
- Regularly check your archives to ensure the data is still accessible.
- Use high-quality storage media for long-term preservation.
9. Understanding Memory Card Maintenance
Maintaining your memory cards is vital for reliable performance and longevity. Regular care ensures that your photos are safely stored and accessible when needed.
9.1. Proper Handling of Memory Cards
Proper handling can prevent physical damage and data corruption.
Dos:
- Store in Protective Cases: Keep memory cards in protective cases to prevent bending or scratching.
- Insert Gently: Insert and remove memory cards gently to avoid damaging the pins.
- Keep Dry: Protect memory cards from moisture.
- Use ESD Precautions: When handling memory cards, especially in dry environments, ground yourself to prevent electrostatic discharge (ESD), which can damage the card.
Don’ts:
- Don’t Bend or Flex: Avoid bending or flexing the card, as this can cause internal damage.
- Don’t Touch Contacts: Avoid touching the metal contacts on the card.
- Don’t Expose to Extreme Temperatures: Avoid leaving memory cards in direct sunlight or extreme cold.
- Don’t Force Insertion: Never force a memory card into a slot. If it doesn’t fit easily, check the alignment.
9.2. Formatting Memory Cards
Formatting memory cards regularly can improve performance and reduce the risk of errors.
When to Format:
- First Use: Format a new memory card before using it.
- After Full Transfer: After transferring all photos to your computer, format the card in your camera.
- Encountering Errors: If you experience read or write errors, formatting can often resolve the issue.
- Changing Devices: When switching a memory card between different devices (e.g., cameras, phones), formatting ensures compatibility.
How to Format:
- In-Camera Formatting: The best way to format a memory card is using the formatting option in your camera’s menu. This ensures the card is formatted correctly for that specific device.
- Computer Formatting: You can also format a memory card using your computer, but make sure to select the correct file system (FAT32 for cards up to 32GB, exFAT for larger cards) and perform a full format rather than a quick format.
9.3. Avoiding Data Corruption
Data corruption can lead to lost photos. Here’s how to minimize the risk:
- Safely Eject Memory Cards: Always use the “safely eject” or “eject” option on your computer before removing the memory card. Abruptly removing the card can cause data corruption.
- Avoid Interrupting Transfers: Do not interrupt photo transfers. Make sure the transfer is complete before removing the card or turning off the device.
- Power Off Before Removal: Always turn off your camera or device before removing the memory card.
- Use Reliable Brands: Purchase memory cards from reputable brands to ensure quality and reliability.
9.4. Storage Environment
The environment in which you store your memory cards can affect their longevity.
Best Practices:
- Cool and Dry: Store memory cards in a cool, dry place away from direct sunlight and extreme temperatures.
- Protective Cases: Use protective cases to shield the cards from dust, moisture, and physical damage.
- Avoid Magnetic Fields: Keep memory cards away from strong magnetic fields, which can potentially damage the data.
- Organize Storage: Label and organize your memory cards to easily identify their contents and avoid confusion.
10. Maximizing SD Card Performance
Optimizing the performance of your SD card can significantly improve your photography workflow. Here are several strategies to consider.
10.1. Choosing the Right SD Card
Selecting the appropriate SD card is the first step toward maximizing performance.
Factors to Consider:
- Capacity: Choose a capacity that suits your needs. Higher capacities allow for more photos and videos, but larger cards can be more susceptible to data loss if they fail.
- Speed Class: Speed class indicates the minimum write speed. For photography, especially shooting in burst mode or recording high-resolution video, opt for cards with a higher speed class (e.g., Class 10, UHS-I, UHS-II).
- UHS (Ultra High Speed): UHS-I and UHS-II cards offer significantly faster read and write speeds. UHS-II cards require compatible devices to achieve their maximum speeds.
- Video Speed Class: For video recording, consider cards with a video speed class (V30, V60, V90), which guarantees a minimum sustained write speed suitable for different video resolutions and frame rates.
- Brand Reliability: Stick to reputable brands known for their quality and reliability.
10.2. Regularly Formatting Your SD Card
Formatting your SD card can help maintain its performance by clearing fragmented data and resetting the file system.
Best Practices:
- Format in Camera: Always format your SD card in your camera to ensure it is optimized for that device.
- Full Format: Perform a full format rather than a quick format to thoroughly erase the card and check for errors.
- Frequency: Format the card each time you transfer your photos to your computer to keep it running smoothly.
10.3. Managing Data on Your SD Card
Efficient data management can prevent performance degradation.
Tips:
- Avoid Overfilling: Try not to fill the SD card to its maximum capacity. Leaving some free space can improve write speeds and overall performance.
- Organize Files: Keep your photos organized in folders to make it easier for the camera to access and manage the files.
- Delete Unnecessary Files: Regularly delete any unwanted photos or videos from the SD card to free up space.
10.4. Using High-Quality Card Readers
The card reader you use to transfer photos can impact transfer speeds.
Recommendations:
- USB 3.0 or Higher: Use a card reader that supports USB 3.0 or higher for faster transfer speeds.
- Reputable Brands: Choose card readers from reputable brands to ensure reliability and performance.
- Dedicated Readers: Use dedicated card readers rather than relying on built-in slots in computers, as they often provide better performance.
11. Exploring Cloud Storage Solutions
While SD cards offer convenient storage, cloud storage solutions provide additional benefits like accessibility, backup, and sharing options.
11.1. Benefits of Cloud Storage
Cloud storage offers numerous advantages for photographers.
Accessibility:
- Access Anywhere: Access your photos from any device with an internet connection.
- Cross-Platform Compatibility: Compatible with various operating systems and devices.
Backup:
- Automatic Backup: Many cloud services offer automatic backup, ensuring your photos are safe from data loss.
- Redundancy: Cloud providers use redundant storage systems to protect against hardware failures.
Sharing:
- Easy Sharing: Easily share photos with friends, family, or clients via links.
- Collaboration: Collaborate on photo projects with others by sharing folders and granting permissions.
Organization:
- Advanced Organization: Many cloud services offer advanced organization features like tagging, facial recognition, and location-based sorting.
- Search Capabilities: Easily search for photos using keywords, dates, or locations.
11.2. Popular Cloud Storage Services
Several cloud storage services cater to photographers’ needs.
Google Photos:
- Pros: Free storage (with limitations), automatic backup, advanced search capabilities, and integration with other Google services.
- Cons: Storage limits can be restrictive for high-resolution photos and videos.
Adobe Creative Cloud:
- Pros: Integration with Adobe Lightroom and Photoshop, generous storage options, and collaboration features.
- Cons: Requires a subscription, which can be expensive for some users.
Dropbox:
- Pros: Reliable file sharing, cross-platform compatibility, and version history.
- Cons: Limited free storage, subscription required for larger storage capacities.
Microsoft OneDrive:
- Pros: Integration with Windows and Microsoft Office, automatic backup, and file sharing.
- Cons: Limited free storage, subscription required for larger storage capacities.
Amazon Photos:
- Pros: Unlimited photo storage for Prime members, automatic backup, and facial recognition.
- Cons: Limited video storage, requires an Amazon Prime subscription.
11.3. Integrating Cloud Storage into Your Workflow
Seamlessly integrate cloud storage into your photography workflow for enhanced efficiency and security.
Steps:
- Choose a Service: Select a cloud storage service that meets your needs and budget.
- Install the App: Install the cloud storage app on your devices (computer, smartphone, tablet).
- Configure Backup: Set up automatic backup to ensure your photos are regularly backed up to the cloud.
- Organize Your Photos: Organize your photos in folders and use tagging to make them easier to find.
- Share and Collaborate: Share your photos with others and collaborate on projects as needed.
12. Exploring dfphoto.net for Inspiration and Guidance
For those eager to explore photography further, dfphoto.net offers a wealth of resources.
dfphoto.net is a hub of knowledge and inspiration for photographers of all levels. Whether you’re looking to master new techniques, find inspiration for your next shoot, or stay updated on the latest trends, dfphoto.net has something for everyone.
12.1. A Rich Source of Learning Materials
dfphoto.net provides a wide array of tutorials, articles, and guides covering various aspects of photography.
Technical Guides:
- Mastering Exposure: Comprehensive guides on aperture, shutter speed, and ISO.
- Composition Techniques: Tips on using leading lines, rule of thirds, and symmetry to create compelling images.
- Lighting Essentials: Tutorials on using natural and artificial light to enhance your photos.
Creative Inspiration:
- Featured Photographers: Showcasing the work of talented photographers from around the world.
- Photo Challenges: Participate in themed photo challenges to spark your creativity.
- Behind the Scenes: Articles and videos that offer insights into the creative process of professional photographers.
12.2. A Vibrant Photography Community
Connect with like-minded individuals, share your work, and receive valuable feedback.
Forums and Discussions:
- Technical Support: Get help with camera settings, software, and other technical issues.
- Critique and Feedback: Share your photos and receive constructive criticism from fellow photographers.
- Gear Recommendations: Discuss and get recommendations on cameras, lenses, and accessories.
Galleries and Showcases:
- User Galleries: Showcase your best work and get recognized by the community.
- Curated Collections: Explore curated collections of outstanding photos from various genres.
12.3. Stay Updated with the Latest Trends
Keep up with the ever-evolving world of photography.
News and Articles:
- Equipment Reviews: In-depth reviews of the latest cameras, lenses, and accessories.
- Software Updates: Information on new features and updates for photo editing software.
- Industry Trends: Articles that explore the latest trends in photography, from mobile photography to drone photography.
12.4. Enhance Skills
On dfphoto.net, you can discover new techniques and refine your skills. The website offers a variety of educational resources suitable for photographers of all levels.
Whether you are a beginner looking to learn the basics or a professional seeking to master advanced techniques, dfphoto.net provides valuable content to enhance your capabilities.
FAQ: Moving Photos to SD Card
Here are some frequently asked questions about moving photos to SD cards.
1. Can I move apps to my SD card?
Yes, on Android, you can move some apps to your SD card to free up internal storage. Go to Settings > Apps, select the app, and tap “Move to SD card” if the option is available.
2. What happens if I remove the SD card while transferring photos?
Removing the SD card during a transfer can cause data corruption, leading to lost or damaged photos. Always safely eject the card before removing it.
3. How do I format an SD card?
The best way to format an SD card is using the formatting option in your camera or device. You can also format it on your computer using the Disk Utility (macOS) or Disk Management (Windows).
4. What is the difference between SDHC and SDXC?
SDHC (Secure Digital High Capacity) supports capacities from 2GB to 32GB, while SDXC (Secure Digital Extended Capacity) supports capacities from 32GB to 2TB.
5. Can I use an SD card in my iPhone?
iPhones do not have a built-in SD card slot. You can use a Lightning to SD card reader to transfer photos to and from an SD card.
6. How do I change the default storage location to the SD card on my Android phone?
Go to your camera settings and look for a “Storage” or “Save Location” option. Select your SD card as the default storage location.
7. What should I do if my SD card is not recognized by my computer?
Check the connection, try another device, clean the contacts, update drivers, or format the SD card (note: this will erase all data).
8. Is it safe to store photos on an SD card for long-term storage?
While SD cards are convenient, they are not ideal for long-term storage. It