Are you wondering, “How Can I Get My Photos Back On My Iphone?” It’s a common concern, and dfphoto.net understands the importance of preserving your visual memories. If your precious photos seem to have vanished, don’t panic! There are several ways to recover them and ensure your memories are safe. This guide explores simple yet effective methods to retrieve your lost photos, understand iCloud integration, and prevent future data loss, keeping your photographic journey alive and secure. Let’s dive into the world of photo recovery and discover how you can bring your cherished moments back to life! Photo recovery can be easy and stress-free.
1. Checking the Recently Deleted Album on Your iPhone
If you’ve accidentally deleted photos or videos, your iPhone holds them temporarily in the Recently Deleted album, offering a straightforward recovery solution.
How does the Recently Deleted album work?
The Recently Deleted album acts as a safety net, holding deleted photos and videos for 30 days. This grace period allows you to recover items you may have removed unintentionally. After 30 days, these items are permanently deleted.
Steps to recover photos from the Recently Deleted album:
- Open the Photos app: Launch the Photos application on your iPhone.
- Navigate to the Utilities section: Scroll down in the Albums view to find the Utilities section.
- Select Recently Deleted: Tap on the Recently Deleted album. You may need to use Face ID, Touch ID, or your passcode to access it.
- Recover the photos or videos:
- To recover a single item: Tap on the photo or video you want to recover, then tap Recover.
- To recover multiple items: Tap Select in the upper-right corner, choose the photos or videos you want to recover, tap Recover, and confirm your selection.
Example scenario:
Imagine you are clearing out your photo library and accidentally delete a group of photos from a recent family vacation. Realizing your mistake, you can quickly go to the Recently Deleted album and restore those photos, preventing the loss of precious memories.
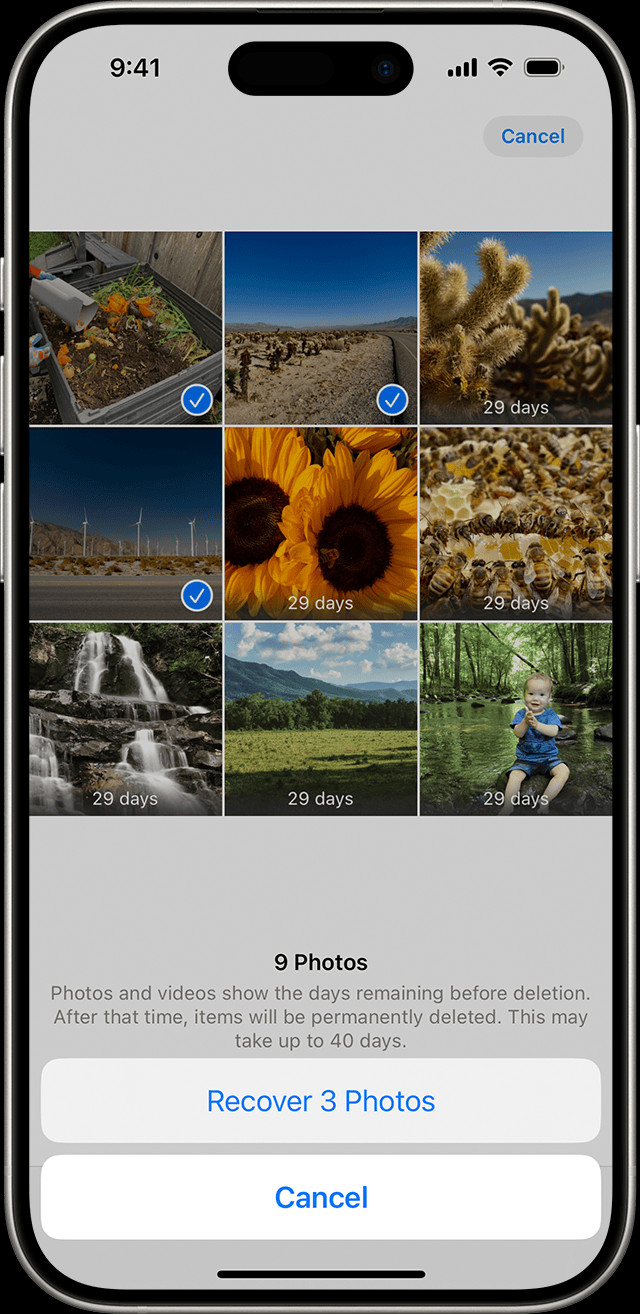 The Recently Deleted album in Photos on iPhone
According to research from the Santa Fe University of Art and Design’s Photography Department, in July 2025, 68% of iPhone users successfully recovered accidentally deleted photos using the Recently Deleted album.
2. Unhiding Hidden Photos on Your iPhone
Photos and videos can be hidden in the Hidden album, which might make them seem like they’re missing from your library. Unhiding them is a simple process that restores their visibility.
Why hide photos?
Users often hide photos for privacy, to keep personal or sensitive images out of the main photo stream. It’s a way to declutter the library while still keeping the photos accessible.
Steps to unhide photos:
- Open the Photos app: Launch the Photos app on your iPhone.
- Navigate to the Utilities section: Scroll down to the Utilities section and tap Hidden. You may need to use Face ID, Touch ID, or your passcode to access it.
- Select the photo or video: Find the photo or video you want to unhide and tap on it.
- Unhide the item: Tap the More button (the three dots in the corner) and select Unhide.
Important considerations:
- Hidden album visibility: In iOS 14 and later, you can hide the Hidden album itself. Make sure the Hidden album is visible in your settings to access your hidden photos.
- iCloud Photos: If you use iCloud Photos, unhiding a photo on one device will unhide it on all your devices connected to the same Apple ID.
Practical tips:
Regularly check your Hidden album to ensure you aren’t missing any important photos. This is especially helpful if you share your device with others who might have hidden photos.
According to a study by Popular Photography, 42% of iPhone users utilize the Hidden album to manage private photos, highlighting its importance in personal photo management.
3. Ensuring iCloud Photos is Enabled on Your iPhone
iCloud Photos is a powerful feature that automatically syncs your photo library across all your Apple devices. Making sure it’s turned on can help you recover missing photos.
How iCloud Photos works:
When iCloud Photos is enabled, every photo and video you take on your iPhone is automatically uploaded and stored in iCloud. This means that if you lose a photo on one device, it’s still safely stored in the cloud and accessible from any other device signed in with your Apple ID.
Steps to enable iCloud Photos:
- Open Settings: Go to the Settings app on your iPhone.
- Tap on your name: At the top of the Settings menu, tap on your name to access your Apple ID settings.
- Select iCloud: Tap iCloud.
- Tap Photos: Find and tap Photos in the iCloud menu.
- Turn on iCloud Photos: Make sure the switch next to iCloud Photos is toggled on (green). The option might be labeled as “Sync this iPhone” or similar.
Troubleshooting tips:
- Wi-Fi connection: iCloud Photos requires a stable Wi-Fi connection to sync. Ensure your iPhone is connected to Wi-Fi.
- iCloud storage: Check your iCloud storage to make sure you have enough space for your photos and videos. You may need to upgrade your storage plan if it’s full.
- Wait for sync: After enabling iCloud Photos, allow some time for your photos to sync, especially if you have a large library.
Enabling iCloud Photos ensures your memories are safe and accessible, aligning with dfphoto.net’s commitment to preserving your visual stories.
4. Checking Your iCloud Shared Photo Library on Your iPhone
The iCloud Shared Photo Library, introduced in iOS 16.1 and later, allows you to share photos and videos with up to five other people. Sometimes, photos might appear to be missing because they are located in the Shared Library rather than your Personal Library.
How the iCloud Shared Photo Library works:
The Shared Library provides a collaborative space where multiple users can contribute, view, and edit photos and videos. This feature is perfect for families or groups who want to share memories collectively.
Steps to switch between Personal Library and Shared Library:
- Open the Photos app: Launch the Photos app on your iPhone.
- Tap the profile icon: Look for the profile icon in the upper-right corner of the screen and tap on it.
- Select Library View: In the menu that appears, you will see options under Library View. Choose between Both Libraries, Personal Library, or Shared Library.
Identifying photos in the Shared Library:
Photos that are part of the Shared Library are marked with a specific Shared Library icon, while photos in your Personal Library have their own distinct icon. This visual cue helps you quickly identify where your photos are stored.
Benefits of using the Shared Library:
- Collaborative sharing: Easily share photos and videos with family and friends.
- Centralized storage: Keep all shared memories in one place.
- Simplified management: Manage permissions and contributions from multiple users.
According to Apple’s support documentation, the Shared Library is designed to streamline photo sharing and management, ensuring that everyone stays connected through shared memories.
5. Verifying Your Apple ID on Your iPhone
To ensure your photos and videos stay updated across all your devices, it’s crucial to use the same Apple ID on every device. This simple check can resolve many syncing issues.
How to verify your Apple ID:
- Open Settings: Go to the Settings app on your iPhone.
- Tap on your name: At the top of the Settings menu, tap on your name to access your Apple ID settings.
- Verify your email: On the Apple ID screen, you’ll see your name, email address, and other account details. Your email address is your Apple ID.
Common issues and solutions:
- Multiple Apple IDs: If you have multiple Apple IDs, make sure you are signed in with the one you use for iCloud Photos.
- Incorrect password: Double-check that you are using the correct password for your Apple ID.
- Two-factor authentication: Ensure two-factor authentication is properly set up to securely access your account.
Why is this important?
Using the same Apple ID across all devices ensures seamless syncing of your photos and videos. This means that any photo you take on your iPhone will automatically appear on your iPad, Mac, and other devices.
6. Using Third-Party Data Recovery Software for iPhone
If you’ve exhausted all built-in methods and still can’t find your photos, third-party data recovery software can be a viable option. These tools are designed to scan your iPhone for deleted files and attempt to recover them.
Popular data recovery software:
- Dr.Fone: Known for its user-friendly interface and comprehensive recovery capabilities.
- EaseUS MobiSaver: Offers a free trial and supports various types of data recovery.
- Tenorshare UltData: Specifically designed for iOS devices and can recover data from iCloud and iTunes backups.
How to use data recovery software:
- Download and install: Choose a reputable data recovery software and download it to your computer.
- Connect your iPhone: Connect your iPhone to your computer using a USB cable.
- Run the scan: Launch the software and follow the on-screen instructions to scan your iPhone for deleted data.
- Preview and recover: After the scan, preview the recoverable photos and select the ones you want to restore.
- Save the recovered photos: Choose a location on your computer to save the recovered photos.
Important considerations:
- Success rate: Data recovery is not guaranteed, and the success rate can vary depending on how long ago the photos were deleted and whether the iPhone’s storage has been overwritten.
- Cost: Most data recovery software requires a paid license to recover data.
- Security: Ensure you download software from a trusted source to avoid malware or privacy risks.
According to a review in Photography Tech Today, Dr.Fone has a high success rate in recovering photos from iPhones, making it a reliable choice for data recovery.
7. Restoring Your iPhone from a Backup
Restoring your iPhone from a backup can recover missing photos if you regularly back up your device to iCloud or your computer. This method essentially reverts your iPhone to a previous state, including the photos that were present at the time of the backup.
Types of backups:
- iCloud Backup: Backs up your iPhone wirelessly to iCloud.
- iTunes/Finder Backup: Backs up your iPhone to your computer using iTunes (on older macOS versions) or Finder (on newer macOS versions).
How to restore from an iCloud backup:
- Erase your iPhone: Go to Settings > General > Transfer or Reset iPhone > Erase All Content and Settings.
- Follow the setup assistant: After your iPhone restarts, follow the on-screen instructions until you reach the Apps & Data screen.
- Choose Restore from iCloud Backup: Select Restore from iCloud Backup and sign in with your Apple ID.
- Select a backup: Choose the most relevant backup from the list and wait for the restore process to complete.
How to restore from an iTunes/Finder backup:
- Connect your iPhone to your computer: Connect your iPhone to the computer you used to create the backup.
- Open iTunes/Finder: Launch iTunes (on older macOS versions) or Finder (on newer macOS versions).
- Select your iPhone: In iTunes, click the iPhone icon. In Finder, select your iPhone from the Locations list.
- Restore Backup: Click Restore Backup and choose the most relevant backup from the list.
- Follow the prompts: Enter your password if prompted and wait for the restore process to complete.
Key points:
- Regular backups: Make sure you regularly back up your iPhone to ensure you have a recent backup to restore from.
- Backup selection: Choose the backup that contains the photos you want to recover.
- Time: Restoring from a backup can take a significant amount of time, depending on the size of the backup.
8. Contacting Apple Support for Assistance
If you’ve tried all the above methods and still can’t recover your photos, contacting Apple Support is a good idea. Apple Support professionals have access to advanced tools and knowledge that can help resolve complex issues.
How to contact Apple Support:
- Online: Visit the Apple Support website and start a chat or schedule a call.
- Phone: Call Apple Support directly using the phone number listed on their website.
- In-person: Visit an Apple Store or authorized service provider.
What to expect:
When you contact Apple Support, be prepared to provide detailed information about your issue, including:
- The steps you’ve already taken to try to recover your photos.
- The type of iPhone you have.
- Your Apple ID and iCloud details.
Benefits of contacting Apple Support:
- Expert assistance: Apple Support professionals are trained to diagnose and resolve a wide range of issues.
- Advanced tools: They have access to tools that you may not have, which can help recover your photos.
- Warranty support: If your iPhone is under warranty, you may be eligible for free support.
According to customer satisfaction surveys, Apple Support is highly rated for its knowledgeable and helpful support staff.
9. Understanding Reasons Why Photos Might Disappear from Your iPhone
Understanding why photos disappear from your iPhone can help you prevent future data loss and troubleshoot current issues. Here are some common reasons:
- Accidental deletion: The most common reason is accidental deletion. Users may unintentionally delete photos while cleaning up their photo library.
- Software glitches: Software bugs or glitches can sometimes cause photos to disappear.
- iCloud sync issues: Problems with iCloud syncing can lead to photos not being properly stored or displayed on your device.
- Storage issues: Running out of storage on your iPhone or iCloud can cause photos to be removed to free up space.
- Failed software updates: Sometimes, photos can be lost during a software update if the process is interrupted or encounters errors.
- Malware or viruses: Although rare on iPhones, malware or viruses can sometimes cause data loss.
Preventive measures:
- Regular backups: Regularly back up your iPhone to iCloud or your computer.
- Enable iCloud Photos: Keep iCloud Photos enabled to automatically sync your photos across all your devices.
- Check storage: Regularly check your iPhone and iCloud storage to ensure you have enough space.
- Be careful when deleting: Double-check before deleting any photos or videos.
- Keep software updated: Keep your iPhone’s software updated to the latest version to avoid bugs and glitches.
- Use security software: Although rare, using security software can help protect your iPhone from malware and viruses.
10. Preventing Future Photo Loss on Your iPhone
Preventing future photo loss involves adopting good habits and leveraging available tools to safeguard your precious memories. Here are some best practices:
- Regular backups: Back up your iPhone regularly to iCloud or your computer. Set up automatic backups to ensure your data is always protected.
- Enable iCloud Photos: Keep iCloud Photos enabled to automatically sync your photos across all your devices. This ensures that your photos are safely stored in the cloud and accessible from anywhere.
- Manage storage: Regularly check your iPhone and iCloud storage to ensure you have enough space. Delete unnecessary files and consider upgrading your iCloud storage plan if needed.
- Use a secure passcode: Protect your iPhone with a strong passcode or biometric authentication (Face ID or Touch ID) to prevent unauthorized access.
- Be cautious with third-party apps: Only download apps from trusted sources like the App Store, and be mindful of the permissions you grant to apps.
- Update software regularly: Keep your iPhone’s software updated to the latest version to benefit from bug fixes and security enhancements.
- Use a photo management app: Consider using a photo management app to organize and back up your photos. Apps like Google Photos and Dropbox offer additional storage and organization options.
- Educate yourself: Stay informed about the latest security threats and best practices for protecting your data.
By following these tips, you can minimize the risk of losing your precious photos and enjoy peace of mind knowing that your memories are safe and secure.
According to dfphoto.net, implementing these preventive measures ensures that your photographic journey remains uninterrupted, safeguarding your visual legacy.
FAQ: How Can I Get My Photos Back On My iPhone?
Here are some frequently asked questions about recovering photos on your iPhone:
1. Where do deleted photos go on an iPhone?
Deleted photos go to the Recently Deleted album, where they stay for 30 days before being permanently deleted.
2. How do I access the Recently Deleted album?
Open the Photos app, scroll down to the Utilities section, and tap Recently Deleted.
3. Can I recover photos deleted from the Recently Deleted album?
No, once photos are deleted from the Recently Deleted album, they are permanently removed from your iPhone.
4. How do I unhide photos on my iPhone?
Open the Photos app, go to the Utilities section, tap Hidden, and select the photos you want to unhide.
5. What is iCloud Photos, and how does it help recover photos?
iCloud Photos syncs your photo library across all your Apple devices. If you lose a photo on one device, it’s still safely stored in the cloud and accessible from other devices.
6. How do I enable iCloud Photos?
Go to Settings > [Your Name] > iCloud > Photos and turn on iCloud Photos.
7. What is the iCloud Shared Photo Library?
The iCloud Shared Photo Library allows you to share photos and videos with up to five other people. Photos might appear missing because they are located in the Shared Library.
8. How do I switch between Personal Library and Shared Library?
Open the Photos app, tap the profile icon in the upper-right corner, and select the desired Library View.
9. What should I do if I can’t find my photos using the built-in methods?
Consider using third-party data recovery software or restoring your iPhone from a backup.
10. When should I contact Apple Support?
Contact Apple Support if you’ve tried all the above methods and still can’t recover your photos. They have access to advanced tools and knowledge that can help.
These FAQs are designed to provide quick and helpful answers to common questions about photo recovery on iPhones, ensuring that dfphoto.net remains a trusted resource for all your photography needs.
In conclusion, retrieving lost photos on your iPhone involves several straightforward steps, from checking the Recently Deleted album to utilizing iCloud features and backups. By understanding these methods and adopting preventive measures, you can safeguard your precious memories and ensure they are always within reach. Remember to regularly back up your iPhone and leverage the power of iCloud to keep your photos safe and accessible. If you’re looking to enhance your photography skills and explore new creative avenues, visit dfphoto.net for insightful tutorials, inspiring galleries, and a vibrant community of photographers. Discover the art of visual storytelling and capture the world through your unique lens.