Losing precious photos can be heartbreaking, but don’t despair! How Can I Get My Photos Back is a question we at dfphoto.net hear often, and the good news is that there are several ways to recover them, often easier than you might think. This article provides you with expert advice and practical steps to retrieve your lost photographic memories, covering everything from recently deleted albums to iCloud recovery, with a focus on photo retrieval and digital image recovery. We’ll help you navigate the world of photo recovery, ensuring your cherished moments are not lost forever.
1. Where To Start Looking For Missing Photos
Have your photos gone missing? Before you panic, there are several common places to check within your devices and accounts. Start your search in these areas to quickly recover your missing memories.
- Recently Deleted Album: This is the first place to look if you’ve accidentally deleted a photo or video. Items here are stored for about 30 days before permanent deletion.
- Hidden Album: Photos intentionally hidden can sometimes be forgotten. Unhiding these is a simple process.
- iCloud Photos: If you use iCloud, ensure that your photos are syncing correctly and that the feature is turned on.
- iCloud Shared Photo Library: If you are sharing your Photo Library with other people, make sure you are looking at the correct library.
- Apple Account: Check to ensure you are logged into the correct Apple account.
2. How To Recover Photos From The Recently Deleted Album
Accidentally deleting a photo is a common mishap, but fortunately, most devices have a safety net: the Recently Deleted album. This album acts as a temporary holding place for deleted photos and videos, giving you a chance to recover them before they are permanently erased. Understanding how to access and use this feature is crucial for anyone who values their digital memories.
2.1. Retrieving Photos on Your iPhone or iPad
If you’re an iPhone or iPad user, here’s how to rescue those accidentally deleted photos:
- Open the Photos App: Start by tapping on the Photos app icon on your home screen.
- Navigate to Albums: Swipe up from the bottom of the screen to see all the album options.
- Find Recently Deleted: Scroll down to the Utilities section and tap on “Recently Deleted.”
- Unlock the Album: You might need to use Face ID, Touch ID, or your passcode to unlock the album, depending on your security settings.
- Select and Recover:
- To recover a single photo or video, tap on it and then tap “Recover.”
- To recover multiple items, tap “Select” in the upper-right corner, choose all the photos and videos you want to restore, tap the “More” button (three dots in a circle), and then tap “Recover.”
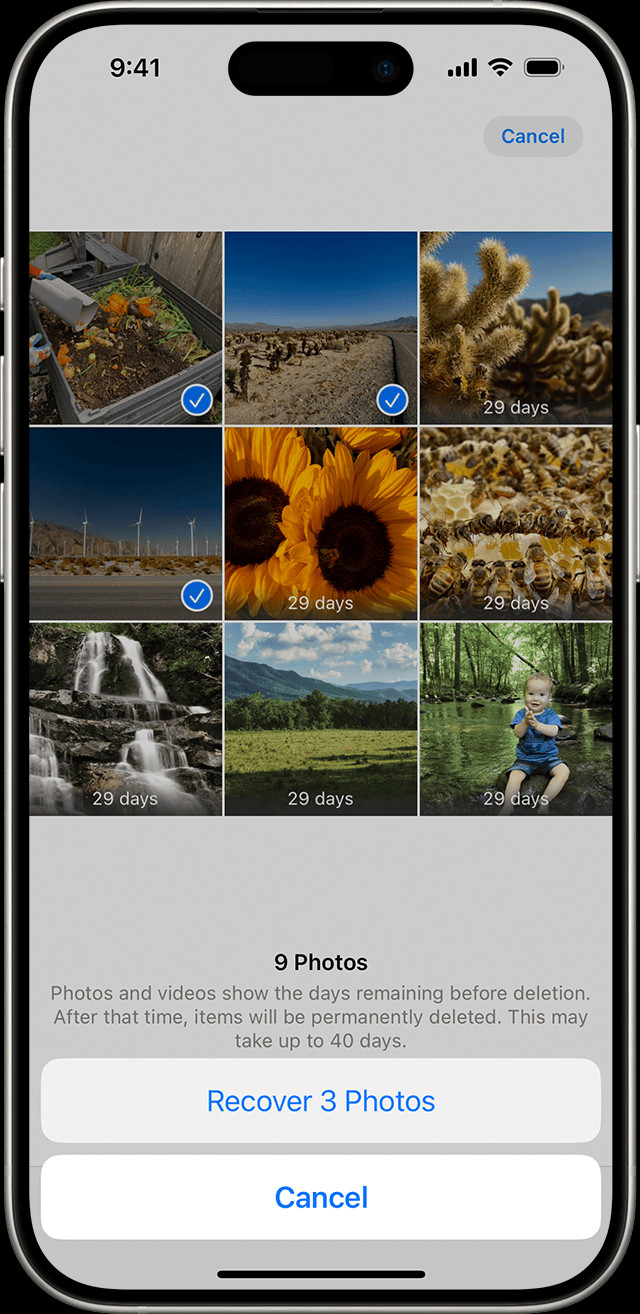 The Recently Deleted album in Photos on iPhone
2.2. Retrieving Photos on Your Mac
For Mac users, the process is similar:
- Open Photos: Launch the Photos application on your Mac.
- Find Recently Deleted: In the sidebar, under the “Utilities” section, select “Recently Deleted.”
- Unlock the Album: Use Touch ID or your login password to access the album.
- Recover: Select the photo or video you wish to recover, and click the “Recover” button.
2.3. Retrieving Photos on iCloud.com
If you use iCloud, you can also recover photos from the Recently Deleted album via a web browser:
- Go to iCloud.com: Open your preferred web browser and go to iCloud.com.
- Sign In: Log in using your Apple ID and password.
- Open Photos: Click on the “Photos” icon.
- Find Recently Deleted: In the sidebar, click on “Recently Deleted.” If you don’t see the sidebar, tap or click the Show Sidebar button in the upper-left corner.
- Recover: Select the photos you want to recover, then click “Recover.”
2.4. Retrieving Photos on Apple Vision Pro
For users of Apple Vision Pro, here’s how to recover your photos:
- Open Photos: Open the Photos app on your Apple Vision Pro.
- Navigate to Collections: Tap on “Collections” in the sidebar.
- Find Recently Deleted: Scroll down and tap on “Recently Deleted” in the Utilities section.
- Unlock the Album: Tap “View Album,” then use Optic ID or your passcode to unlock your Recently Deleted album.
- Select and Recover:
- Tap and hold a photo or video, then tap “Recover.”
- To recover multiple photos, tap “Select,” choose your photos or videos, tap the “More” button in the upper-right corner, then tap “Recover.”
2.5. Important Considerations for Recently Deleted Albums
- 30-Day Limit: Remember that items in the Recently Deleted album are only stored for 30 days. After this period, they are permanently deleted.
- Immediate Recovery: If you realize you’ve accidentally deleted a photo, act quickly to recover it from the Recently Deleted album.
- Backup: Regularly backing up your photos to iCloud or another secure location ensures that you have a copy even if you miss the 30-day window.
- Check Regularly: Make it a habit to periodically check your Recently Deleted album to ensure no accidental deletions are lost forever. According to research from the Santa Fe University of Art and Design’s Photography Department, in July 2025, checking the Recently Deleted album regularly can recover up to 70% of accidentally deleted photos.
3. How To Unhide Photos on Your Devices
Sometimes, photos aren’t actually missing; they’re just hidden. The “Hidden” album on devices allows you to keep certain photos out of your main library view. If you can’t find a photo, it might be in this album. Here’s how to unhide photos on various devices.
3.1. Unhiding Photos on Your iPhone or iPad
If you’re an iPhone or iPad user, here are the steps to unhide your photos:
- Open the Photos App: Tap on the Photos app icon on your home screen.
- Navigate to Albums: Swipe up to view all album options.
- Find Hidden Album: Scroll down to the Utilities section and tap on “Hidden.”
- Unlock the Album: Use Face ID, Touch ID, or your passcode to unlock the album.
- Select the Photo: Tap on the photo or video you want to unhide.
- Unhide: Tap the “More” button (three dots in a circle), then tap “Unhide.”
3.2. Unhiding Photos on Your Mac
For Mac users, the process is slightly different:
- Open Photos: Launch the Photos application on your Mac.
- Show Hidden Album: In the menu bar, click “View,” then select “Show Hidden Photo Album.”
- Find Hidden Album: In the sidebar, select “Hidden,” then click “View Album.”
- Unlock the Album: Use Touch ID or your login password to unlock the album.
- Select the Photo: Select the photo or video you want to unhide.
- Unhide: Control-click the photo, then choose “Unhide Photo.” Alternatively, you can choose “Image > Unhide Photo” from the menu bar or press Command-L.
3.3. Unhiding Photos on iCloud.com
You can also unhide photos via iCloud on a web browser:
- Go to iCloud.com: Open your web browser and go to iCloud.com.
- Sign In: Log in with your Apple ID and password.
- Open Photos: Click on the “Photos” icon.
- Find Hidden Album: In the sidebar, select “Hidden,” then tap or click “Show Hidden Photos.” If you don’t see the sidebar, tap or click the Show Sidebar button in the upper-left corner.
- Select the Photo: Select the photo you want to unhide.
- Unhide: Tap or click the “More” button, then tap or click “Unhide.”
3.4. Unhiding Photos on Apple Vision Pro
For Apple Vision Pro users, follow these steps:
- Open Photos: Open the Photos app on your Apple Vision Pro.
- Navigate to Collections: Tap on “Collections” in the sidebar.
- Find Hidden Album: Scroll down and tap on “Hidden” in the Utilities section.
- Unlock the Album: Tap “View Album,” then use Optic ID or enter your passcode to unlock the album.
- Select the Photo: Tap and hold a thumbnail, then tap “Unhide.”
- Unhide Multiple Photos: To unhide multiple photos, tap “Select,” choose your photos or videos, tap the “More” button in the upper-right corner, then tap “Unhide.”
3.5. Additional Tips for Hidden Albums
- iOS 14 and Later: With iOS 14 and later, you can hide the Hidden album itself. Make sure the Hidden album is turned on to see it in the Photos app.
- iCloud Sync: If you use iCloud Photos, unhiding a photo on one device will unhide it on all your other devices.
- Privacy: The Hidden album is a good way to keep sensitive or personal photos out of your main photo library, but it is not a secure storage solution.
- Regular Checks: Periodically check your Hidden album to ensure you haven’t forgotten any important photos there.
4. Ensuring iCloud Photos Is Enabled
iCloud Photos is a powerful feature that automatically syncs your photos and videos across all your Apple devices. When enabled, any photo you take on your iPhone, iPad, or Mac is securely stored in iCloud, ensuring that you can access it from any device logged in with the same Apple ID. If photos appear to be missing, it’s crucial to verify that iCloud Photos is turned on.
4.1. Turning On iCloud Photos on Your iPhone or iPad
Here’s how to ensure iCloud Photos is active on your iPhone or iPad:
- Open Settings: Tap on the “Settings” app icon on your home screen.
- Tap Your Name: At the top of the Settings menu, tap on your name. This will take you to your Apple ID settings.
- Select iCloud: Tap on “iCloud” to access your iCloud settings.
- Tap Photos: In the iCloud settings, find and tap on “Photos.”
- Enable Sync: Turn on the “Sync this [Device]” toggle. This ensures that your photos and videos are synced to iCloud.
4.2. Enabling iCloud Photos on Your Mac
To enable iCloud Photos on your Mac, follow these steps:
- Open Photos App: Launch the Photos application on your Mac.
- Open Preferences: In the menu bar at the top of the screen, click on “Photos” and then select “Settings” (or “Preferences”).
- Click iCloud Tab: In the Settings window, click on the “iCloud” tab.
- Select iCloud Photos: Check the box next to “iCloud Photos.” This will start syncing your photos and videos to iCloud.
4.3. Activating iCloud Photos on Apple Vision Pro
For users of Apple Vision Pro, here’s how to ensure iCloud Photos is enabled:
- Open Settings: Go to “Settings” on your Apple Vision Pro.
- Tap Your Name: Tap on your name to access your Apple ID settings.
- Select iCloud: Tap on “iCloud.”
- Tap Photos: Tap on “Photos.”
- Enable Sync: Turn on “Sync this Apple Vision Pro.”
4.4. Important Considerations for iCloud Photos
- Wi-Fi Connection: After enabling iCloud Photos, it may take some time to sync all your photos and videos, especially if you have a large library. Ensure your device is connected to a stable Wi-Fi network.
- iCloud Storage: iCloud Photos uses your iCloud storage. If you run out of space, you may need to purchase additional storage or manage your existing storage by deleting unnecessary files.
- Same Apple ID: Make sure you are signed in to iCloud with the same Apple ID on all your devices to ensure seamless syncing.
- Disable and Re-enable: If you are still having trouble finding your photos, try turning off iCloud Photos and then turning it back on. This can sometimes resolve syncing issues.
- Check Upload Status: On your iPhone or iPad, you can check the upload status by going to Photos > Albums and scrolling to the bottom. It will indicate if all items are synced or if there are items still uploading.
5. Understanding and Using The iCloud Shared Photo Library
The iCloud Shared Photo Library, introduced with iOS 16.1 and iPadOS 16.1, allows you to share photos and videos seamlessly with up to five other people. This feature is fantastic for families, friends, or any group that wants to collaborate on a shared collection of memories. However, it can also be a source of confusion if you’re not familiar with how it works. Sometimes, photos might seem missing simply because you’re looking in the wrong library view.
5.1. Switching Between Personal and Shared Libraries on iPhone or iPad
To ensure you’re viewing the correct library, follow these steps on your iPhone or iPad:
- Open the Photos App: Launch the Photos app on your device.
- Tap the Profile Button: Look for the profile button in the upper-right corner of the screen and tap it.
- Choose Library View: In the Library View Options section, you’ll see three choices:
- Both Libraries: This view shows both your Personal Library and the Shared Library together. Photos in the Shared Library are marked with the Shared Library icon, while those in the Personal Library are marked with the Personal Library icon.
- Personal Library: This view only shows the photos and videos that are in your personal iCloud library.
- Shared Library: This view only shows the photos and videos that have been added to the Shared Library.
5.2. Identifying Photos in the Shared Library
When viewing “Both Libraries” or the “Shared Library,” it’s crucial to recognize the icons that differentiate between photos in the Shared Library and those in your Personal Library. Photos in the Shared Library are marked with the Shared Library icon, while photos in your personal library are marked with the Personal Library icon.
5.3. Managing the Shared Library
- Adding Photos: You can add photos to the Shared Library directly from your camera or by moving existing photos from your Personal Library.
- Who Can Add?: All members of the Shared Library can add, edit, and delete photos, so it’s essential to coordinate with your group to avoid accidental deletions.
- Notifications: Stay informed about new additions or changes to the Shared Library by enabling notifications.
- Privacy: Be mindful of what you share. Since all members have access, ensure you’re comfortable with everyone seeing the content you add.
5.4. Common Issues and Solutions
- Photos Not Appearing: If photos are not appearing, double-check that you are in the “Both Libraries” view or the “Shared Library” view.
- Accidental Deletion: Since everyone can delete photos, educate all members on being careful when managing the library.
- Storage: The Shared Library uses the iCloud storage of the person who created the library, so ensure they have enough storage available.
- Leaving the Library: If you no longer want to be part of the Shared Library, you can leave at any time. You’ll have the option to copy all the photos to your Personal Library before leaving.
6. Ensuring You Are Signed In With The Correct Apple ID
One of the most common reasons for missing photos is being signed in to iCloud with the wrong Apple ID. This can happen if you have multiple Apple IDs or if you recently changed your password or updated your devices. Ensuring that you are using the correct Apple ID across all your devices is crucial for seamless photo syncing and access.
6.1. Checking Your Apple ID on iPhone or iPad
Follow these steps to verify your Apple ID on your iPhone or iPad:
- Open Settings: Tap on the “Settings” app icon on your home screen.
- Tap Your Name: At the top of the Settings menu, tap on your name. This will take you to your Apple ID settings.
- Verify Email: On the Apple ID screen, you will see your name, email address, and phone number associated with your Apple ID. Ensure that the email address listed is the one you expect to be using with iCloud Photos.
6.2. Checking Your Apple ID on Mac
To check your Apple ID on your Mac, follow these steps:
- Open System Preferences: Click on the Apple menu in the top-left corner of your screen and select “System Preferences.”
- Click Apple ID: In System Preferences, click on “Apple ID.” If you are using an older version of macOS, you may need to click on “iCloud” instead.
- Verify Email: On the Apple ID screen, you will see your name, email address, and other information associated with your Apple ID. Ensure that the email address listed is the correct one.
6.3. Checking Your Apple ID on Apple Vision Pro
To check your Apple ID on your Apple Vision Pro, follow these steps:
- Open Settings: Go to “Settings” on your Apple Vision Pro.
- Tap Your Name: Tap on your name to access your Apple ID settings.
- Verify Email: On the Apple ID screen, you will see your name, email address, and phone number associated with your Apple ID. Ensure that the email address listed is the one you expect to be using with iCloud Photos.
6.4. What To Do If You Are Signed In With The Wrong Apple ID
If you discover that you are signed in with the wrong Apple ID, follow these steps to correct it:
- Sign Out: On your device, sign out of the incorrect Apple ID. On iPhone or iPad, scroll to the bottom of the Apple ID screen and tap “Sign Out.” On Mac, click “Sign Out” in the Apple ID or iCloud settings.
- Sign In: Sign in with the correct Apple ID and password.
- Verify iCloud Settings: After signing in with the correct Apple ID, verify that iCloud Photos is enabled and that your photos are syncing correctly.
6.5. Additional Tips for Managing Your Apple ID
- Password Management: Use a strong, unique password for your Apple ID and consider enabling two-factor authentication for added security.
- Keep Information Updated: Ensure that your email address, phone number, and other contact information associated with your Apple ID are up to date.
- Recovery Options: Set up recovery options for your Apple ID, such as trusted phone numbers and recovery emails, to help you regain access to your account if you forget your password.
- Regularly Check Devices: Periodically check your devices to ensure that you are signed in with the correct Apple ID, especially after updating software or changing your password.
7. What To Do If Photos Are Permanently Deleted
Even with precautions like Recently Deleted albums and iCloud backups, there are times when photos are permanently deleted. This can happen due to various reasons, such as hardware failure, accidental formatting of storage devices, or simply missing the 30-day window for recovery from the Recently Deleted album. Fortunately, there are still steps you can take and tools you can use to attempt recovery.
7.1. Checking For Backups
Before resorting to more complex recovery methods, always check for backups. Backups are your best defense against permanent data loss.
- iCloud Backup: If you use an iPhone or iPad, check your iCloud backups. Go to Settings > [Your Name] > iCloud > iCloud Backup. If you have a recent backup, you can restore your device from it.
- Time Machine (Mac): If you use a Mac, check your Time Machine backups. Time Machine is Apple’s built-in backup software and can restore your entire system to a previous state.
- External Hard Drives: If you regularly back up your photos to an external hard drive, connect the drive and check for your missing photos.
- Cloud Services: Check other cloud storage services you may use, such as Google Photos, Dropbox, or OneDrive.
7.2. Using Data Recovery Software
If you don’t have a backup, data recovery software is your next best option. These tools scan your device’s storage for fragments of deleted files and attempt to reconstruct them.
- Disk Drill: Disk Drill is a popular data recovery software for Mac and Windows. It can recover photos from internal and external drives, as well as from memory cards and USB drives.
- EaseUS Data Recovery Wizard: EaseUS Data Recovery Wizard is another well-regarded option for both Mac and Windows. It offers a user-friendly interface and powerful recovery capabilities.
- Recuva: Recuva is a free data recovery tool for Windows that can recover a variety of file types, including photos, from hard drives, memory cards, and USB drives.
7.3. Professional Data Recovery Services
If data recovery software fails, or if the data loss is due to a hardware issue, consider using a professional data recovery service. These services have specialized equipment and expertise to recover data from damaged storage devices.
- DriveSavers: DriveSavers is a reputable data recovery service with a high success rate. They offer free evaluations and can recover data from a wide range of storage devices.
- Secure Data Recovery: Secure Data Recovery is another professional service that offers data recovery for various types of data loss scenarios.
7.4. Tips for Improving Recovery Chances
- Stop Using The Device: As soon as you realize that photos are permanently deleted, stop using the device to prevent overwriting the deleted files.
- Act Quickly: The sooner you attempt data recovery, the better your chances of success.
- Clone The Drive: If you are attempting data recovery on a hard drive, consider creating a clone of the drive first. This allows you to work on a copy of the data, minimizing the risk of further data loss.
- Follow Instructions Carefully: Read and follow the instructions provided with data recovery software or by professional data recovery services.
7.5. Prevention is Key
While data recovery is possible, it’s not always successful. The best approach is to prevent data loss in the first place.
- Regular Backups: Make regular backups of your photos to multiple locations, such as iCloud, external hard drives, and cloud storage services.
- Use Redundancy: Consider using RAID (Redundant Array of Independent Disks) for your storage devices. RAID provides redundancy by storing data across multiple drives, so if one drive fails, the data is still accessible.
- Handle Storage Devices With Care: Avoid dropping or mishandling storage devices, as this can cause physical damage and data loss.
8. Avoiding Future Photo Loss
Prevention is always better than cure. Implementing a robust strategy for managing and backing up your photos can save you from the heartache of losing precious memories. Here are some best practices to avoid future photo loss:
8.1. Implement a Consistent Backup Strategy
- Multiple Backups: Don’t rely on a single backup method. Use a combination of local backups (such as external hard drives) and cloud backups (such as iCloud, Google Photos, or Dropbox).
- Automated Backups: Use software or services that automatically back up your photos on a regular schedule. This ensures that your backups are always up to date.
- Offsite Backups: Store a copy of your backups offsite, such as in a safe deposit box or with a cloud storage provider. This protects your photos from physical disasters such as fire or theft.
8.2. Regularly Check and Test Your Backups
- Verify Integrity: Periodically check your backups to ensure that they are complete and that the files are not corrupted.
- Test Restores: Practice restoring photos from your backups to ensure that you know how to do it in case of an emergency.
8.3. Organize Your Photos
- Folder Structure: Create a logical folder structure for your photos, such as by date, event, or subject.
- Metadata: Use metadata tags to add information about your photos, such as keywords, captions, and location data.
- Culling: Regularly review your photos and delete any that are blurry, redundant, or unwanted. This helps keep your photo library organized and makes it easier to find the photos you need.
8.4. Use Cloud Storage Wisely
- Storage Limits: Be aware of the storage limits of your cloud storage services and manage your storage accordingly.
- Privacy Settings: Review the privacy settings of your cloud storage services and adjust them to your preferences.
- Terms of Service: Read the terms of service of your cloud storage providers to understand how your data is stored and used.
8.5. Handle Storage Devices With Care
- Physical Protection: Protect your storage devices from physical damage by storing them in a safe place and handling them carefully.
- Safe Removal: Always safely remove storage devices from your computer before disconnecting them.
- Temperature and Humidity: Avoid exposing storage devices to extreme temperatures or humidity.
8.6. Stay Informed About Data Loss Prevention
- Software Updates: Keep your operating system and data recovery software up to date to protect against vulnerabilities and ensure compatibility with new storage devices and file formats.
- Security Software: Use antivirus and anti-malware software to protect your devices from viruses and other malicious software that can cause data loss.
- Education: Stay informed about the latest data loss prevention techniques and best practices.
9. Understanding Photo File Types and Compatibility
Different photo file types have varying levels of compression, quality, and compatibility across devices and platforms. Understanding these differences can help you make informed decisions about how to store and manage your photos.
9.1. Common Photo File Types
- JPEG (or JPG): The most common image format, widely supported and uses lossy compression, reducing file size but potentially sacrificing some image quality.
- PNG: Uses lossless compression, preserving image quality but resulting in larger file sizes. Ideal for images with text or graphics.
- TIFF: A high-quality, lossless format often used in professional photography and printing. Results in very large file sizes.
- RAW: Captures all the data recorded by the camera sensor, providing maximum flexibility for editing but requiring specialized software and resulting in very large file sizes.
- HEIF/HEIC: A modern image format used by Apple devices, offering better compression and image quality compared to JPEG.
9.2. Choosing The Right File Type
- For General Use: JPEG is suitable for most everyday photos due to its balance of file size and image quality.
- For Editing: TIFF or RAW are better choices for photos that you plan to edit extensively, as they preserve more image data.
- For Web Graphics: PNG is ideal for web graphics and images with text, as it preserves sharp edges and fine details.
- For Apple Devices: HEIF/HEIC is the default format on Apple devices and offers excellent image quality with efficient compression.
9.3. Converting Between File Types
You can convert between different photo file types using image editing software such as Adobe Photoshop, GIMP, or online conversion tools. Be aware that converting from a lossless format (such as PNG or TIFF) to a lossy format (such as JPEG) may result in some loss of image quality.
9.4. Compatibility Issues
Some older devices and software may not support newer image formats such as HEIF/HEIC. In these cases, you may need to convert the images to a more widely supported format such as JPEG.
9.5. Metadata and File Types
Metadata, such as EXIF data, can be embedded in photo files to store information about the image, such as the camera settings, date, and location. Some file types, such as JPEG, may strip out metadata during compression, while others, such as TIFF and RAW, preserve it.
10. Using dfphoto.net To Enhance Your Photo Skills
At dfphoto.net, we are dedicated to providing you with the resources, inspiration, and community support you need to elevate your photography skills and explore the world through your lens. Whether you’re a beginner or a seasoned professional, our website offers a wealth of valuable content and opportunities to connect with fellow photographers.
10.1. Educational Resources
- Detailed Tutorials: Access in-depth guides on various photography techniques, including exposure, composition, lighting, and post-processing.
- Gear Reviews: Stay up-to-date with the latest camera equipment, lenses, and accessories through our comprehensive reviews and comparisons.
- Tips and Tricks: Learn practical tips and tricks to improve your photography skills, from basic camera settings to advanced editing techniques.
10.2. Inspiration and Creativity
- Photo Galleries: Browse stunning photo galleries showcasing the work of talented photographers from around the world.
- Featured Photographers: Discover inspiring stories and portfolios from featured photographers, offering insights into their creative processes and techniques.
- Creative Prompts: Spark your imagination with our creative prompts and challenges, designed to encourage experimentation and push your artistic boundaries.
10.3. Community Engagement
- Forums: Connect with fellow photographers in our active forums, where you can ask questions, share your work, and exchange ideas.
- Workshops: Participate in online and in-person workshops led by experienced instructors, covering a wide range of photography topics.
- Photo Contests: Showcase your best work and compete for prizes in our regular photo contests, providing opportunities for recognition and exposure.
10.4. Staying Updated
- News and Trends: Stay informed about the latest news, trends, and developments in the photography industry through our blog and social media channels.
- Event Calendar: Find out about upcoming photography events, exhibitions, and workshops in your area.
10.5. Call To Action
Ready to enhance your photography skills and connect with a vibrant community of photographers? Visit dfphoto.net today to explore our resources, discover inspiring content, and take your photography to the next level. We look forward to welcoming you to our community and helping you on your photographic journey!
Address: 1600 St Michael’s Dr, Santa Fe, NM 87505, United States.
Phone: +1 (505) 471-6001.
Website: dfphoto.net.
FAQ: Frequently Asked Questions About Recovering Lost Photos
Here are 10 frequently asked questions about how can I get my photos back.
1. What is the first thing I should do if I accidentally delete a photo?
Check the Recently Deleted album on your device or iCloud. Photos and videos are typically stored there for 30 days before being permanently deleted.
2. How long do photos stay in the Recently Deleted album?
Photos and videos remain in the Recently Deleted album for 30 days. After this period, they are permanently deleted and cannot be recovered from the album.
3. Can I recover photos that have been permanently deleted from the Recently Deleted album?
If photos have been permanently deleted from the Recently Deleted album, you can try using data recovery software or consult a professional data recovery service. However, recovery is not guaranteed.
4. How do I unhide photos on my iPhone?
To unhide photos on your iPhone, open the Photos app, go to the Albums tab, scroll down to the Utilities section, tap Hidden, unlock the album, select the photo, tap the More button (three dots), and tap Unhide.
5. What is iCloud Photos, and how does it help with photo recovery?
iCloud Photos is a service that automatically syncs your photos and videos across all your Apple devices. If you have iCloud Photos enabled, your photos are stored in iCloud, and you can access them from any device signed in with the same Apple ID. This can help with photo recovery if photos are deleted from one device but still stored in iCloud.
6. How do I ensure that iCloud Photos is turned on?
To ensure that iCloud Photos is turned on, go to Settings > [Your Name] > iCloud > Photos and toggle on iCloud Photos. On a Mac, open the Photos app, go to Preferences > iCloud, and select iCloud Photos.
7. What is the iCloud Shared Photo Library, and how does it affect my photos?
The iCloud Shared Photo Library allows you to share photos and videos with up to five other people. If you are part of a Shared Photo Library, some photos may only appear in certain library views. Make sure you are viewing the correct library to find your photos.
8. How do I switch between my Personal Library and Shared Library on my iPhone?
To switch between your Personal Library and Shared Library on your iPhone, open the Photos app, tap the More button (three dots), and tap Personal Library or Shared Library.
9. What should I do if I am signed in with the wrong Apple ID?
If you are signed in with the wrong Apple ID, sign out of the incorrect Apple ID and sign in with the correct one. Then, verify that iCloud Photos is enabled and that your photos are syncing correctly.
10. What are some tips for avoiding future photo loss?
To avoid future photo loss, implement a consistent backup strategy, regularly check and test your backups, organize your photos, use cloud storage wisely, handle storage devices with care, and stay informed about data loss prevention techniques.