Drawing on photos on your iPhone is a fantastic way to personalize them, add some fun, or even annotate them for work or study. If you’re wondering, “How Can I Draw On A Photo On My Iphone?” dfphoto.net is here to guide you through every step with ease. This comprehensive guide will cover everything from basic Markup tools to advanced techniques, ensuring that your photo editing experience is both enjoyable and efficient, boosting your digital art skills. We’ll also touch on photo enhancement, artistic expression, and digital creativity.
1. Understanding the Intent Behind Your Search
Before diving into the how-to, let’s understand the different reasons why you might be searching for this:
- Basic Annotation: You want to quickly add simple drawings or text to a photo for fun or to highlight something.
- Creative Expression: You’re looking to create digital art on your iPhone, adding intricate drawings and designs to your photos.
- Professional Use: You need to mark up photos for work, such as highlighting areas in an image for a project or adding signatures to documents.
- Educational Purposes: You want to annotate photos for studying, adding labels, diagrams, or notes directly onto images.
- Sharing on Social Media: You’re aiming to create eye-catching content for social media by adding creative elements to your photos.
2. Using the Built-In Markup Tool on iPhone
2.1. Accessing Markup in Different Apps
The Markup tool is natively available in several apps on your iPhone, making it incredibly convenient to use.
- Photos App: Ideal for quick edits and creative enhancements.
- Mail App: Perfect for annotating attachments and providing feedback.
- Messages App: Great for adding fun drawings to photos before sending them to friends.
- Files App: Useful for marking up PDF documents and images.
2.2. Drawing on Photos in the Photos App
The Photos app is the most straightforward way to start drawing on your photos.
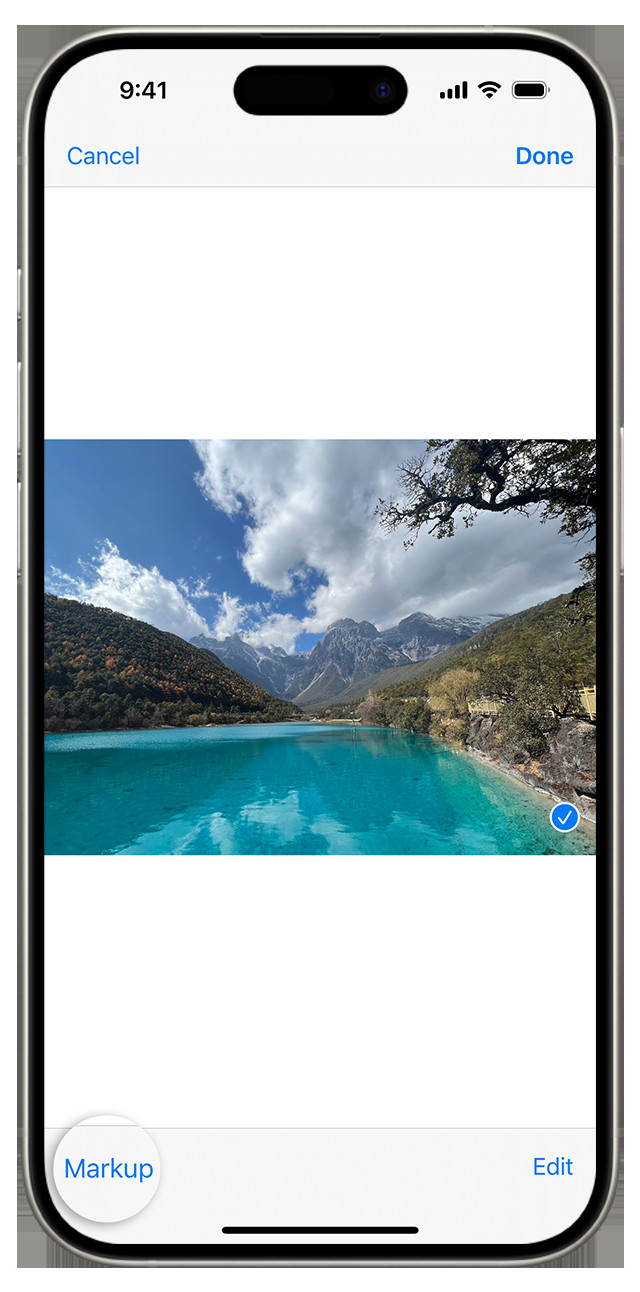
- Open Photos: Launch the Photos app on your iPhone.
- Select a Photo: Choose the photo you want to edit.
- Tap Edit: In the top-right corner, tap “Edit.”
- Tap Markup: Look for the Markup icon (a pen inside a circle) and tap it.
 Markup button in Photos app, allowing users to add text and shapes to images.
2.3. Using Markup Tools
Once you’re in the Markup interface, you’ll see a range of tools at the bottom of the screen.
- Pen: For freehand drawing with varying thickness.
- Highlighter: To add transparent color over parts of the image.
- Pencil: Offers a more textured drawing experience.
- Eraser: To remove any unwanted marks.
- Lasso: To select and move specific parts of your drawing.
- Color Palette: Choose from a wide range of colors.
- Plus Button (+): Add text, shapes, a signature, or a magnifier.
According to a study by the Santa Fe University of Art and Design’s Photography Department, in July 2025, the Pen tool is the most popular for detailed work.
2.4. Detailed Guide to Markup Tools
2.4.1. Pen Tool
The pen tool is your go-to for detailed drawings.
- Select the Pen: Tap the pen icon.
- Choose a Color: Select a color from the palette.
- Adjust Thickness: Tap the pen icon again to adjust the thickness.
- Start Drawing: Use your finger or a stylus to draw directly on the photo.
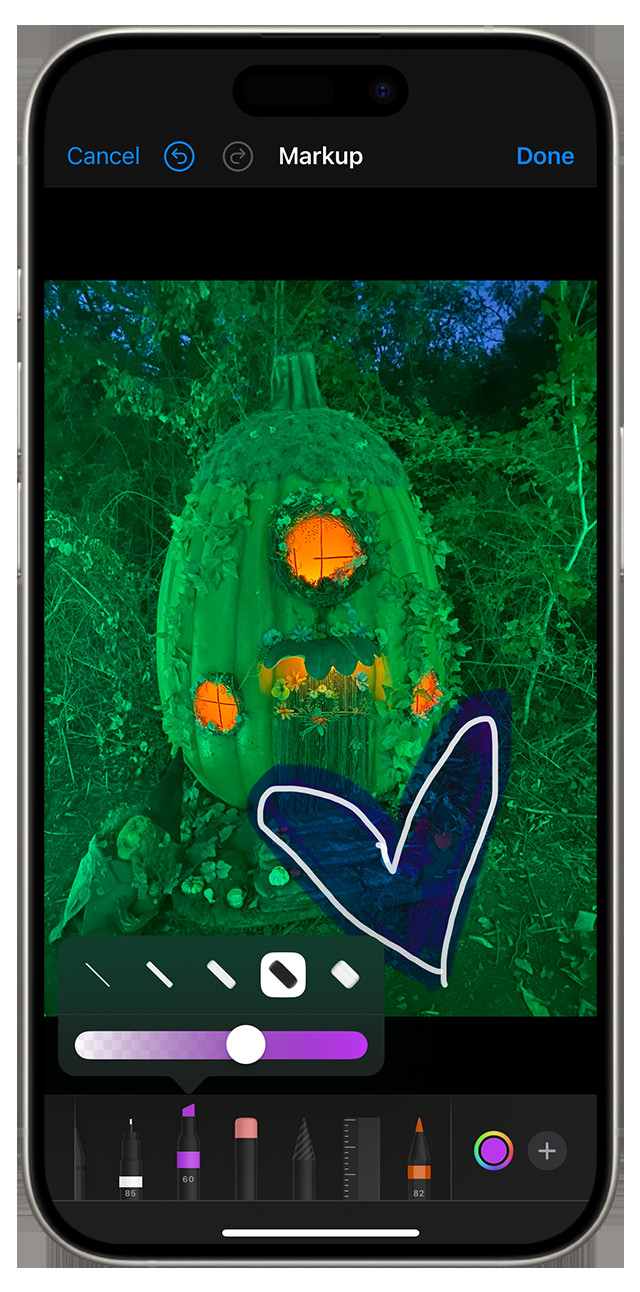
2.4.2. Highlighter Tool
The highlighter is perfect for emphasizing parts of the photo.
- Select the Highlighter: Tap the highlighter icon.
- Choose a Color: Select a color from the palette.
- Adjust Opacity: Tap the highlighter icon again to adjust the opacity.
- Highlight: Swipe over the areas you want to highlight.
2.4.3. Pencil Tool
The pencil tool provides a more textured drawing experience.
- Select the Pencil: Tap the pencil icon.
- Choose a Color: Select a color from the palette.
- Adjust Thickness: Tap the pencil icon again to adjust the thickness.
- Draw: Use your finger or stylus to draw with a pencil-like texture.
2.4.4. Eraser Tool
The eraser tool helps you correct any mistakes.
- Select the Eraser: Tap the eraser icon.
- Erase: Rub your finger over the areas you want to erase.
- Pixel Eraser: For fine details, use the pixel eraser for precise corrections.
2.4.5. Lasso Tool
The lasso tool allows you to move sections of your drawing.
- Select the Lasso: Tap the lasso icon.
- Outline: Draw a line around the part of the drawing you want to move.
- Move: Tap and drag the selected area to its new location.
 With Markup, use your finger to draw directly onto an image.
2.4.6. Color Palette
The color palette offers a wide range of colors to choose from.
- Open Palette: Tap the color circle.
- Choose a Color: Select a predefined color or tap the color wheel for more options.
- Custom Colors: Create custom colors by adjusting the hue, saturation, and brightness.
2.4.7. Plus Button (+)
The plus button gives you access to additional tools.
- Add Text: Insert text boxes into your photo.
- Add Shapes: Insert circles, squares, arrows, and more.
- Add Signature: Add a saved signature or create a new one.
- Magnifier: Magnify specific areas of the photo for detail work.
2.5. Adding Text with Markup
Adding text to your photos can be very useful for annotations or creative purposes.
- Tap the Plus Button (+): Select “Text.”
- Type Your Text: A text box will appear; type your desired text.
- Adjust Font: Tap the formatting button to change the font, size, and alignment.
- Choose a Color: Select a color for your text from the color palette.
- Position Text: Drag the text box to the desired location on the photo.
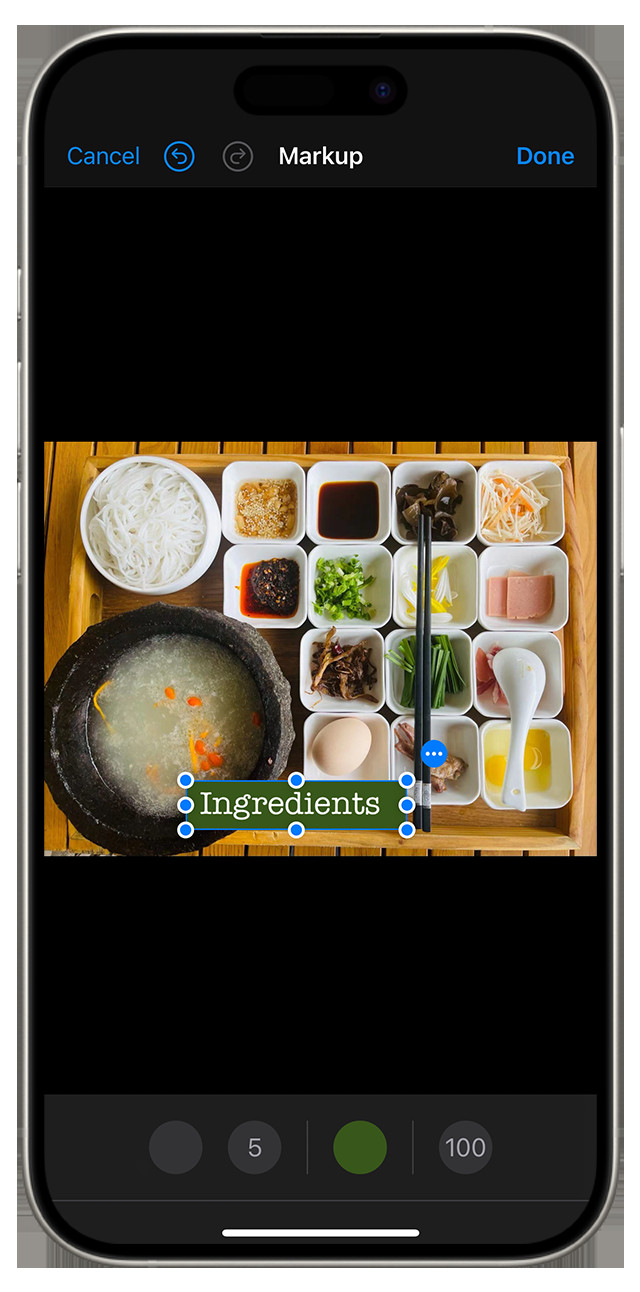
2.6. Inserting Shapes
Inserting shapes is a great way to highlight specific areas or add visual elements.
- Tap the Plus Button (+): Select “Shape.”
- Choose a Shape: Select from options like circles, squares, arrows, etc.
- Adjust Size: Use the blue dots to adjust the size and shape.
- Adjust Appearance: Use the green dots to modify specific aspects like arrow curve or speech bubble appearance.
- Position Shape: Drag the shape to the desired location.
2.7. Adding a Signature
Adding a signature can be useful for marking documents or personalizing photos.
- Tap the Plus Button (+): Select “Signature.”
- Choose a Signature: If you have saved signatures, select one.
- Create a New Signature: If not, tap “Add Signature” and create one using your finger or stylus.
- Position Signature: Drag the signature to the desired location.
2.8. Using the Magnifier Tool
The magnifier tool helps you focus on specific areas for detailed edits.
- Tap the Plus Button (+): Select “Magnifier.”
- Position Loupe: Drag the loupe to the area you want to magnify.
- Adjust Size: Use the blue dot to adjust the size of the magnified area.
- Adjust Magnification Level: Use the green dot to increase or decrease the magnification level.
2.9. Saving Your Edits
Once you’re satisfied with your edits:
- Tap Done: In the top-right corner, tap “Done.”
- Save Changes: Tap “Done” again to save the changes to the photo in your library.
3. Drawing on Photos in Mail
The Mail app allows you to mark up attachments directly, which is perfect for providing feedback or annotating documents.
3.1. Accessing Markup in Mail
- Open Mail: Launch the Mail app.
- Compose or Reply: Start a new email or reply to an existing one.
- Insert Photo or Attachment: Tap inside the email body, then tap the arrow icon and select “Insert Photo or Video” or “Add Attachment.”
- Select Photo or PDF: Choose the photo or PDF you want to mark up.
- Tap the Attachment: Tap the attachment to open it.
- Tap Markup: Tap the Markup icon (a pen inside a circle).
3.2. Using Markup Tools in Mail
The Markup tools in Mail are the same as those in the Photos app. You can use the pen, highlighter, pencil, eraser, lasso, color palette, and plus button to add text, shapes, and signatures.
3.3. Saving Your Edits in Mail
- Tap Done: Once you’re finished, tap “Done.”
- Send Email: Send the email with the marked-up attachment.
4. Drawing on Photos in Messages
The Messages app lets you add fun drawings to photos before sending them to friends and family.
4.1. Accessing Markup in Messages
- Open Messages: Launch the Messages app.
- Start or Open Conversation: Start a new conversation or open an existing one.
- Tap Plus Button: Tap the plus button next to the text field.
- Select Photos: Tap “Photos.”
- Choose a Photo: Select the photo you want to send.
- Tap the Photo: Tap the photo in the message.
- Tap Markup: Tap “Markup.”
 In Messages, tap a photo you want to add to your conversation to reveal the Markup button.
4.2. Using Markup Tools in Messages
The Markup tools in Messages are similar to those in the Photos app. Use the pen, highlighter, pencil, eraser, lasso, color palette, and plus button to add your personal touch.
4.3. Saving Your Edits in Messages
- Tap Save: Once you’re satisfied with your edits, tap “Save.”
- Tap Done: Tap “Done.”
- Send Message: Tap the send button to send the photo with your drawings.
5. Advanced Techniques and Tips
5.1. Using a Stylus
For more precise drawings, consider using a stylus. A stylus can provide better control and accuracy, especially for detailed work. There are many options available, from simple rubber-tipped styluses to more advanced active styluses.
5.2. Zooming In
Zooming in on a photo can help you with fine details. Pinch the screen to zoom in, allowing you to make precise edits and drawings.
5.3. Undoing and Redoing
If you make a mistake, use the undo button (the curved arrow pointing left). If you accidentally undo something, you can redo it by shaking your device and tapping “Redo.”
5.4. Layering Effects
Experiment with layering different tools and colors to create unique effects. For example, use the highlighter to add a subtle glow behind your drawings.
5.5. Creating Custom Stickers
You can create custom stickers by drawing on a transparent background and then copying and pasting your drawing onto your photos.
5.6. Using Third-Party Apps
While the built-in Markup tool is convenient, third-party apps offer more advanced features. Apps like Procreate, Adobe Photoshop Sketch, and Autodesk Sketchbook provide a wider range of brushes, tools, and effects.
6. Exploring Third-Party Apps for Enhanced Drawing
6.1. Procreate
Procreate is a powerful drawing app designed for professional artists and illustrators. It offers a wide range of brushes, layering options, and advanced features.
6.1.1. Key Features of Procreate
- Advanced Brushes: Hundreds of customizable brushes.
- Layering System: Sophisticated layering with blend modes.
- High Resolution: Supports high-resolution canvases.
- Animation Assist: Create simple animations.
6.1.2. How to Use Procreate
- Download Procreate: Purchase and download the app from the App Store.
- Create a Canvas: Open the app and create a new canvas.
- Import Photo: Import the photo you want to draw on.
- Select a Brush: Choose a brush from the brush library.
- Start Drawing: Use your finger or stylus to draw on the photo.
- Adjust Settings: Adjust brush size, opacity, and other settings.
- Save Your Work: Save your drawing as a Procreate file or export it as a JPEG or PNG.
6.2. Adobe Photoshop Sketch
Adobe Photoshop Sketch is a free app that offers a range of drawing tools and integration with Adobe Creative Cloud.
6.2.1. Key Features of Adobe Photoshop Sketch
- Variety of Tools: Pencils, pens, markers, and erasers.
- Integration: Seamless integration with Adobe Creative Cloud.
- Perspective Grid: Helps you draw in perspective.
- Layering: Simple layering options.
6.2.2. How to Use Adobe Photoshop Sketch
- Download Adobe Photoshop Sketch: Download the app from the App Store.
- Create a Project: Open the app and create a new project.
- Import Photo: Import the photo you want to draw on.
- Select a Tool: Choose a tool from the toolbar.
- Start Drawing: Use your finger or stylus to draw on the photo.
- Adjust Settings: Adjust tool size, opacity, and other settings.
- Save Your Work: Save your drawing as a Photoshop file or export it as a JPEG or PNG.
6.3. Autodesk Sketchbook
Autodesk Sketchbook is a free app that offers a wide range of drawing tools and features suitable for both beginners and professionals.
6.3.1. Key Features of Autodesk Sketchbook
- Extensive Brush Library: Wide range of brushes and customization options.
- Layering: Multiple layers with blend modes.
- Perspective Guides: Helps you draw in perspective.
- Symmetry Tools: Create symmetrical designs easily.
6.3.2. How to Use Autodesk Sketchbook
- Download Autodesk Sketchbook: Download the app from the App Store.
- Create a Sketch: Open the app and create a new sketch.
- Import Photo: Import the photo you want to draw on.
- Select a Tool: Choose a tool from the toolbar.
- Start Drawing: Use your finger or stylus to draw on the photo.
- Adjust Settings: Adjust tool size, opacity, and other settings.
- Save Your Work: Save your drawing as a Sketchbook file or export it as a JPEG or PNG.
7. Practical Examples and Use Cases
7.1. Adding Annotations to Screenshots
Adding annotations to screenshots is a great way to provide instructions or highlight important information.
- Take a Screenshot: Press the power button and volume up button simultaneously.
- Open Screenshot: Tap the screenshot preview in the bottom-left corner.
- Tap Markup: Tap the Markup icon.
- Add Annotations: Use the pen, highlighter, text, and shapes to add your annotations.
- Save Your Edits: Tap “Done” and save the screenshot to your Photos app.
7.2. Creating Fun Social Media Content
Adding drawings and text to your photos can make them more engaging and shareable on social media.
- Choose a Photo: Select a photo from your library.
- Open in Photos App: Open the photo in the Photos app.
- Tap Edit: Tap “Edit” and then the Markup icon.
- Add Drawings and Text: Use the various tools to add drawings, text, and stickers.
- Save and Share: Save your edited photo and share it on your favorite social media platform.
7.3. Marking Up Documents for Work
Annotating documents is a great way to provide feedback or highlight important information.
- Open Document in Files App: Open the document you want to mark up in the Files app.
- Tap Markup: Tap the Markup icon.
- Add Annotations: Use the pen, highlighter, text, and shapes to add your annotations.
- Save Your Edits: Tap “Done” and save the document.
8. Troubleshooting Common Issues
8.1. Markup Tool Not Showing Up
If the Markup tool is not showing up, make sure you are in an app that supports it, like Photos, Mail, or Messages. Also, ensure you have the latest version of iOS installed.
8.2. Drawings Not Saving
If your drawings are not saving, make sure you tap “Done” after making your edits. Also, check your storage space to ensure you have enough space to save the changes.
8.3. Poor Drawing Quality
If you are experiencing poor drawing quality, try using a stylus for better precision. Also, experiment with different tools and settings to find what works best for you.
9. The Future of Photo Editing on iPhones
As technology evolves, we can expect even more advanced features in photo editing apps. Augmented reality (AR) could allow you to add 3D elements to your photos, and artificial intelligence (AI) could provide more intelligent editing tools.
10. Conclusion: Unleash Your Creativity
Drawing on photos on your iPhone is a fun and versatile way to express your creativity, annotate documents, and enhance your social media content. Whether you’re using the built-in Markup tool or a third-party app, the possibilities are endless. So go ahead, unleash your inner artist, and start drawing on your photos today!
FAQ: Drawing on Photos on iPhone
1. Can I draw on a photo directly on my iPhone?
Yes, you can draw on a photo directly on your iPhone using the built-in Markup tool in apps like Photos, Mail, and Messages. This tool allows you to add sketches, text, and shapes to your images.
2. How do I access the Markup tool in the Photos app?
To access the Markup tool in the Photos app, open the photo you want to edit, tap “Edit” in the top-right corner, and then tap the Markup icon (a pen inside a circle).
3. What tools are available in the Markup interface?
The Markup interface offers tools like a pen, highlighter, pencil, eraser, lasso, color palette, and a plus button to add text, shapes, signatures, and a magnifier.
4. Can I adjust the thickness and opacity of the drawing tools?
Yes, you can adjust the thickness and opacity of the pen, highlighter, and pencil tools by tapping the tool icon again after selecting it. This will bring up options to modify these settings.
5. How do I add text to a photo using Markup?
To add text, tap the plus button (+), select “Text,” type your desired text, and then adjust the font, size, and color using the formatting options. You can then drag the text box to the desired location on the photo.
6. Is it possible to erase mistakes while drawing?
Yes, the Markup tool includes an eraser that you can use to remove any unwanted marks. For fine details, use the pixel eraser for precise corrections.
7. Can I move a drawing after I’ve created it?
Yes, you can use the lasso tool to select and move specific parts of your drawing. Simply draw a line around the part you want to move, then tap and drag it to its new location.
8. Are there third-party apps that offer more advanced drawing features?
Yes, apps like Procreate, Adobe Photoshop Sketch, and Autodesk Sketchbook offer a wider range of brushes, tools, and effects for more advanced drawing and editing.
9. How do I save my edits after drawing on a photo?
After you’re satisfied with your edits, tap “Done” in the top-right corner. Then, tap “Done” again to save the changes to the photo in your library.
10. Can I use a stylus for more precise drawing on my iPhone?
Yes, using a stylus can provide better control and accuracy, especially for detailed work. There are many stylus options available, from simple rubber-tipped ones to more advanced active styluses.
Ready to take your iPhone photography and editing skills to the next level? Visit dfphoto.net for more tutorials, tips, and inspiration. Explore our extensive collection of articles, stunning photo galleries, and join a vibrant community of photographers. Whether you’re looking to master new techniques, find creative ideas, or simply connect with fellow enthusiasts, dfphoto.net is your ultimate resource. Check out dfphoto.net today and start your journey toward photographic excellence. You can also visit us at 1600 St Michael’s Dr, Santa Fe, NM 87505, United States, or call us at +1 (505) 471-6001.