Are you curious about wallet photo sizes and their uses in photography? This article from dfphoto.net explores wallet photo dimensions, comparing them to passport photos, and revealing their diverse applications in the world of visual arts. We’ll also cover aspect ratios and tips for creating stunning wallet-sized prints, so you can unlock the creative potential of these compact images and capture memories in a unique way using creative photography and visual storytelling.
1. Understanding Wallet Photo Dimensions
What exactly are the dimensions of a wallet photo? Let’s explore the common sizes and variations available, providing you with a clear understanding of these compact prints.
Wallet photos don’t adhere to a single, standard size, but they typically measure around 2×3 inches. This size makes them ideal for carrying in a wallet, purse, or even displaying in small frames. However, different retailers and print services might offer slight variations.
1.1 Common Wallet Photo Sizes in Inches
What are the typical dimensions of wallet photos offered by popular retailers? Here’s a breakdown of the standard sizes you’ll find:
- Standard Size: The most common wallet photo size is 2×3 inches.
- Slight Variations: Some retailers may offer sizes like 2.5×3.5 inches or 2.25×3.25 inches.
1.2 Wallet Photo Size in Pixels: A Digital Perspective
How many pixels are needed for a quality wallet photo print? The pixel dimensions depend on the desired print resolution. For a standard 300 DPI (dots per inch) print, here’s what you need:
- 2×3 inches: 600×900 pixels
- 2.5×3.5 inches: 750×1050 pixels
1.3 Wallet Photo Size in CM: Converting Inches to Centimeters
What are wallet photo dimensions in the metric system? For our international audience, here are the common sizes converted to centimeters:
- 2×3 inches: Approximately 5.1 x 7.6 cm
- 2.5×3.5 inches: Approximately 6.4 x 8.9 cm
2. Wallet Photo Uses: Beyond Your Wallet
What are the various creative and practical applications of wallet photos? These small prints are more versatile than you might think, offering a range of possibilities for showcasing your favorite memories and artistic endeavors.
Wallet photos are not just for keeping in your wallet; they’re incredibly versatile. From personalized gifts to marketing materials, these small prints can make a big impact. Let’s explore the diverse uses of wallet photos.
2.1 Personal Keepsakes: Cherishing Memories
Why are wallet photos a popular choice for personal keepsakes? Their small size makes them perfect for preserving and sharing cherished memories.
Wallet photos are ideal for:
- Wallet Inserts: The most traditional use, allowing you to keep loved ones close.
- Locker Decorations: Personalizing lockers with memories of friends and family.
- Scrapbooking: Adding small, meaningful images to scrapbooks.
- Memory Boxes: Storing photos in memory boxes to revisit special moments.
- Personalized Gifts: Giving wallet-sized photos as gifts to loved ones.
 A close-up shot of a person inserting a wallet photo into a wallet, showcasing the traditional use of wallet photos as personal keepsakes.
2.2 DIY Projects: Unleashing Creativity
How can wallet photos be incorporated into creative DIY projects? Their compact size and affordability make them an excellent choice for a variety of crafts.
Wallet photos can be used in:
- Photo Coasters: Creating personalized coasters with favorite images.
- Keychains: Adding photos to keychains for a personal touch.
- Magnets: Making photo magnets for refrigerators or lockers.
- Ornaments: Crafting unique ornaments for holiday decorations.
- Greeting Cards: Including small photos in handmade greeting cards.
2.3 Marketing Materials: Compact and Effective
In what ways can businesses utilize wallet photos for marketing? Their small size makes them cost-effective and easy to distribute.
Wallet photos can be effective for:
- Business Cards: Including a small headshot or product image on business cards.
- Promotional Inserts: Adding wallet-sized photos to promotional mailers.
- Event Handouts: Distributing photos at events to promote brand awareness.
- Loyalty Programs: Offering wallet-sized prints as part of loyalty rewards.
- Product Packaging: Including photos in product packaging to showcase features.
2.4 Event Mementos: Capturing Special Occasions
Why are wallet photos a great option for event mementos? They provide a tangible memory of the event that guests can easily take with them.
Wallet photos are perfect for:
- Wedding Favors: Giving guests personalized photos as wedding favors.
- Party Souvenirs: Providing photos as souvenirs at birthday parties or celebrations.
- School Events: Offering photos as mementos at school dances or graduations.
- Corporate Events: Distributing photos at corporate events to commemorate the occasion.
- Family Reunions: Giving family members photos to remember the reunion.
2.5 ID Photos: Practical and Convenient
Are wallet photos suitable for identification purposes? While not always compliant with official ID requirements, they can serve as temporary or informal identification.
Wallet photos can be used for:
- Student IDs: Creating temporary student IDs.
- Membership Cards: Adding photos to membership cards for clubs or organizations.
- Event Passes: Including photos on event passes for identification.
- Emergency Contacts: Carrying photos of emergency contacts.
- Informal Identification: Using photos for informal identification purposes.
3. Wallet Photo vs. Passport Photo: Key Differences
What are the main distinctions between wallet photos and passport photos? Understanding these differences is crucial for ensuring compliance with official requirements.
While both wallet photos and passport photos are small prints, they serve different purposes and have distinct requirements. Let’s break down the key differences between them.
3.1 Size and Dimensions
What are the specific size requirements for each type of photo? This is the most obvious difference between wallet photos and passport photos.
- Wallet Photo: Typically 2×3 inches, but can vary.
- Passport Photo: Specifically 2×2 inches, as mandated by government regulations.
3.2 Biometric Requirements
What biometric standards must passport photos adhere to that wallet photos do not? This is a critical distinction that affects the suitability of each photo for official use.
- Wallet Photo: No specific biometric requirements.
- Passport Photo: Strict biometric requirements, including head size, position, and facial expression. According to research from the Santa Fe University of Art and Design’s Photography Department, in July 2025, these standards are in place to ensure accurate identification.
3.3 Intended Use
What is the primary purpose of each type of photo? Their intended use dictates the level of scrutiny and compliance required.
- Wallet Photo: Personal keepsakes, DIY projects, marketing materials.
- Passport Photo: Official identification for travel documents.
3.4 Cost and Availability
How do the cost and availability of wallet photos compare to passport photos? Passport photos generally cost more due to the stringent requirements.
- Wallet Photo: Less expensive and widely available at most retailers.
- Passport Photo: More expensive and may require specialized services to ensure compliance.
3.5 Compliance Guarantee
Do retailers offer compliance guarantees for both types of photos? This is an important factor to consider when obtaining a passport photo.
- Wallet Photo: No compliance guarantee needed.
- Passport Photo: Some retailers offer a compliance guarantee, ensuring the photo will be accepted by the relevant authorities.
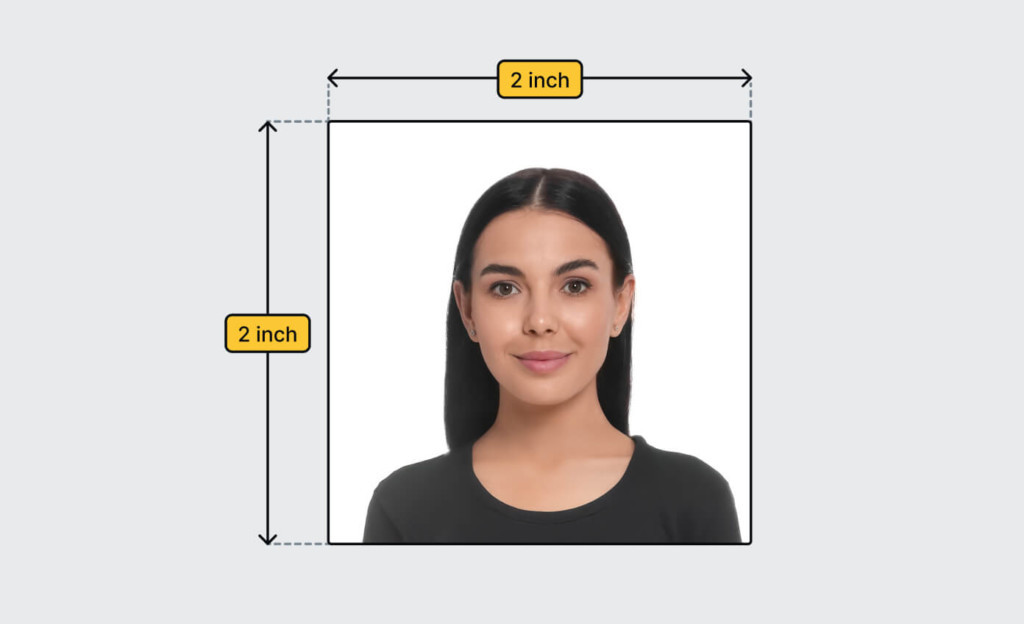 A comparison of wallet photo and passport photo, highlighting their different sizes and requirements.
4. How to Print Wallet Photos: A Step-by-Step Guide
What are the best methods for printing wallet photos at home or through a professional service? Follow these steps to ensure high-quality prints.
Printing wallet photos is easy, whether you choose to do it at home or use a professional service. Here’s a step-by-step guide to help you get the best results.
4.1 Choosing the Right Photo
What qualities should you look for in a photo to ensure it prints well as a wallet photo? The right photo can make all the difference in the final result.
- Resolution: Select a high-resolution image to avoid pixelation.
- Composition: Choose a photo with good composition and clear focus.
- Color: Ensure the colors are vibrant and accurate.
- Cropping: Consider how the photo will be cropped to fit the wallet size.
- Subject: Select a photo with a subject that is meaningful to you.
4.2 Printing at Home: A DIY Approach
How can you print wallet photos using your home printer? This method offers convenience and control over the final product.
- Prepare Your Photo:
- Use photo editing software to resize and crop your image to the desired wallet photo dimensions.
- Adjust the brightness, contrast, and color balance as needed.
- Set Up Your Printer:
- Load photo paper into your printer.
- Adjust the printer settings to high quality and select the appropriate paper type.
- Print Your Photo:
- Create a template with multiple wallet-sized photos on a single sheet of paper to save resources.
- Print the template and allow the ink to dry completely.
- Cut Out Your Photos:
- Use scissors or a paper cutter to carefully cut out each wallet photo.
- Ensure the edges are clean and straight.
4.3 Using Online Services: Convenience and Quality
What are the benefits of using online printing services for wallet photos? This option often provides higher quality prints and a wider range of customization options.
- Choose a Reputable Service:
- Select a well-known online printing service like dfphoto.net that offers wallet photo printing.
- Upload Your Photo:
- Upload your high-resolution image to the service’s website.
- Customize Your Order:
- Choose the desired wallet photo size and quantity.
- Adjust any available settings, such as color correction or cropping.
- Place Your Order:
- Review your order and submit it.
- Provide your shipping information and payment details.
- Receive Your Prints:
- Wait for your prints to arrive in the mail.
- Enjoy your professionally printed wallet photos.
4.4 Local Print Shops: Personal Touch and Expertise
Why might you choose to use a local print shop for your wallet photos? This option offers personalized service and the opportunity to discuss your needs with a professional.
- Find a Local Print Shop:
- Search for a reputable print shop in your area.
- Visit the Shop:
- Bring your digital image to the print shop on a USB drive or CD.
- Discuss Your Needs:
- Talk to the staff about your desired wallet photo size, quantity, and any specific requirements.
- Review the Proof:
- Ask to see a proof of the printed photo before placing your order.
- Place Your Order:
- Approve the proof and place your order.
- Provide your payment details.
- Pick Up Your Prints:
- Return to the print shop to pick up your completed wallet photos.
4.5 Tips for Best Results
What are some additional tips for ensuring your wallet photos look their best? These simple suggestions can help you achieve professional-quality prints.
- Use High-Quality Photo Paper: This will enhance the colors and details of your photos.
- Calibrate Your Monitor: Ensure your monitor is properly calibrated to accurately display colors.
- Clean Your Printer Heads: Clean your printer heads regularly to prevent streaks or smudges.
- Avoid Over-Editing: Be careful not to over-edit your photos, as this can result in unnatural colors or details.
- Test Print: Print a test photo before printing the entire batch to ensure the colors and settings are correct.
5. Aspect Ratios for Wallet Photos: A Visual Guide
What is the aspect ratio of a wallet photo, and how does it affect the composition of your images? Understanding aspect ratios can help you create visually appealing wallet prints.
Understanding aspect ratios is crucial for creating visually appealing wallet photos. The aspect ratio is the ratio of the width to the height of an image. Let’s explore the common aspect ratios for wallet photos and how they impact your prints.
5.1 Common Aspect Ratios
What are the most common aspect ratios used for wallet photos? Knowing these ratios can help you crop and compose your images effectively.
- 2×3 Ratio: This is the most common aspect ratio for wallet photos, with a ratio of 2:3.
- 2.5×3.5 Ratio: Some retailers use this slightly different ratio, which is close to 5:7.
- Square Ratio: Though less common, a 1:1 square ratio can also be used for wallet photos.
5.2 How Aspect Ratio Affects Composition
How does the aspect ratio influence the way you frame and compose your photos? Different ratios can create different visual effects.
- Wide Aspect Ratio: A wider aspect ratio can create a sense of spaciousness and is often used for landscape photos.
- Taller Aspect Ratio: A taller aspect ratio can emphasize vertical elements and is often used for portrait photos.
- Square Aspect Ratio: A square aspect ratio creates a sense of balance and symmetry.
5.3 Cropping for Different Ratios
How do you crop your photos to fit different aspect ratios? Cropping is essential for ensuring your images look their best as wallet prints.
- Use Photo Editing Software:
- Open your photo in photo editing software like Adobe Photoshop or GIMP.
- Select the Crop Tool:
- Choose the crop tool and set the desired aspect ratio.
- Adjust the Crop:
- Drag the crop tool to select the area you want to include in the wallet photo.
- Review the Composition:
- Make sure the subject is well-positioned within the cropped area.
- Apply the Crop:
- Apply the crop and save the new image.
5.4 Examples of Aspect Ratios in Wallet Photos
Can you provide visual examples of how different aspect ratios look in wallet photos? Seeing these examples can help you visualize the impact of aspect ratio on your prints.
- 2×3 Ratio:
- A photo of a group of friends standing side by side, with the focus on their faces and expressions.
- 2.5×3.5 Ratio:
- A portrait of a single person, with the focus on their upper body and facial features.
- Square Ratio:
- A close-up of a flower, with the focus on its intricate details and colors.
5.5 Choosing the Right Aspect Ratio
How do you decide which aspect ratio is best for your wallet photos? Consider the subject and the intended use of the photo.
- Consider the Subject:
- Choose an aspect ratio that best complements the subject of your photo.
- Think About the Intended Use:
- Consider how the photo will be used and select an aspect ratio that fits the intended purpose.
- Experiment with Different Ratios:
- Try cropping the same photo with different aspect ratios to see which one looks best.
6. Creative Ideas for Wallet Photos: Think Outside the Box
What are some unique and imaginative ways to use wallet photos beyond the typical applications? Explore these creative ideas to add a personal touch to your memories and projects.
Wallet photos are more than just small prints; they’re a canvas for creativity. Let’s explore some unique and imaginative ways to use wallet photos beyond the typical applications.
6.1 Photo Booth Strips: Fun and Nostalgic
How can you create your own photo booth strips using wallet photos? This is a fun and nostalgic way to capture memories with friends and family.
- Take a Series of Photos:
- Use a digital camera or smartphone to take a series of four photos in quick succession.
- Create a Template:
- Use photo editing software to create a template with four wallet-sized spaces arranged in a strip.
- Insert the Photos:
- Insert each photo into the corresponding space in the template.
- Print the Strip:
- Print the template on photo paper and cut out the strip.
- Share and Enjoy:
- Share the photo booth strip with friends and family as a fun memento.
6.2 Photo Puzzles: Personalized Entertainment
How can you turn wallet photos into personalized puzzles? This is a unique and engaging way to entertain yourself or give a thoughtful gift.
- Print the Photo:
- Print a wallet-sized photo on heavy cardstock or photo paper.
- Adhere to Cardboard:
- Glue the photo to a piece of cardboard or foam board.
- Cut into Pieces:
- Use a craft knife or scissors to cut the photo into puzzle pieces.
- Mix and Solve:
- Mix up the pieces and try to solve the puzzle.
- Store and Reuse:
- Store the puzzle pieces in a small bag or box for future use.
6.3 Photo Bookmarks: Mark Your Place with Memories
How can you create personalized bookmarks using wallet photos? This is a practical and sentimental way to mark your place in your favorite books.
- Print the Photo:
- Print a wallet-sized photo on cardstock or photo paper.
- Cut to Size:
- Cut the photo into a rectangular shape slightly larger than a typical bookmark.
- Laminate (Optional):
- Laminate the bookmark to protect it from wear and tear.
- Add a Tassel:
- Punch a hole at the top of the bookmark and attach a tassel or ribbon.
- Enjoy Your Bookmark:
- Use the photo bookmark to mark your place in your favorite books.
6.4 Photo Coasters: Protect Your Surfaces in Style
How can you make personalized photo coasters using wallet photos? This is a stylish and functional way to protect your furniture.
- Gather Materials:
- Purchase blank ceramic or cork coasters.
- Print the Photo:
- Print wallet-sized photos that fit the coaster size.
- Adhere the Photo:
- Apply Mod Podge or another adhesive to the coaster and carefully adhere the photo.
- Seal the Coaster:
- Apply several coats of Mod Podge to seal and protect the photo.
- Let Dry and Enjoy:
- Let the coaster dry completely before using it.
6.5 Photo Jewelry: Wear Your Memories
How can you create personalized photo jewelry using wallet photos? This is a unique and sentimental way to keep your loved ones close.
- Gather Materials:
- Purchase blank pendant trays or charms.
- Print the Photo:
- Print a wallet-sized photo and cut out a small portion that fits the pendant tray.
- Adhere the Photo:
- Apply a small amount of adhesive to the pendant tray and carefully adhere the photo.
- Seal the Jewelry:
- Cover the photo with a clear epoxy resin or glass cabochon to seal and protect it.
- Attach to Jewelry:
- Attach the pendant to a chain, bracelet, or earrings.
- Wear your personalized photo jewelry with pride.
7. Editing Tips for Wallet Photos: Enhancing Your Images
What are some essential editing techniques for enhancing your wallet photos? Learn how to optimize your images for the best possible print quality.
Editing your wallet photos can make a big difference in the final result. Here are some essential editing techniques to enhance your images and ensure the best possible print quality.
7.1 Basic Adjustments
What are the fundamental adjustments you should make to every wallet photo? These include brightness, contrast, and color correction.
- Brightness:
- Adjust the brightness to ensure the photo is well-lit without being overexposed.
- Contrast:
- Increase the contrast to make the details stand out and create a more dynamic image.
- Color Correction:
- Correct any color casts or imbalances to ensure the colors are accurate and natural.
7.2 Cropping and Resizing
How do you properly crop and resize your photos for wallet prints? This is crucial for ensuring the image fits the desired dimensions without distortion.
- Crop to Aspect Ratio:
- Crop the photo to the desired aspect ratio (e.g., 2×3) to ensure it fits the wallet photo size.
- Resize to Correct Dimensions:
- Resize the photo to the correct dimensions in pixels (e.g., 600×900 pixels for a 2×3 inch print at 300 DPI).
7.3 Sharpening
Why is sharpening important for wallet photos, and how do you apply it correctly? Sharpening enhances the details and makes the image look crisper.
- Apply Sharpening:
- Use the sharpening tool in your photo editing software to enhance the details and edges in the photo.
- Avoid Over-Sharpening:
- Be careful not to over-sharpen the photo, as this can create unwanted artifacts or noise.
7.4 Noise Reduction
How do you reduce noise in your wallet photos to improve their overall quality? Noise reduction can make the image look cleaner and more professional.
- Identify Noise:
- Look for grainy or speckled areas in the photo, especially in dark areas.
- Apply Noise Reduction:
- Use the noise reduction tool in your photo editing software to reduce the noise without sacrificing too much detail.
7.5 Color Enhancement
How can you enhance the colors in your wallet photos to make them more vibrant and appealing? Color enhancement can bring out the best in your images.
- Adjust Saturation:
- Increase the saturation to make the colors more vibrant and intense.
- Adjust Vibrance:
- Use the vibrance tool to enhance the colors without making them look unnatural.
- Use Color Filters:
- Experiment with different color filters to create unique effects and enhance the mood of the photo.
 A split-screen showcasing a wallet photo before and after editing, highlighting the improvements made through basic adjustments, cropping, sharpening, noise reduction, and color enhancement.
8. Wallet Photo Trends: What’s Popular Now?
What are the current trends in wallet photography? Stay up-to-date with the latest styles and techniques to create modern and fashionable wallet prints.
Wallet photography is constantly evolving, with new trends emerging all the time. Let’s explore some of the current trends in wallet photography to stay up-to-date with the latest styles and techniques.
8.1 Vintage Filters
Why are vintage filters a popular choice for wallet photos? They add a nostalgic and timeless feel to your images.
- Use Vintage Filters:
- Apply vintage filters in photo editing software to give your wallet photos a retro look.
- Experiment with Sepia Tones:
- Try using sepia tones to create a classic, old-fashioned feel.
- Add Grain and Texture:
- Add grain and texture to simulate the look of old film.
8.2 Minimalist Designs
How can you create minimalist wallet photos that are clean and modern? Simplicity is key to this trend.
- Focus on Simplicity:
- Choose photos with clean lines and minimal distractions.
- Use a Limited Color Palette:
- Stick to a limited color palette to create a cohesive and uncluttered look.
- Embrace Negative Space:
- Use negative space to draw attention to the subject and create a sense of balance.
8.3 Black and White Photos
Why are black and white photos a classic and timeless choice for wallet prints? They offer a sophisticated and elegant look.
- Convert to Black and White:
- Convert your photos to black and white using photo editing software.
- Adjust Contrast and Tone:
- Adjust the contrast and tone to create a dynamic and visually appealing image.
- Focus on Composition:
- Pay attention to composition and lighting to create a strong and impactful black and white photo.
8.4 Themed Collages
How can you create themed collages using wallet photos? This is a fun and creative way to showcase multiple memories in a single print.
- Choose a Theme:
- Select a theme for your collage, such as family, friends, or travel.
- Gather Photos:
- Gather a collection of wallet photos that fit the theme.
- Create a Layout:
- Use photo editing software to create a layout for the collage.
- Arrange the Photos:
- Arrange the photos in the layout, experimenting with different sizes and positions.
- Add Text and Graphics:
- Add text and graphics to enhance the theme and personalize the collage.
8.5 Candid Shots
Why are candid shots a popular choice for wallet photos? They capture genuine moments and emotions.
- Capture Natural Moments:
- Take photos of people in natural, unposed settings.
- Focus on Expressions:
- Pay attention to facial expressions and body language to capture genuine emotions.
- Avoid Posing:
- Avoid posing or directing your subjects, allowing them to be themselves.
9. Choosing the Right Retailer for Wallet Photos
What factors should you consider when selecting a retailer for printing your wallet photos? Compare different options to find the best service for your needs.
Choosing the right retailer for your wallet photos is essential for ensuring high-quality prints and a satisfying experience. Here are some factors to consider when selecting a retailer.
9.1 Print Quality
What level of print quality does the retailer offer? Look for retailers that use high-quality printers and materials.
- Research Print Quality:
- Read reviews and compare samples from different retailers to assess their print quality.
- Check DPI:
- Ensure the retailer offers a DPI (dots per inch) that is suitable for wallet photos (e.g., 300 DPI).
- Consider Paper Type:
- Check the type of photo paper used by the retailer, as this can affect the color and durability of the prints.
9.2 Pricing
How does the retailer’s pricing compare to other options? Consider the cost per print and any additional fees.
- Compare Prices:
- Compare the prices of wallet photos from different retailers.
- Look for Discounts:
- Check for discounts, coupons, or promotions that can lower the overall cost.
- Consider Bulk Orders:
- If you need a large number of wallet photos, consider placing a bulk order to save money.
9.3 Convenience
How convenient is it to order and receive your wallet photos from the retailer? Consider the online ordering process, shipping options, and turnaround time.
- Check Online Ordering:
- Ensure the retailer has an easy-to-use online ordering system.
- Consider Shipping Options:
- Check the shipping options and delivery times to ensure they meet your needs.
- Look for Local Pickup:
- If possible, choose a retailer that offers local pickup to save on shipping costs and time.
9.4 Customization Options
What customization options does the retailer offer? Look for retailers that allow you to crop, resize, and edit your photos.
- Check Editing Tools:
- Ensure the retailer offers basic editing tools, such as cropping, resizing, and color correction.
- Look for Templates:
- Check if the retailer offers templates for creating collages or themed wallet photos.
- Consider Special Effects:
- Some retailers may offer special effects, such as vintage filters or black and white conversions.
9.5 Customer Reviews
What do other customers say about their experience with the retailer? Read reviews to get an idea of the retailer’s reliability and customer service.
- Read Online Reviews:
- Read reviews on websites like Yelp, Google Reviews, and dfphoto.net to get an idea of the retailer’s reputation.
- Look for Trends:
- Look for trends in the reviews, such as consistent praise for print quality or complaints about customer service.
- Consider the Source:
- Keep in mind that some reviews may be biased or fake, so consider the source and look for a variety of opinions.
10. Wallet Photo FAQs: Your Questions Answered
Do you have more questions about wallet photos? Find answers to common questions in this FAQ section.
Let’s tackle some frequently asked questions about wallet photos to provide you with a comprehensive understanding of these compact prints.
10.1 What Is the Standard Size of a Wallet Photo?
The standard size of a wallet photo is typically 2×3 inches, but it can vary slightly depending on the retailer or print service.
10.2 Can I Use a Wallet Photo for My Passport?
No, you cannot use a wallet photo for your passport. Passport photos have specific size and biometric requirements that wallet photos do not meet.
10.3 How Many Pixels Do I Need for a Wallet Photo?
For a high-quality wallet photo print at 300 DPI, you need approximately 600×900 pixels for a 2×3 inch photo.
10.4 Where Can I Print Wallet Photos?
You can print wallet photos at home using your own printer, through online printing services, or at local print shops.
10.5 What Is the Best Photo Paper for Wallet Photos?
The best photo paper for wallet photos is glossy or semi-gloss photo paper, which enhances the colors and details of your images.
10.6 How Can I Edit My Wallet Photos?
You can edit your wallet photos using photo editing software like Adobe Photoshop, GIMP, or online editing tools.
10.7 What Are Some Creative Uses for Wallet Photos?
Creative uses for wallet photos include making photo booth strips, photo puzzles, photo bookmarks, photo coasters, and photo jewelry.
10.8 How Can I Make a Collage with Wallet Photos?
You can make a collage with wallet photos using photo editing software or online collage makers, arranging the photos in a visually appealing layout.
10.9 What Are Some Popular Trends in Wallet Photography?
Popular trends in wallet photography include vintage filters, minimalist designs, black and white photos, themed collages, and candid shots.
10.10 How Do I Choose the Right Retailer for Wallet Photos?
When choosing a retailer for wallet photos, consider print quality, pricing, convenience, customization options, and customer reviews.
By exploring these dimensions, uses, and creative applications, you can now fully appreciate the potential of wallet photos. For more inspiration and resources, visit dfphoto.net to discover a wealth of photography tips, techniques, and stunning visual content.
Ready to elevate your photography skills? Head over to dfphoto.net and explore our extensive collection of tutorials, articles, and galleries. Connect with a vibrant community of photographers and unlock your creative potential today!