Taking passport photos can often feel like a tedious and costly chore. Before you head to a professional studio or photo booth, you might wonder, “How Big Is A Passport Photo anyway?” Understanding the correct passport photo size and dimensions is the first step in ensuring your application process goes smoothly, especially if you plan to take your passport photo at home. This guide will walk you through everything you need to know about passport photo size requirements, official guidelines, and how to easily take your own photos that meet all the necessary criteria.
Understanding Passport Photo Size and Dimensions
The standard passport photo size is universally recognized and crucial for acceptance. So, exactly how big is a passport photo? The standard passport photo size is 35mm in width and 45mm in height. This rectangular dimension is consistent across most countries, though it’s always wise to double-check specific requirements for your nation.
In inches, this translates to approximately 1.38 inches wide and 1.77 inches high. While millimeters are the standard measurement in many official guidelines, understanding the inch equivalent can be helpful.
Beyond the overall dimensions of the photo, there are also specific requirements for the size of your head within the photo. Generally, the distance from the crown of your head to your chin should measure between 29mm and 34mm (or roughly 1.14 to 1.34 inches). This ensures that your face occupies the correct proportion of the photo, making facial recognition accurate and efficient for passport authorities.
While the 35mm x 45mm size is the standard, always refer to the official guidelines of your country’s passport issuing authority to confirm there are no unique specifications. For instance, you can check the official websites for UK passport photos and U.S. passport photos for the most up-to-date information.
Official Passport Photo Guidelines: Beyond Size
While knowing “how big is a passport photo” is fundamental, the size is just one piece of the puzzle. Passport photos must also adhere to a strict set of guidelines regarding appearance, background, and photo quality to be accepted. These rules are designed to ensure clarity and consistency for identification purposes. Here are the key official guidelines you need to be aware of:
- Facial Expression: You must have a neutral expression with your mouth closed. Smiling, frowning, or any exaggerated expressions are not permitted.
- Background: The background should be a plain, light color, typically cream or light grey. A completely white background is often discouraged as it can lack contrast.
- Lighting: Photos must have even lighting across the face, free from shadows on the face or background. Avoid harsh shadows and ensure your face is well-lit and clearly visible.
- Focus and Clarity: The photo must be in sharp focus and clear. Blurry or out-of-focus photos will be rejected. Red-eye is also unacceptable and must be corrected.
- Eyeglasses: The official rules often state “no glare off glasses”. However, it is generally recommended to remove eyeglasses entirely to avoid any potential issues with glare or obscuring your eyes. Tinted glasses or sunglasses are strictly prohibited.
- Head Coverings: Generally, head coverings are not allowed. Exceptions are made for religious or medical reasons, but even then, the head covering should not obscure your face.
- Photo Age: Passport photos must be recent, typically taken within the last month to accurately reflect your current appearance. Using old photos is not allowed.
For photos of children and infants, the guidelines are slightly more lenient. Children under six do not need to maintain a neutral expression or look directly at the camera. For infants, they can be photographed from above while lying on a plain, light-colored sheet. However, for all ages, there should be no other person visible in the photo, and if someone supports an infant, their hands should not be seen.
 How to shoot passport photos at home
DIY Passport Photos at Home: Step-by-Step
Taking passport photos at home is a cost-effective and convenient alternative to professional services. Now that you know “how big is a passport photo” and the essential guidelines, here’s a step-by-step guide to help you take your own passport photos successfully:
Setting the Scene: Background and Positioning
Find a suitable background in your home. A light-colored wall, ideally cream or light grey, works best. Avoid pure white walls if possible. Position yourself or your subject facing the wall, ensuring the background is plain and uncluttered. Use portrait orientation for the photo, as this is the required format.
Lighting is Key
Good lighting is crucial for passport photos. Natural daylight from a window is ideal as it provides even and soft illumination, minimizing shadows. Avoid using direct flash, as it can create harsh shadows, red-eye, and wash out facial features. If you must use artificial light, try to diffuse it to create a softer, more even light across the face. Ensure there are no shadows on the face or background.
Taking the Photo
Position the camera or smartphone directly facing the subject at eye level. Maintain a distance where the subject’s head and upper shoulders fill the frame, keeping in mind the head size requirements (29-34mm). Instruct the subject to adopt a neutral expression, look straight at the camera, and keep their mouth closed. Take several photos to ensure you capture a perfect shot, avoiding blinks and ensuring consistent expression. Using a tripod or self-timer can be helpful for self-portraits or to ensure stability.
Using Your Smartphone
Yes, you can use your smartphone to take passport photos! Use the main camera on the back of your phone, not the selfie camera, as the rear camera usually offers better image quality. If your phone has zoom capabilities, use a slight zoom to help achieve a more professional-looking portrait. Turn off any filters, portrait mode, or bokeh effects, as these are not allowed for passport photos. Ensure even lighting and stability when taking the photo.
Digital Passport Photo Specifications
Many passport applications now allow digital photo submissions. If you’re submitting your photo online, there are specific digital requirements to meet in addition to the physical photo guidelines. Knowing “how big is a passport photo” digitally is also important in terms of pixel dimensions and file size.
- Pixel Dimensions: Your digital passport photo must be at least 600 pixels wide and 750 pixels high. These dimensions ensure sufficient image resolution for passport processing systems.
- File Size: The digital photo file size should typically be between 50KB and 10MB. This range ensures the file is large enough to contain sufficient detail but not too large to cause upload issues.
- File Format: The accepted file format is usually JPEG (.jpeg or .jpg). Ensure you save your photo in this format for online submission.
You can easily control and adjust these digital specifications using photo editing software like Photoshop or free online tools. When saving your image, pay attention to the file size and dimensions to meet the official requirements.
Printing and Resizing Your Passport Photos
If you need to print your passport photos, ensuring the correct print size is crucial. Remember, the printed passport photo size must be 35mm x 45mm.
 How to shoot passport photos at home – passport photo size
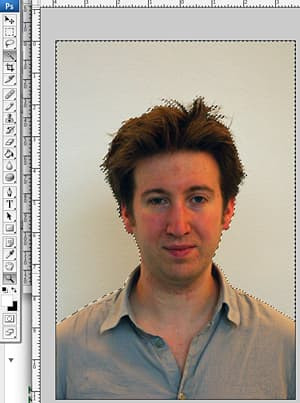
You can use photo editing software like Photoshop or GIMP to resize your digital photo to the exact passport photo dimensions.
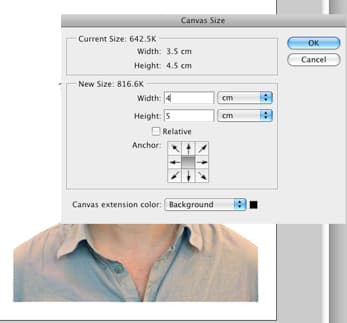
- Create a New File: Open your photo editing software and create a new file with dimensions of 35mm wide and 45mm high. Set the resolution to 300dpi (dots per inch) for good print quality.
- Import Your Photo: Import the passport photo you took into this new file.
- Resize and Position: Resize your photo to fit the 35mm x 45mm frame, ensuring your head size is within the 29-34mm range. Use the software’s resize or free transform tools, holding down the Shift key to maintain proportions.
- Add a Border (Optional): Some guidelines may recommend a slight border around the photo. You can add a small canvas extension (e.g., 5mm on each side) to create a border if needed.
- Print Multiple Photos: To save paper and have spare copies, you can arrange multiple passport photos on a single print sheet. Copy and paste your resized photo to create a set of two or four, ensuring they are identical.
- Printing Settings: When printing, use white photo paper and ensure your printer is set to print at 100% size, without any scaling or resizing. Select high resolution printing for best results.
- Measure After Printing: After printing, use a ruler to double-check that the printed photos are indeed 35mm x 45mm. Cut them out carefully with scissors.
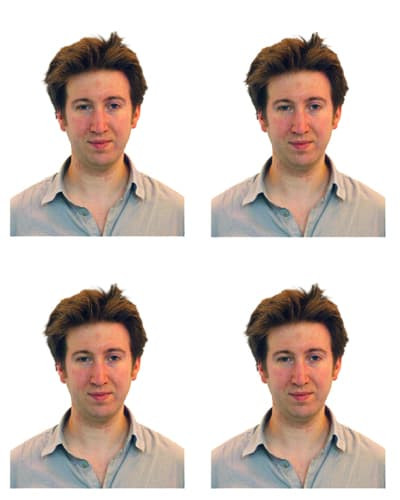 How to shoot passport photos at home – final passport images
Conclusion
Understanding “how big is a passport photo” and adhering to all the official guidelines might seem detailed, but it’s essential for a successful passport application. By taking your passport photos at home, you can save money and time while ensuring you meet all the necessary requirements. Remember to prioritize correct size and dimensions, proper lighting, a plain background, and a neutral expression. Always refer to the official passport photo guidelines of your country’s government website for the most accurate and up-to-date information before taking and submitting your photos. With a little preparation and attention to detail, you can confidently take your own passport photos that are guaranteed to be accepted.