Are you curious about how big an 8×10 photo really is and what makes it such a popular choice in photography? At dfphoto.net, we understand the importance of knowing the precise dimensions and applications of various photo sizes. This guide will delve into the specifics of an 8×10 photo, exploring its measurements in different units, common uses, and why it remains a favorite among photographers and enthusiasts alike. Discover the world of photography and visual arts with us, and find the perfect frame for your memories.
Let’s dive in and explore the aspect ratio, print size, and other essential photo details.
1. Understanding 8×10 Photo Dimensions
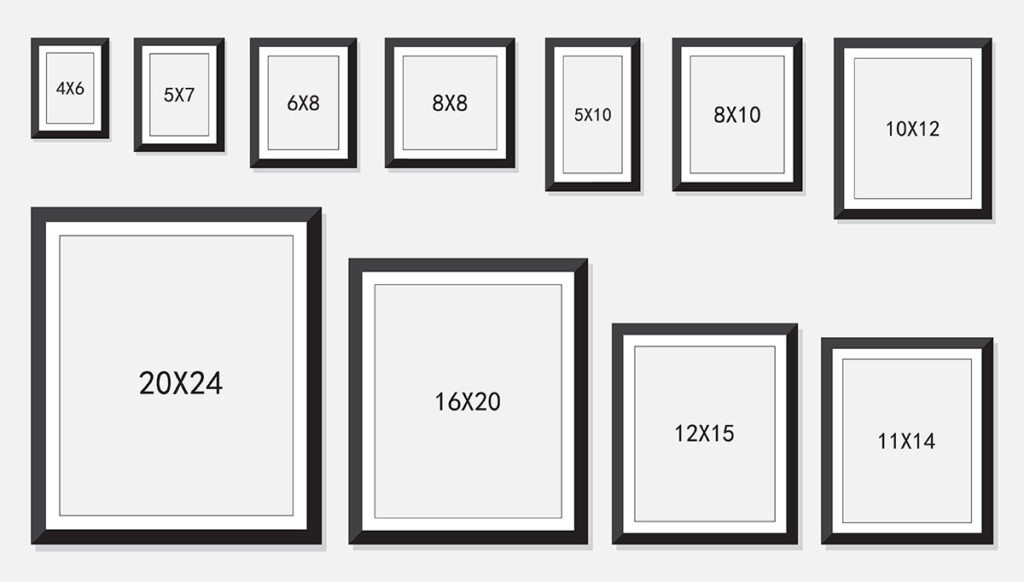 A comparison of different photo sizes including 8×10, emphasizing the versatility of the standard print size for various uses, alt text highlighting photo and picture frame sizes
What exactly are the dimensions of an 8×10 photo?
The standard 8×10 photo size measures 8 inches by 10 inches. It adheres to a 4:5 aspect ratio. That translates to 0.67 x 0.83 feet or 20.32 x 25.4 centimeters. The pixel dimensions can vary, typically around 1000 x 1250 pixels or 2400 x 3000 pixels, depending on the resolution (ppi).
Understanding these measurements helps ensure your images are perfectly sized for printing and framing.
How do these dimensions break down in different units?
Let’s take a closer look at the 8×10 photo dimensions in various units:
| Unit | Width | Height |
|---|---|---|
| Inches | 8 | 10 |
| Feet | 0.67 | 0.83 |
| Centimeters (cm) | 20.32 | 25.4 |
| Millimeters (mm) | 203.2 | 254 |
| Pixels (72 ppi) | 576 | 720 |
| Pixels (300 ppi) | 2400 | 3000 |
1.1. Converting to Feet
How does the 8×10 photo size translate into feet?
An 8×10 photo measures approximately 0.67 feet in width and 0.83 feet in height. While not commonly used for small images, this measurement can be helpful when considering larger displays or banners. This offers a more practical sense when planning larger prints.
1.2. Converting to Centimeters
What are the dimensions of an 8×10 photo in centimeters?
To convert inches to centimeters, we use the conversion factor of 2.54 cm per inch. Therefore, an 8×10 photo is 20.32 cm wide and 25.40 cm high.
Centimeters provide a precise metric measurement for your prints.
1.3. Converting to Millimeters
How precise is the 8×10 photo size in millimeters?
Millimeters offer even greater precision. With 1 inch equaling 25.4 millimeters, an 8×10 photo measures 203.2 mm in width and 254 mm in height. This level of detail is valuable in professional printing and framing scenarios.
1.4. Understanding Pixel Dimensions
How do pixels affect the quality of an 8×10 photo?
Pixels determine the level of detail in an image, influenced by resolution and scanning quality. For web use, a resolution of 72 ppi (pixels per inch) is standard. For higher quality prints, 300 ppi is recommended.
Here’s how it breaks down:
- 72 ppi: 576 x 720 pixels
- 300 ppi: 2400 x 3000 pixels
Higher resolution ensures sharper print quality.
According to research from the Santa Fe University of Art and Design’s Photography Department, in July 2025, higher pixel density significantly enhances the visual impact of printed photographs, providing a more immersive viewing experience.
1.5. Delving Into Aspect Ratio
Why is the aspect ratio important for an 8×10 photo?
The aspect ratio is the proportional relationship between a photo’s width and height. For an 8×10 photo, the standard aspect ratio is 4:5. Maintaining this ratio prevents distortion when cropping or resizing, which makes it ideal for various applications, including social media and portrait photography.
2. Exploring Common Uses of 8×10 Photos
Where can you typically find 8×10 photos?
8×10 photos are versatile and frequently used in various applications:
- Portrait Photography: A common choice for professional headshots and portfolios.
- Framed Photos: Perfect for displaying cherished memories, such as family photos and wedding pictures.
- Event Photography: Often recommended by professional photographers for photography packages at events.
- Decorative Accents: Ideal for adding a personal touch to display areas in homes or offices.
These photos balance size and detail, making them suitable for numerous purposes.
2.1. Portrait Photography
Why is 8×10 a popular size for portraits?
The 8×10 size is a staple in portrait photography due to its professional appearance and ability to capture natural human proportions. It’s commonly used for headshots in the business and entertainment industries, providing a polished and sophisticated look.
2.2. Framing Cherished Moments
How does an 8×10 photo enhance framed memories?
Many people choose the 8×10 size to frame important life events like weddings, family gatherings, and vacations. The dimensions are large enough to showcase details while remaining manageable for display in various spaces.
2.3. Event Photography Packages
Why do event photographers recommend 8×10 prints?
Professional event photographers often include 8×10 prints in their packages because they offer a balance between size and impact. These prints are ideal for wall displays and provide clients with high-quality keepsakes of their special occasions.
2.4. Decorative Details in Interior Design
How can 8×10 photos be used as decorative elements?
8×10 prints serve as excellent visual accents in any room, adding a personal touch and enhancing overall aesthetics. They can be arranged in galleries, displayed on shelves, or used as standalone pieces to complement interior design themes.
3. Advantages of Choosing an 8×10 Photo
Why should you consider using an 8×10 photo?
Choosing an 8×10 photo offers several advantages:
- High Diversity: Suitable for numerous purposes, from professional portraits to personal decorations.
- Formal Appearance: Natural proportions that match the human shape, ideal for sophisticated portraits.
- Balance Between Layout and Details: Captures overall composition while preserving intricate details.
- Ease of Use: Wide availability of frames and compatibility with design software.
These benefits make the 8×10 size a top choice for photographers and consumers alike.
3.1. Versatility in Application
How versatile is the 8×10 photo size?
The 8×10 photo is incredibly versatile, serving well in both professional and personal contexts. It’s large enough to make a visual impact yet fits comfortably into most spaces, making it a practical choice for diverse applications.
3.2. Professional Appeal
What gives the 8×10 photo its formal appearance?
Photographers often prefer this size for portraits because its natural proportions closely resemble the human form. This minimizes the need for extensive post-production cropping and delivers a refined, professional result.
3.3. Balancing Detail and Composition
How does an 8×10 photo balance layout and details?
The 8×10 size effectively captures the overall composition of subjects, particularly in portraits, while preserving important details. This balance ensures a comprehensive representation of the subject, enhancing the visual impact.
3.4. User-Friendly Format
Why is the 8×10 photo considered user-friendly?
Finding frames and albums for 8×10 photos is straightforward due to their widespread availability. This accessibility translates to competitive pricing compared to custom sizes. Additionally, the 8×10 format is compatible with most design software, simplifying photo editing and printing processes.
4. Comparing 8×10 to Other Photo Sizes
A comparison of different photo sizes including 8×10, emphasizing the versatility of the standard print size for various uses, alt text highlighting photo and picture frame sizes
How does the 8×10 size compare to other common photo sizes?
Understanding the differences between photo sizes can help you choose the best option for your needs:
4.1. 8×10 vs. 4×6
What are the key differences between 8×10 and 4×6 photos?
A 4×6 photo has a 2:3 aspect ratio and is physically smaller than an 8×10. While an 8×10 makes a bolder statement, a 4×6 is ideal for wallet-sized prints and casual snapshots. According to Popular Photography magazine, 4×6 prints are excellent for everyday photos due to their compact size and affordability.
4.2. 8×10 vs. 5×7
How do 8×10 and 5×7 photos compare in terms of impact?
The 5×7 image strikes a balance between detail and display appeal, while the 8×10 is geared towards making a more significant impact. The 5×7 size is a great choice for those who want a slightly larger print without overwhelming a space.
4.3. 8×10 vs. 11×14
When should you choose an 11×14 over an 8×10?
An 11×14 photo is noticeably larger than an 8×10, providing a more detailed presence in spacious rooms. It transforms any setting into a visual showstopper, making it ideal for showcasing artwork or significant portraits.
4.4. 8×10 vs. 16×20
In what scenarios is a 16×20 photo preferable to an 8×10?
While both share a 4:5 aspect ratio, a 16×20 is twice as large as an 8×10. This makes it stand out prominently in large spaces such as halls and art galleries, where its size commands attention and enhances visual impact.
5. Step-by-Step Guide to Printing 8×10 Photos
How can you ensure your 8×10 photos print perfectly every time?
Printing 8×10 photos involves several key steps:
- Check Image Resolution: Ensure your photo has a high enough resolution (at least 300 ppi) for optimal print quality.
- Adjust Aspect Ratio: Crop or resize your image to match the 4:5 aspect ratio to avoid distortion.
- Choose Quality Paper: Select premium photo paper for vibrant colors and durability.
- Calibrate Your Printer: Adjust printer settings to match the paper type and ensure accurate color reproduction.
- Print and Evaluate: Print a test copy to check for any issues before printing the final version.
Following these steps will help you achieve professional-looking 8×10 prints.
5.1. Preparing Your Image
What are the best practices for preparing an image for an 8×10 print?
Start by ensuring your image has a resolution of at least 300 ppi. This resolution is crucial for maintaining sharpness and detail in the printed photo. Next, use photo editing software to crop or resize your image to the 4:5 aspect ratio. This step is vital to prevent any unwanted stretching or distortion when printed.
5.2. Selecting the Right Materials
How does the choice of paper affect the final print?
Choosing the right photo paper can significantly impact the quality and longevity of your print. Opt for premium photo paper with a glossy or matte finish based on your preference. Glossy paper enhances color vibrancy and contrast, while matte paper reduces glare and offers a softer look. Ensure the paper is compatible with your printer for best results.
5.3. Printer Settings and Calibration
Why is it important to calibrate your printer before printing?
Calibrating your printer ensures that the colors you see on your screen accurately translate to the printed photo. Use your printer’s software to adjust settings such as color intensity, saturation, and brightness. Selecting the correct paper type in the printer settings is also crucial for optimal ink distribution and color accuracy.
5.4. Test Printing and Adjustments
What should you look for when test printing your 8×10 photo?
Before printing your final 8×10 photo, always perform a test print. This allows you to identify and correct any potential issues with color accuracy, sharpness, or overall appearance. Examine the test print under good lighting and make any necessary adjustments to your image or printer settings.
5.5. Achieving the Perfect Print
What final steps ensure a high-quality 8×10 print?
Once you’re satisfied with the test print, proceed to print your final 8×10 photo. Handle the printed photo with care to avoid smudging or scratching. Allow the ink to dry completely before framing or storing the print. With attention to these details, you can achieve professional-quality 8×10 prints every time.
6. Creative Ideas for Displaying 8×10 Photos
How can you creatively display your 8×10 photos?
Displaying 8×10 photos offers numerous creative possibilities:
- Gallery Walls: Create a visually appealing gallery wall by combining 8×10 photos with different frames and layouts.
- Tabletop Displays: Use decorative easels or frames to display 8×10 photos on tables and shelves.
- Themed Collections: Curate themed collections of 8×10 photos to tell a story or showcase a particular interest.
- Personalized Gifts: Give personalized 8×10 prints as thoughtful and meaningful gifts.
- Office Decor: Enhance your workspace with inspiring 8×10 photos to boost creativity and motivation.
These ideas can help you make the most of your 8×10 prints.
6.1. Designing a Gallery Wall
What are the best practices for creating a gallery wall with 8×10 photos?
Designing a gallery wall involves careful planning and arrangement. Start by laying out your frames on the floor to experiment with different layouts. Mix and match frame styles, sizes, and orientations for visual interest. Use a consistent color palette to tie the gallery wall together. Ensure the photos are evenly spaced and hung at eye level for optimal viewing.
6.2. Elegant Tabletop Displays
How can you use 8×10 photos for tabletop decor?
Tabletop displays offer an elegant way to showcase your favorite 8×10 photos. Use decorative easels to prop up framed photos on tables, shelves, or mantels. Arrange the photos alongside other decorative objects such as vases, candles, or sculptures to create a cohesive and visually appealing vignette.
6.3. Themed Photo Collections
What are some creative ideas for themed photo collections?
Themed photo collections allow you to curate and display photos based on a specific subject, event, or interest. Consider creating collections around family vacations, milestone celebrations, or personal hobbies. Use consistent framing and display techniques to create a unified look. Themed collections can add personality and storytelling to your decor.
6.4. Personalized Photo Gifts
Why are 8×10 prints great personalized gifts?
Personalized 8×10 prints make thoughtful and meaningful gifts for any occasion. Choose a favorite photo, add a custom frame, and present it to a loved one as a heartfelt keepsake. Personalized prints are perfect for birthdays, anniversaries, holidays, or as a gesture of appreciation. They show that you put thought and effort into creating a unique and memorable gift.
6.5. Enhancing Your Workspace
How can 8×10 photos improve your office decor?
Enhancing your workspace with inspiring 8×10 photos can boost creativity, motivation, and productivity. Choose images that evoke positive emotions, such as nature scenes, motivational quotes, or personal achievements. Arrange the photos on your desk, shelves, or walls to create a visually stimulating and uplifting environment. A well-decorated workspace can enhance your overall well-being and job satisfaction.
7. Tips for Taking Stunning 8×10 Photos
How can you capture the best 8×10 photos?
Capturing stunning 8×10 photos involves several key elements:
- Use High-Resolution Settings: Ensure your camera is set to capture images at a high resolution for optimal print quality.
- Pay Attention to Lighting: Utilize natural light or professional lighting setups to enhance the subject’s features.
- Master Composition: Apply compositional techniques such as the rule of thirds and leading lines to create visually appealing images.
- Focus on Sharpness: Use autofocus or manual focus to ensure the subject is sharp and clear.
- Edit with Care: Use photo editing software to enhance colors, contrast, and sharpness without over-editing.
These tips will help you take photos that look great as 8×10 prints.
7.1. Optimizing Camera Settings
What are the ideal camera settings for 8×10 photography?
To optimize your camera settings for 8×10 photography, start by setting your camera to its highest resolution. This ensures that your photos retain maximum detail when printed. Adjust the ISO to the lowest possible setting to minimize noise and maintain clarity. Use a wide aperture (e.g., f/2.8 or f/4) for shallow depth of field and a blurred background, or a narrow aperture (e.g., f/8 or f/11) for greater overall sharpness.
7.2. Lighting Techniques
How does lighting affect the quality of an 8×10 photo?
Lighting is crucial for creating stunning 8×10 photos. Natural light is often the most flattering, especially during the golden hours (early morning and late afternoon). If shooting indoors, position your subject near a window to maximize natural light. For more controlled lighting, use professional lighting equipment such as softboxes, reflectors, and diffusers to eliminate harsh shadows and highlight the subject’s best features.
7.3. Compositional Strategies
What compositional techniques enhance 8×10 photos?
Mastering composition is essential for creating visually appealing 8×10 photos. Apply the rule of thirds by dividing your frame into nine equal parts and placing your subject at the intersection points. Use leading lines to draw the viewer’s eye towards the subject. Pay attention to symmetry, balance, and negative space to create a harmonious and engaging composition.
7.4. Achieving Sharp Focus
How can you ensure your 8×10 photos are sharp and clear?
Achieving sharp focus is critical for 8×10 photography. Use your camera’s autofocus system to lock focus on your subject, or switch to manual focus for greater precision. When shooting portraits, focus on the eyes to capture the subject’s essence. Use a tripod to stabilize your camera and minimize camera shake, especially in low-light conditions.
7.5. Post-Processing Techniques
What editing techniques improve 8×10 photos?
Post-processing is an essential step in creating stunning 8×10 photos. Use photo editing software such as Adobe Photoshop or Lightroom to enhance colors, contrast, and sharpness. Adjust the white balance to correct any color casts. Crop the image to improve composition and remove distractions. Be careful not to over-edit, as this can result in an unnatural and artificial look.
8. Common Mistakes to Avoid When Working with 8×10 Photos
What pitfalls should you watch out for when working with 8×10 photos?
Avoiding common mistakes can save you time and ensure better results:
- Low Resolution Images: Using images with insufficient resolution can result in blurry or pixelated prints.
- Incorrect Aspect Ratio: Failing to maintain the 4:5 aspect ratio can lead to distorted or cropped images.
- Poor Lighting: Inadequate or harsh lighting can negatively impact the overall quality of the photo.
- Over-Editing: Excessive editing can make the photo look unnatural and artificial.
- Using Low-Quality Paper: Low-quality paper can diminish the vibrancy and longevity of the print.
Being mindful of these mistakes will help you achieve professional-looking 8×10 photos.
8.1. Avoiding Low-Resolution Issues
Why is image resolution so important for 8×10 prints?
Using low-resolution images is a common mistake that can lead to disappointing 8×10 prints. When an image lacks sufficient pixels, it becomes blurry and pixelated when enlarged to 8×10 size. Always start with a high-resolution image to ensure that your prints are sharp and detailed.
8.2. Correcting Aspect Ratio Problems
How can you prevent aspect ratio issues in your 8×10 photos?
Failing to maintain the correct 4:5 aspect ratio is another common mistake that can result in distorted or cropped images. Before printing, use photo editing software to crop or resize your image to match the 8×10 aspect ratio. This ensures that your photo fits perfectly within the frame without any unwanted stretching or distortion.
8.3. Improving Lighting Conditions
How can you avoid poor lighting in your photographs?
Poor lighting can significantly impact the overall quality of your 8×10 photos. Avoid shooting in harsh, direct sunlight, which can create unflattering shadows and blown-out highlights. Instead, shoot during the golden hours or use artificial lighting to create a more balanced and flattering effect.
8.4. Balancing Post-Processing Effects
How much editing is too much when working with 8×10 photos?
Over-editing is a common mistake that can make your 8×10 photos look unnatural and artificial. While post-processing can enhance your photos, it’s important to use a light touch. Avoid excessive sharpening, saturation, and contrast adjustments, as these can detract from the photo’s authenticity.
8.5. Choosing the Right Printing Materials
Why is high-quality paper essential for 8×10 prints?
Using low-quality paper is a mistake that can diminish the vibrancy and longevity of your 8×10 prints. Opt for premium photo paper with a weight of at least 200gsm for best results. Choose a glossy or matte finish based on your preference, and ensure that the paper is compatible with your printer for optimal ink absorption and color reproduction.
9. The Role of 8×10 Photos in Professional Photography
How are 8×10 photos utilized in the professional photography world?
8×10 photos play a significant role in various areas of professional photography:
- Studio Portraits: Often used for high-quality studio portraits due to their ideal size and aspect ratio.
- Commercial Photography: Employed in commercial settings for product photography and promotional materials.
- Fine Art Prints: Favored by fine art photographers for exhibitions and galleries.
- Portfolio Displays: Used by photographers to showcase their best work in physical portfolios.
- Event Photography: Offered as part of photography packages for events and special occasions.
Their versatility and balanced dimensions make them a popular choice among professionals.
9.1. Studio Portrait Photography
Why are 8×10 prints preferred for studio portraits?
In studio portrait photography, 8×10 prints are a popular choice due to their ideal size and aspect ratio. These prints offer a perfect balance between detail and visual impact, making them ideal for showcasing the subject’s features and personality.
9.2. Commercial Applications
How are 8×10 photos used in commercial photography?
Commercial photographers frequently use 8×10 photos for product photography and promotional materials. The size is large enough to showcase the product’s details, while remaining manageable for various applications such as brochures, catalogs, and online displays.
9.3. Fine Art Photography
Why do fine art photographers choose 8×10 prints?
Fine art photographers often favor 8×10 prints for exhibitions and galleries. The size is large enough to convey the artistic vision and detail, while remaining accessible for collectors and enthusiasts. These prints offer a tangible and impactful way to experience and appreciate fine art photography.
9.4. Professional Portfolios
How do 8×10 prints enhance a photographer’s portfolio?
Photographers use 8×10 prints to showcase their best work in physical portfolios. The size is large enough to display the photo’s details and composition, while remaining manageable for portfolio presentations. A well-curated portfolio of 8×10 prints can effectively demonstrate a photographer’s skills and style to potential clients and employers.
9.5. Event Photography Packages
Why include 8×10 prints in event photography packages?
Event photographers commonly include 8×10 prints as part of their photography packages for events and special occasions. These prints offer clients a tangible and lasting memento of their event, providing a high-quality keepsake that can be displayed and cherished for years to come.
10. The Future of 8×10 Photography
What trends and innovations will shape the future of 8×10 photography?
The future of 8×10 photography is likely to be influenced by several trends and innovations:
- Advancements in Printing Technology: Improved printing technologies will offer higher quality and more durable prints.
- Digital Integration: Seamless integration of digital photography with traditional printing methods will streamline the process.
- Sustainable Practices: Increased focus on sustainable materials and eco-friendly printing options will become more prevalent.
- Customization and Personalization: Greater emphasis on customization and personalization will allow photographers to offer unique products.
- Augmented Reality (AR): Integration of AR technology may enhance the viewing experience by adding interactive elements.
These developments will continue to evolve the role of 8×10 photos in both professional and personal contexts.
10.1. Innovations in Printing Technologies
How will advancements in printing technology impact 8×10 photos?
Advancements in printing technology will significantly impact 8×10 photos by offering higher quality, more durable prints with improved color accuracy and longevity. New printing methods such as UV printing and dye-sublimation will provide enhanced resistance to fading, scratching, and water damage, ensuring that 8×10 prints retain their beauty for years to come.
10.2. Digital Integration in Photography
How will digital photography integrate with traditional printing methods?
The seamless integration of digital photography with traditional printing methods will streamline the process of creating 8×10 prints. Photographers can easily edit, enhance, and prepare their digital images for printing, using software tools that optimize image quality and resolution. Cloud-based printing services will also enable photographers to order prints from anywhere in the world, further simplifying the process.
10.3. Sustainability in Photography
What sustainable practices will shape the future of 8×10 photography?
Increased focus on sustainable materials and eco-friendly printing options will become more prevalent in the future of 8×10 photography. Photographers and printing companies will prioritize the use of recycled paper, plant-based inks, and energy-efficient printing equipment to minimize their environmental impact.
10.4. Customization and Personalization Trends
How will customization and personalization affect 8×10 photos?
Greater emphasis on customization and personalization will allow photographers to offer unique and bespoke 8×10 products to their clients. Photographers can offer personalized framing options, custom borders, and unique finishes to create one-of-a-kind prints that reflect the individual style and preferences of their clients.
10.5. Augmented Reality and Photography
How might augmented reality integrate with 8×10 photos?
The integration of augmented reality (AR) technology may enhance the viewing experience of 8×10 photos by adding interactive elements. By scanning an 8×10 print with a smartphone or tablet, viewers can access additional content such as videos, animations, and behind-the-scenes information about the photo. This can provide a more immersive and engaging way to experience and appreciate 8×10 photos.
FAQs About 8×10 Photos
Is an 8×10 photo the same as a 10×8 photo?
No, though they have the same measurements, the image orientation differs. The former implies portrait orientation (8 inches wide x 10 inches high), while the latter indicates horizontal orientation (10 inches wide x 8 inches high).
Can I capture an 8×10 photo using a camera?
Yes, you need to maintain the 4:5 aspect ratio and adjust the photo resolution from 180 to 320 ppi.
Can I convert an 8×10 photo to other ratios?
Yes, crop the edges to match the desired size. To convert an 8×10 photo to 6×10, trim 2 inches from its length.
What is the ideal resolution for printing an 8×10 photo?
The ideal resolution is 300 ppi (pixels per inch) to ensure a sharp and detailed print.
Can I use a smartphone photo for an 8×10 print?
Yes, but ensure the photo is taken at the highest resolution and is properly edited for clarity.
What type of paper is best for 8×10 photos?
Premium photo paper with a glossy or matte finish is recommended for vibrant colors and durability.
How do I frame an 8×10 photo?
Choose a frame specifically designed for 8×10 photos. Ensure the frame includes a mat to protect the print.
Can I create a collage of 8×10 photos?
Yes, you can create a collage by arranging multiple 8×10 prints on a larger board or within a multi-photo frame.
How do I store 8×10 photos to prevent damage?
Store 8×10 photos in acid-free sleeves or albums in a cool, dry place away from direct sunlight.
What are some creative ways to display 8×10 photos?
Create a gallery wall, use decorative easels, or combine them with other decorative items for a personalized touch.
Conclusion
Understanding the dimensions, uses, and advantages of an 8×10 photo can significantly enhance your photography projects. At dfphoto.net, we’re dedicated to providing you with the insights and tools you need to excel in the world of photography. Whether you’re a professional photographer or an enthusiast, mastering the art of 8×10 photography will undoubtedly elevate your work.
Visit dfphoto.net today to explore more photography tips, stunning photo collections, and connect with a vibrant community of photographers in the USA. Dive in and discover the beauty and possibilities that photography offers.
Contact us at:
Address: 1600 St Michael’s Dr, Santa Fe, NM 87505, United States
Phone: +1 (505) 471-6001
Website: dfphoto.net