Are you looking to capture stunning night photos? Having good night photos involves understanding key techniques and settings. At dfphoto.net, we provide you with the knowledge and inspiration to excel in night photography, enhancing your skills in low-light conditions and artistic vision. Explore how to optimize your camera settings, master editing techniques, and discover the gear that can transform your nighttime images.
1. Understanding Night Photography Challenges
Night photography presents unique challenges. To have good night photos, you must overcome limitations related to light, ISO, and motion.
1.1. Limited Light Conditions
Low light requires slower shutter speeds or higher ISO settings, which can introduce noise.
- Solution: Use lenses with wide apertures and stabilize your camera.
1.2. High ISO and Noise
High ISO settings can result in grainy images.
- Solution: Optimize exposure settings and use noise reduction software.
1.3. Motion Blur
Slow shutter speeds can cause motion blur, especially with moving subjects.
- Solution: Increase shutter speed or use image stabilization.
2. Essential Camera Settings for Night Photography
Mastering camera settings is crucial for capturing sharp, well-exposed night photos.
2.1. Aperture
Use the widest aperture (smallest f-number) your lens allows to maximize light intake. This helps keep your ISO lower.
- Example: An aperture of f/1.8 or f/2.8 is ideal.
2.2. Shutter Speed
Adjust shutter speed to balance brightness and sharpness.
- Guideline: Start with 1/60th of a second and adjust as needed.
2.3. ISO
Keep ISO as low as possible to minimize noise.
- Recommendation: Use a native ISO setting, typically below 1600.
2.4. White Balance
Set white balance to match the ambient light.
- Options: Use Auto White Balance (AWB) or presets like Tungsten or Fluorescent.
2.5. Shooting Mode
Shoot in manual mode to have full control over settings.
- Alternative: Aperture Priority mode can also be effective.
3. Gear Recommendations for Night Photography
The right gear can significantly enhance your night photography capabilities.
3.1. Cameras
Choose a camera with good low-light performance and high ISO capabilities.
| Camera Model | Sensor Type | ISO Range | Features |
|---|---|---|---|
| Sony a7S III | Full Frame | 80-102400 | Excellent low-light performance |
| Nikon D850 | Full Frame | 64-25600 | High resolution and dynamic range |
| Fujifilm X-T4 | APS-C | 160-12800 | Compact and versatile |
| Canon EOS R6 | Full Frame | 100-102400 | Excellent image stabilization |
| Olympus OM-D E-M1 Mark III | Micro Four Thirds | 200-25600 | Compact and weather-sealed |
3.2. Lenses
Use lenses with wide apertures to gather more light.
| Lens Model | Focal Length | Aperture | Mount |
|---|---|---|---|
| Sigma 35mm f/1.4 DG HSM Art | 35mm | f/1.4 | Sony E, Canon EF, Nikon F |
| Canon EF 50mm f/1.8 STM | 50mm | f/1.8 | Canon EF |
| Sony FE 24mm f/1.4 GM | 24mm | f/1.4 | Sony E |
| Nikon AF-S 35mm f/1.8G ED | 35mm | f/1.8 | Nikon F |
| Rokinon 14mm f/2.8 | 14mm | f/2.8 | Multiple |
3.3. Tripods
A sturdy tripod is essential for long exposures.
- Recommendation: Choose a tripod that can handle the weight of your camera and lens.
3.4. Remote Shutter Release
A remote shutter release minimizes camera shake during long exposures.
- Alternatives: Use a smartphone app or the camera’s self-timer.
3.5. Flashlights and Headlamps
Use flashlights or headlamps to light up subjects or your surroundings.
- Tip: Choose lights with adjustable brightness.
4. Techniques for Capturing Stunning Night Photos
Employ these techniques to elevate your night photography.
4.1. Long Exposure Photography
Use long exposure to capture light trails and smooth water surfaces.
- Process: Set a slow shutter speed (e.g., 10 seconds or longer) and use a tripod.
4.2. Light Painting
Use a flashlight to “paint” light onto your subject during a long exposure.
- Technique: Experiment with different light sources and movements.
4.3. Star Photography
Capture the beauty of the night sky by using long exposures and wide-angle lenses.
- Considerations: Find dark locations away from city lights.
4.4. Urban Nightscapes
Photograph cityscapes at night to capture the vibrant energy of urban life.
- Tips: Use leading lines and find interesting compositions.
4.5. Portrait Photography at Night
Capture portraits at night using streetlights or artificial lighting.
- Suggestion: Use a fast lens and focus carefully.
5. Composition Tips for Night Photography
Composition is vital in night photography.
5.1. Use Leading Lines
Leading lines draw the viewer’s eye into the scene.
- Examples: Roads, rivers, and architectural elements.
5.2. Rule of Thirds
Place key elements along the lines or intersections of a 3×3 grid.
- Benefits: Creates a balanced and visually appealing composition.
5.3. Symmetry and Patterns
Look for symmetrical scenes or repeating patterns.
- Impact: Adds a sense of order and visual interest.
5.4. Fill the Frame
Get close to your subject to eliminate distractions.
- Advantage: Highlights details and creates a strong focal point.
5.5. Use Negative Space
Leave empty space around your subject to create a sense of depth.
- Effect: Draws attention to the main subject.
6. Post-Processing Techniques for Night Photos
Post-processing can enhance your night photos.
6.1. RAW Processing
Shoot in RAW format to capture more data.
- Benefit: Allows for greater flexibility in editing.
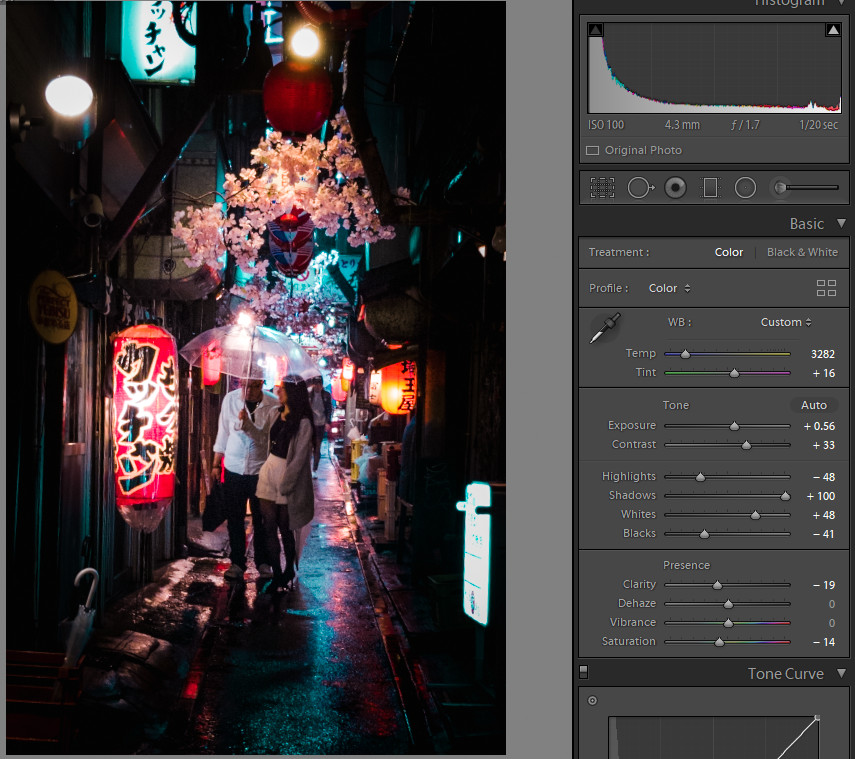
6.2. Exposure Adjustments
Adjust exposure to brighten or darken the image.
- Software: Use Adobe Lightroom or Capture One.
6.3. White Balance Correction
Correct the white balance to achieve accurate colors.
- Tools: Use the white balance slider or presets.
6.4. Noise Reduction
Reduce noise using noise reduction software.
- Note: Be careful not to over-smooth the image.
6.5. Sharpening
Sharpen the image to enhance details.
- Tip: Use a sharpening mask to avoid over-sharpening.
6.6. Color Correction
Adjust colors to create a mood.
- Options: Use color grading tools or presets.
7. Mastering Focus at Night
Achieving sharp focus in low light can be challenging.
7.1. Manual Focus
Use manual focus to ensure precise focus.
- Technique: Use live view and zoom in to fine-tune focus.
7.2. Focus Peaking
Enable focus peaking to highlight areas in focus.
- Benefit: Simplifies manual focusing.
7.3. Back-Button Focus
Use back-button focus to separate focusing from the shutter release.
- Advantage: Allows you to lock focus and recompose.
7.4. Focus on Infinity
For landscapes, focus on infinity to capture distant objects.
- Method: Use the infinity mark on your lens or focus on a distant light source.
8. Dealing with Light Pollution
Light pollution can affect the quality of your night photos.
8.1. Find Dark Locations
Travel to areas with minimal light pollution.
- Resources: Use light pollution maps to find dark locations.
8.2. Use Filters
Use light pollution filters to reduce the effects of artificial light.
- Types: CLS (City Light Suppression) filters.
8.3. Shoot During Moonless Nights
Shoot during new moon phases to minimize light.
- Benefit: Allows for darker skies and more stars.
8.4. Adjust White Balance
Adjust white balance to compensate for light pollution.
- Technique: Use custom white balance or adjust color temperature.
9. Inspiring Night Photography Locations in the USA
The USA offers numerous stunning locations for night photography.
9.1. Santa Fe, New Mexico
Santa Fe offers dark skies and unique landscapes.
 Night photography in Santa Fe New Mexico with clear skies
- Address: 1600 St Michael’s Dr, Santa Fe, NM 87505, United States
- Phone: +1 (505) 471-6001
- Website: dfphoto.net
9.2. Death Valley National Park, California
Death Valley provides exceptionally dark skies and surreal landscapes.
- Features: Sand dunes, mountains, and salt flats.
9.3. Acadia National Park, Maine
Acadia offers coastal views and dark skies.
- Highlights: Bass Harbor Head Light and Cadillac Mountain.
9.4. Big Bend National Park, Texas
Big Bend boasts some of the darkest skies in the continental USA.
- Attractions: Mountains, canyons, and desert landscapes.
9.5. Glacier National Park, Montana
Glacier offers stunning mountain views and dark skies.
- Must-sees: Lake McDonald and Going-to-the-Sun Road.
10. Staying Safe During Night Photography
Safety is important when shooting at night.
10.1. Plan Your Route
Plan your route and inform someone of your location.
- Suggestion: Use GPS and offline maps.
10.2. Bring a Friend
Shoot with a friend for added security.
- Benefit: Provides assistance and companionship.
10.3. Carry a Flashlight
Carry a flashlight or headlamp to see your surroundings.
- Tip: Choose a light with adjustable brightness.
10.4. Be Aware of Wildlife
Be aware of wildlife and take precautions.
- Note: Carry bear spray in bear country.
10.5. Dress Appropriately
Dress in layers to stay warm.
- Necessity: Nights can be cold, even in summer.
11. Advanced Techniques for Night Photography
Explore these advanced techniques to take your night photography further.
11.1. Stacking Images
Stack multiple images to reduce noise and increase detail.
- Software: Use software like Sequator or DeepSkyStacker.
11.2. Using Star Trackers
Use star trackers to compensate for the Earth’s rotation.
- Result: Allows for longer exposures without star trails.
11.3. HDR Photography at Night
Create HDR (High Dynamic Range) images to capture a wider range of tones.
- Method: Take multiple exposures and merge them in post-processing.
11.4. Panorama Photography at Night
Create panoramic images to capture wide vistas.
- Tools: Use a panoramic head for precise alignment.
11.5. Time-Lapse Photography at Night
Create time-lapse videos to capture the movement of stars or city lights.
- Setup: Use an intervalometer to take photos at set intervals.
12. Overcoming Common Challenges in Night Photography
Address these common issues to improve your night photos.
12.1. Correcting Color Casts
Correct color casts caused by artificial light.
- Solution: Adjust white balance or use color correction tools.
12.2. Reducing Flare
Reduce lens flare caused by bright lights.
- Technique: Use a lens hood or block the light source.
12.3. Minimizing Camera Shake
Minimize camera shake during long exposures.
- Prevention: Use a tripod, remote shutter release, or image stabilization.
12.4. Dealing with Hot Pixels
Remove hot pixels caused by long exposures.
- Remedy: Use dark frame subtraction or software tools.
12.5. Focusing in Complete Darkness
Focus in complete darkness using a flashlight or laser pointer.
- Method: Focus on a distant object and switch to manual focus.
13. Building a Night Photography Portfolio
Showcase your best night photos in a portfolio.
13.1. Select Your Best Images
Choose your strongest images.
- Criteria: Sharpness, composition, and impact.
13.2. Organize Your Portfolio
Organize your portfolio by theme or location.
- Structure: Create a logical flow.
13.3. Online Platforms
Use online platforms to showcase your work.
- Examples: dfphoto.net, Instagram, and Flickr.
13.4. Print Your Photos
Print your photos for exhibitions or personal enjoyment.
- Options: Use professional printing services.
13.5. Seek Feedback
Get feedback from other photographers.
- Benefit: Helps improve your skills.
14. Night Photography Projects to Inspire You
Get inspired by these night photography projects.
14.1. Documenting City Life at Night
Capture the energy of city life after dark.
- Ideas: Street scenes, nightlife, and architecture.
14.2. Creating Star Trail Images
Capture the movement of stars over time.
- Technique: Use long exposures or stacking images.
14.3. Photographing the Milky Way
Capture the beauty of the Milky Way.
- Requirements: Dark skies and wide-angle lens.
14.4. Light Painting Experiments
Experiment with light painting techniques.
- Possibilities: Create abstract designs or illuminate subjects.
14.5. Capturing Moonlit Landscapes
Photograph landscapes under the light of the moon.
- Considerations: Use long exposures and adjust white balance.
15. Understanding Legal and Ethical Considerations
Respect the law and ethics when shooting at night.
15.1. Respect Private Property
Avoid trespassing on private property.
- Tip: Obtain permission if necessary.
15.2. Follow Local Laws
Follow local laws and regulations.
- Note: Some areas have restrictions on night photography.
15.3. Minimize Light Pollution
Minimize light pollution when using artificial lights.
- Practice: Use shielded lights and avoid shining lights into the sky.
15.4. Respect Wildlife
Respect wildlife and their habitats.
- Guideline: Avoid disturbing animals or their environment.
15.5. Obtain Model Releases
Obtain model releases for portraits.
- Necessity: Required for commercial use.
16. Latest Trends in Night Photography
Stay updated with the latest trends in night photography.
16.1. Astrophotography with Smartphones
Use smartphones for astrophotography.
- Features: Many smartphones offer astrophotography modes.
16.2. AI-Powered Editing Tools
Use AI-powered editing tools to enhance night photos.
- Examples: Luminar AI and Topaz Denoise AI.
16.3. Virtual Reality Night Photography
Create virtual reality night photography experiences.
- Tools: Use 360 cameras and VR platforms.
16.4. Drone Night Photography
Use drones to capture aerial night photos.
- Requirements: Follow FAA regulations and use drones with night vision.
16.5. Sustainable Night Photography
Practice sustainable night photography.
- Actions: Minimize light pollution and respect the environment.
17. Choosing the Right Editing Software
Selecting the right editing software is essential for post-processing night photos.
17.1. Adobe Lightroom
Adobe Lightroom is a popular choice for its comprehensive editing tools.
Features:
- RAW processing
- Color correction
- Noise reduction
- Presets and profiles
17.2. Adobe Photoshop
Adobe Photoshop offers advanced editing capabilities.
Features:
- Layer-based editing
- Advanced color correction
- Content-aware fill
- Sky replacement
17.3. Capture One
Capture One is known for its excellent color handling and detail.
Features:
- RAW processing
- Color grading
- Tethered shooting
- Advanced noise reduction
17.4. Luminar AI
Luminar AI offers AI-powered editing tools for quick and easy enhancements.
Features:
- AI-powered sky replacement
- Skin enhancement
- Atmospheric effects
- Presets and templates
17.5. DxO PhotoLab
DxO PhotoLab provides lens correction and noise reduction.
Features:
- Lens sharpness
- Noise reduction (DxO PRIME)
- Color rendering
- Local adjustments
18. Understanding Camera Stabilization
Effective camera stabilization is essential for capturing sharp night photos, especially in low-light conditions.
18.1. Optical Image Stabilization (OIS)
Optical Image Stabilization (OIS) is a hardware feature in lenses that physically compensates for camera shake.
Function:
- Reduces blur by counteracting movement.
- Allows for longer exposure times.
- Improves image sharpness.
18.2. In-Body Image Stabilization (IBIS)
In-Body Image Stabilization (IBIS) is built into the camera body and stabilizes the sensor.
Benefits:
- Works with any lens.
- Provides stabilization for older lenses.
- Enhances low-light performance.
18.3. Digital Image Stabilization (DIS)
Digital Image Stabilization (DIS) uses software to reduce blur.
Limitations:
- Can reduce image quality.
- May not be effective for long exposures.
- Uses digital processing.
18.4. Tripods and Monopods
Tripods and monopods provide stability for long exposures.
Importance:
- Essential for landscape and astrophotography.
- Reduces camera shake.
- Allows for sharp images.
18.5. Techniques for Reducing Camera Shake
Various techniques can reduce camera shake.
Techniques:
- Use a remote shutter release.
- Use a self-timer.
- Hold the camera properly.
19. Advanced Lighting Techniques
Mastering advanced lighting techniques can greatly enhance your night photography.
19.1. High-Speed Sync (HSS) Flash
High-Speed Sync (HSS) flash allows you to use flash at high shutter speeds.
Uses:
- Freezes motion.
- Overpowers ambient light.
- Creates balanced exposure.
19.2. Rear Curtain Sync Flash
Rear Curtain Sync Flash triggers the flash at the end of the exposure.
Results:
- Creates light trails behind moving objects.
- Adds dynamic effects.
- Enhances motion portrayal.
19.3. Off-Camera Flash
Off-Camera Flash positions the flash away from the camera.
Benefits:
- Creates dimension.
- Reduces shadows.
- Adds creative lighting.
19.4. Gels
Gels are colored filters placed over the flash.
Effects:
- Corrects color.
- Adds creative hues.
- Modifies mood.
19.5. Reflectors
Reflectors bounce light onto the subject.
Purposes:
- Fills shadows.
- Adds highlights.
- Enhances details.
20. Essential Accessories for Night Photography
Essential accessories can improve your night photography experience and results.
20.1. Headlamps
Headlamps provide hands-free lighting for navigating dark areas.
Benefits:
- Navigating in the dark
- Setting up equipment
- Safety
20.2. Gloves
Gloves keep your hands warm in cold conditions.
Advantages:
- Maintaining dexterity
- Comfort in cold conditions
- Avoiding frostbite
20.3. Extra Batteries
Extra batteries ensure you don’t run out of power during long shoots.
Necessity:
- Prolonged shooting times
- Cold weather drains batteries faster
- Avoiding interruptions
20.4. Lens Cleaning Kit
A lens cleaning kit keeps your lens free of dirt and smudges.
Features:
- Maintaining image clarity
- Removing dust and fingerprints
- Preventing flare
20.5. Camera Bag
A camera bag protects your equipment from damage.
Purposes:
- Safe transport
- Organization
- Weather protection
21. Mastering Hyperfocal Distance
Hyperfocal distance is the closest distance at which a lens can be focused while keeping objects at infinity acceptably sharp.
21.1. Understanding Hyperfocal Distance
Hyperfocal distance is crucial for maximizing depth of field.
Definition:
- Closest distance for acceptable sharpness
- Maximizing depth of field
- Ensures everything beyond is sharp
21.2. Calculating Hyperfocal Distance
Calculators and apps help determine the hyperfocal distance.
Tools:
- Online calculators
- Mobile apps
- Lens charts
21.3. Setting Focus Manually
Set focus manually to achieve hyperfocal distance.
Steps:
- Focus on the calculated distance
- Use focus peaking
- Ensure sharpness in the viewfinder
21.4. Using Depth of Field Scales
Depth of field scales on lenses indicate hyperfocal distance.
Function:
- Visual guide
- Quick setup
- Ensures optimal sharpness
21.5. Applying Hyperfocal Distance in Landscapes
Use hyperfocal distance in landscapes for maximum sharpness.
Benefits:
- Sharp foreground
- Sharp background
- Balanced composition
22. Frequently Asked Questions (FAQs)
22.1. What is the best camera setting for night photography?
The best camera settings are a wide aperture (e.g., f/1.8 or f/2.8), low ISO (below 1600), and manual focus. Adjust shutter speed to balance brightness and sharpness.
22.2. How can I reduce noise in night photos?
To minimize noise, use the lowest native ISO possible, shoot in RAW format, and use noise reduction software during post-processing.
22.3. What lenses are best for night photography?
Lenses with wide apertures (e.g., f/1.4 or f/1.8) are best for night photography as they allow more light to enter the camera.
22.4. Do I need a tripod for night photography?
Yes, a tripod is essential for long exposures to prevent camera shake and ensure sharp images.
22.5. How can I capture star trails in night photography?
To capture star trails, use a long exposure time (e.g., 30 minutes or longer) and a tripod. You can also stack multiple images in post-processing.
22.6. What is light painting, and how do I do it?
Light painting involves using a flashlight to illuminate your subject during a long exposure. Experiment with different light sources and movements to create unique effects.
22.7. How do I deal with light pollution in night photography?
To minimize the effects of light pollution, find dark locations away from city lights, use light pollution filters, and shoot during moonless nights.
22.8. What is the best way to focus in low light conditions?
Use manual focus and zoom in on your subject in live view to fine-tune focus. Focus peaking can also help you identify areas in focus.
22.9. How important is post-processing in night photography?
Post-processing is very important for enhancing night photos. It allows you to adjust exposure, white balance, reduce noise, and sharpen details.
22.10. What are some common mistakes to avoid in night photography?
Common mistakes include using too high ISO, not using a tripod, failing to focus properly, and underexposing the image.
At dfphoto.net, our goal is to provide you with comprehensive guidance and inspiration for night photography. Whether you’re looking to master camera settings, explore new techniques, or find the perfect location, our resources are here to support your journey. Discover our tutorials, stunning image galleries, and a vibrant community of photographers. Visit dfphoto.net today and transform your night photography skills. Explore composition, lighting techniques, and image enhancement to capture extraordinary low-light images.
(Address: 1600 St Michael’s Dr, Santa Fe, NM 87505, United States. Phone: +1 (505) 471-6001. Website: dfphoto.net.)