Does Cvs Develop Photos? Yes, CVS Photo Centers offer photo development services, but with some key considerations. This guide from dfphoto.net dives into the details of CVS’s photo services, comparing them to other options and helping you make the best choice for your photography needs. Explore various photographic techniques and visual arts tailored just for you. Discover more about film development and digital artistry with dfphoto.net.
1. What Photo Services Does CVS Offer?
CVS provides a range of photo services, including:
- Film Developing: CVS develops film for both film rolls and disposable cameras.
- Prints from Film: You can get prints made directly from your film.
- Prints from Digital: CVS allows you to print photos from digital sources, such as your phone or computer.
2. Is CVS a Convenient Option for Photo Developing?
Yes, with approximately 9,600 retail locations*, CVS Photo Centers are conveniently located in many areas. This makes them an accessible option for prints and film developing. For photographers, it can offer quick solutions.
3. How Does CVS’s Photo Printing Service Rate?
CVS was ranked as the 4th best photo printing service in 2017 by TopTenReviews. However, it is not clear if this ranking applies to their online or in-store photo centers.
4. Does CVS Still Support Film Development?
Yes, CVS is one of the few major retailers that still offers film developing for both film rolls and disposable cameras. Walmart Photo Center and Walgreens Photo Center are the other two. They offer this service for both the hobbyist and professional photographers.
5. How Does the CVS Film Development Process Work?
Customers can drop off their film rolls or single-use cameras at a CVS store. The film is then sent to a processing center in Greenwood, S.C., run by Fujifilm. Digital copies are supplied but originals are not returned. CVS also sells single-use cameras. For avid film photographers, this is a plus.
6. What Are the Advantages of Using CVS for Photo Developing?
- Convenience: CVS stores are widely available.
- Supports Film: CVS still supports film development.
7. What Are the Drawbacks of Using CVS for Photo Developing?
- Negatives Not Returned: CVS does not return your original negatives.
- Quality Concerns: Some customers have reported issues with scanning and printing quality.
- Long Turnaround Times: Many users have experienced long wait times for their photos to be developed.
8. What Do Customers Say About Their CVS Photo Experience?
Here are some excerpts from users regarding their experiences with CVS Photo:
- Wilson A, Atlantic Beach, Florida: “CVS photo still develops film in my area, but only C-41. They have to send it away and it takes about 4-7 days. However, they do not send back your negatives. All you get back is standard 4×5 prints and a CD with your photos on them. I found this out the hard way.”
- Jake S: “I only got my film developed at CVS Photo Centers and I’m pretty satisfied with the prints. The downside is you don’t get your negatives back and it takes like 5 weeks. The price is good for the quality and I would definitely develop from them again.”
- @zerlix_detroit: “I’m in Michigan…Most of the drug stores (CVS, Walgreens) stopped because the C-41 machines broke down, they send out their film. I use a local camera shop for the 35mm and 120.”
- @danbien30, Poughkeepsie, NY: “When I got into 35mm I started shooting like a madman figuring “oh when I worked in the photo at Walmart (in 2008) we processed film”. They don’t. I also checked Rite Aid, CVS, and Walgreens in my area (Poughkeepsie, NY). Nothing in-house, they all send out with a week or more turn around time. Also, they DO NOT send negatives back as I asked. There is, however, a wonderful place about an hour north (Albany) that processes c-41, E6, etc… very pleased with the results. A little pricey, but I’ll take quality.”
- Charles R. L, Virginia: “Nearly all CVS’s have switched to digital-only processing and printing, mostly DIY.”
- @burlesontx , Houston, TX.: “CVS sends out the film to be processed at their district photo lab.”
9. What Other Printing Options Does CVS Photo Offer?
CVS Photo offers various printing options, including:
- Custom Picture Prints: Print images in a variety of shapes and sizes.
- Personalized Growth Charts: Create custom growth charts for kids.
- Customized Image Banners: Design your own party decorations with custom image banners.
- Collage Prints: Combine multiple photos into one print.
- Mounted Image Prints: Stylish, contemporary way to decorate.
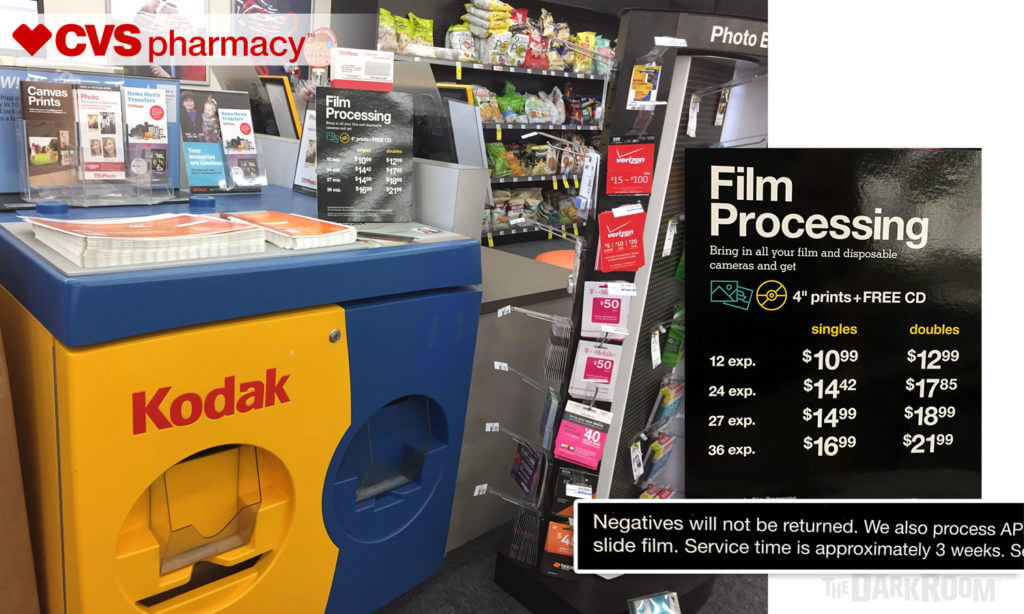 CVS Film Processing
A CVS Photo film submission box demonstrating their developing service, where customers can drop off film rolls for processing and printing, a convenient option for film enthusiasts.
10. How Can I Get High-Quality Photo Prints from CVS?
CVS Photo provides a selection of image printing services to take your pictures from the screen to your home, office, or wallet. You can print photos for any frame size or create posters.
11. Exploring the Nuances of CVS Photo Development Services
CVS Photo, with its widespread presence, has become a familiar name for photo printing and developing services. However, the experience can vary significantly based on location, the specific services offered, and the evolving landscape of photo technology. This section delves deeper into these nuances to provide a more comprehensive understanding.
11.1. The Shift Towards Digital and DIY Processing
As noted by Charles R. L from Virginia, many CVS locations have shifted towards digital-only processing and printing, with a focus on DIY services. This trend reflects the broader industry move towards digital photography and instant gratification. While this means that customers can quickly print photos from their smartphones or digital cameras, it also indicates a potential decline in the availability of traditional film development services.
11.2. Regional Variations in Service Availability
The availability of film development services at CVS can vary significantly by region. As @zerlix_detroit pointed out, many drug stores, including CVS and Walgreens, in Michigan have stopped offering in-house film processing due to the breakdown of C-41 machines. Instead, they send the film out to be processed. This regional variation highlights the importance of checking with your local CVS to confirm the availability of film development services.
11.3. The Convenience Factor: A Double-Edged Sword
CVS’s convenience is undoubtedly a major draw for many customers. With thousands of locations across the United States, it’s easy to drop off film or pick up prints while running other errands. However, this convenience can come at a cost. The turnaround time for film development can be longer compared to dedicated photo labs, and the quality of prints may not always meet the expectations of discerning photographers.
11.4. The Importance of Understanding the Process
Many of the negative experiences reported by CVS customers stem from a lack of understanding about the film development process. For example, the fact that CVS sends film out to a processing center is not always clearly communicated to customers. This can lead to confusion and frustration when the turnaround time is longer than expected. Similarly, the policy of not returning negatives is a significant drawback for many film photographers, but it is not always made clear upfront.
11.5. Weighing the Pros and Cons
Ultimately, the decision of whether or not to use CVS for photo development depends on your individual needs and priorities. If convenience and affordability are your top concerns, and you don’t mind the possibility of longer turnaround times and not getting your negatives back, CVS may be a suitable option. However, if you prioritize quality, speed, and the preservation of your negatives, you may be better off using a dedicated photo lab.
12. Understanding the Technical Aspects of Film Developing at CVS
To make an informed decision about using CVS for film development, it’s essential to understand the technical aspects of the process, including the types of film they process, the quality of their scans, and the printing options available.
12.1. Types of Film Processed
CVS primarily processes C-41 color negative film, which is the most common type of film used in modern cameras. However, they may not process other types of film, such as black and white, E-6 slide film, or specialty formats. Before dropping off your film, it’s crucial to confirm that CVS can process the specific type of film you have.
12.2. Scanning Quality
The quality of the scans produced by CVS can vary depending on the equipment used at the processing center and the skill of the technician. In general, the scans are adequate for making small prints and sharing online, but they may not be high enough resolution for large prints or professional use. If you require high-resolution scans, you may want to consider using a dedicated photo lab that specializes in film scanning.
12.3. Printing Options
CVS offers a range of printing options, including standard 4×6 prints, enlargements, and photo gifts. The quality of the prints is generally good, but it may not be comparable to prints produced by professional photo labs that use higher-quality paper and printing equipment.
12.4. Digital Image Delivery
CVS typically delivers digital images on a CD or via online download. The file format is usually JPEG, which is a compressed format that can result in some loss of detail. If you require uncompressed image files, you may want to ask if CVS can provide TIFF files, although this may not be an option.
12.5. Color Correction and Image Enhancement
CVS may offer basic color correction and image enhancement services, but the extent of these services can vary. If you have specific requirements for color accuracy or image editing, it’s best to discuss them with the CVS staff before dropping off your film.
13. Alternatives to CVS for Film Development and Photo Printing
While CVS offers a convenient option for film development and photo printing, it’s essential to be aware of the alternatives available, each with its own set of advantages and disadvantages.
13.1. Dedicated Photo Labs
Dedicated photo labs specialize in film development and printing, and they typically offer higher quality and more personalized service than CVS. These labs often use professional-grade equipment and employ experienced technicians who can provide expert advice and assistance. However, dedicated photo labs can be more expensive than CVS, and they may not be as conveniently located.
Examples of Dedicated Photo Labs:
- The Darkroom (online)
- Duggal Visual Solutions (New York City)
- Luster Photo & Digital Labs (New York City)
- Richard Photo Lab (Los Angeles)
13.2. Online Photo Printing Services
Online photo printing services offer a wide range of printing options, including prints, photo books, canvas prints, and other photo gifts. These services are typically more affordable than dedicated photo labs, and they offer the convenience of ordering prints from home. However, the quality of prints may not be as high as those produced by dedicated photo labs, and the turnaround time can be longer.
Examples of Online Photo Printing Services:
- Shutterfly
- Snapfish
- Mpix
- Printique
13.3. Local Camera Shops
Local camera shops often offer film development and printing services, and they can provide a more personalized experience than CVS. These shops typically have knowledgeable staff who can offer advice and assistance, and they may offer additional services such as film scanning and photo restoration. However, local camera shops can be more expensive than CVS, and they may not be as conveniently located.
13.4. DIY Film Development
For the adventurous photographer, DIY film development is an option. This involves purchasing the necessary equipment and chemicals and developing film at home. DIY film development allows for complete control over the process, but it requires a significant investment of time and effort.
13.5. Comparison Table
| Feature | CVS Photo | Dedicated Photo Labs | Online Photo Printing | Local Camera Shops | DIY Film Development |
|---|---|---|---|---|---|
| Quality | Good | Excellent | Good | Very Good | Excellent (if skilled) |
| Price | Affordable | Expensive | Affordable | Moderate | Moderate (initial investment) |
| Convenience | Very Convenient | Less Convenient | Very Convenient | Less Convenient | Inconvenient |
| Turnaround Time | Varies | Faster | Varies | Faster | Immediate |
| Service | Limited | Personalized | Limited | Personalized | Complete Control |
| Negatives Returned | No | Yes | No | Yes | Yes |
13.6. Choosing the Right Option
The best option for film development and photo printing depends on your individual needs and priorities. Consider the following factors when making your decision:
- Quality: How important is the quality of the prints and scans?
- Price: What is your budget?
- Convenience: How important is it to have a convenient location and turnaround time?
- Service: Do you need personalized service and expert advice?
- Negatives: Do you want to get your negatives back?
14. Tips for Getting the Best Results from CVS Photo Services
If you decide to use CVS for photo development or printing, here are some tips to help you get the best possible results:
14.1. Confirm Service Availability
Before dropping off your film, call your local CVS to confirm that they offer the specific service you need.
14.2. Inquire About Processing Times
Ask about the turnaround time for film development and printing, and factor that into your decision.
14.3. Specify Your Preferences
Clearly communicate your preferences for print sizes, paper type, and color correction.
14.4. Inspect Your Prints
When you pick up your prints, inspect them carefully for any defects or errors. If you’re not satisfied with the quality, ask for a refund or reprint.
14.5. Back Up Your Digital Images
Whether you get your images on a CD or via online download, be sure to back them up to multiple locations to protect them from loss or damage.
14.6. Consider Scanning Negatives Yourself
If you want to preserve your negatives and have more control over the scanning process, consider purchasing a film scanner and scanning them yourself.
14.7. Ask About Discounts and Promotions
CVS often offers discounts and promotions on photo services, so be sure to ask about any available deals.
14.8. Understand the Limitations
Be aware of the limitations of CVS’s photo services, such as the fact that they don’t return negatives and the quality may not be as high as that of dedicated photo labs.
15. How to Choose the Right Film for Your Needs
Choosing the right film is crucial to achieving the desired results in your photographs. Here’s a guide to help you select the best film for your specific needs:
15.1. Film Speed (ISO)
Film speed, also known as ISO, indicates the film’s sensitivity to light. Lower ISO films (e.g., ISO 100) are less sensitive and produce finer grain, while higher ISO films (e.g., ISO 400, 800, or 1600) are more sensitive and better suited for low-light conditions.
15.2. Film Type
- Color Negative Film (C-41): The most common type of film, producing color prints.
- Black and White Film: Produces monochrome images with varying tones of gray.
- Slide Film (E-6): Produces positive images on transparent film, often used for projection.
- Specialty Films: Includes infrared film, redscale film, and other unique options.
15.3. Film Format
- 35mm Film: The most popular format, offering a good balance of image quality and convenience.
- Medium Format Film: Larger than 35mm, producing higher-quality images with more detail.
- Large Format Film: The largest format, offering the highest image quality but requiring specialized equipment.
15.4. Color Rendition
Different films have different color renditions, which can affect the overall look and feel of your photographs. Some films produce vibrant, saturated colors, while others produce more muted, natural colors.
15.5. Grain Structure
The grain structure of a film refers to the size and appearance of the individual grains of silver halide that make up the image. Lower ISO films typically have finer grain, while higher ISO films have coarser grain.
15.6. Contrast
Contrast refers to the difference between the lightest and darkest areas of an image. Some films have high contrast, producing images with stark blacks and whites, while others have low contrast, producing images with more subtle tonal gradations.
15.7. Choosing Based on Subject Matter
- Portraits: Low ISO film with natural color rendition and fine grain.
- Landscapes: Low to medium ISO film with vibrant colors and good sharpness.
- Street Photography: Medium to high ISO film with good contrast and grain.
- Low Light Photography: High ISO film with good sensitivity and manageable grain.
16. Exploring the Art of Black and White Photography
Black and white photography offers a unique way to capture the world, emphasizing tones, textures, and compositions. Here are some tips for creating compelling black and white images:
16.1. Think in Tones
When shooting in black and white, focus on the tonal relationships within the scene. Look for areas of high contrast and subtle gradations of gray.
16.2. Master Composition
Composition is even more critical in black and white photography, as it helps to guide the viewer’s eye and create a sense of balance and harmony.
16.3. Use Filters
Filters can be used to enhance certain tones and create dramatic effects. For example, a red filter can darken skies and increase the contrast of foliage.
16.4. Experiment with Development
When developing black and white film, experiment with different developers and techniques to achieve the desired tonal range and contrast.
16.5. Embrace Grain
Grain can add character and texture to black and white images, especially when shooting with high ISO film.
16.6. Post-Processing Techniques
In post-processing, use tools like curves, levels, and dodging and burning to fine-tune the tones and contrast of your black and white images.
16.7. Study the Masters
Study the work of renowned black and white photographers such as Ansel Adams, Henri Cartier-Bresson, and Diane Arbus to learn from their techniques and approaches.
17. Mastering the Art of Composition in Photography
Composition is the arrangement of elements within a photograph to create a visually appealing and engaging image. Here are some key compositional techniques:
17.1. Rule of Thirds
Divide the frame into nine equal parts using two horizontal and two vertical lines. Place key elements along these lines or at their intersections.
17.2. Leading Lines
Use lines to guide the viewer’s eye through the image, creating a sense of depth and direction.
17.3. Symmetry and Patterns
Symmetry and patterns can create visually striking and harmonious images.
17.4. Framing
Use elements within the scene to frame the main subject, drawing attention to it and adding depth.
17.5. Negative Space
Use empty space around the subject to create a sense of balance and calm.
17.6. Depth of Field
Control the depth of field to isolate the subject or create a sense of depth and perspective.
17.7. Perspective
Experiment with different perspectives to create unique and dynamic compositions.
18. Understanding Exposure: Aperture, Shutter Speed, and ISO
Exposure is the amount of light that reaches the camera sensor, and it’s controlled by three key settings: aperture, shutter speed, and ISO.
18.1. Aperture
Aperture refers to the size of the lens opening, measured in f-stops. A wider aperture (e.g., f/2.8) lets in more light and creates a shallow depth of field, while a narrower aperture (e.g., f/16) lets in less light and creates a greater depth of field.
18.2. Shutter Speed
Shutter speed refers to the length of time the camera shutter is open, measured in seconds or fractions of a second. A faster shutter speed (e.g., 1/1000 second) freezes motion, while a slower shutter speed (e.g., 1 second) allows for motion blur.
18.3. ISO
ISO refers to the sensitivity of the camera sensor to light. A lower ISO (e.g., ISO 100) is less sensitive and produces less noise, while a higher ISO (e.g., ISO 3200) is more sensitive and better suited for low-light conditions.
18.4. The Exposure Triangle
Aperture, shutter speed, and ISO are interconnected, and adjusting one setting will affect the others. The key is to find the right balance between these three settings to achieve the desired exposure.
18.5. Using a Light Meter
A light meter can help you determine the correct exposure settings for a given scene.
18.6. Understanding Histograms
A histogram is a graphical representation of the tonal range in an image, and it can be used to assess the exposure and contrast.
19. Essential Photography Equipment for Beginners
Starting your photography journey requires the right equipment. Here’s a list of essential gear for beginners:
19.1. Camera
- DSLR or Mirrorless Camera: Versatile options with interchangeable lenses.
- Point-and-Shoot Camera: Compact and easy to use for casual photography.
- Smartphone: Convenient for everyday snapshots and social media sharing.
19.2. Lenses
- Kit Lens: Typically a zoom lens that comes with the camera, suitable for general photography.
- Prime Lens: Fixed focal length lenses with wider apertures and sharper image quality.
- Zoom Lens: Offers a range of focal lengths for different shooting situations.
19.3. Tripod
A tripod is essential for steadying the camera and preventing blurry images, especially in low-light conditions.
19.4. Camera Bag
A camera bag is used to protect and transport your camera and accessories.
19.5. Memory Cards
Memory cards are used to store your digital images. Choose cards with sufficient capacity and speed for your shooting needs.
19.6. Cleaning Supplies
Keep your camera and lenses clean with a microfiber cloth and lens cleaning solution.
19.7. Optional Accessories
- External Flash: Provides additional lighting for portraits and other subjects.
- Filters: Used to enhance colors, reduce glare, and create special effects.
- Remote Shutter Release: Prevents camera shake when using slow shutter speeds.
20. Exploring Different Genres of Photography
Photography offers a wide range of genres to explore, each with its own unique challenges and rewards.
20.1. Portrait Photography
Capturing the personality and essence of a person.
20.2. Landscape Photography
Showcasing the beauty and grandeur of natural landscapes.
20.3. Street Photography
Capturing candid moments and everyday life in public spaces.
20.4. Wildlife Photography
Documenting animals in their natural habitats.
20.5. Macro Photography
Capturing extreme close-up images of small subjects.
20.6. Architectural Photography
Documenting buildings and structures in an aesthetically pleasing way.
20.7. Sports Photography
Capturing action and excitement in sporting events.
21. The Importance of Post-Processing in Digital Photography
Post-processing is an essential part of the digital photography workflow, allowing you to enhance and refine your images.
21.1. Software Options
- Adobe Photoshop: Industry-standard software with a wide range of editing tools.
- Adobe Lightroom: Streamlined workflow for organizing and editing large batches of photos.
- GIMP: Free and open-source alternative to Photoshop.
- Capture One: Professional-grade software with advanced color editing capabilities.
21.2. Basic Adjustments
- Exposure: Adjusting the overall brightness of the image.
- Contrast: Adjusting the difference between the lightest and darkest areas.
- Highlights and Shadows: Adjusting the brightness of the brightest and darkest areas separately.
- White Balance: Correcting color casts to achieve accurate colors.
- Clarity: Adding detail and definition to the image.
21.3. Advanced Techniques
- Curves and Levels: Fine-tuning the tonal range of the image.
- Dodging and Burning: Selectively lightening and darkening areas of the image.
- Color Grading: Adjusting the colors to create a specific mood or style.
- Sharpening: Adding sharpness to the image to enhance detail.
- Noise Reduction: Reducing unwanted noise in the image.
22. The Role of Lighting in Photography
Lighting is one of the most crucial elements in photography, shaping the mood, atmosphere, and overall impact of an image.
22.1. Types of Light
- Natural Light: Sunlight, moonlight, and skylight.
- Artificial Light: Flash, studio strobes, and continuous lighting.
22.2. Qualities of Light
- Hard Light: Direct, focused light that creates strong shadows.
- Soft Light: Diffused, gentle light that creates soft shadows.
- Warm Light: Light with a reddish or yellowish tint.
- Cool Light: Light with a bluish tint.
22.3. Lighting Techniques
- Front Lighting: Light source is behind the photographer, illuminating the subject directly.
- Side Lighting: Light source is to the side of the subject, creating shadows and depth.
- Backlighting: Light source is behind the subject, creating a silhouette or rim light.
- Diffused Lighting: Soft, even lighting that minimizes shadows.
22.4. Using Reflectors
Reflectors can be used to bounce light onto the subject, filling in shadows and creating a more balanced exposure.
22.5. Working with Shadows
Shadows can add depth, drama, and mystery to an image.
22.6. Golden Hour and Blue Hour
The golden hour (shortly after sunrise and before sunset) and the blue hour (shortly before sunrise and after sunset) offer beautiful, soft light that is ideal for photography.
23. Building a Photography Portfolio
A photography portfolio is a collection of your best work, showcasing your skills and style to potential clients or employers.
23.1. Selecting Your Best Images
Choose images that represent your strongest work and demonstrate your versatility.
23.2. Curation and Editing
Carefully curate your portfolio to ensure a cohesive and consistent style. Edit your images to perfection, paying attention to color, tone, and composition.
23.3. Online Platforms
- Website: Create your own website to showcase your work and provide contact information.
- Behance: Online platform for showcasing creative work.
- 500px: Online community for photographers.
- Instagram: Social media platform for sharing photos.
23.4. Print Portfolio
A physical print portfolio can be a powerful tool for presenting your work in person.
23.5. Portfolio Review
Seek feedback from other photographers and industry professionals to improve your portfolio.
23.6. Updating Your Portfolio
Regularly update your portfolio with your latest and greatest work.
24. Understanding Copyright and Image Licensing
Copyright protects your original photographs from unauthorized use.
24.1. Copyright Basics
Copyright is automatically granted to the creator of an original work, including photographs.
24.2. Registering Your Copyright
Registering your copyright with the U.S. Copyright Office provides additional legal protection.
24.3. Image Licensing
Image licensing allows you to grant others the right to use your photographs under specific terms and conditions.
24.4. Creative Commons Licenses
Creative Commons licenses offer a flexible way to share your work while retaining certain rights.
24.5. Watermarking
Watermarking your images can help to deter unauthorized use.
24.6. Protecting Your Work
Monitor your images online and take action against any copyright infringement.
25. Resources for Learning Photography
There are numerous resources available for learning photography, both online and in person.
25.1. Online Courses
- CreativeLive: Offers a wide range of photography courses taught by industry experts.
- Skillshare: Online learning platform with photography classes.
- Udemy: Online marketplace for learning and teaching.
25.2. Photography Books
- “Understanding Exposure” by Bryan Peterson
- “The Photographer’s Eye” by Michael Freeman
- “Read This If You Want to Take Great Photographs” by Henry Carroll
25.3. Photography Workshops
Attend photography workshops to learn from experienced instructors and network with other photographers.
25.4. Photography Clubs
Join a photography club to connect with other photographers, share your work, and learn new techniques.
25.5. Online Communities
Engage in online photography communities to share your work, ask questions, and receive feedback.
FAQ: CVS Photo Development and Printing
Here are some frequently asked questions about CVS photo development and printing services:
1. Does CVS develop all types of film?
CVS primarily develops C-41 color negative film. Check with your local store for other film types.
2. How long does it take for CVS to develop film?
Turnaround times can vary, but it typically takes several days to a week.
3. Does CVS return negatives?
No, CVS does not return negatives.
4. What is the quality of CVS photo prints?
The quality is generally good for standard prints but may not be comparable to professional labs.
5. Can I print photos from my phone at CVS?
Yes, CVS offers options for printing photos from your phone.
6. Does CVS offer same-day photo printing?
Yes, CVS offers same-day printing for select products.
7. How much does it cost to develop film at CVS?
Prices vary, so check with your local store for current rates.
8. Can I order photo gifts from CVS?
Yes, CVS offers a variety of photo gifts, such as mugs, blankets, and phone cases.
9. Does CVS offer photo restoration services?
Photo restoration services can be used to repair and enhance old or damaged images, preserving precious memories for years to come. In some cases, CVS may not offer photo restoration services directly, it’s always a good idea to check with your local store to inquire about availability.
10. What file formats does CVS accept for printing digital photos?
CVS typically accepts JPEG, PNG, and TIFF file formats for printing digital photos, ensuring compatibility with a wide range of devices and software.
For those in the Santa Fe area, consider visiting or contacting dfphoto.net for more in-depth information and services: Address: 1600 St Michael’s Dr, Santa Fe, NM 87505, United States. Phone: +1 (505) 471-6001. Website: dfphoto.net.
Whether you’re a seasoned photographer or just starting out, understanding the ins and outs of photo developing and printing is essential. While CVS provides a convenient option, exploring alternatives and understanding the technical aspects can help you make the best choices for your photographic journey. Explore the beauty of photography further with dfphoto.net, your go-to source for inspiration, education, and community. Find tutorials, galleries, and expert advice to enhance your skills. Join dfphoto.net today and start capturing the world like never before! Discover the allure of film photography.