Do It Yourself Photo Canvas projects are an excellent way to display your treasured memories with a personal artistic touch, enhancing your home decor with customized visual art that reflects your unique style. At dfphoto.net, you’ll find inspiration and guidance to transform your favorite photos into stunning canvas art. Embrace this creative opportunity to produce personalized photo gifts and wall art, preserving moments in a tangible, artistic form, all while saving money.
1. Understanding The Basics of DIY Photo Canvas
Do it yourself photo canvas projects offer a personalized and cost-effective way to display your favorite photos. Instead of paying for expensive canvas prints, you can create your own unique wall art at home. This process involves transferring a photo onto a canvas, adding texture, and finishing it to create a professional-looking piece.
1.1. What is a Photo Canvas?
A photo canvas is a photograph printed onto canvas material, stretched over a frame, and displayed as art. It is a popular way to showcase photos because the canvas texture adds an artistic quality to the image. According to research from the Santa Fe University of Art and Design’s Photography Department, in July 2023, canvas prints are preferred for their durability and classic aesthetic.
1.2. Why Choose DIY?
Opting for a do it yourself photo canvas offers several advantages:
- Cost Savings: Creating your own canvas print is significantly cheaper than ordering from a professional printing service.
- Personalization: You have complete control over the size, texture, and finishing touches.
- Creative Satisfaction: The process of creating your own art is rewarding and fun.
- Upcycling Opportunity: You can repurpose old canvases or materials, making it an environmentally friendly option.
1.3. Key Materials and Tools
To start your do it yourself photo canvas project, you’ll need the following materials and tools:
- Blank canvas
- Enlarged photo prints on photo paper
- Mod Podge Matte Finish
- Foam brushes
- Black acrylic paint (optional)
- Exacto knife / craft knife
- Cutting board
 DIY photo canvases Pinterest graphic showing the finished project
2. Preparing Your Photo and Canvas
Proper preparation is crucial for achieving a professional-looking do it yourself photo canvas. This involves selecting the right photo, printing it correctly, and preparing your canvas.
2.1. Choosing the Right Photo
- Resolution: Select a high-resolution photo to ensure clarity when enlarged.
- Composition: Consider the composition and ensure the main subject is well-framed.
- Color and Tone: Choose a photo with good color balance and tone. Adjustments can be made using photo editing software if needed.
- Personal Significance: Select a photo that holds special meaning to you.
2.2. Printing Your Photo
- Professional Printing: It is highly recommended to have your photo professionally printed at a photo lab on photo paper.
- Avoid Home Printing: Home-printed photos are prone to smearing when used with Mod Podge.
- Paper Type: Ensure the photo is printed on photo paper, not banner paper or regular paper.
- Costco Photo Lab: Many DIY enthusiasts recommend Costco for affordable and high-quality photo enlargements.
2.3. Preparing the Canvas
- Blank Canvas: Purchase a blank canvas in the desired size.
- Upcycling: Old canvases can be upcycled by painting them black.
- Painting the Sides: Painting the sides of the canvas with black acrylic paint gives it a more finished look.
- Drying Time: Allow the paint to dry completely before proceeding.
3. Step-by-Step Guide to Creating Your DIY Photo Canvas
Follow these steps to create your own do it yourself photo canvas:
3.1. Painting the Canvas (Optional)
If you choose to paint the canvas, apply a layer of black acrylic paint to the sides and let it dry completely. This step enhances the overall aesthetic of the finished product.
3.2. Applying Mod Podge
Use a foam brush to coat the front of the canvas with a layer of Mod Podge. Ensure an even application to avoid any lumps or streaks.
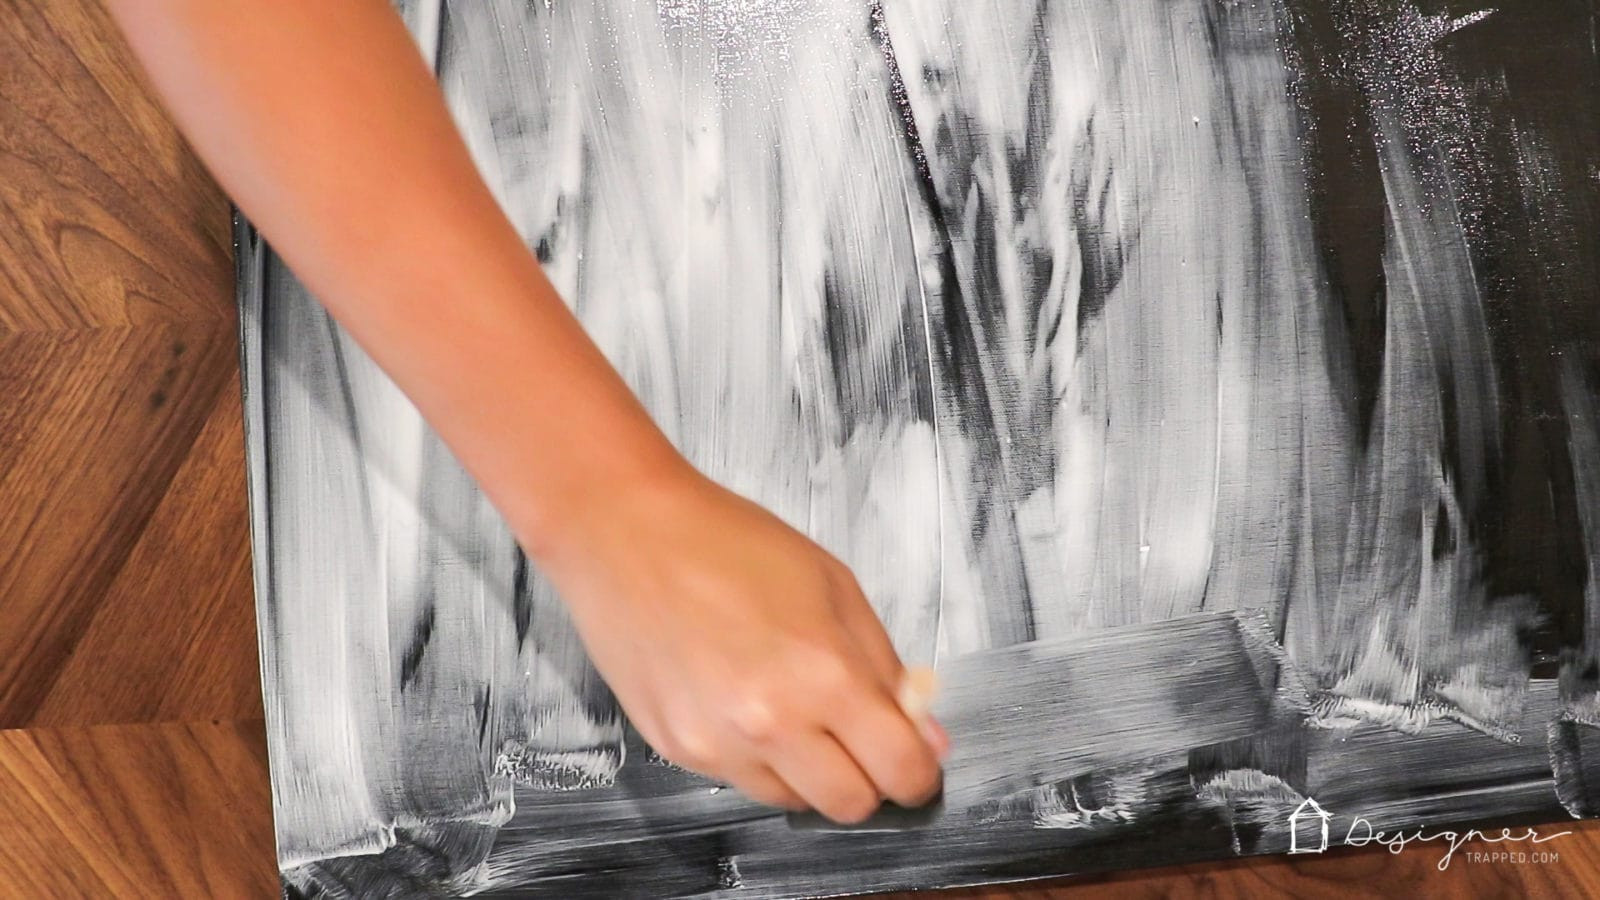 Applying Mod Podge to a blank canvas
3.3. Attaching the Photo
Carefully place your photo on top of the wet Mod Podge, ensuring the photo side faces up. Align the photo correctly and gently press it onto the canvas.
3.4. Smoothing and Flattening
Flip the canvas over and use your hands to press and flatten the photo, ensuring it adheres nicely. Smooth out any air bubbles to achieve a seamless finish. A brayer can be used for this step if you have one.
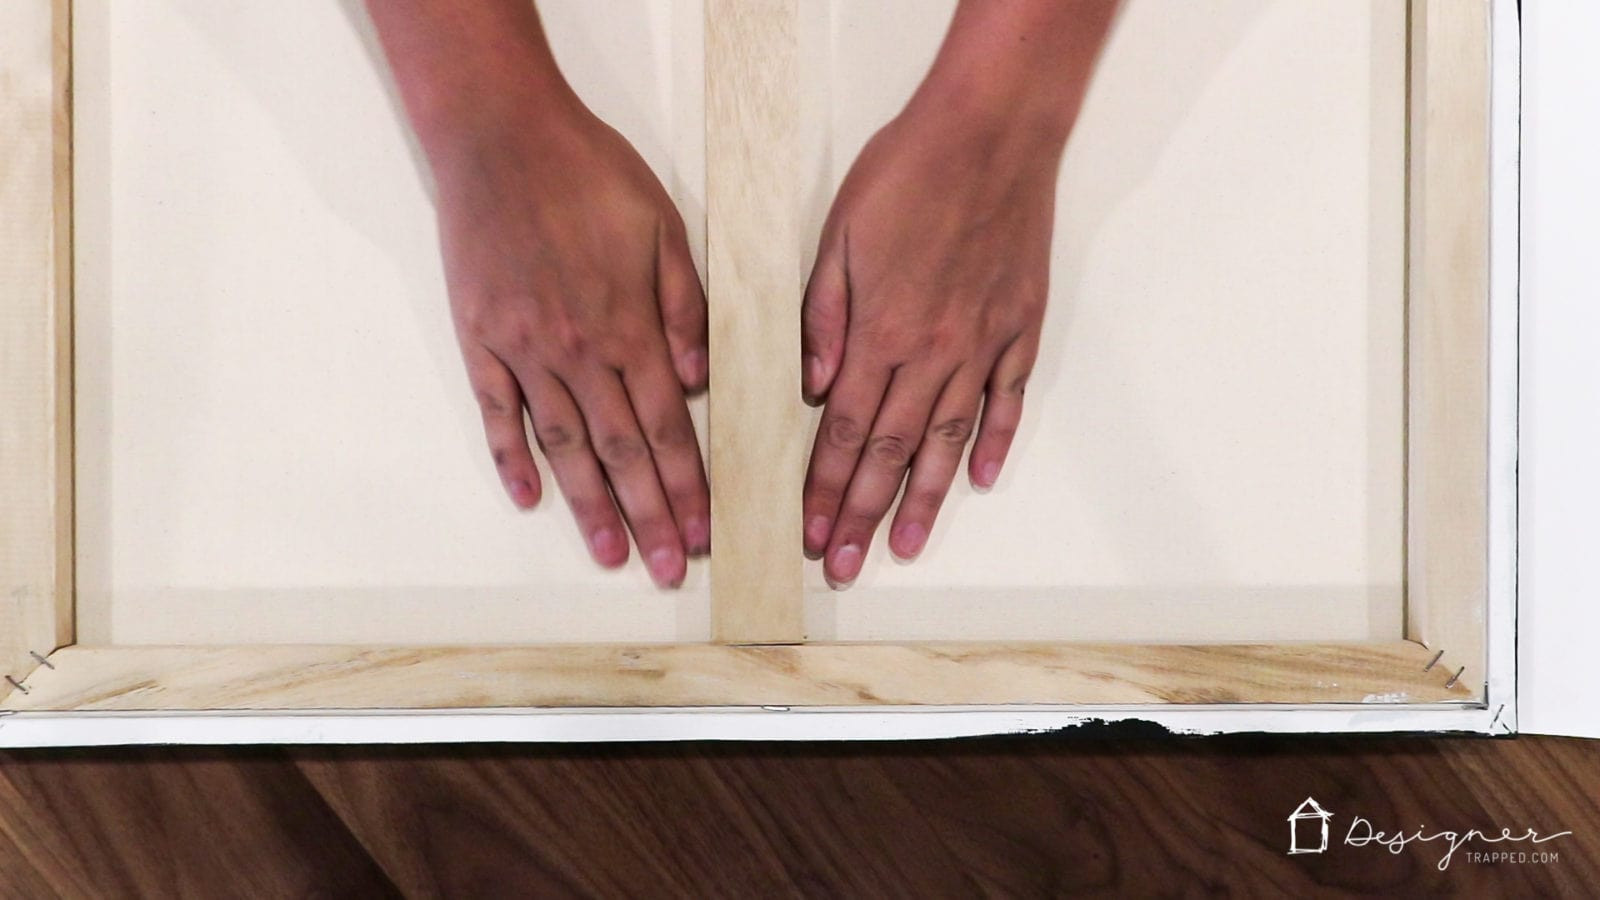 Smoothing out the photo on the canvas
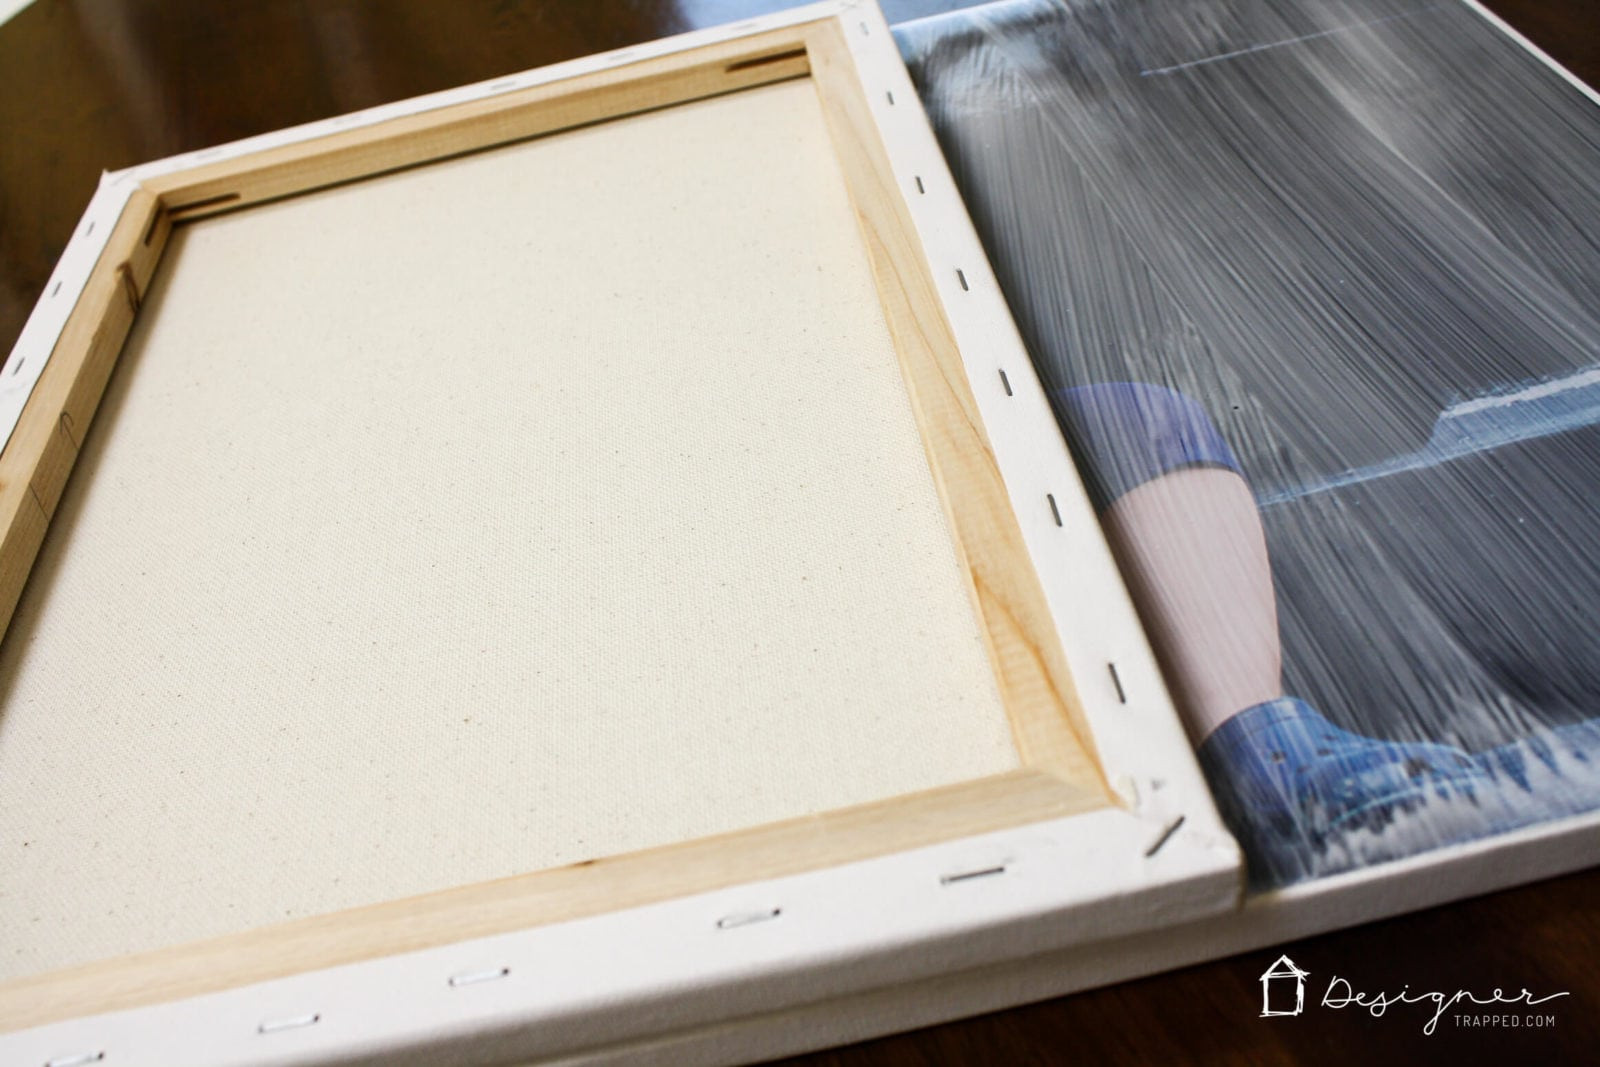
3.5. Drying Overnight
Leave the canvas upside down and place some books on top to prevent wrinkling as the Mod Podge dries. Allow it to dry overnight.
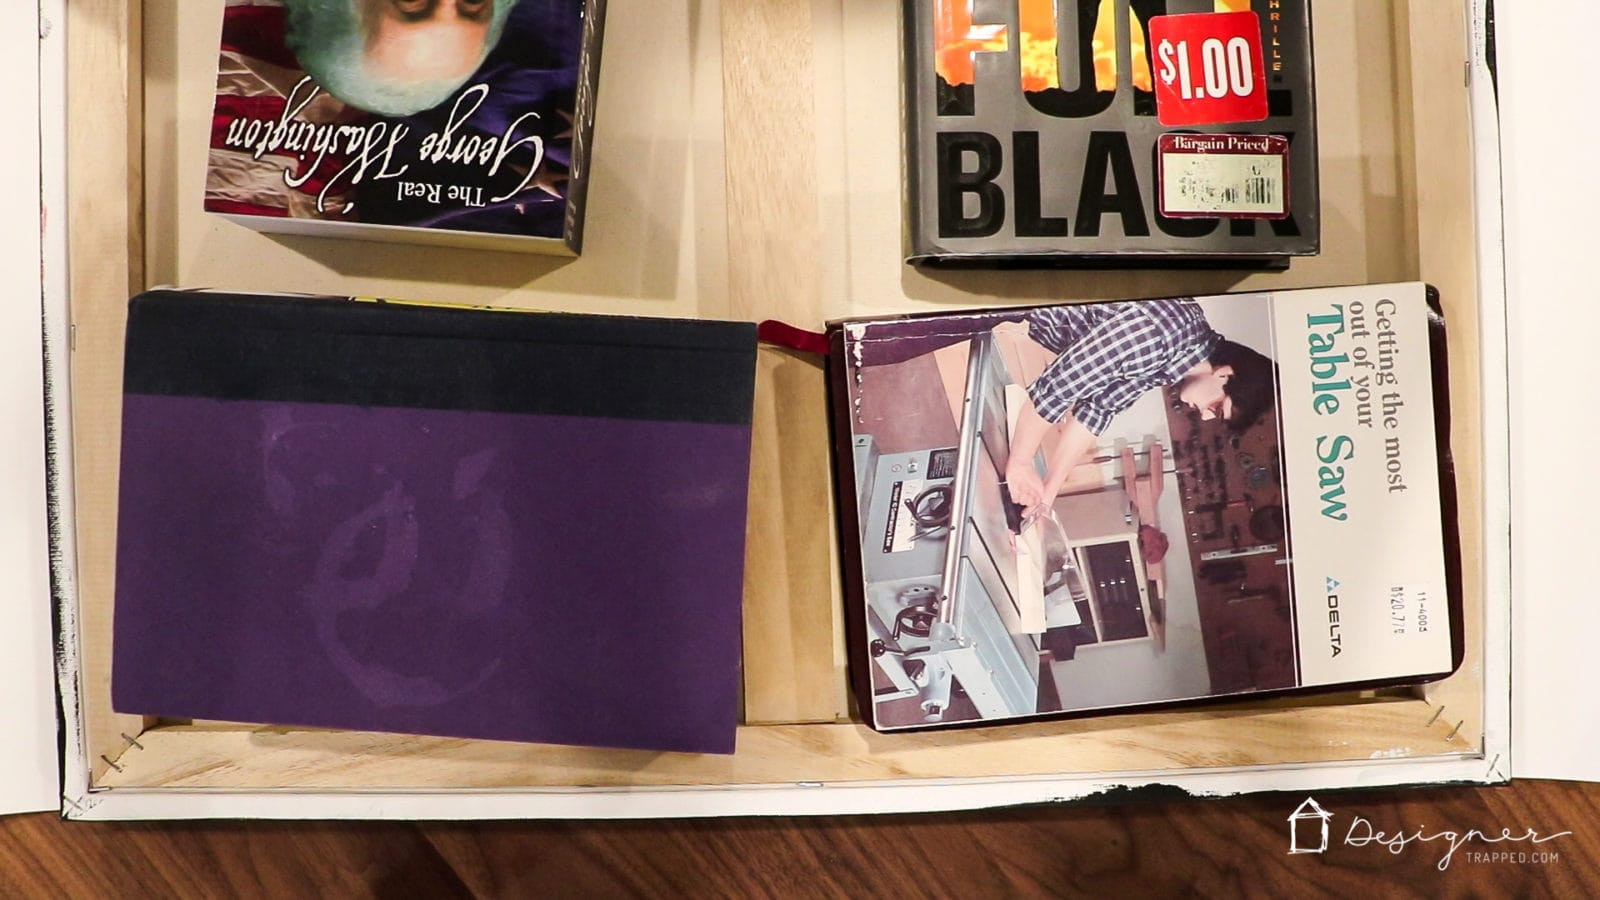 Drying the canvas overnight with books on top
3.6. Trimming Excess Paper
After the canvas is dry, use an Exacto knife or craft knife and a cutting board to trim off any excess photo paper. Use the edge of the canvas as your guide for a clean cut.
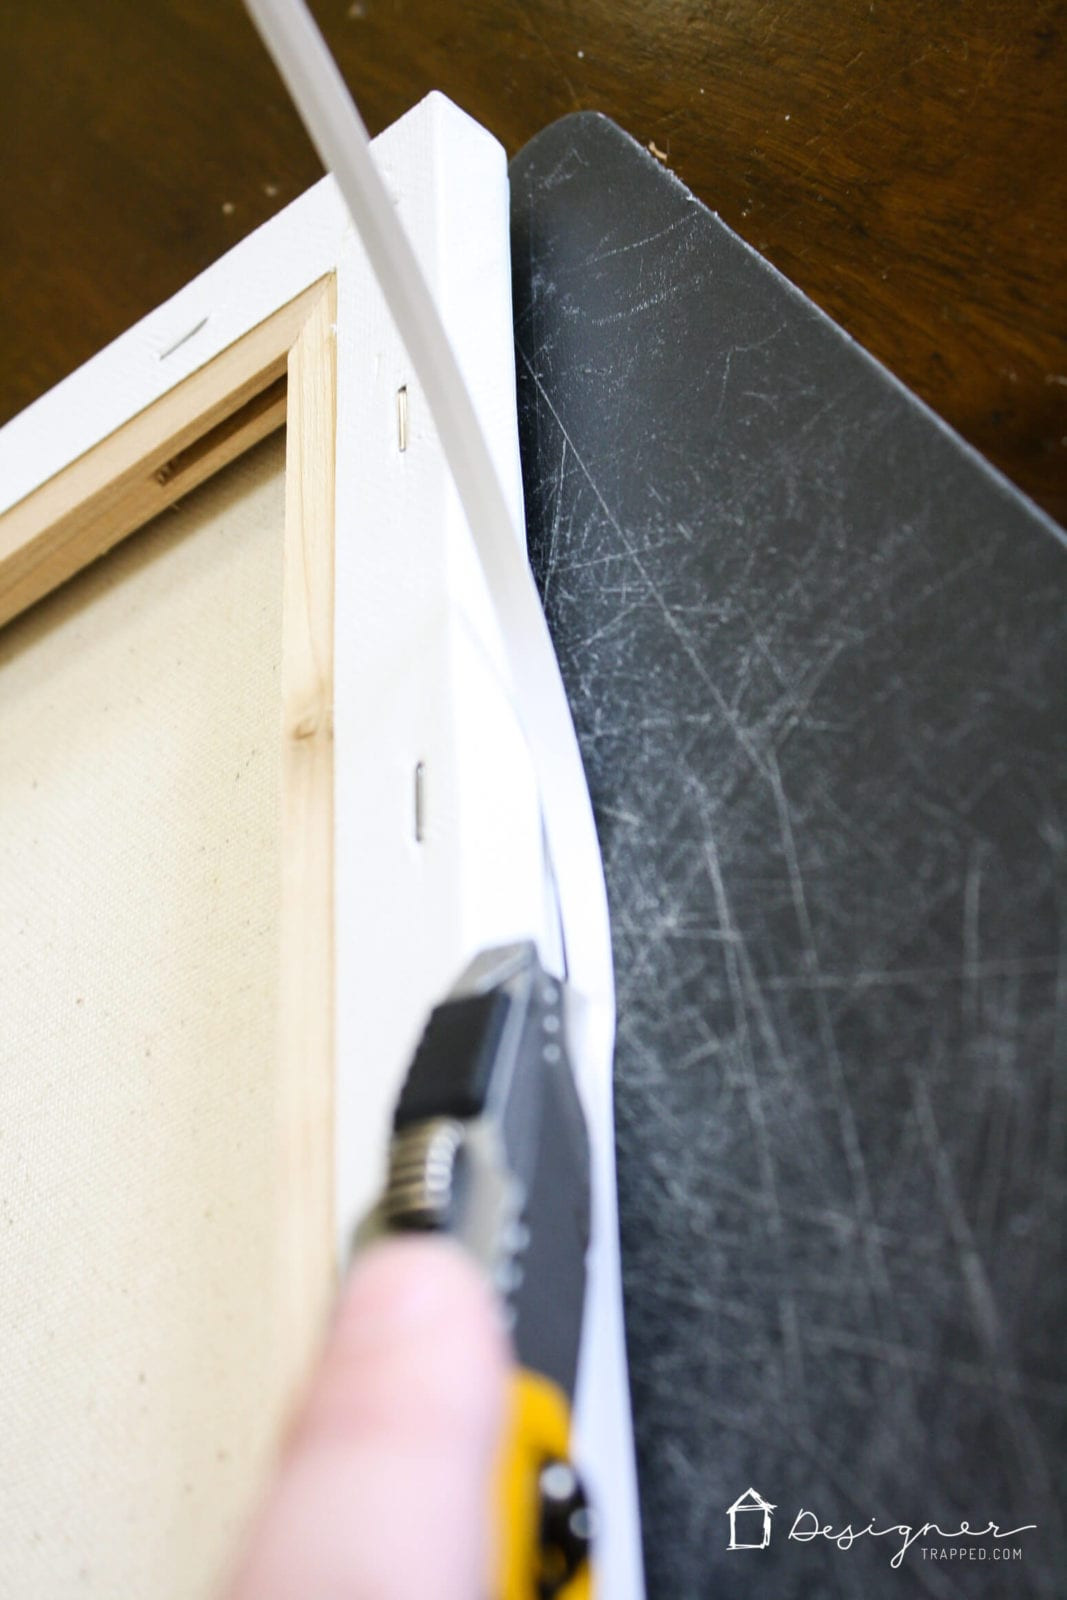 Trimming the excess paper with an Exacto knife
4. Adding Texture for an Authentic Canvas Look
Adding texture is what truly transforms your do it yourself photo canvas into a professional-looking piece. This step gives the photo a realistic canvas feel.
4.1. Applying Another Layer of Mod Podge
Paint a thin layer of Mod Podge (matte finish) on the front of the photo using long, even strokes. This layer will act as an adhesive for the texture.
 Applying a thin layer of Mod Podge on the photo
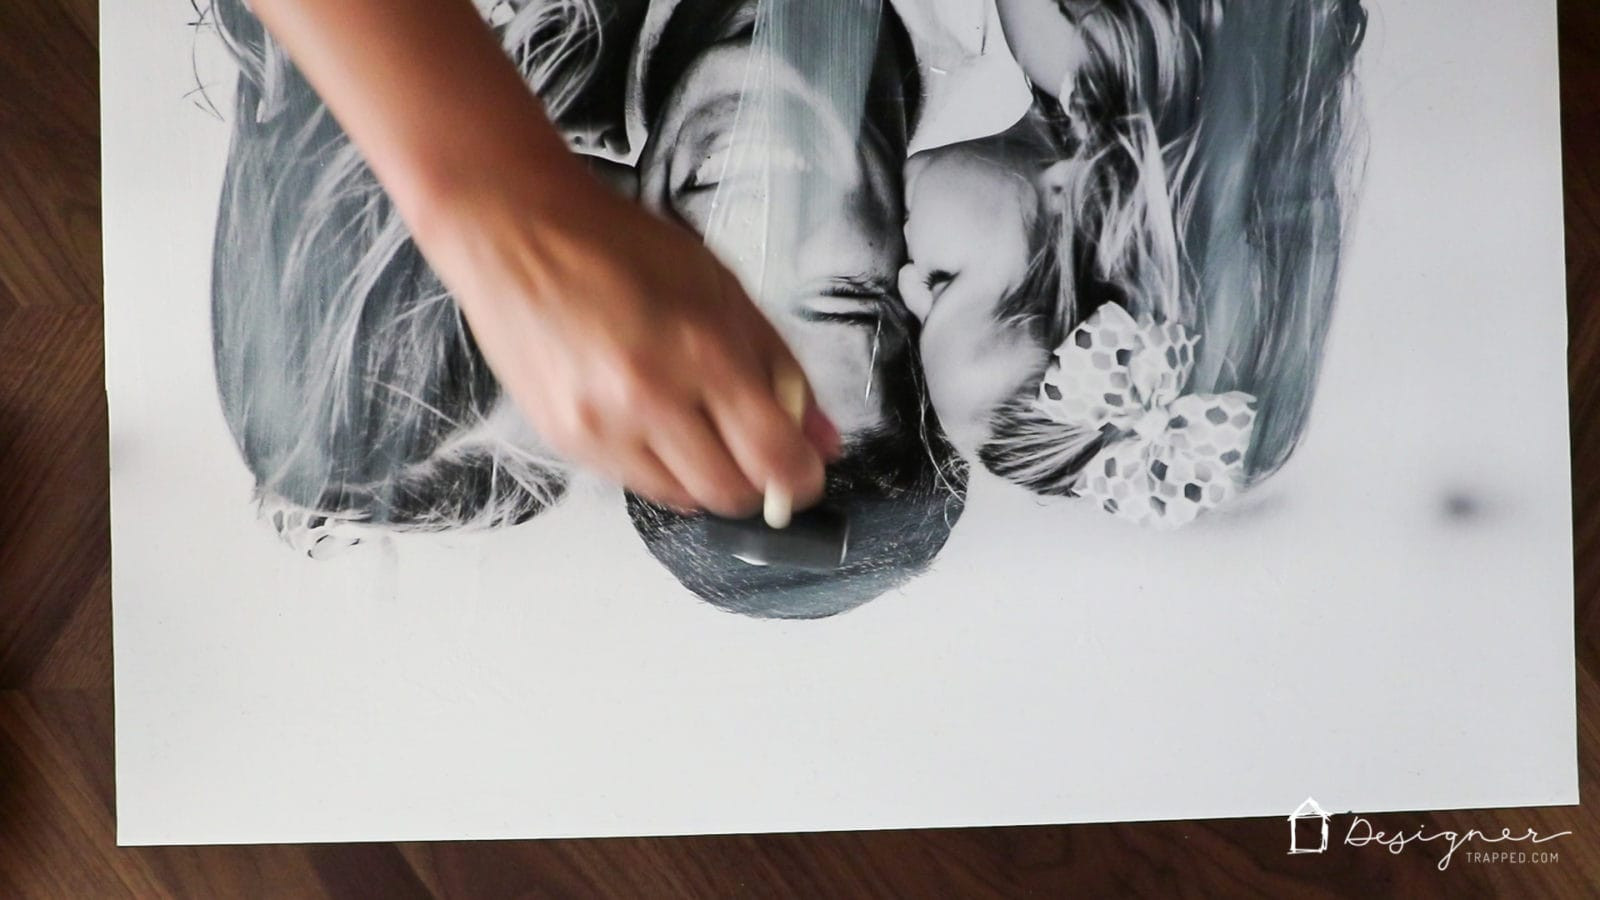
4.2. Texture Method 1: Using a Blank Canvas
Quickly grab a blank canvas and sandwich it on top of your photo that is coated with wet Mod Podge. Gently press the two surfaces together and then peel the blank canvas off. This will leave an authentic canvas texture on your photo. Repeat this process until the entire canvas is covered.
 Adding texture using a blank canvas
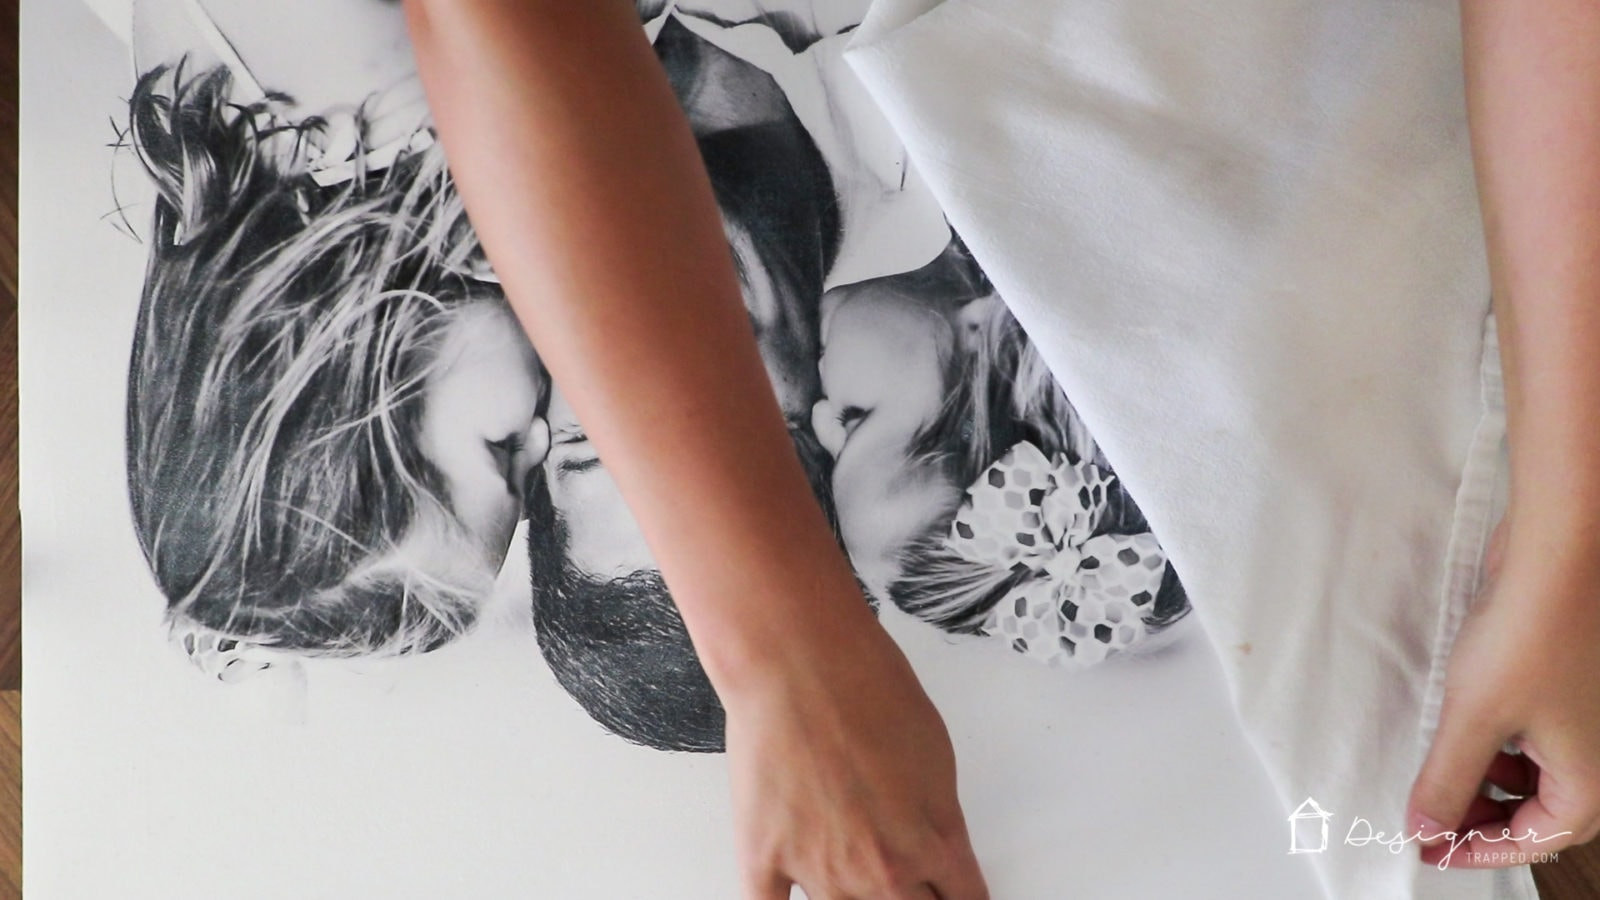
4.3. Texture Method 2: Using a T-Shirt or Dish Towel
Alternatively, you can use an old t-shirt or dish towel. Spread it out on top of the photo and wet Mod Podge, being careful to avoid wrinkles. Gently press it on top of your photo and then lift it off. This method also creates a unique texture.
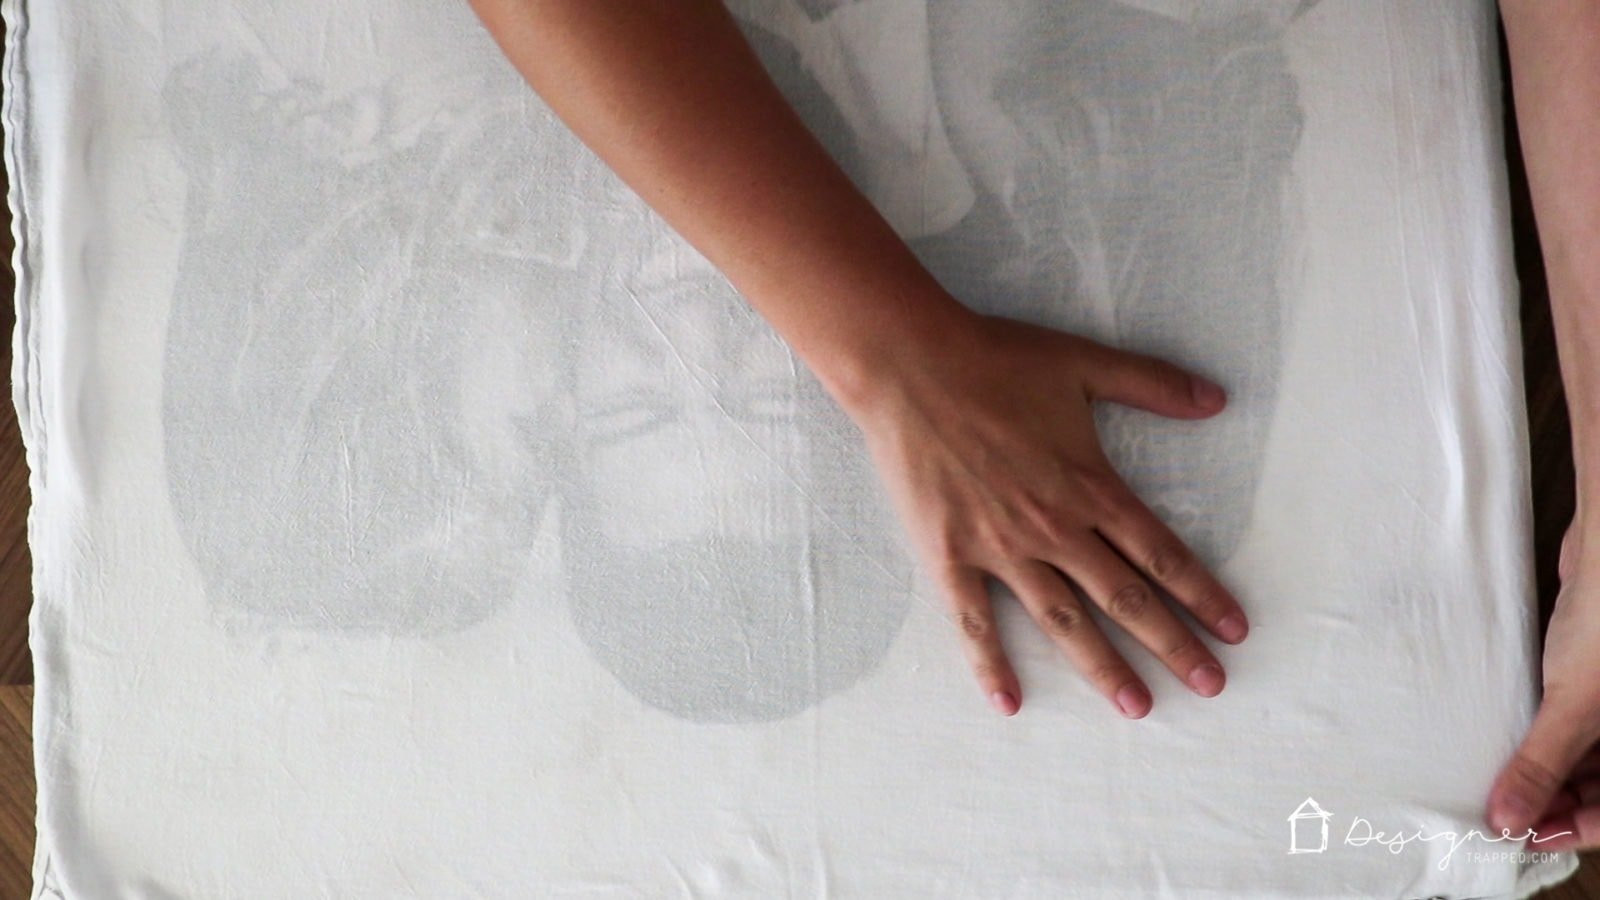 Adding texture using a t-shirt or dish towel
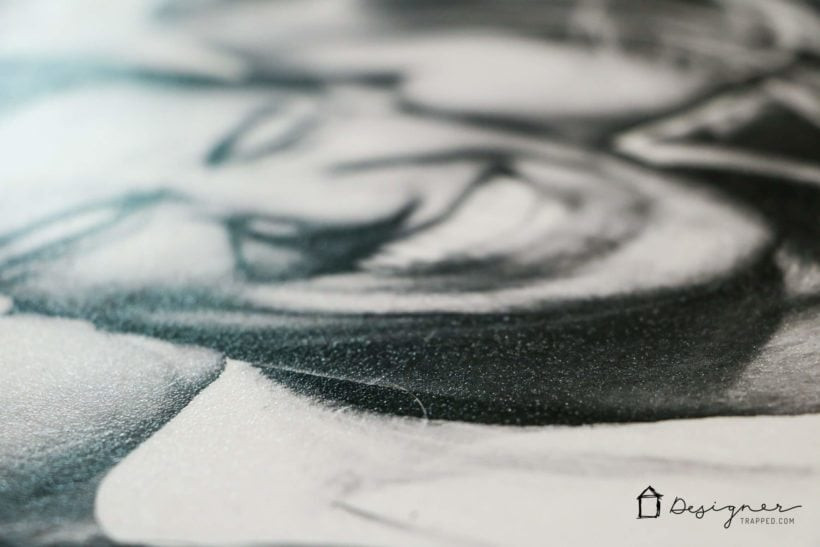
 The texture after using a dish towel
5. Finishing Touches and Displaying Your DIY Photo Canvas
Once the texture is added and the Mod Podge is dry, your do it yourself photo canvas is ready for display.
5.1. Drying Time
Allow the Mod Podge to dry completely. The texture will become more pronounced as it dries.
5.2. Inspecting the Texture
Check the texture to ensure it is evenly distributed and looks appealing. If necessary, you can add another thin layer of Mod Podge and repeat the texture process.
5.3. Displaying Your Canvas
Hang up your beautiful do it yourself photo canvas and admire your work. Photo canvases can be displayed in various settings, such as living rooms, bedrooms, or hallways.
 DIY photo canvas with texture
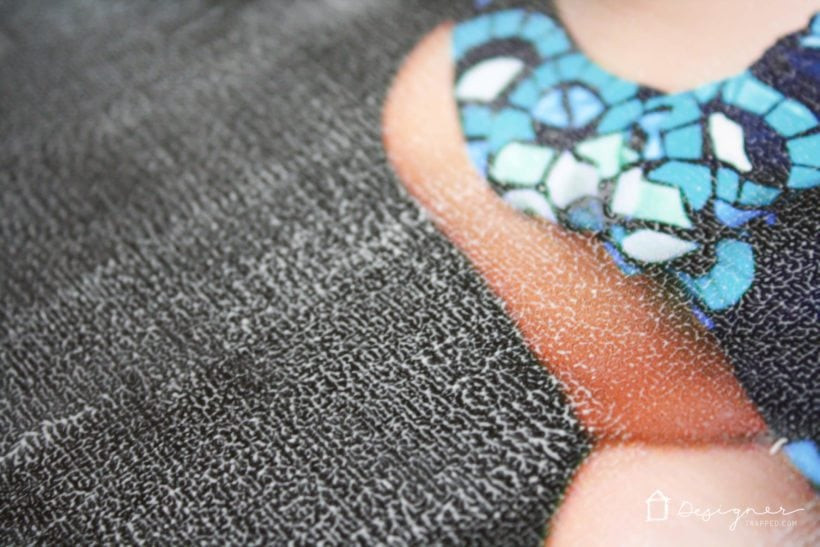
 Close up of the DIY photo canvas texture
6. Creative Ideas and Variations for DIY Photo Canvases
Explore different creative ideas to personalize your do it yourself photo canvas and make it unique.
6.1. Photo Collages
Create a collage of multiple photos on a single canvas. This is a great way to display a series of related images, such as family vacations or special events.
6.2. Black and White or Sepia Tones
Use black and white or sepia-toned photos for a classic and timeless look. These tones can add a sense of nostalgia and elegance to your canvas.
6.3. Adding Text or Quotes
Incorporate text or quotes into your do it yourself photo canvas. This can include meaningful phrases, names, dates, or song lyrics. Use stencils or freehand lettering to add the text.
6.4. Mixed Media
Combine your photo with other materials, such as paint, fabric, or embellishments. This can create a unique and textured piece of art.
6.5. Different Canvas Sizes and Shapes
Experiment with different canvas sizes and shapes to create visually interesting displays. A gallery wall with various sized canvases can be particularly striking.
7. Overcoming Common Challenges in DIY Photo Canvas Projects
While creating a do it yourself photo canvas is relatively straightforward, some challenges may arise. Here are some tips to overcome them:
7.1. Photo Smearing
- Problem: Home-printed photos may smear when used with Mod Podge.
- Solution: Always use professionally printed photos on photo paper.
7.2. Air Bubbles
- Problem: Air bubbles can form between the photo and the canvas.
- Solution: Use a brayer or your hands to smooth out the photo and remove any air bubbles.
7.3. Wrinkling
- Problem: The photo may wrinkle as the Mod Podge dries.
- Solution: Place books on top of the canvas while it dries to prevent wrinkling.
7.4. Uneven Texture
- Problem: The texture may be uneven or inconsistent.
- Solution: Ensure the Mod Podge is applied evenly and repeat the texture process if necessary.
7.5. Trimming Issues
- Problem: Trimming excess paper can be difficult and result in jagged edges.
- Solution: Use a sharp Exacto knife or craft knife and a cutting board for clean cuts.
8. Cost Analysis and Budgeting for Your DIY Photo Canvas
One of the main advantages of creating a do it yourself photo canvas is the cost savings. Here’s a cost analysis to help you budget for your project:
| Item | Estimated Cost | Notes |
|---|---|---|
| Blank Canvas | $5 – $20 | Depending on size and quality |
| Photo Enlargement | $5 – $10 | At Costco or similar photo lab |
| Mod Podge | $5 – $10 | A bottle can be used for multiple projects |
| Foam Brushes | $2 – $5 | Can be purchased in bulk |
| Black Acrylic Paint | $3 – $7 | Optional, for painting the sides of the canvas |
| Exacto Knife / Cutting Board | $10 – $20 | If you don’t already own them |
| Total Estimated Cost | $30 – $72 | Varies based on materials and if you have some items already on hand. |
Compared to ordering a custom canvas print from a professional service, which can cost upwards of $70-$100 for a 16×20 canvas, creating your own do it yourself photo canvas can save you a significant amount of money.
9. The Benefits of Displaying Personal Photos
Displaying personal photos in your home offers numerous benefits beyond just aesthetic appeal. According to the American Psychological Association, viewing personal photos can:
- Boost Mood: Reminiscing about happy memories can improve your mood and reduce stress.
- Strengthen Relationships: Photos can serve as conversation starters and help you connect with family and friends.
- Enhance Self-Esteem: Seeing photos of yourself and your loved ones can boost your self-esteem and sense of belonging.
- Create a Sense of Identity: Personal photos help to create a sense of identity and continuity in your life.
Creating a do it yourself photo canvas is a meaningful way to preserve and display these important memories.
10. Optimizing Your DIY Photo Canvas for Different Decor Styles
Your do it yourself photo canvas can be tailored to fit various decor styles, ensuring it complements your home’s aesthetic.
10.1. Modern Decor
- Minimalist Design: Opt for clean lines and simple designs.
- Black and White Photos: Use black and white photos for a sleek and sophisticated look.
- Geometric Patterns: Incorporate geometric patterns or abstract designs.
- Large Canvas Sizes: Choose large canvas sizes to make a bold statement.
10.2. Rustic Decor
- Warm Tones: Use photos with warm tones and natural colors.
- Distressed Textures: Add distressed textures to the canvas for a vintage feel.
- Wooden Frames: Consider adding a wooden frame to enhance the rustic aesthetic.
- Collage with Natural Elements: Combine your photo with natural elements, such as dried flowers or leaves.
10.3. Bohemian Decor
- Vibrant Colors: Use photos with vibrant colors and eclectic designs.
- Layered Textures: Incorporate layered textures and patterns.
- Tapestry Backgrounds: Use tapestry backgrounds or fabric scraps to add a bohemian touch.
- Small Canvas Sizes: Combine multiple small canvases to create a gallery wall.
10.4. Coastal Decor
- Seascape Photos: Use photos of seascapes, beaches, or coastal landscapes.
- Blue and White Tones: Incorporate blue and white tones to evoke a coastal feel.
- Seashell Embellishments: Add seashell embellishments or nautical elements.
- Light and Airy Design: Keep the design light and airy to reflect a coastal aesthetic.
11. The Environmental Benefits of DIY Projects
Engaging in do it yourself projects like creating a photo canvas can have positive environmental impacts.
11.1. Reducing Waste
By making your own canvas print, you reduce the demand for mass-produced items, which often contribute to waste and pollution.
11.2. Upcycling Materials
Do it yourself projects provide an opportunity to upcycle materials, such as old canvases or fabric scraps, giving them a new purpose and preventing them from ending up in landfills.
11.3. Using Eco-Friendly Products
Opt for eco-friendly products, such as water-based paints and non-toxic adhesives, to minimize your environmental impact.
11.4. Supporting Local Businesses
Purchase your materials from local businesses to reduce transportation emissions and support your community.
12. Showcasing Your Photography Skills Through DIY Canvases
Creating a do it yourself photo canvas is an excellent way to showcase your photography skills and artistic talent.
12.1. Highlighting Your Best Shots
Select your best shots to create stunning canvas prints that highlight your photography skills.
12.2. Creating a Portfolio
Use your DIY photo canvases to create a portfolio of your work, showcasing your talent and creativity.
12.3. Selling Your Work
Consider selling your DIY photo canvases at local craft fairs or online marketplaces to share your art with others and earn some income.
12.4. Gifting Personalized Art
Create personalized DIY photo canvases as gifts for friends and family, showcasing your thoughtfulness and creativity.
13. Staying Updated with Photography Trends at dfphoto.net
To stay updated with the latest photography trends and techniques, visit dfphoto.net for valuable resources and inspiration.
13.1. Exploring Photography Techniques
Learn about various photography techniques, such as composition, lighting, and editing, to enhance your skills.
13.2. Discovering New Equipment
Stay informed about the latest camera equipment, lenses, and accessories to improve your photography setup.
13.3. Finding Inspiration
Discover inspiring photos and artwork to fuel your creativity and spark new ideas.
13.4. Connecting with a Community
Connect with a community of photographers and artists to share your work, exchange ideas, and receive feedback.
14. Frequently Asked Questions (FAQ) About DIY Photo Canvas
14.1. How much does it cost to make a DIY photo canvas?
A single do it yourself photo canvas in size 16 x 20 can cost around $30-$72, depending on the materials used. This is significantly cheaper than ordering a custom canvas print from a professional service, which can cost upwards of $70-$100 for the same size.
14.2. Can I use a photo that I print at home on photo paper?
It is not recommended to use photos printed at home on an inkjet or laser printer, as the Mod Podge may cause the ink to smear. Always use professionally printed photos on photo paper.
14.3. Can I make a DIY photo canvas using a photo printed on regular paper?
It is not recommended to use photos printed on regular paper, as the paper is too thin and will wrinkle, resulting in a poor finish.
14.4. Can I use a poster print to make this kind of photo canvas?
It is not recommended to use poster prints from office supply stores, as they are usually printed on banner paper, which may peel.
14.5. What kind of Mod Podge should I use?
Use Mod Podge Matte Finish for best results. The matte finish will give your canvas a non-glossy, professional look.
14.6. How long does it take to make a DIY photo canvas?
The actual creation process takes about 20 minutes, excluding drying time. Allow overnight for the Mod Podge to dry completely.
14.7. What size canvas should I use?
Choose a canvas size that corresponds with the size of your photo enlargement. Common sizes include 8×10, 12×16, 16×20, and 20×30.
14.8. How do I prevent air bubbles when attaching the photo to the canvas?
Use a brayer or your hands to smooth out the photo and remove any air bubbles. Start from the center and work your way out to the edges.
14.9. How do I add texture to the canvas?
You can add texture by using a blank canvas or an old t-shirt or dish towel to press onto the Mod Podge-coated photo.
14.10. Can I add embellishments to my DIY photo canvas?
Yes, you can add embellishments such as paint, fabric, or decorative elements to personalize your canvas.
15. Call to Action
Ready to transform your favorite photos into stunning canvas art? Visit dfphoto.net for more inspiration, tutorials, and tips on creating your own do it yourself photo canvas. Join our community of photographers and artists and start showcasing your creativity today. Explore our vast collection of photos, learn new techniques, and connect with like-minded individuals. Elevate your photography skills and create personalized masterpieces that reflect your unique style. Visit us at Address: 1600 St Michael’s Dr, Santa Fe, NM 87505, United States. Phone: +1 (505) 471-6001. Website: dfphoto.net.