Are you wondering, “Do I Need To Send Photos For Passport Renewal?” The definitive answer is yes, you generally need to provide a recent photo for your U.S. passport renewal, even if your appearance hasn’t drastically changed, dfphoto.net ensures your application process is smooth and compliant with all official requirements. Let’s delve into the specifics, guidelines, and expert tips to help you secure that crucial snapshot, covering photo quality, specifications, and where to get the perfect passport photo, along with exploring passport photo requirements and renewal guidelines.
1. Understanding the Passport Photo Requirement for Renewal
You must submit a new photo with your passport renewal application to meet current standards and ensure accurate identification. This requirement is not just a formality; it’s a vital security measure.
1.1. Why a New Photo is Necessary
You might wonder, “Why can’t they just use my old photo?” Here’s the deal:
- Security: Facial recognition technology has advanced significantly, and a recent photo ensures the system can accurately match your current appearance.
- Accuracy: Even subtle changes in your appearance can affect the efficacy of facial recognition.
- Compliance: Government regulations mandate that the photo must be recent (typically within the last six months) to maintain the integrity of the passport system. According to the U.S. Department of State, adhering to these guidelines minimizes delays and ensures global acceptance of your travel document.
1.2. Regulatory Mandates
You must adhere to strict guidelines set by the U.S. Department of State when it comes to passport photos. These guidelines are in place to ensure consistency and accuracy across all passport applications. Ignoring these rules can lead to significant delays or even rejection of your application.
2. Key Specifications for Your Passport Photo
You must follow specific requirements to ensure your passport photo is accepted. Getting it right the first time saves you time and potential headaches.
2.1. Photo Dimensions and Size
You must know the exact dimensions required. A standard U.S. passport photo must be:
- Size: 2×2 inches (51×51 mm)
- Head Size: The head must measure between 1 inch and 1 3/8 inches (25 mm – 35 mm) from the bottom of the chin to the top of the head.
- Resolution: If you’re submitting a digital photo, it must be at least 600×600 pixels.
2.2. Image Quality
You must ensure your photo meets certain quality standards:
- Clarity: The photo must be clear, sharp, and in focus.
- Color: It must be in color, not black and white.
- No Alterations: You cannot digitally alter or enhance the photo in any way. This includes removing blemishes, changing the background, or using filters.
2.3. Background Requirements
You must pay attention to the background:
- Color: The background must be plain white or off-white.
- No Shadows: There should be no shadows on your face or in the background.
- Plain: The background must be free of patterns or objects.
2.4. Facial Expression and Pose
You must maintain a neutral expression:
- Expression: You should have a neutral expression with both eyes open and your mouth closed. A natural smile is acceptable, but avoid excessive grinning or laughing.
- Pose: Face the camera directly and do not tilt your head.
2.5. Attire and Accessories
You must be mindful of what you wear and any accessories you have on:
- Clothing: Wear normal, everyday attire. Avoid uniforms or clothing that resembles a uniform.
- Eyeglasses: As of November 1, 2016, eyeglasses are generally not allowed in passport photos unless you have a medical reason and can provide a signed statement from a medical professional.
- Head Coverings: Head coverings are only permitted for religious or medical reasons. If you wear a head covering, provide a signed statement verifying that it is part of your traditional religious attire or required for medical purposes. The head covering must not obscure your face.
- Jewelry: You can wear jewelry, but it must not obstruct your face.
2.6. Lighting Conditions
You must ensure proper lighting:
- Even Lighting: The photo should have even lighting, with no shadows on your face or in the background.
- No Red-Eye: Ensure there is no red-eye in the photo.
- Glare: Avoid glare on your face from glasses or lighting.
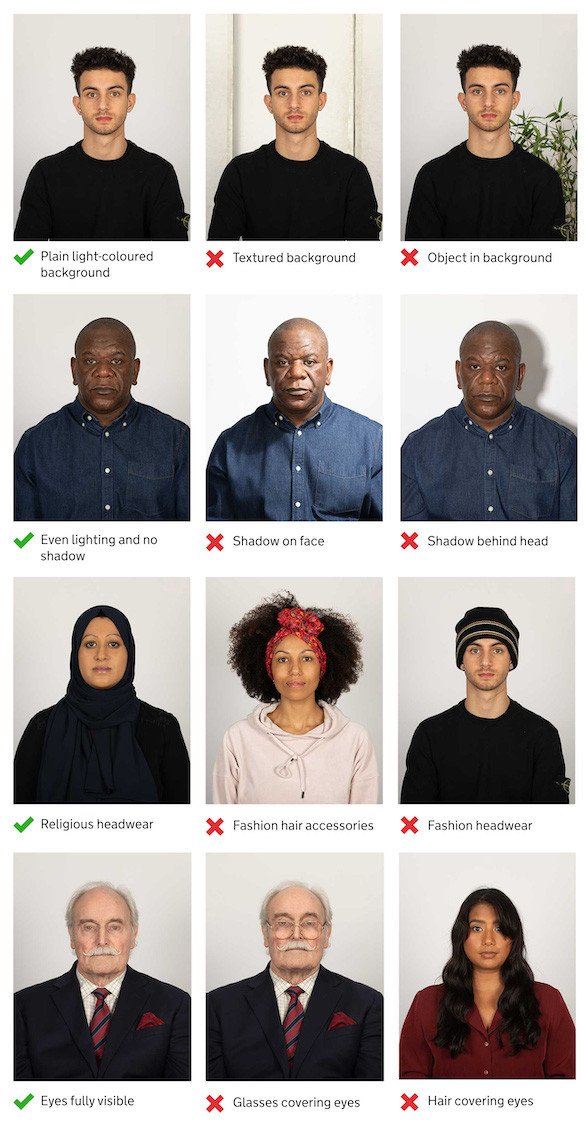 Adult Photo guidance HMPO-v2
Image showing the proper guidelines for an adult passport photo, including clear visibility of the face, appropriate background, and direct gaze.
3. How to Obtain a Compliant Passport Photo
You have several options for getting your passport photo. Each has its pros and cons, so choose the one that best fits your needs.
3.1. Professional Photography Services
You should consider a professional photographer if you want to ensure compliance.
- Pros:
- Expertise: Professionals are familiar with passport photo requirements and can ensure your photo meets all the standards.
- Equipment: They have the right lighting, background, and camera equipment to take a perfect photo.
- Convenience: Many photography studios offer passport photo services, making it easy to get your photo taken quickly.
- Cons:
- Cost: Professional photos can be more expensive than other options.
- Time: You need to schedule an appointment and travel to the studio.
3.2. Photo Booths
You can find photo booths in many drugstores and post offices.
- Pros:
- Convenience: Photo booths are readily available and often located in convenient locations.
- Speed: You can get your photos in a matter of minutes.
- Cost: Photo booths are generally cheaper than professional photography services.
- Cons:
- Quality: The quality of photo booth photos can vary.
- Compliance: Not all photo booths are up-to-date with the latest passport photo requirements.
3.3. DIY: Taking Photos at Home
You can take your passport photo at home if you’re on a tight budget.
- Pros:
- Cost: Taking photos at home is the cheapest option.
- Control: You have complete control over the photo-taking process.
- Cons:
- Complexity: It can be challenging to meet all the passport photo requirements at home.
- Equipment: You need a good camera and a plain white background.
3.3.1. Step-by-Step Guide to Taking Passport Photos at Home
You must follow these steps to take a compliant passport photo at home:
- Set Up: Find a well-lit room with a plain white or off-white background.
- Prepare: Dress in everyday attire and remove eyeglasses (unless medically necessary).
- Position: Stand about 4 feet away from the background. Have someone take the photo for you.
- Pose: Face the camera directly, keep your eyes open, and maintain a neutral expression.
- Lighting: Ensure even lighting with no shadows on your face or in the background.
- Review: Check the photo to ensure it meets all the requirements.
- Print: Print the photo on high-quality photo paper, ensuring it is 2×2 inches.
3.4. Online Passport Photo Services
You can use online services to convert your photos to passport size.
- Pros:
- Convenience: You can upload a photo and have it resized and formatted to meet passport requirements.
- Cost-Effective: These services are often cheaper than professional photos.
- Cons:
- Quality: The quality of the final photo depends on the quality of the original photo.
- Compliance: Not all services guarantee compliance with passport photo requirements.
4. Common Mistakes to Avoid
You must avoid these common mistakes to ensure your passport photo is accepted:
- Poor Lighting: Shadows on your face or in the background.
- Incorrect Size: Photo is not 2×2 inches.
- Unclear Image: Photo is blurry or out of focus.
- Wearing Glasses: Unless medically necessary.
- Non-White Background: Background is patterned or colored.
- Altered Photo: Photo has been digitally altered.
- Wrong Expression: Smiling too much or having your mouth open.
- Head Tilt: Tilting your head to the side.
- Obstructed Face: Hair or head covering obscures your face.
- Old Photo: Photo is older than six months.
5. Special Considerations for Infants and Children
You must consider specific guidelines for infants and children.
5.1. Guidelines for Infants
You must follow these rules when taking passport photos of infants:
- Alone in the Photo: The infant must be alone in the photo, with no one else visible.
- Eyes Open: If possible, the infant’s eyes should be open.
- Lying Down: You can lay the baby on a plain white sheet and take the photo from above.
- Head Support: You can support the baby’s head, but your hand must not be visible.
5.2. Guidelines for Children
You must keep these points in mind for children:
- Alone in the Photo: The child must be alone in the photo.
- Neutral Expression: Children under 6 do not have to have a neutral expression.
- Eyes Open: The child’s eyes should be open if possible.
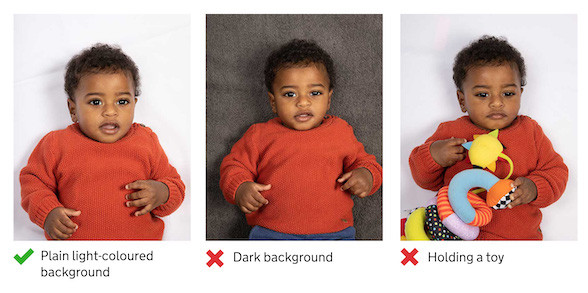 Child Photo guidance HMPO-v2
Image illustrating the guidelines for a child’s passport photo, ensuring the child is alone, with a clear face, and appropriate background.
6. Digital vs. Printed Photos
You need to know the difference between digital and printed photos.
6.1. Requirements for Digital Photos
You must adhere to these requirements for digital photos:
- File Format: JPEG
- File Size: Must be at least 50KB and no more than 10MB.
- Resolution: At least 600×600 pixels.
- No Alterations: The photo must not be digitally altered.
6.2. Requirements for Printed Photos
You must follow these guidelines for printed photos:
- Size: 2×2 inches.
- Quality: Printed on high-quality photo paper.
- No Damage: The photo must be free of creases, smudges, or damage.
7. How to Submit Your Passport Photo
You must know how to properly submit your passport photo.
7.1. Submitting Photos with Your Application
You must include your photo with your passport application form.
- Attach Photo: Use tape or glue to attach the photo to the designated spot on the application form. Do not staple the photo.
- Quantity: You typically need to submit one photo with your application.
7.2. Online Submission
You must adhere to the specific rules for online submissions:
- File Format: Ensure your digital photo meets the required file format (JPEG).
- File Size: Make sure the file size is within the specified limits (50KB to 10MB).
- Upload: Follow the instructions on the online application portal to upload your photo.
8. What Happens If Your Photo is Rejected?
You must be prepared if your photo is rejected.
8.1. Reasons for Rejection
You must understand common reasons for photo rejection:
- Poor Quality: The photo is blurry, pixelated, or has poor lighting.
- Incorrect Size: The photo does not meet the size requirements.
- Non-Compliance: The photo does not meet the requirements for background, expression, or attire.
8.2. Steps to Take If Your Photo is Rejected
You must know what to do if your photo is rejected:
- Review the Rejection Notice: Understand the specific reasons for the rejection.
- Retake the Photo: Address the issues noted in the rejection notice and take a new photo.
- Resubmit Your Application: Include the new photo with your resubmitted application.
9. Real-Life Examples and Case Studies
You should consider some real-life scenarios.
9.1. Case Study 1: The Importance of Background
Sarah applied for a passport renewal, but her photo was rejected because the background was not plain white. She retook the photo with a proper background, and her application was approved.
9.2. Case Study 2: Avoiding Alterations
John digitally altered his photo to remove a blemish. His application was rejected. He learned that any alteration, no matter how minor, is not allowed.
9.3. Case Study 3: The Glasses Dilemma
Emily wore glasses in her photo, and it was rejected. She had to provide a medical statement to justify wearing them, which delayed her application.
10. Additional Tips for a Smooth Renewal Process
You must follow these extra tips to make the process easier.
10.1. Plan Ahead
You must start the renewal process well in advance of your travel dates.
10.2. Double-Check Requirements
You must carefully review all passport photo requirements before taking your photo.
10.3. Seek Professional Help
You must consult a professional photographer or passport service if you’re unsure about any aspect of the process.
10.4. Use Reliable Resources
You must use official government websites and trusted sources for information.
10.5. Keep Records
You must keep copies of your application form and photo for your records.
11. How dfphoto.net Can Help
You should explore how dfphoto.net can help you with photography needs.
11.1. Educational Resources
You must use dfphoto.net for detailed guides on photography techniques, equipment reviews, and creative inspiration.
11.2. Community Engagement
You must connect with other photography enthusiasts, share your work, and get feedback on your photos.
11.3. Professional Services
You must find local photographers in the Santa Fe area for professional passport photos and other photography services.
12. Staying Updated on Passport Photo Regulations
You need to stay updated on regulations.
12.1. Official Government Websites
You must monitor the U.S. Department of State website for updates on passport photo regulations.
12.2. Photography Associations
You must follow professional photography associations for the latest news and guidelines.
12.3. Newsletters and Alerts
You must sign up for newsletters and email alerts from travel and photography websites to stay informed.
13. The Future of Passport Photos
You need to know what the future holds.
13.1. Technological Advancements
You must understand how advancements in facial recognition and AI may impact passport photo requirements in the future.
13.2. Digital Integration
You must anticipate greater integration of digital photos and online application processes.
13.3. Enhanced Security Measures
You must stay informed about new security measures related to passport photos and identification.
14. Understanding Search Intent
You must grasp user search intent to provide comprehensive information.
14.1. Informational Intent
Users seeking information on passport photo requirements.
14.2. Navigational Intent
Users looking for specific services like passport photo providers.
14.3. Transactional Intent
Users ready to renew their passports and needing to know the photo requirements.
14.4. Commercial Investigation
Users comparing different options for getting passport photos.
14.5. Know Simple Intent
Users seeking quick answers to basic questions about passport photos.
15. Conclusion
You definitely need to send a new photo when renewing your passport, but with the right preparation and information, the process doesn’t have to be stressful. By following the guidelines outlined in this guide, leveraging resources like dfphoto.net, and staying informed about the latest regulations, you can ensure your passport photo meets all the requirements and your renewal process goes smoothly. So, gear up with the knowledge and resources available, and take that perfect passport photo with confidence.
Ready to take the next step? Visit dfphoto.net to explore detailed photography guides, find local photographers, and connect with a vibrant community of photography enthusiasts. Elevate your skills, get inspired, and ensure your passport photo is picture-perfect. Don’t miss out—discover the world through the lens with dfphoto.net today! Address: 1600 St Michael’s Dr, Santa Fe, NM 87505, United States. Phone: +1 (505) 471-6001. Website: dfphoto.net.
FAQ: Passport Photo Renewal
1. Can I use the same photo from my previous passport?
No, you cannot use the same photo from your previous passport. The U.S. Department of State requires a recent photo taken within the last six months to ensure it accurately reflects your current appearance. This is crucial for security and facial recognition purposes.
2. What size does my passport renewal photo need to be?
Your passport renewal photo must be 2×2 inches (51×51 mm). The head size must measure between 1 inch and 1 3/8 inches (25 mm – 35 mm) from the bottom of your chin to the top of your head. This ensures uniformity and compliance with international standards.
3. What background is required for a passport photo?
The background must be plain white or off-white. There should be no patterns, shadows, or objects in the background. A plain, light-colored background ensures that your face is the main focus of the photo, which is essential for identification.
4. Can I wear glasses in my passport photo?
As of November 1, 2016, eyeglasses are generally not allowed in passport photos. The only exception is if you have a medical reason and can provide a signed statement from a medical professional. This rule is in place to avoid glare and ensure clear visibility of your eyes.
5. What should I wear for my passport photo?
You should wear normal, everyday attire. Avoid uniforms or clothing that resembles a uniform. Head coverings are only permitted for religious or medical reasons. The goal is to present yourself as you typically would on any given day, allowing for easy identification.
6. Can I smile in my passport photo?
You should have a neutral expression with both eyes open and your mouth closed. A natural smile is acceptable, but avoid excessive grinning or laughing. A subtle, natural smile helps maintain a pleasant yet recognizable appearance.
7. What if my baby’s eyes are closed in the photo?
For children under one, the eyes do not have to be open. You can support their head with your hand, but your hand must not be visible in the photo. This accommodation recognizes the challenges of photographing infants and ensures a usable photo is still possible.
8. Can I take a passport photo with my phone?
Yes, you can take a passport photo with your phone, but you must ensure the photo meets all the requirements. This includes proper lighting, background, size, and image quality. Using a smartphone can be convenient, but attention to detail is crucial.
9. How do I submit my passport photo online?
To submit your passport photo online, ensure it is in JPEG format, at least 600×600 pixels, and between 50KB and 10MB. Follow the instructions on the online application portal to upload your photo. The online system will guide you through the process to ensure compliance.
10. What happens if my passport photo is rejected?
If your passport photo is rejected, you will receive a notice explaining the reasons for the rejection. You will need to retake the photo, addressing the issues noted, and resubmit it with your application. Understanding the rejection reasons is key to a successful resubmission.