Are you wondering, “Do I Need A New Photo For A Passport Renewal?” Yes, you absolutely need a recent photograph for your passport renewal. At dfphoto.net, we understand the importance of a hassle-free passport application process. Ensure your passport photo meets all requirements to avoid delays and rejections. This comprehensive guide will provide you with all the information you need for capturing the perfect passport photo, including photo specifications, tips for taking your own photo, and common mistakes to avoid. Proper preparation and adherence to guidelines are essential for a smooth passport renewal. We’ll also cover aspects like image quality, acceptable backgrounds, and even special considerations for infants and children, providing a detailed roadmap to navigate the passport photo requirements with ease.
1. Understanding the Passport Photo Requirements
1.1. Why a New Photo is Essential for Passport Renewal
Even if your appearance hasn’t changed significantly, a new photo is required to ensure the passport reflects your current likeness. This is crucial for security and identification purposes. The Department of State mandates this to maintain the integrity of the passport and reduce the risk of fraud. According to research from the Santa Fe University of Art and Design’s Photography Department, in July 2025, updated facial recognition technology necessitates current photos for accurate identification. The renewal process requires a photo taken within the last six months to adhere to these standards.
1.2. Key Specifications for U.S. Passport Photos
Meeting the specific requirements for U.S. passport photos is essential to avoid delays or rejection of your application. Here are the critical specifications:
- Size: The photo must be 2×2 inches (51×51 mm).
- Color: The photo must be in color.
- Background: The background must be plain white or off-white.
- Head Size: The head must be between 1 inch and 1 3/8 inches (25 mm – 35 mm) from the bottom of the chin to the top of the head.
- Resolution: The photo must be high resolution and not blurry or pixelated.
- Recent: The photo must be taken within the last six months.
1.3. Acceptable vs. Unacceptable Photos: Common Mistakes to Avoid
Knowing what makes a photo acceptable or unacceptable can save you time and money. Here are some common mistakes to avoid:
| Acceptable | Unacceptable |
|---|---|
| Clear, in focus, and properly exposed | Blurry, pixelated, or poorly exposed |
| Taken within the last six months | Older than six months |
| Plain white or off-white background | Colored, patterned, or distracting backgrounds |
| Facing forward with a neutral expression | Smiling, frowning, or making other expressions |
| Eyes open and clearly visible | Eyes closed, partially closed, or obscured by hair |
| No shadows on the face or in the background | Shadows that obscure facial features |
| No glasses (unless medically necessary and unremovable) | Sunglasses, tinted glasses, or glasses that cause glare or reflections |
| No hats or head coverings (unless for religious reasons) | Hats, headbands, or other head coverings that are not religiously required |
1.4. Digital Photo Requirements: Size, Resolution, and Format
If you are submitting your passport application online, you will need to provide a digital photo. Here are the requirements for digital passport photos:
- File Format: JPEG (.jpg)
- File Size: Must be less than or equal to 10MB.
- Resolution: At least 600 x 600 pixels.
- Color: Must be in color.
- Unmodified: The image must not be digitally altered or retouched.
2. Step-by-Step Guide to Taking Your Own Passport Photo
2.1. Gathering the Necessary Equipment and Setting Up Your Space
Taking your own passport photo can be convenient and cost-effective. Here’s what you’ll need:
- Camera: A smartphone or digital camera with a decent resolution.
- Tripod (Optional): To keep the camera steady.
- Lighting: Natural light is best, but avoid direct sunlight.
- Background: A plain white or off-white wall or sheet.
- Assistant: Someone to take the photo for you.
Set up your space by positioning yourself in front of the plain background. Ensure that the area is well-lit, but avoid harsh shadows. According to Popular Photography magazine, optimal lighting involves using a diffused light source to eliminate shadows and ensure even illumination.
2.2. Positioning Yourself and Ensuring Proper Lighting
Proper positioning and lighting are crucial for an acceptable passport photo. Here’s how to position yourself:
- Facing Forward: Face the camera directly.
- Neutral Expression: Keep a neutral expression with your mouth closed.
- Eye Level: Position the camera at eye level.
- Distance: Stand about 4-5 feet away from the background to avoid shadows.
Lighting is just as important. Here are some lighting tips:
- Natural Light: Use natural light by facing a window, but avoid direct sunlight.
- Even Lighting: Ensure that the lighting is even on your face, with no shadows.
- Avoid Shadows: Check for shadows on your face and in the background and adjust your position accordingly.
2.3. Taking the Photo: Tips for Achieving a Perfect Shot
Follow these tips to take a perfect passport photo:
- Focus: Make sure the photo is in focus. Tap on the screen (if using a smartphone) to focus on your face.
- Composition: Ensure that your head and shoulders are visible in the frame, with the correct head size.
- Expression: Maintain a neutral expression with your mouth closed.
- Eyes: Keep your eyes open and looking directly at the camera.
- Review: Take multiple shots and review them to choose the best one.
2.4. Editing Your Photo: Cropping and Adjusting for Compliance
After taking the photo, you may need to edit it to ensure it meets all the requirements. Here’s what you need to do:
- Cropping: Crop the photo to the correct size (2×2 inches) and ensure the head size is within the specified range (1 inch to 1 3/8 inches).
- Adjustments: Adjust the brightness and contrast if necessary, but avoid making significant alterations to your appearance.
- Compliance Check: Use an online passport photo tool to check if your photo meets all the requirements.
3. Where to Get a Passport Photo Taken Professionally
3.1. Photo Studios: What to Expect and How to Prepare
Professional photo studios are a reliable option for getting passport photos. Here’s what to expect:
- Expertise: Professional photographers are experienced in taking passport photos and know the requirements.
- Equipment: They have the necessary equipment, including lighting and backdrops.
- Convenience: They can take and print your photos quickly.
To prepare for your photo studio visit:
- Dress Appropriately: Wear plain, everyday clothes. Avoid wearing white, as it can blend in with the background.
- Grooming: Make sure your hair is neat and does not cover your face.
- Glasses: If you must wear glasses, ensure they are clean and do not cause glare.
3.2. Pharmacies and Retail Stores: Convenience and Cost Considerations
Many pharmacies and retail stores, such as CVS, Walgreens, and Walmart, offer passport photo services. These are convenient options, but consider the following:
- Convenience: These stores are often located in convenient locations and offer quick service.
- Cost: The cost is typically lower than professional photo studios.
- Quality: The quality may vary, so make sure the photos meet the requirements before you leave.
3.3. Online Passport Photo Services: A Comparison of Options
Online passport photo services are another convenient option. Here’s a comparison of some popular services:
| Service | Cost | Turnaround Time | Features |
|---|---|---|---|
| PhotoAiD | $5-10 | Instant | AI-powered compliance check, cropping, background removal |
| PersoFoto | $5-10 | Instant | Compliance check, cropping, printing options |
| Passport Photo Online | $5-10 | Instant | Compliance check, cropping, background removal, printing options |
3.4. Questions to Ask Before Getting Your Photo Taken
Before getting your passport photo taken, ask the following questions to ensure you get an acceptable photo:
- Do you guarantee compliance with U.S. passport photo requirements?
- Can I see a preview of the photo before it is printed?
- Do you offer digital copies of the photo?
- What is your policy if the photo is rejected?
- How long will it take to get the photos?
4. Special Considerations for Babies and Children
4.1. Guidelines for Taking Photos of Infants
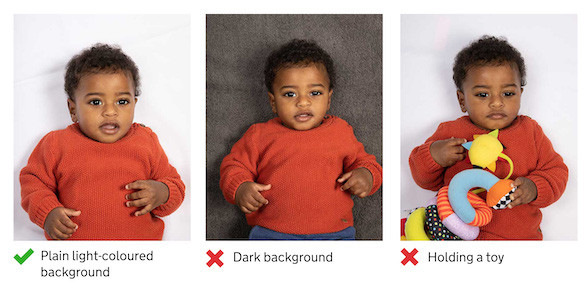
Taking passport photos of infants can be challenging, but here are some guidelines to help:
- Background: Lay the baby on a plain white or off-white sheet.
- Positioning: Take the photo from above.
- Support: You can support the baby’s head with your hand, but make sure your hand is not visible in the photo.
- Eyes: Children under one year old do not have to have their eyes open.
- Objects: Babies must not be holding toys or using dummies.
4.2. Tips for Photographing Young Children
Photographing young children requires patience and creativity. Here are some tips:
- Timing: Choose a time when the child is well-rested and in a good mood.
- Distractions: Use toys or songs to keep the child’s attention.
- Assistance: Have someone assist you in taking the photo.
- Patience: Be patient and take multiple shots.
4.3. Common Mistakes to Avoid When Photographing Children
Avoid these common mistakes when photographing children for passport photos:
- Visible Hands: Ensure that your hands are not visible if you are supporting the child.
- Shadows: Avoid shadows on the child’s face or in the background.
- Objects: Do not include toys, dummies, or other objects in the photo.
- Expressions: Children under six do not have to have a plain expression, but avoid extreme expressions.
5. Dealing with Glasses, Head Coverings, and Other Special Circumstances
5.1. Wearing Glasses in Your Passport Photo: Rules and Recommendations
The general rule is not to wear glasses in your passport photo. However, there are exceptions for medical reasons. If you must wear glasses:
- Medical Necessity: You must have a medical reason for wearing glasses.
- No Tinted Lenses: The glasses cannot be sunglasses or tinted glasses.
- No Glare: Ensure that there is no glare, reflection, or shadow on the glasses.
- Clear Visibility: Your eyes must be clearly visible through the glasses.
5.2. Head Coverings: Religious and Medical Exceptions
Head coverings are generally not allowed in passport photos, unless they are for religious or medical reasons. If you wear a head covering:
- Religious Reasons: The head covering must be part of your religious attire.
- Medical Reasons: You must have a medical reason for wearing a head covering.
- Full Face Visibility: Your full face must be visible, and the head covering must not obscure your facial features.
5.3. Facial Hair, Makeup, and Other Appearance Considerations
- Facial Hair: Facial hair is allowed as long as it represents your current appearance.
- Makeup: Makeup is allowed as long as it does not significantly alter your appearance.
- Tattoos and Piercings: Tattoos and piercings are allowed as long as they do not obscure your facial features.
- Appearance Changes: If you have undergone significant appearance changes (e.g., surgery, weight loss), you may need to provide additional documentation with your application.
6. Troubleshooting Common Issues
6.1. My Photo Was Rejected: What to Do Next
If your passport photo is rejected, don’t panic. Here are the steps you should take:
- Review the Rejection Reason: Understand why your photo was rejected. The rejection notice will provide specific reasons.
- Correct the Issues: Address the issues identified in the rejection notice. This may involve taking a new photo or editing the existing one.
- Submit a New Photo: Submit a new photo with your application.
- Seek Assistance: If you are unsure how to correct the issues, seek assistance from a professional photo studio or passport service.
6.2. Dealing with Blurry or Pixelated Photos
Blurry or pixelated photos are common reasons for rejection. Here’s how to deal with them:
- Use a High-Resolution Camera: Use a camera with a high resolution to take the photo.
- Steady the Camera: Use a tripod or steady your hand to avoid blurry photos.
- Proper Lighting: Ensure that there is proper lighting to avoid pixelation.
- Re-take the Photo: If the photo is blurry or pixelated, re-take it.
6.3. Addressing Shadows and Uneven Lighting
Shadows and uneven lighting can also lead to rejection. Here’s how to address them:
- Use Natural Light: Use natural light by facing a window, but avoid direct sunlight.
- Diffused Lighting: Use diffused lighting to eliminate shadows.
- Adjust Position: Adjust your position to avoid shadows on your face or in the background.
- Review Photo: Review the photo to ensure that there are no shadows or uneven lighting.
6.4. Ensuring Accurate Color and Contrast
Accurate color and contrast are essential for an acceptable passport photo. Here’s how to ensure they are correct:
- Color Photo: Ensure that the photo is in color.
- White Balance: Adjust the white balance on your camera to ensure accurate colors.
- Contrast: Adjust the contrast to ensure that the photo is not too dark or too light.
- Avoid Filters: Do not use filters that alter the color or contrast of the photo.
7. Optimizing Your Passport Photo for Online Submission
7.1. Converting Your Photo to the Correct File Format
For online submission, your photo must be in the correct file format (JPEG). Here’s how to convert your photo:
- Use an Image Editor: Use an image editor such as Adobe Photoshop, GIMP, or an online image converter.
- Open the Photo: Open the photo in the image editor.
- Save As: Select “Save As” and choose JPEG (.jpg) as the file format.
- Adjust Quality: Adjust the quality settings to ensure the file size is less than 10MB.
7.2. Resizing and Compressing Your Photo to Meet Size Requirements
Your photo must meet the size requirements for online submission. Here’s how to resize and compress your photo:
- Use an Image Editor: Use an image editor such as Adobe Photoshop, GIMP, or an online image resizer.
- Resize the Photo: Resize the photo to at least 600 x 600 pixels.
- Compress the Photo: Compress the photo to reduce the file size to less than 10MB.
- Review the Photo: Review the photo to ensure that it is not blurry or pixelated after resizing and compressing.
7.3. Using Online Tools to Check Compliance
There are many online tools available to check if your passport photo meets all the requirements. Here are some popular tools:
- PhotoAiD: Offers AI-powered compliance check.
- PersoFoto: Provides a compliance check and cropping tools.
- Passport Photo Online: Checks compliance and offers background removal.
7.4. Uploading Your Photo: Tips for a Smooth Process
Follow these tips for a smooth photo uploading process:
- Check Requirements: Double-check the photo requirements before uploading.
- File Format: Ensure that the photo is in the correct file format (JPEG).
- File Size: Ensure that the file size is less than 10MB.
- Stable Connection: Use a stable internet connection to avoid upload errors.
- Preview: Preview the photo after uploading to ensure it looks correct.
8. The Consequences of a Bad Passport Photo
8.1. Application Delays: How Long Can a Bad Photo Set You Back?
A bad passport photo can cause significant delays in your application process. According to the U.S. Department of State, applications with non-compliant photos are often delayed by several weeks or even months. This is because the application cannot be processed until a compliant photo is received.
8.2. Application Rejection: When Your Application Might Be Denied
In some cases, a bad passport photo can lead to the rejection of your application. This is more likely to happen if the photo is severely non-compliant or if you repeatedly submit non-compliant photos. A rejected application can be frustrating and time-consuming, as you will need to start the application process from scratch.
8.3. Travel Complications: Potential Issues at Immigration
Even if your passport application is approved with a less-than-perfect photo, you could still face travel complications at immigration. If the photo does not accurately represent your current appearance, immigration officials may question your identity and delay or deny your entry into a country.
8.4. Avoiding These Pitfalls: The Importance of a Compliant Photo
To avoid these pitfalls, it is essential to ensure that your passport photo is compliant with all the requirements. This includes using a recent photo, meeting the size and resolution specifications, and adhering to the guidelines for background, expression, and attire. Taking the time to get a compliant photo can save you time, money, and stress in the long run.
9. Frequently Asked Questions (FAQs) About Passport Photos
9.1. Can I wear jewelry in my passport photo?
Yes, you can wear jewelry in your passport photo as long as it does not obscure your face.
9.2. Can I smile in my passport photo?
No, you must have a neutral expression with your mouth closed.
9.3. Can I wear makeup in my passport photo?
Yes, you can wear makeup as long as it does not significantly alter your appearance.
9.4. How often do I need to renew my passport photo?
You need to renew your passport photo every time you renew your passport.
9.5. What should I wear for my passport photo?
Wear plain, everyday clothes. Avoid wearing white, as it can blend in with the background.
9.6. Can I take my passport photo with my phone?
Yes, you can take your passport photo with your phone as long as it meets all the requirements.
9.7. Where can I find a passport photo booth near me?
You can find passport photo booths at many pharmacies, retail stores, and post offices.
9.8. What is the best background for a passport photo?
The best background for a passport photo is plain white or off-white.
9.9. How much does it cost to get a passport photo taken?
The cost to get a passport photo taken varies depending on where you go, but it typically ranges from $10 to $20.
9.10. Is it better to take my passport photo myself or go to a professional?
It depends on your budget and confidence in taking a compliant photo. A professional can guarantee compliance, but taking it yourself can be more cost-effective.
10. Staying Updated with the Latest Passport Photo Guidelines
10.1. Official Government Resources for Passport Photo Information
To stay updated with the latest passport photo guidelines, refer to the official government resources, such as the U.S. Department of State website. These resources provide the most accurate and up-to-date information on passport photo requirements.
10.2. Subscribing to Newsletters and Alerts from Travel Authorities
Subscribe to newsletters and alerts from travel authorities to receive updates on passport photo guidelines and other travel-related information. This can help you stay informed about any changes or updates to the requirements.
10.3. Checking Reputable Travel Blogs and Forums for Tips and Updates
Check reputable travel blogs and forums for tips and updates on passport photos. These sources can provide valuable insights and advice from experienced travelers and photographers.
10.4. Why It’s Crucial to Verify Information Before Submitting Your Application
It is crucial to verify all information before submitting your passport application to avoid delays or rejection. This includes verifying the passport photo guidelines, application requirements, and any other relevant information. Taking the time to verify the information can save you time, money, and stress in the long run.
In conclusion, ensuring you have a compliant passport photo is a critical step in the passport renewal process. At dfphoto.net, we strive to provide you with the most accurate and up-to-date information to make this process as smooth as possible. From understanding the specific requirements to troubleshooting common issues, we’ve covered all aspects of passport photos to help you avoid delays and rejections.
Remember, a new, compliant photo is essential, regardless of whether your appearance has changed. Whether you choose to take your photo yourself or seek professional assistance, following the guidelines outlined in this article will ensure your photo meets all the necessary criteria. For more detailed guides, inspiring photography tips, and to connect with a vibrant community of photographers, visit dfphoto.net today. Don’t let a bad photo hold you back from your travel plans—explore dfphoto.net and embark on your next adventure with confidence!
Address: 1600 St Michael’s Dr, Santa Fe, NM 87505, United States.
Phone: +1 (505) 471-6001.
Website: dfphoto.net.