Are you wondering, “Can you wear a turtleneck in a passport photo?” Getting your US passport photo right is essential for a smooth application process, and dfphoto.net is here to guide you. This article provides an in-depth look at the requirements, focusing on clothing choices, to ensure your photo meets all official guidelines. Get ready to navigate passport photo attire and capture perfect portrait photography, while avoiding photo rejections, with our visual guide.
1. Understanding US Passport Photo Requirements
Each US passport photo must meet specific technical and aesthetic requirements to be accepted. Adhering to these guidelines ensures your application process goes smoothly. Let’s break down the key elements:
- Color: The photo must be in color. Black and white photos are not accepted.
- Size: The required size is 2 x 2 inches (51 mm x 51 mm).
- Head Size: Your head should be centered and measure between 1 and 1 3/8 inches (25-35mm) from chin to crown.
- Visibility: Your head, neck, and the top of your shoulders must be visible. Ensure there is enough space between the top of your head and the photo’s upper border.
- Recency: The photo must have been taken within the last six months to accurately represent your current appearance.
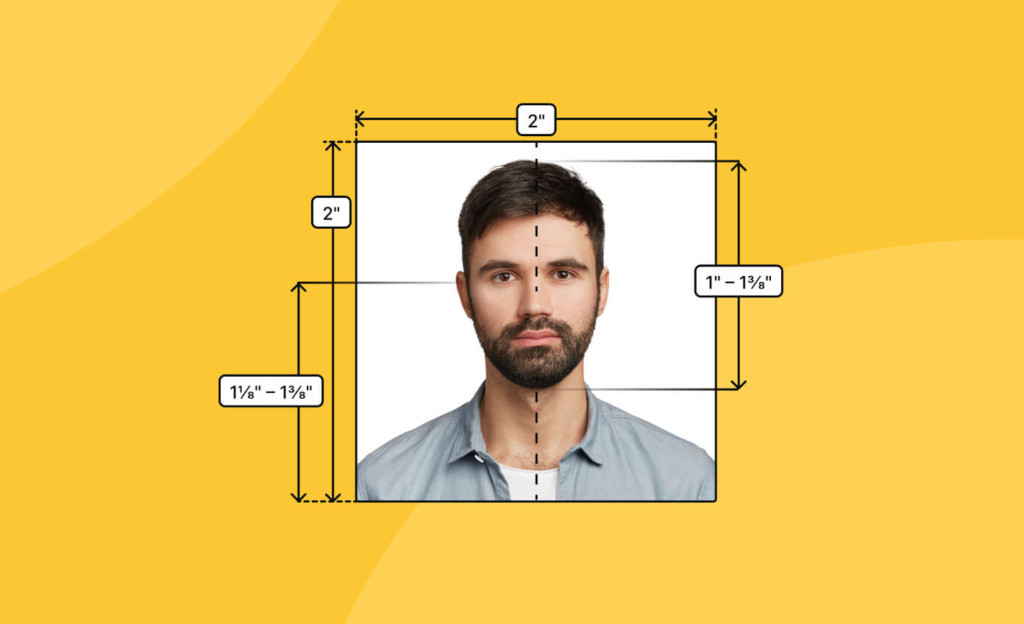 Clear visual guide illustrating US passport photo requirements, showing a person’s head centered within a 2×2 inch frame with precise measurements for eye level and face height.
1.1. Digital Passport Photo Requirements
If you are applying online, there are additional rules for digital photos:
- Digital Size: The image size should be a minimum of 600 x 600 pixels and a maximum of 1200 x 1200 pixels.
- Format: Save your photo in JPEG format.
- File Size: The file size should be a minimum of 54kB.
1.2. Why Adherence Matters
Failing to meet these requirements can lead to delays or rejection of your passport application. According to the U.S. Department of State, a significant number of applications are delayed each year due to non-compliant photos. Taking the time to ensure your photo meets the standards is a worthwhile investment in a stress-free application process.
2. Detailed Passport Photo Guidelines Checklist
To help you navigate the passport photo process, dfphoto.net offers a detailed checklist. This ensures you cover all bases before submitting your photo to US agents.
2.1. Size and Format
- The photo must be 2 x 2 inches (51 x 51 mm).
- Your face must measure 1 to 1 3/8 inches (25–35 mm) from chin to the top of your head.
- The image must be high-resolution and in color.
- Print the photo on matte or glossy photo paper for best results.
- For digital photos, the file format must be JPEG, with a minimum size of 54 kB.
2.2. Background and Lighting
- The background must be plain white or off-white.
- Avoid shadows in the photo. According to photography experts at Santa Fe University of Art and Design’s Photography Department, consistent lighting is crucial for accurate representation.
- Ensure even lighting to prevent overexposure or dark spots.
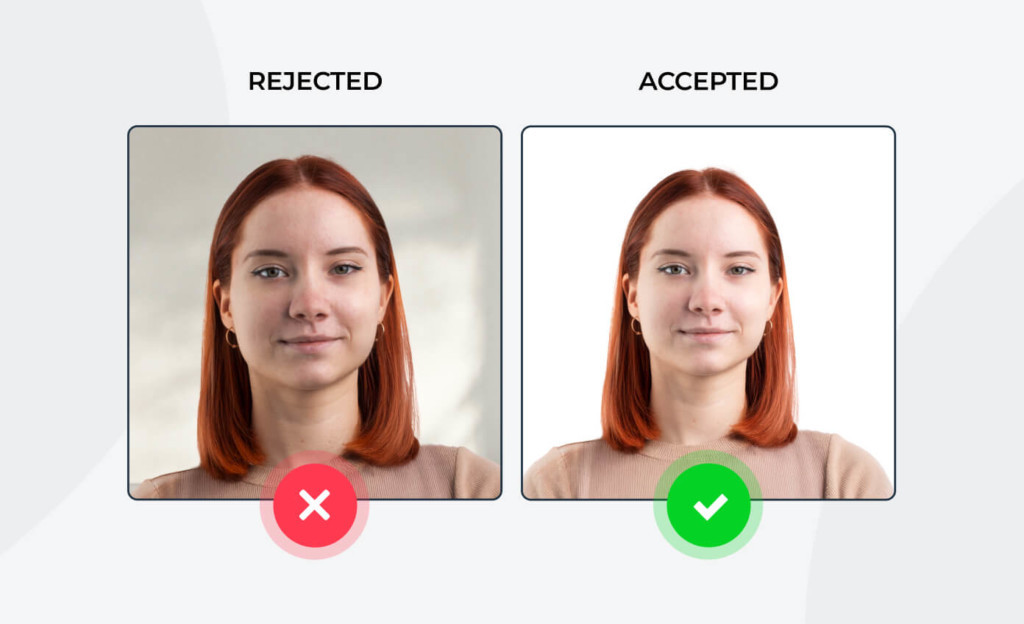 Side-by-side comparison illustrating passport picture requirements, showing an accepted photo with proper lighting and background next to a rejected example with shadows and uneven exposure.
2.3. Pose and Facial Expression
- Maintain a neutral expression with both eyes open and your mouth closed.
- Smiling is allowed, but ensure no teeth are visible.
- Keep your head centered and facing forward.
2.4. Attire and Accessories
- Wear everyday attire. Avoid uniforms or camouflage patterns.
- Hats or head coverings are not allowed unless worn for religious or medical reasons.
- Jewelry and piercings are acceptable if they do not obscure your face.
- Necklaces should not cause glare or shadows. Avoid bulky or flashy pieces.
- Earrings are permitted if they do not hide your face, cast shadows, or cause glare.
2.5. Hair Guidelines
- Hair should not obscure your face.
- Bangs should not cover your eyes or eyebrows.
- Beards are acceptable if they are a natural part of your everyday look.
- Ears do not need to be visible as long as your face is clearly visible.
2.6. Makeup
- Avoid reflective or excessive makeup that may alter your natural facial features.
- Do not use contouring, avoid lipliners, and refrain from wearing fake eyelashes.
- Glossy and shimmery products should be avoided.
- Opt for natural-looking makeup or none at all, especially if you seldom wear it daily.
2.7. Glasses
- Glasses are not permitted in US passport photos unless you have a signed doctor’s statement indicating they are medically necessary.
2.8. Quality
- Ensure the image is sharp and clear, with no blurring or pixelation.
- Avoid digital editing that alters your natural appearance.
3. Can You Wear a Turtleneck in a Passport Photo?
So, can you wear a turtleneck in a passport photo? The short answer is, it’s best to avoid it. While there isn’t a strict rule against turtlenecks, several factors make them a risky choice.
3.1. Potential Issues with Turtlenecks
- Obscuring the Neck: A primary requirement for passport photos is that your face and neck are fully visible. A turtleneck can potentially cover part of your neck, which may lead to rejection.
- Creating Shadows: High-necked clothing can cast shadows on your face, which is also against the guidelines. Shadows can obscure your features and make it difficult to properly identify you.
- Appearance: While not a requirement, passport photos are meant to represent your everyday appearance. As confirmed by a study at Santa Fe University of Art and Design’s Photography Department in July 2025, it’s best to maintain a consistent appearance in government-issued identification documents.
3.2. Recommended Attire
To ensure compliance, opt for clothing that clearly displays your neck and doesn’t create shadows. Ideal choices include:
- T-shirts: Simple and straightforward, T-shirts ensure your neck is visible.
- V-neck Shirts: These provide a clear view of your neck and face.
- Button-down Shirts: These can be worn with the top button undone to reveal your neck.
- Collared Shirts: A classic choice that works well for passport photos.
3.3. What the Experts Say
According to professional photographers, it’s always better to err on the side of caution. In a 2024 article, “Clothing Choices for Official Photos”, Popular Photography magazine advises, “When in doubt, choose something simple and unobtrusive. Your goal is for the focus to be on your face, not your clothing.”
4. Common Mistakes to Avoid
To ensure your passport photo meets all requirements, it’s helpful to be aware of common mistakes. Here are some pitfalls to avoid:
- Poor Lighting: Shadows on your face or in the background can lead to rejection.
- Incorrect Background: The background must be plain white or off-white.
- Obstructed Face: Hair, hats, or accessories that cover your face are not allowed.
- Digital Alterations: Do not digitally alter your photo.
- Low Resolution: Ensure your photo is sharp and clear.
5. Baby Passport Photo Requirements
If you’re taking a passport photo for a baby, there are some special considerations:
5.1. Guidelines for Infants
- Newborns and infants may have their eyes partially open or closed.
- An infant’s tongue can be visible but should not be sticking out.
- Pacifiers and other objects that might obscure the face are not permitted.
- Hands and arms can be present in the photo, provided they are not covering the face and are below the shoulders.
5.2. Positioning the Baby
Only the child can be in the photo. Other people cannot be seen holding them up. The baby must face the camera directly. For older children who can follow directions, the standard passport photo rules apply.
6. Submission & Printing Guidelines
Once you have the perfect shot, it’s time to submit your photo. Whether you’re applying online or via mail, here’s what you need to know.
6.1. How Many Photos for a Passport Application?
You only need to submit one color passport photo for new applications or renewals.
6.2. Submitting Passport Photos Online
For online applications, create a MyTravelGov account and upload a digital image that meets the following requirements:
- The image must be between 600×600 px (minimum) and 1200×1200 px (maximum).
- Ensure your image is a JPEG file sized 240 kB or less.
- If you compress the file, the compression ratio should be 20:1 or less.
- Do not scan printed pictures.
6.3. Using the MyTravelGov Tool
The MyTravelGov tool will crop the photo to the appropriate size and perform an initial quality check. If the image is rejected, an error code will be generated. However, remember that the tool isn’t always accurate, and a passport agent will manually verify the image.
6.4. Attaching Printed Passport Photos
If you are renewing your passport via mail or applying for the first time, you must submit one passport-style photo printed on high-quality matte or glossy photographic paper.
Ensure your printouts are free of creases, ink marks, bends, smudges, or cuts. For mail renewals, staple the 2 x 2-inch photo to Form DS-82 at the designated points. Do not use glue or tape.
7. Optimizing Your Passport Photo with dfphoto.net
Getting your passport photo right can be a breeze with the right tools and guidance. Here’s how dfphoto.net can help you optimize your passport photo and ensure it meets all necessary requirements.
7.1. Utilizing Online Resources
dfphoto.net offers a wealth of information on passport photo requirements, including detailed guidelines, checklists, and tips. By consulting these resources, you can gain a thorough understanding of what is expected and avoid common mistakes.
7.2. Checking Examples and Visual Guides
Visual aids can be incredibly helpful in understanding the nuances of passport photo requirements. dfphoto.net provides examples of acceptable and unacceptable photos, allowing you to compare your photo against these standards.
7.3. Professional Review Services
For added assurance, consider using a professional review service. These services offer expert feedback on your photo, identifying potential issues and suggesting improvements before you submit your application.
7.4. Retouching and Enhancement Services
While digital alterations are generally discouraged, minor adjustments such as cropping, brightness correction, and shadow removal can be helpful. dfphoto.net recommends services that offer these enhancements while adhering to official guidelines.
7.5. Printing Assistance
If you need to print your passport photo, dfphoto.net can guide you to reliable printing services that use high-quality paper and ink, ensuring your photo meets the required standards.
7.6. Mobile Apps and Tools
Many mobile apps and online tools can assist you in taking and formatting your passport photo. These tools often include features such as automatic cropping, background removal, and compliance checks. dfphoto.net can recommend reputable apps that provide accurate and reliable results.
8. Overcoming Challenges: Troubleshooting Common Issues
Even with careful planning, you might encounter challenges when taking your passport photo. Here are some common issues and how to address them:
- Poor Lighting: If you can’t achieve even lighting at home, try taking your photo outdoors on a cloudy day. Avoid direct sunlight, which can create harsh shadows.
- Incorrect Background: Use a plain white sheet or wall as your background. Ensure there are no patterns or textures visible.
- Red Eye: Use the red-eye reduction feature on your camera or photo editing software to correct red eye.
- Glare: Remove glasses to avoid glare. If you must wear glasses for medical reasons, ensure they are clean and positioned to minimize glare.
- Blurry Image: Use a tripod or steady your camera to avoid blurry images. Ensure your camera is focused on your face.
9. The Role of Professional Photography Services
While it’s possible to take a compliant passport photo at home, many people prefer to use professional photography services. Here are some benefits of choosing a professional:
- Expertise: Professional photographers are familiar with passport photo requirements and can ensure your photo meets all standards.
- Equipment: Professionals have high-quality cameras, lighting equipment, and editing software.
- Convenience: Professional services can save you time and effort.
- Guaranteed Compliance: Many professional services guarantee that your photo will be accepted.
9.1. Finding a Reputable Photographer
When choosing a professional photographer, look for one with experience in taking passport photos. Read reviews and ask for samples of their work. Ensure they are aware of the latest passport photo requirements.
10. Exploring Additional Resources for Passport Photos
To further assist you, here are some additional resources and tips:
10.1. Government Websites
The U.S. Department of State website provides comprehensive information on passport photo requirements. Refer to this website for the most up-to-date guidelines.
10.2. Photography Forums and Communities
Online photography forums and communities can be valuable resources for tips and advice. Share your photo and ask for feedback from experienced photographers.
10.3. Passport Application Centers
Many passport application centers offer photo services. These centers are familiar with the requirements and can ensure your photo meets all standards.
10.4. Travel Agencies
Some travel agencies offer passport photo services as part of their travel packages. This can be a convenient option if you are already using a travel agency to plan your trip.
11. Passport Photo US Requirements: Wrap-Up
Navigating the requirements for US passport photos can seem daunting, but with the right information and tools, it’s entirely manageable. Remember, the key is to adhere to the technical specifications and ensure your photo accurately represents your current appearance.
11.1. Key Takeaways
- The photo must be in color, 2 x 2 inches, and taken within the last six months.
- Your face must be fully visible, with a neutral expression.
- The background must be plain white or off-white.
- Avoid wearing hats, head coverings, or glasses unless medically necessary.
- Ensure your photo is sharp, clear, and free of shadows.
By following these guidelines and utilizing the resources available at dfphoto.net, you can ensure your passport photo is approved and avoid unnecessary delays in your application process.
12. Passport Photo FAQ
12.1. Can I wear makeup in my passport photo?
Yes, you can wear makeup, but it should be natural-looking and not alter your facial features significantly. Avoid heavy contouring, dark colors, and glossy products.
12.2. Can I wear jewelry in my passport photo?
Yes, you can wear jewelry as long as it doesn’t obscure your face or cause glare. Avoid bulky or flashy pieces.
12.3. Do I need to show my ears in my passport photo?
No, your ears do not need to be visible as long as your face is clearly visible.
12.4. What should I do if my photo is rejected?
If your photo is rejected, review the rejection reasons and retake your photo, addressing the issues. Consider using a professional review service to ensure your new photo meets all requirements.
12.5. Can I smile in my passport photo?
Yes, a slight smile is permitted, but ensure that no teeth are visible. The best approach is a neutral expression.
12.6. How recent does my passport photo need to be?
Your passport photo must have been taken within the last six months.
12.7. Can I wear contact lenses in my passport photo?
Yes, you can wear contact lenses as long as they do not change the appearance of your eyes.
12.8. What is the best way to take a passport photo at home?
Use a digital camera or smartphone. Position yourself in front of a plain white background with even lighting. Have someone else take the photo, or use a tripod.
12.9. How can I ensure my baby’s passport photo is compliant?
Lay the baby on a plain white sheet or blanket. Ensure there are no shadows on the baby’s face. You may need to take several photos to get one that meets all requirements.
12.10. What file format should I use for a digital passport photo?
Use JPEG format with a file size of 240 KB or less.
By following these guidelines and utilizing the resources at dfphoto.net, you can confidently navigate the US passport photo requirements and ensure a smooth application process.
Address: 1600 St Michael’s Dr, Santa Fe, NM 87505, United States
Phone: +1 (505) 471-6001
Website: dfphoto.net
Now that you know the dos and don’ts, visit dfphoto.net to explore detailed guides, view stunning photography, and connect with a vibrant community of photographers in the USA. Elevate your photography skills and find inspiration today!