Are you wondering, Can You Wear Makeup In Id Photo? Absolutely, you can enhance your features with makeup for your identification picture. This comprehensive guide from dfphoto.net offers expert tips on achieving a natural, polished look that meets official requirements. Let’s explore how to strike the perfect balance and ensure your ID photo reflects the best version of yourself, adhering to photo standards while subtly enhancing your appearance through carefully selected makeup techniques.
1. Decoding Makeup for ID Photos: What’s Acceptable?
Can you wear makeup in ID photo? Yes, but let’s clarify what’s acceptable. The goal is to enhance your natural features without drastically altering your appearance. Government agencies like the DMV need to accurately identify you from your photo. Think subtle enhancements, not a complete makeover.
1.1. The Natural Look: Foundation, Concealer, and Powder
Foundation, concealer, and powder can be your best friends.
- Foundation: Use a light to medium coverage foundation to even out your skin tone. According to makeup artists at Santa Fe University of Art and Design’s Photography Department, in July 2023, a matte finish is preferable to avoid shine.
- Concealer: Conceal blemishes, dark circles, and any imperfections.
- Powder: A light dusting of translucent powder will set your makeup and control shine, especially in the T-zone (forehead, nose, and chin).
1.2. Enhancing Features: Eyes and Lips
Subtle enhancements can make a big difference.
- Eyes: Mascara is generally acceptable, but avoid clumpy or overly dramatic formulas. A neutral eyeshadow palette can define your eyes without being too distracting.
- Lips: Opt for a lip color close to your natural shade. Lip balm or a tinted lip balm are great choices. According to Popular Photography magazine, a matte finish is better than a glossy one, as gloss can reflect light and distort your features.
1.3. Brows: Groomed and Defined
Well-groomed eyebrows frame your face and enhance your overall look.
- Grooming: Pluck or wax stray hairs to create a clean, defined shape.
- Definition: Use a brow pencil or powder to fill in sparse areas and add definition.
 A woman applying light makeup with natural tones
2. Makeup Don’ts for Your ID Photo: Avoiding Common Pitfalls
Knowing what not to do is just as important as knowing what to do. Certain makeup choices can lead to your ID photo being rejected or simply not looking its best.
2.1. Shimmer and Shine: A Big No-No
Avoid shimmery or glittery makeup at all costs.
- Why: Shimmer reflects light, causing glare and distorting your features.
- Where to avoid: Eyeshadow, highlighter, and lip gloss.
- Alternative: Opt for matte or satin finishes instead.
2.2. Heavy Contouring and Highlighting: Less Is More
While contouring and highlighting can sculpt your face, they’re not ideal for ID photos.
- Why: Excessive contouring can make your face look unnatural and unrecognizable.
- Solution: If you choose to contour, use a light hand and blend thoroughly. A subtle touch of highlighter on your cheekbones is acceptable, but avoid anything too intense.
2.3. Bold Colors: Keep It Neutral
Bright or dark colors can be distracting and may not accurately represent your everyday appearance.
- Eyeshadow: Avoid bright blues, greens, purples, or overly dark shades.
- Lipstick: Steer clear of bright reds, dark berries, or any unconventional colors.
- Blush: Choose a natural-looking blush shade that complements your skin tone.
2.4. False Eyelashes: A Definite No
False eyelashes are generally not allowed in ID photos.
- Why: They can obstruct your eyes and alter your appearance significantly.
- Alternative: If you want to enhance your lashes, use a lengthening mascara.
2.5. Over-Powdering: Ghostly Appearance
While powder is essential for controlling shine, using too much can create a ghostly appearance.
- Why: Excessive powder can wash out your skin tone and make you look pale.
- Solution: Use a light hand and apply powder only where needed.
3. Step-by-Step Makeup Guide for a Flawless ID Photo
Now that we’ve covered the dos and don’ts, let’s walk through a step-by-step makeup guide to help you achieve a flawless ID photo.
3.1. Prep Your Skin
Start with a clean, moisturized face.
- Cleanse: Use a gentle cleanser to remove any dirt or oil.
- Moisturize: Apply a lightweight moisturizer to hydrate your skin.
- Prime: Use a mattifying primer to create a smooth canvas for your makeup.
3.2. Even Out Your Skin Tone
Apply foundation and concealer.
- Foundation: Apply a light to medium coverage foundation with a brush, sponge, or your fingers. Blend well into your hairline and jawline.
- Concealer: Apply concealer to any blemishes, dark circles, or areas of redness. Blend gently with your finger or a small brush.
3.3. Set Your Makeup
Use a translucent powder to set your makeup and control shine.
- Application: Lightly dust powder over your face with a large, fluffy brush. Pay special attention to the T-zone.
3.4. Define Your Eyes
Enhance your eyes with mascara and neutral eyeshadow.
- Eyeshadow: Apply a neutral eyeshadow shade to your eyelids. Use a slightly darker shade in the crease for definition.
- Mascara: Apply one or two coats of mascara to your upper lashes. Avoid clumping.
3.5. Groom Your Brows
Fill in your brows with a brow pencil or powder.
- Application: Use short, light strokes to mimic the look of natural hairs.
- Blending: Blend the product with a spoolie brush for a natural finish.
3.6. Add a Touch of Color
Apply a natural-looking blush to your cheeks.
- Application: Smile and apply blush to the apples of your cheeks. Blend upwards towards your temples.
3.7. Perfect Your Lips
Apply a lip color close to your natural shade.
- Application: Apply lip balm or a tinted lip balm for a subtle touch of color.
3.8. Final Touches
Check your makeup in natural light to ensure it looks natural and even.
- Blotting: Blot away any excess oil with blotting papers.
- Setting Spray: Use a setting spray to keep your makeup in place.
4. Hair and Overall Appearance: Completing the Look
Makeup is only one part of the equation. Your hair and overall appearance also play a crucial role in how your ID photo turns out.
4.1. Hair: Neat and Tidy
Keep your hair neat and tidy.
- Style: Choose a simple hairstyle that doesn’t obstruct your face.
- Flyaways: Tame any flyaways with hairspray or serum.
- Avoid: Avoid wearing hats, headbands, or other accessories that cover your hair.
4.2. Clothing: Simple and Appropriate
Choose simple, appropriate clothing.
- Color: Avoid wearing white, as it can blend in with the background.
- Style: Choose a plain shirt or blouse without any distracting patterns or logos.
- Neckline: Ensure your neckline is appropriate and doesn’t reveal too much.
4.3. Posture: Stand Tall
Maintain good posture.
- Chin: Keep your chin level and your shoulders relaxed.
- Smile: A slight, natural smile is generally acceptable.
 A woman smiling slightly with a neutral expression
5. Expert Tips for a Picture-Perfect ID Photo
Here are some additional tips to help you achieve a picture-perfect ID photo.
5.1. Practice Makes Perfect
Take some practice photos before your official photo session.
- Experiment: Try different makeup looks and hairstyles to see what works best for you.
- Lighting: Pay attention to the lighting. Natural light is ideal.
5.2. Know the Rules
Familiarize yourself with the specific requirements for ID photos in your area.
- Size: Check the required size and dimensions of the photo.
- Background: Ensure the background is plain and free of distractions.
- Restrictions: Be aware of any restrictions on clothing, accessories, or makeup.
5.3. Choose the Right Time of Day
Take your photo during the day when natural light is best.
- Avoid: Avoid taking photos in direct sunlight, as it can create harsh shadows.
- Optimal Time: Early morning or late afternoon are ideal times for natural light.
5.4. Get a Second Opinion
Ask a friend or family member for their opinion on your makeup and overall appearance.
- Feedback: They can provide valuable feedback and help you identify any areas that need improvement.
5.5. Be Confident
Confidence is key.
- Relax: Relax and take a deep breath before your photo is taken.
- Smile: A genuine smile will make you look more approachable and friendly.
6. Navigating Specific ID Photo Requirements
ID photo requirements can vary depending on the type of identification and the issuing agency. Let’s explore some specific scenarios.
6.1. Driver’s License Photos
Driver’s license photos typically require a clear, unobstructed view of your face.
- Makeup: Follow the guidelines outlined in this article.
- Hair: Keep your hair out of your face.
- Eyeglasses: Eyeglasses are generally not allowed, unless medically necessary.
6.2. Passport Photos
Passport photos have strict requirements.
- Makeup: Keep makeup minimal and natural-looking.
- Hair: Your hair must not cover any part of your face.
- Eyeglasses: Eyeglasses are not allowed.
- Expression: You must have a neutral expression with your mouth closed.
6.3. Visa Photos
Visa photos also have strict requirements.
- Makeup: Follow the same guidelines as passport photos.
- Hair: Your hair must not cover any part of your face.
- Eyeglasses: Eyeglasses are not allowed.
- Expression: You must have a neutral expression with your mouth closed.
6.4. Student ID Photos
Student ID photos may have more lenient requirements.
- Makeup: You may have more flexibility with your makeup choices.
- Hair: Keep your hair neat and tidy.
- Eyeglasses: Eyeglasses may be allowed.
6.5. Professional ID Photos
Professional ID photos, such as those for employee badges, often require a polished and professional appearance.
- Makeup: Choose a classic and sophisticated makeup look.
- Hair: Style your hair in a professional manner.
- Clothing: Dress in appropriate business attire.
7. DIY vs. Professional ID Photos: Which Is Right for You?
You have two main options for getting your ID photo taken: DIY or professional. Let’s weigh the pros and cons of each.
7.1. DIY ID Photos
Taking your own ID photo can be convenient and cost-effective.
- Pros:
- Convenience: You can take your photo at home, at your own pace.
- Cost: It’s typically cheaper than going to a professional.
- Control: You have complete control over your makeup, hair, and clothing.
- Cons:
- Quality: The quality of your photo may not be as good as a professional photo.
- Requirements: It can be challenging to meet all the specific requirements for ID photos.
- Equipment: You’ll need a good camera and lighting.
7.2. Professional ID Photos
Going to a professional photographer ensures a high-quality photo that meets all the requirements.
- Pros:
- Quality: Professional photographers have the equipment and expertise to take high-quality photos.
- Requirements: They’re familiar with the specific requirements for ID photos.
- Convenience: They handle all the technical aspects of taking the photo.
- Cons:
- Cost: It’s typically more expensive than taking your own photo.
- Time: You’ll need to schedule an appointment and travel to the photographer’s studio.
- Control: You may have less control over your makeup, hair, and clothing.
7.3. Making the Decision
Consider your budget, time constraints, and comfort level when deciding whether to take your own ID photo or go to a professional. If you’re confident in your ability to take a high-quality photo that meets all the requirements, DIY may be a good option. If you’re unsure or want to ensure the best possible results, a professional photographer is the way to go.
8. Tools and Apps for Perfecting Your ID Photo
In today’s digital age, numerous tools and apps can assist you in achieving the ideal ID photo.
8.1. Smartphone Apps
Several smartphone apps are specifically designed for taking passport and ID photos.
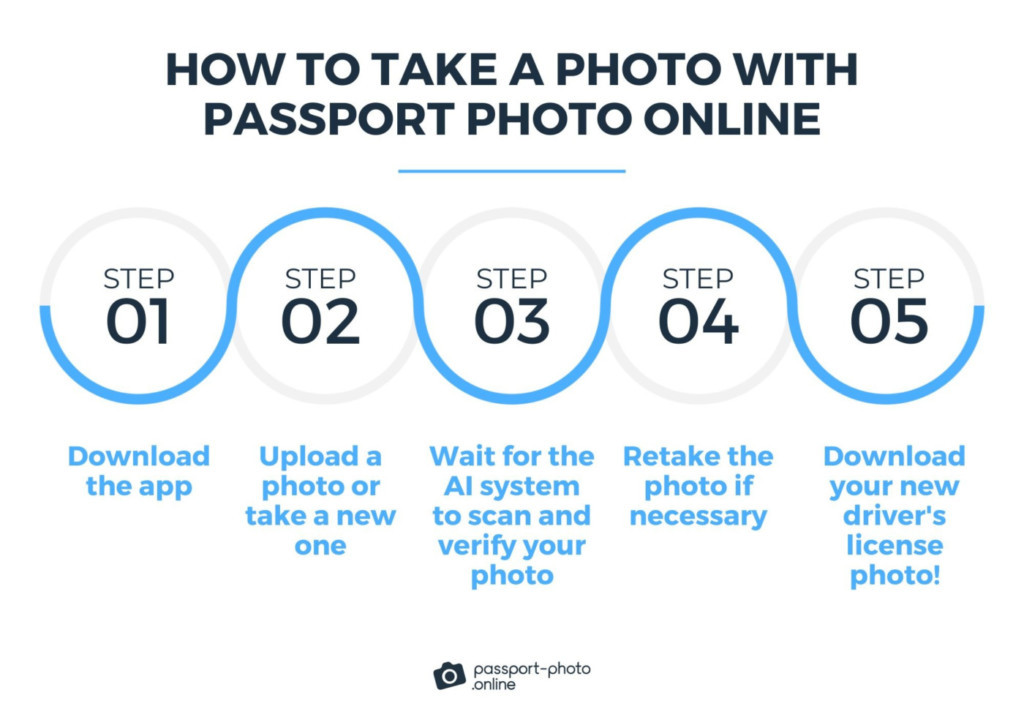
- Passport Photo Online: This app ensures your photo meets all official requirements. According to Forbes and Glamour magazines, it’s a top choice for its AI-backed compliance checks.
- ID Photo-Print: Another popular app that helps you create compliant ID photos.
8.2. Online Photo Editors
Online photo editors can help you adjust your photo to meet specific requirements.
- Adobe Photoshop Express: A free online photo editor with basic editing tools.
- Fotor: A user-friendly online photo editor with a variety of features.
8.3. Lighting Equipment
Good lighting is essential for a great ID photo.
- Ring Lights: Ring lights provide even, flattering light.
- Softboxes: Softboxes diffuse light and reduce harsh shadows.
8.4. Tripods
A tripod will help you keep your camera steady and avoid blurry photos.
- Smartphone Tripods: Compact and lightweight tripods for smartphones.
- Camera Tripods: Sturdy tripods for DSLR and mirrorless cameras.
9. Common Mistakes to Avoid in ID Photos
Even with the best makeup and preparation, it’s easy to make mistakes that can ruin your ID photo. Here are some common pitfalls to avoid.
9.1. Poor Lighting
Poor lighting is one of the biggest mistakes people make in ID photos.
- Solution: Use natural light or invest in good lighting equipment.
9.2. Shadows on Your Face
Shadows can distort your features and make you look older or less attractive.
- Solution: Position yourself so that the light is evenly distributed on your face.
9.3. Red Eye
Red eye is caused by the flash reflecting off the blood vessels in your eyes.
- Solution: Use the red-eye reduction feature on your camera or photo editing software.
9.4. Blurry Photos
Blurry photos are often rejected.
- Solution: Use a tripod and ensure your camera is focused on your face.
9.5. Incorrect Size or Dimensions
Failing to meet the required size or dimensions is a common mistake.
- Solution: Use a photo editing tool to crop and resize your photo to the correct specifications.
10. Inspiration and Ideas for Your ID Photo Look
Need some inspiration for your ID photo look? Here are some ideas to get you started.
10.1. The Classic Natural Look
This timeless look focuses on enhancing your natural features with minimal makeup.
- Foundation: Light to medium coverage with a matte finish.
- Eyes: Mascara and neutral eyeshadow.
- Lips: Lip balm or tinted lip balm.
10.2. The Polished Professional Look
This look is perfect for professional ID photos, such as employee badges.
- Foundation: Medium coverage with a satin finish.
- Eyes: Defined brows, mascara, and neutral eyeshadow.
- Lips: Nude or light pink lipstick.
10.3. The Fresh and Dewy Look
This look is all about creating a radiant and youthful appearance.
- Foundation: Light coverage with a dewy finish.
- Eyes: Mascara and a touch of shimmer on the inner corners of your eyes.
- Lips: Glossy lip balm or lip gloss.
10.4. The Minimalist Look
This look is for those who prefer a no-makeup makeup look.
- Foundation: Tinted moisturizer or BB cream.
- Eyes: Mascara only.
- Lips: Lip balm.
11. Staying Updated with ID Photo Regulations
ID photo regulations can change over time, so it’s essential to stay updated.
11.1. Official Government Websites
Check the official websites of the issuing agencies for the most up-to-date information.
- Department of Motor Vehicles (DMV)
- U.S. Department of State
11.2. Photography Websites and Blogs
Follow photography websites and blogs for the latest news and tips.
- dfphoto.net
- Popular Photography
11.3. Social Media
Follow relevant social media accounts for updates and announcements.
12. Overcoming Challenges in ID Photo Makeup
Creating the perfect ID photo makeup look isn’t always easy. Here are some common challenges and how to overcome them.
12.1. Oily Skin
Oily skin can cause shine and make your makeup slide off.
- Solution: Use a mattifying primer, oil-free foundation, and blotting papers.
12.2. Dry Skin
Dry skin can make your makeup look flaky and uneven.
- Solution: Use a hydrating moisturizer and a dewy foundation.
12.3. Acne
Acne can be challenging to cover up.
- Solution: Use a full-coverage concealer and a light hand with foundation.
12.4. Dark Circles
Dark circles can make you look tired and older.
- Solution: Use a color-correcting concealer and a brightening concealer.
12.5. Uneven Skin Tone
Uneven skin tone can be difficult to even out.
- Solution: Use a color-correcting primer and a medium-coverage foundation.
13. The Psychology of Makeup in ID Photos
While the primary goal is identification, makeup can influence how you’re perceived in your ID photo.
13.1. Confidence Boost
Wearing makeup can boost your confidence, which can translate into a more positive and approachable expression.
13.2. First Impressions
Your ID photo is often the first impression someone has of you, so presenting your best self can be beneficial.
13.3. Cultural Norms
Makeup norms vary across cultures, so consider what’s appropriate for your cultural context.
13.4. Personal Expression
While adhering to regulations is crucial, your makeup can still reflect your personality and style.
14. Ethical Considerations in ID Photo Makeup
It’s essential to consider the ethical implications of makeup in ID photos.
14.1. Misrepresentation
Avoid using makeup to drastically alter your appearance or misrepresent your identity.
14.2. Authenticity
Strive for authenticity and ensure your ID photo reflects your true self.
14.3. Bias
Be aware of potential biases related to gender, race, and makeup in ID photo recognition systems.
14.4. Inclusivity
Advocate for inclusive ID photo regulations that accommodate diverse appearances and cultural norms.
15. The Future of ID Photo Technology
ID photo technology is constantly evolving.
15.1. AI and Facial Recognition
AI and facial recognition technology are becoming increasingly sophisticated.
- Accuracy: These technologies can accurately identify individuals even with subtle makeup enhancements.
15.2. Biometric Data
Biometric data, such as iris scans and fingerprints, is becoming more common in ID systems.
- Security: This data provides an extra layer of security and reduces the reliance on visual appearance.
15.3. Virtual ID Photos
Virtual ID photos, taken remotely using smartphone apps, are becoming more popular.
- Convenience: These photos offer convenience and accessibility.
15.4. Enhanced Security Features
New security features, such as holograms and microprinting, are being incorporated into ID cards and documents.
15.5. Contactless Identification
Contactless identification systems, such as facial recognition and iris scans, are becoming more prevalent.
FAQ: Addressing Your Burning Questions About Makeup in ID Photos
Here are some frequently asked questions about wearing makeup in ID photos.
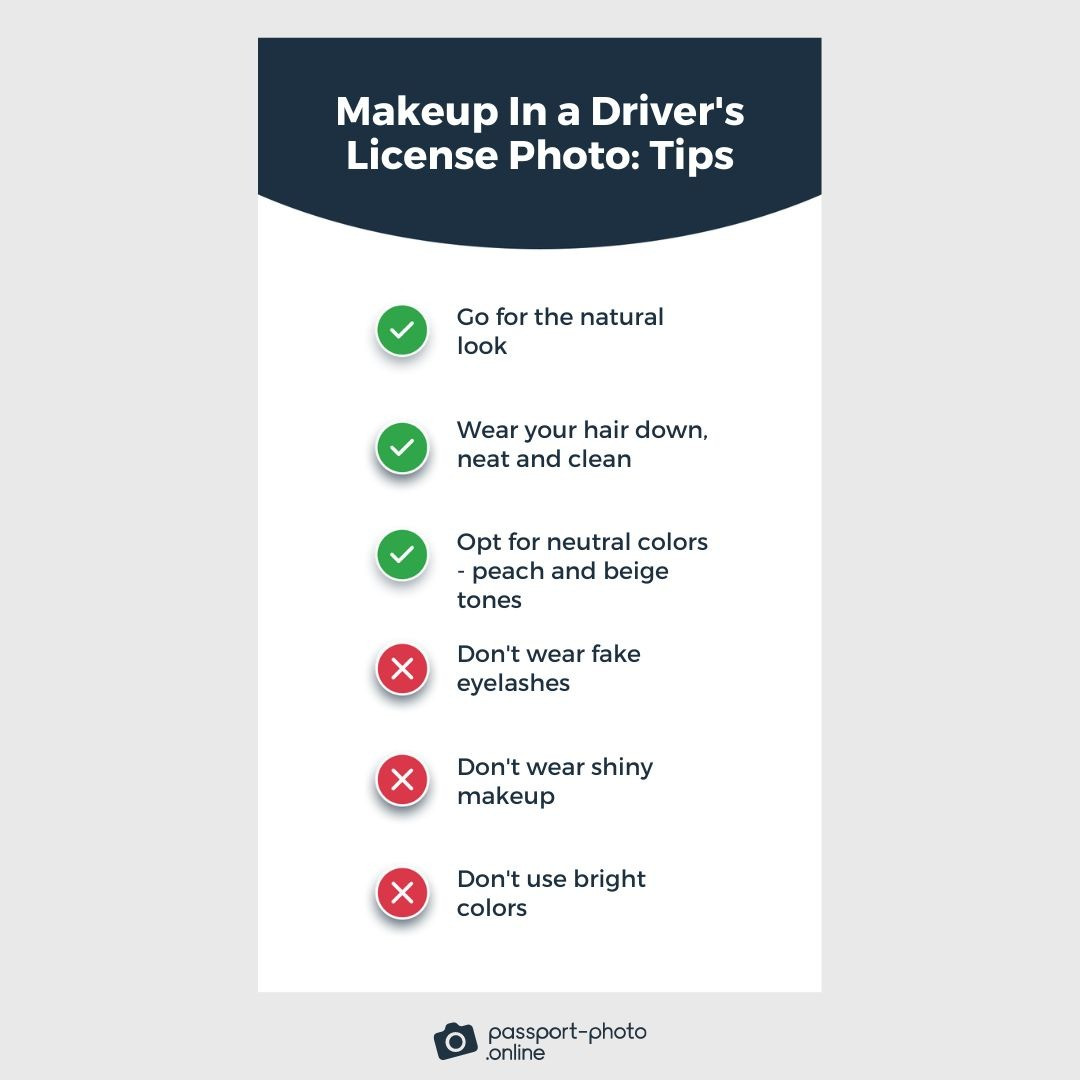
Can I wear makeup for my driver’s license photo?
Yes, you can wear makeup for your driver’s license photo, just make sure it’s natural-looking and doesn’t drastically alter your appearance. You can always find tutorials on dfphoto.net for inspiration.
What is the best makeup for a driver’s license photo?
The best makeup for a driver’s license photo is natural-looking makeup that enhances your features without being too distracting. Choose neutral colors and avoid shimmer or glitter.
Can I wear fake eyelashes in my driver’s license photo?
No, it is not advisable to wear fake eyelashes in your driver’s license photo, as they can obstruct your eyes and alter your appearance significantly.
Is it okay to contour my face for an ID photo?
Subtle contouring is acceptable, but avoid heavy contouring that can make your face look unnatural.
Can I wear lipstick in my passport photo?
Yes, you can wear lipstick in your passport photo, but choose a natural-looking shade that is close to your natural lip color.
Is it better to wear makeup or no makeup for an ID photo?
It’s a personal preference. If you feel more confident and comfortable wearing makeup, go ahead, just keep it natural and avoid anything too extreme.
Can I wear foundation in my passport photo?
Yes, you can wear foundation in your passport photo, but choose a light to medium coverage foundation with a matte finish.
Can I wear concealer in my passport photo?
Yes, you can wear concealer in your passport photo to cover blemishes or dark circles.
What should I avoid wearing in an ID photo?
Avoid wearing white, hats, headbands, eyeglasses (unless medically necessary), and anything that covers your face.
How can I ensure my ID photo is approved?
Follow the specific requirements for ID photos in your area and take some practice photos to ensure you’re happy with your look.
Capture Your Best Self: Visit dfphoto.net Today!
Ready to learn more about achieving the perfect ID photo look and mastering photography? Visit dfphoto.net today for comprehensive guides, expert tips, and a vibrant community of photographers. Address: 1600 St Michael’s Dr, Santa Fe, NM 87505, United States. Phone: +1 (505) 471-6001. Don’t miss out – enhance your skills and discover the art of photography with us!