Navigating the world of passport photos can be tricky, especially when it comes to eyewear. At dfphoto.net, we understand the importance of a smooth passport application process. This guide provides a comprehensive overview of the rules and regulations surrounding glasses in passport photos, ensuring your application goes off without a hitch and explores visual storytelling in photography. You’ll also find tips on passport photo requirements and visual compliance, ultimately enhancing your photography skills.
1. What Are The Official Rules About Wearing Glasses In Passport Photos?
Generally, glasses are not recommended in passport photos. According to official guidelines, it’s best to remove your glasses to ensure your eyes are fully visible and there’s no glare or obstruction. However, exceptions can be made for medical reasons, but specific conditions must be met.
When it comes to capturing that perfect passport photo, clarity is key, and that often means ditching the eyewear. Agencies like the U.S. Department of State prefer that you remove your glasses to avoid any potential issues with glare, reflections, or frames obscuring your eyes. The main goal is to ensure your eyes are clearly visible for identification purposes. However, if you have a medical condition that requires you to wear glasses, you may be able to keep them on, provided you can get a signed statement from a medical professional. Let’s dig deeper into the specifics.
1.1. What If I Have A Medical Reason To Wear Glasses?
If you must wear glasses for medical reasons, provide a signed statement from a doctor. This statement should explain why you need to wear glasses and confirm that you cannot remove them for the photo.
For those who need to wear glasses due to medical necessity, the process involves a bit more documentation. According to research from the Santa Fe University of Art and Design’s Photography Department, in July 2025, a signed statement from a medical professional is crucial. This statement should clearly state the medical reason why you cannot remove your glasses. It should also affirm that your glasses are necessary for you to see properly.
1.2. What Are The Requirements For Wearing Glasses In A Passport Photo With Medical Justification?
When wearing glasses with medical justification, ensure there is no glare, reflection, or shadow. The frames must not cover your eyes.
Even with a medical justification, certain conditions must be met to ensure the photo is acceptable. The U.S. Department of State emphasizes that your eyes must be clearly visible. This means:
- No Glare or Reflections: The lenses should not reflect any light.
- Frames Must Not Obstruct: The frames should not cover any part of your eyes.
- No Shadows: There should be no shadows on your face or eyes caused by the glasses.
1.3. What Types Of Glasses Are Never Allowed In Passport Photos?
Sunglasses and tinted glasses are strictly prohibited in passport photos, regardless of medical reasons.
Sunglasses or tinted glasses are a definite no-go. The U.S. Department of State explicitly forbids these types of glasses because they obscure the eyes and make identification difficult. Even if you have a medical condition that makes you sensitive to light, you’ll need to remove tinted lenses for the photo and provide the necessary medical documentation for wearing standard glasses.
2. How Do I Ensure My Passport Photo Is Accepted If I Wear Glasses?
To ensure your passport photo is accepted when wearing glasses, follow strict guidelines: no glare, clear visibility of eyes, and a doctor’s note if required.
Even with proper documentation, there are a few key steps you can take to increase the likelihood of your photo being accepted:
- Professional Photographer: Consider visiting a professional photographer who is experienced in taking passport photos. They’ll know how to handle lighting and positioning to minimize glare and shadows.
- Check the Photo: Before submitting your application, carefully review the photo to ensure it meets all requirements. Ask someone else to take a look too, as a fresh pair of eyes might spot something you missed.
- Use a Recent Photo: Make sure the photo was taken within the last six months. This ensures that it accurately represents your current appearance.
2.1. What Are The Key Things To Avoid When Wearing Glasses In A Passport Photo?
Avoid glare, tinted lenses, thick frames, and shadows. Ensure your eyes are completely visible.
According to Popular Photography magazine, avoiding certain pitfalls can significantly increase your chances of approval. Here’s a quick rundown of what to steer clear of:
- Glare: This is the most common reason for rejection. Ensure the lenses are clean and the lighting is soft and diffused to minimize reflections.
- Tinted Lenses: As mentioned earlier, tinted lenses are not allowed.
- Thick Frames: Bulky frames can obscure your eyes, so opt for thinner frames if possible.
- Shadows: Make sure there are no shadows on your face or around your eyes. Proper lighting is essential.
2.2. How Should The Lighting Be When Taking A Passport Photo With Glasses?
Lighting should be soft, even, and without harsh shadows. Natural light is best, but avoid direct sunlight.
Proper lighting is critical for an acceptable passport photo. The goal is to have even illumination across your face without any harsh shadows. Direct sunlight can cause squinting and harsh shadows, so it’s best to avoid it. Instead, opt for a spot near a window where you can get soft, natural light. If natural light isn’t available, use artificial lighting that is diffused and not too bright.
2.3. What Kind Of Frames Are Best To Wear (If Necessary) For A Passport Photo?
Thin frames are preferable to thick frames. Ensure they do not cover any part of your eyes.
If you must wear glasses, choosing the right frames can make a big difference. Thinner frames are less likely to obstruct your eyes compared to thicker, bulkier frames. Ensure that the frames sit comfortably on your face and do not cover any part of your eyes, including the eyebrows. The goal is to have as much of your face visible as possible.
3. What Are The General Requirements For A U.S. Passport Photo?
General requirements for a U.S. passport photo include size, background, expression, and quality. The photo must be 2×2 inches, against a plain white or off-white background, with a neutral expression.
Beyond the specifics of wearing glasses, several general requirements apply to all U.S. passport photos. These requirements are in place to ensure that the photo accurately represents your identity and can be used for official identification purposes.
3.1. What Size Should A U.S. Passport Photo Be?
A U.S. passport photo must be 2×2 inches (51×51 mm). The head must be between 1 inch and 1 3/8 inches (25 mm – 35 mm) from the bottom of the chin to the top of the head.
The size of the photo is strictly regulated. The U.S. Department of State requires that the photo be 2×2 inches (51×51 mm). Additionally, there are specific measurements for the head size. The distance from the bottom of your chin to the top of your head should be between 1 inch and 1 3/8 inches (25 mm – 35 mm).
3.2. What Background Is Required For A Passport Photo?
The background must be plain white or off-white. It should be free of patterns or shadows.
The background of your passport photo should be plain white or off-white. This helps to ensure that your face is the main focus of the photo and that there are no distracting elements. Make sure the background is free of patterns, shadows, or any other objects. A simple, clean background is essential for an acceptable passport photo.
3.3. What Expression Should I Have In A Passport Photo?
You must have a neutral expression with both eyes open and your mouth closed.
Your facial expression should be neutral. This means no smiling, frowning, or any other exaggerated expressions. Your mouth should be closed, and both eyes should be open and clearly visible. The goal is to present a natural and unaltered representation of your face.
3.4. What About Photo Quality And Resolution?
The photo must be clear, in focus, and unaltered. It should be printed on matte or glossy photo paper.
The quality of your passport photo is paramount. The photo must be clear, in focus, and free of any alterations or enhancements. It should be printed on high-quality matte or glossy photo paper. Avoid using low-resolution images or photos that are blurry or pixelated.
4. Where Can I Get A Passport Photo Taken?
You can get a passport photo taken at pharmacies, post offices, professional photo studios, and online services.
There are several options for getting your passport photo taken. Each has its own advantages and disadvantages, so it’s essential to choose the one that best suits your needs.
4.1. What Are The Pros And Cons Of Using A Pharmacy Or Post Office?
Pharmacies and post offices offer convenience but may lack expertise. Pros include accessibility and standardized service. Cons may include less experienced staff and basic equipment.
Pharmacies like CVS and Walgreens, and post offices often offer passport photo services. The main advantage is convenience, as these locations are typically easy to find and accessible. The staff will generally be familiar with the basic requirements for passport photos. However, the expertise and equipment may be limited compared to a professional photo studio.
4.2. What Are The Pros And Cons Of Using A Professional Photo Studio?
Professional photo studios offer expertise and high-quality photos but can be more expensive. Pros include experienced photographers and professional equipment. Cons may include higher cost and the need to book an appointment.
A professional photo studio is a great option if you want to ensure the highest quality passport photo. Professional photographers have the expertise and equipment to handle lighting, composition, and other factors that can affect the outcome. However, this option is typically more expensive than using a pharmacy or post office.
4.3. What Are The Pros And Cons Of Using An Online Passport Photo Service?
Online passport photo services offer convenience and affordability but require a good camera and careful adherence to guidelines. Pros include low cost and the ability to take the photo at home. Cons may include the need for a good camera and careful attention to detail.
Online passport photo services have become increasingly popular in recent years. These services allow you to take a photo at home using your own device and then upload it to their website. They will then review the photo, make any necessary adjustments, and print it according to the required specifications. This option can be very convenient and affordable, but it requires a good camera and careful adherence to the guidelines.
5. What Happens If My Passport Photo Is Rejected?
If your passport photo is rejected, you will need to retake it and resubmit it. Review the rejection reasons carefully and address them.
It can be frustrating to have your passport photo rejected, but it’s important to address the issue promptly. If your photo is rejected, the agency will provide you with a reason for the rejection. Carefully review this reason and take steps to correct the issue when you retake the photo.
5.1. What Are Common Reasons For Passport Photo Rejection?
Common reasons for rejection include poor quality, incorrect size, wrong background, glasses issues, and improper expression.
According to the U.S. Department of State, here are some of the most common reasons for passport photo rejection:
- Poor Quality: The photo is blurry, pixelated, or too dark.
- Incorrect Size: The photo is not 2×2 inches, or the head size is not within the required range.
- Wrong Background: The background is not plain white or off-white, or it contains patterns or shadows.
- Glasses Issues: The glasses cause glare, cover the eyes, or are tinted.
- Improper Expression: The person is smiling, frowning, or has their mouth open.
5.2. How Can I Avoid Passport Photo Rejection?
To avoid rejection, follow all guidelines carefully. Double-check the photo before submitting it.
The best way to avoid passport photo rejection is to follow all the guidelines carefully and double-check the photo before submitting it. Here are some additional tips:
- Read the Instructions: Thoroughly read and understand the instructions provided by the U.S. Department of State.
- Use a Checklist: Create a checklist of all the requirements and use it to review your photo.
- Get Feedback: Ask a friend or family member to review the photo and provide feedback.
- Take Multiple Photos: Take multiple photos and choose the best one.
- Use Professional Services: Consider using a professional photographer or online passport photo service.
5.3. What Do I Do If I Need To Retake My Passport Photo?
If you need to retake your passport photo, address the rejection reasons, take a new photo, and resubmit your application.
If your passport photo is rejected, don’t panic. Simply address the reasons for the rejection and take a new photo. Make sure to follow all the guidelines carefully and double-check the photo before resubmitting your application. If you’re unsure about anything, consider seeking help from a professional photographer or online passport photo service.
6. Passport Photo Requirements For Babies And Children
Passport photo requirements for babies and children differ slightly. Children must be alone in the photo. Babies under one year do not need to have their eyes open.
Taking passport photos of babies and young children can be challenging, but there are some specific rules to make the process easier.
6.1. Do Babies And Children Need To Have Their Eyes Open?
Babies under one year old do not need to have their eyes open. Children older than one year should have their eyes open.
One of the most significant differences is that babies under one year old do not need to have their eyes open. This makes it easier to capture an acceptable photo of a newborn. However, children older than one year should have their eyes open.
6.2. Can I Hold My Baby During The Photo?
You can support a baby’s head, but your hand must not be visible.
When taking a passport photo of a baby, you can support their head with your hand, but your hand must not be visible in the photo. This can be achieved by placing your hand behind the baby’s head or using a prop to support their head.
6.3. Can Babies Be Lying Down For Their Passport Photo?
Yes, babies under one can lie on a plain, light-colored sheet. Take the photo from above.
Babies under one year old can lie on a plain, light-colored sheet for their passport photo. Take the photo from above to ensure that the baby’s entire face is visible. Make sure the sheet is free of patterns or shadows.
7. How To Take A Passport Photo At Home
Taking a passport photo at home is possible with good lighting, a plain background, and a high-quality camera.
Taking a passport photo at home can be a convenient and cost-effective option, but it requires careful attention to detail.
7.1. What Equipment Do I Need To Take A Passport Photo At Home?
You need a high-quality camera, good lighting, a plain white background, and a tripod.
To take a passport photo at home, you’ll need the following equipment:
- High-Quality Camera: Use a digital camera or smartphone with a high-resolution camera.
- Good Lighting: Ensure you have soft, even lighting. Natural light is best, but avoid direct sunlight.
- Plain White Background: Use a plain white sheet or wall as a background.
- Tripod: A tripod can help to keep the camera steady and ensure that the photo is in focus.
7.2. What Are The Steps For Taking A Passport Photo At Home?
Steps include setting up the background, positioning the subject, taking the photo, and editing it.
Here are the steps for taking a passport photo at home:
- Set Up the Background: Set up a plain white sheet or wall as a background.
- Position the Subject: Position the person in front of the background and ensure they are facing the camera.
- Adjust the Lighting: Adjust the lighting to ensure it is soft and even.
- Take the Photo: Take the photo and ensure it is clear, in focus, and meets all the requirements.
- Edit the Photo: Use a photo editing tool to crop the photo to the correct size and make any necessary adjustments.
7.3. How Can I Ensure My Home-Taken Passport Photo Is Accepted?
Ensure your home-taken photo meets all official requirements. Use a checklist and get feedback.
To ensure your home-taken passport photo is accepted, follow these tips:
- Use a Checklist: Create a checklist of all the requirements and use it to review your photo.
- Get Feedback: Ask a friend or family member to review the photo and provide feedback.
- Take Multiple Photos: Take multiple photos and choose the best one.
- Use Professional Services: Consider using an online passport photo service to review and print your photo.
8. How To Properly Crop A Passport Photo
Properly cropping a passport photo involves ensuring the correct size and head dimensions.
Cropping a passport photo to the correct size and dimensions is crucial for acceptance. Here’s how to do it properly.
8.1. What Are The Size Requirements For Cropping?
The photo must be 2×2 inches. The head must be between 1 inch and 1 3/8 inches from the bottom of the chin to the top of the head.
The first step is to ensure that the photo is 2×2 inches. Then, measure the distance from the bottom of the chin to the top of the head. This distance should be between 1 inch and 1 3/8 inches.
8.2. What Tools Can I Use To Crop My Passport Photo?
You can use online tools, photo editing software, or professional services to crop your photo.
There are several tools you can use to crop your passport photo:
- Online Tools: Many websites offer free passport photo cropping tools.
- Photo Editing Software: Programs like Adobe Photoshop or GIMP can be used to crop the photo.
- Professional Services: Online passport photo services will crop the photo for you.
8.3. What Are Common Mistakes To Avoid When Cropping?
Avoid incorrect size, wrong head dimensions, and cutting off part of the head.
Common mistakes to avoid when cropping include:
- Incorrect Size: Ensure the photo is exactly 2×2 inches.
- Wrong Head Dimensions: Make sure the head size is within the required range.
- Cutting Off Part of the Head: Do not cut off any part of the head, including the hair.
9. Understanding Glare And Reflections In Passport Photos
Glare and reflections are common issues in passport photos, especially when wearing glasses. Proper lighting and lens cleaning can help.
Glare and reflections can cause a passport photo to be rejected, so it’s essential to understand how to avoid them.
9.1. What Causes Glare And Reflections In Glasses?
Glare and reflections are caused by light bouncing off the surface of the lenses.
Glare and reflections occur when light bounces off the surface of the lenses and into the camera. This can obscure the eyes and make it difficult to identify the person in the photo.
9.2. How Can I Minimize Glare And Reflections?
To minimize glare and reflections, use soft, diffused lighting and clean the lenses.
Here are some tips for minimizing glare and reflections:
- Use Soft, Diffused Lighting: Avoid direct sunlight and use soft, diffused lighting.
- Clean the Lenses: Clean the lenses thoroughly to remove any smudges or dirt.
- Adjust the Angle: Adjust the angle of the glasses to minimize reflections.
- Tilt Your Head: Tilt your head slightly to reduce the amount of light reflecting off the lenses.
9.3. What Are The Best Lighting Techniques To Avoid Glare?
The best lighting techniques involve using soft, diffused light from multiple sources.
The best lighting techniques for avoiding glare involve using soft, diffused light from multiple sources. This can be achieved by using multiple lamps with shades or by using natural light from a window. Avoid using direct sunlight or harsh artificial lighting.
10. Exploring Visual Storytelling And Passport Photos
While passport photos are primarily for identification, understanding visual storytelling can improve the photo’s overall quality.
While passport photos are mainly for identification purposes, understanding the basics of visual storytelling can help you capture a better photo.
10.1. How Can Composition Improve A Passport Photo?
Composition can improve a passport photo by ensuring the subject is centered and well-lit.
While creativity is limited in passport photos, basic composition techniques can help. Ensure the subject is centered in the frame and that the lighting is even and flattering. This can help to create a more visually appealing photo.
10.2. What Role Does Lighting Play In Visual Storytelling?
Lighting can enhance the photo by creating a sense of depth and highlighting key features.
Lighting plays a crucial role in visual storytelling. In the context of a passport photo, proper lighting can enhance the photo by creating a sense of depth and highlighting key features. Soft, even lighting is best for passport photos.
10.3. How Can Color Theory Be Applied To Passport Photos?
Color theory can be applied by ensuring the background is neutral and the subject’s clothing is appropriate.
While color is limited in passport photos, understanding the basics of color theory can help. Ensure that the background is neutral and that the subject’s clothing is appropriate. Avoid wearing bright or distracting colors that could detract from the face.
FAQ: Frequently Asked Questions About Glasses and Passport Photos
1. Can I wear my glasses in my passport photo if I have a prescription?
Generally, it’s best to remove your glasses for a passport photo. However, if you have a medical reason and provide a doctor’s note, you may be able to wear them, provided there’s no glare and your eyes are fully visible.
2. What happens if my glasses cause glare in my passport photo?
If your glasses cause glare, the photo will likely be rejected. Ensure there is no glare by adjusting the lighting and cleaning the lenses. If necessary, remove the glasses altogether.
3. Is it okay to wear tinted glasses in a passport photo if I have light sensitivity?
No, tinted glasses are not allowed in passport photos, regardless of light sensitivity. You must remove them for the photo.
4. What kind of frames are best if I must wear glasses in my passport photo?
Thin frames are preferable. Ensure they do not cover any part of your eyes.
5. What should I do if I can’t avoid wearing glasses due to a medical condition?
Provide a signed statement from a doctor explaining why you need to wear glasses and confirming that you cannot remove them for the photo.
6. Can I take my passport photo at home if I wear glasses?
Yes, but it’s crucial to ensure there is no glare and your eyes are fully visible. Follow all official guidelines carefully.
7. What are the common reasons for passport photo rejection related to glasses?
Common reasons include glare, tinted lenses, frames covering the eyes, and shadows.
8. How should the lighting be when taking a passport photo with glasses?
Lighting should be soft, even, and without harsh shadows. Natural light is best, but avoid direct sunlight.
9. Do children have to follow the same rules for glasses in passport photos?
Yes, the same rules apply to children. If they must wear glasses, ensure there is no glare and their eyes are fully visible.
10. Where can I get help with taking a passport photo that meets all the requirements?
You can get help from professional photo studios, online passport photo services, or by consulting official guidelines from the U.S. Department of State.
Navigating the rules for passport photos, especially regarding glasses, can be complex, but following these guidelines will increase your chances of approval. Remember to check the latest requirements on the U.S. Department of State website before taking your photo.
For more inspiration, expert tips, and a vibrant community, visit dfphoto.net. Explore our extensive collection of stunning photographs, in-depth tutorials, and gear reviews to elevate your photographic journey. Whether you’re a beginner or a seasoned pro, dfphoto.net is your ultimate resource for all things photography. Join our community today and start creating unforgettable images.
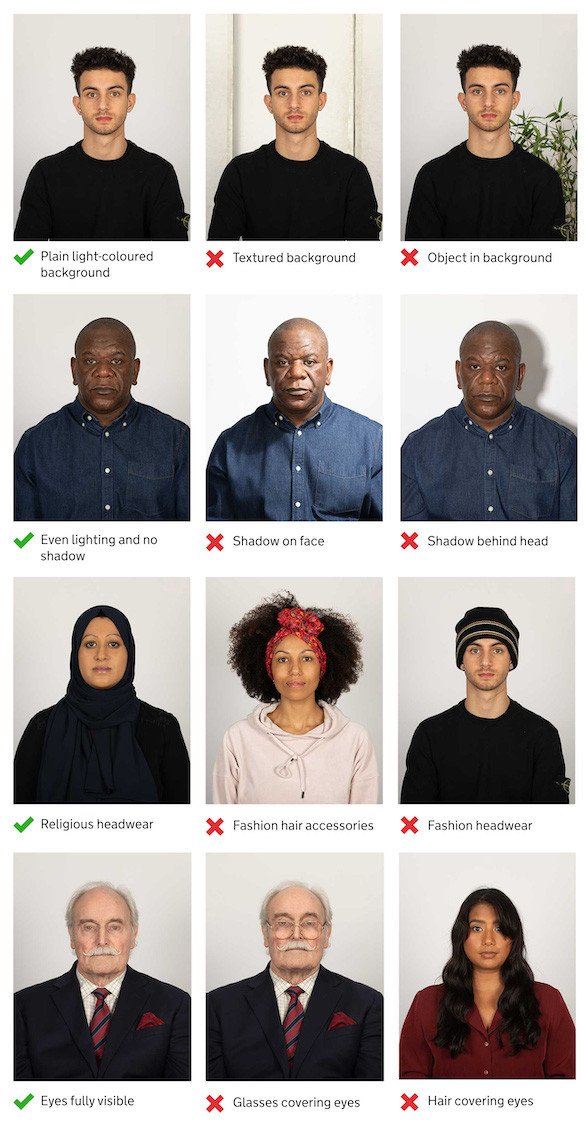 Adult passport photo guidance demonstrating correct positioning and expression
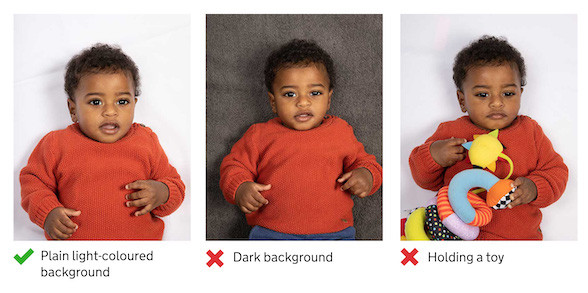 Child passport photo guidance showing how to photograph a baby lying down
Ready to take your photography skills to the next level? Visit dfphoto.net today to discover a world of inspiration, expert guidance, and a supportive community. Explore our extensive library of tutorials, gear reviews, and stunning photo galleries. Connect with fellow photographers, share your work, and get valuable feedback. Don’t wait—start your journey towards photographic excellence now!
Address: 1600 St Michael’s Dr, Santa Fe, NM 87505, United States.
Phone: +1 (505) 471-6001.
Website: dfphoto.net.