Are you wondering, “Can You Wear A Turtleneck In A Passport Photo?” Here at dfphoto.net, we provide the definitive answer and ensure your photograph adheres to every official guideline, making the application process seamless, and we’re here to help you navigate the nuances of passport photo attire, including those cozy turtlenecks, along with expert tips to avoid rejection. With our guidance, coupled with insights on appropriate clothing and accessory choices, you’ll be well-prepared to submit a passport photo that meets all requirements. Explore image dimension, head size, and background specifications.
1. Understanding US Passport Photo Requirements: A Comprehensive Overview
The requirements for USA passport photos are very specific, and it’s important to know them well to prevent rejection. These requirements cover everything from photo dimensions to apparel. Here is a detailed overview:
- Color: Your passport photo must be in color. Black and white photos will not be accepted.
- Size: The photo must be 2 x 2 inches (51 mm x 51 mm).
- Head Size: Your head must be centered, facing the camera, and measure between 1 and 1 3/8 inches (25-35mm) from chin to crown.
- Visibility: Your head, neck, and the top of your shoulders must be visible, with adequate space between the top of your head and the photo’s upper border.
- Recency: The photo must be taken within the last six months to accurately represent your current appearance.
- Digital Dimensions (for online applications): The photo should be between 600 x 600 pixels (minimum) and 1200 x 1200 pixels (maximum).
- File Format (for online applications): Use JPEG format.
- File Size (for online applications): The file size should be 54kB or greater.
2. Essential Checklist for Passport Photos
To help you prepare, dfphoto.net has put together an essential checklist for passport photos. Going through this checklist before submitting your photo will ensure you meet all the necessary requirements:
- Size and Format:
- The photo should be 2×2 inches (51×51 mm).
- Your face should take up 1 to 1 3/8 inches (25–35 mm) from chin to crown.
- The image must be high-resolution, in color, and printed on matte or glossy photo paper.
- For digital photos, the format must be JPEG, with a minimum size of 54 kB.
- Background and Lighting:
- The background must be plain white or off-white.
- Lighting should be even to avoid overexposure or shadows.
- Ensure there are no visible shadows on the face or background.
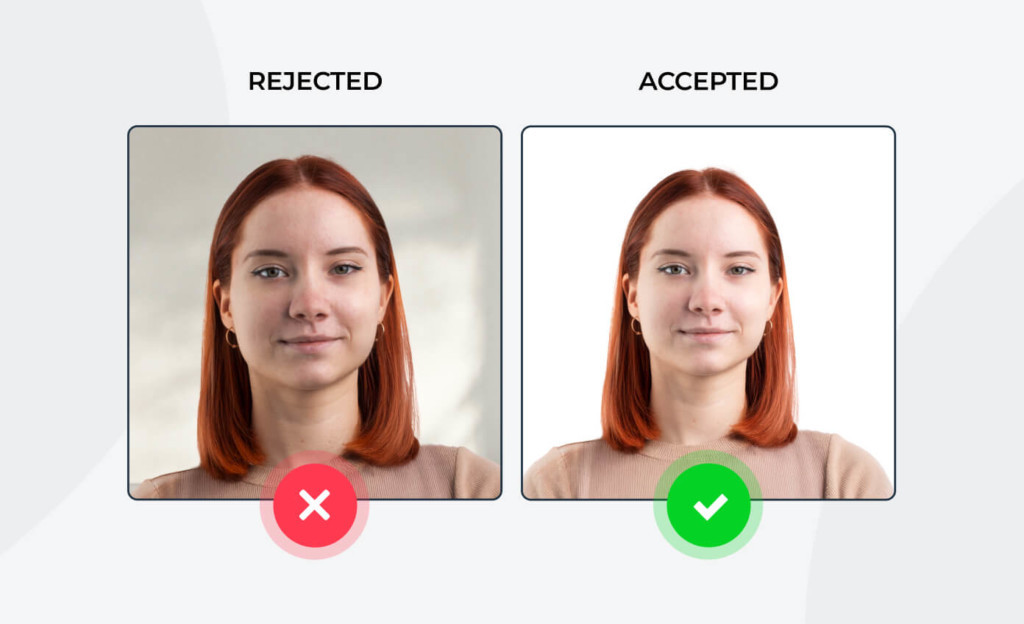 Side-by-side comparison illustrating passport picture requirements, showing an accepted photo with proper lighting and background next to a rejected example with shadows and uneven exposure.
- Pose and Expression:
- Maintain a neutral expression with both eyes open and your mouth closed.
- A slight smile is permitted, but avoid showing your teeth.
- Your head must be centered and facing forward.
- Attire and Accessories:
- Wear everyday clothing, avoiding uniforms or camouflage patterns.
- Hats or head coverings are not allowed unless worn for religious or medical reasons.
- Jewelry and piercings are acceptable if they do not obscure the face.
- Necklaces should not cause glare or shadows; avoid bulky pieces.
- Earrings are acceptable if they do not hide the face or cause glare.
- Hair:
- Hair should not obscure the face.
- Bangs should not cover the eyes or eyebrows.
- Beards are acceptable if they are a natural part of your look.
- Ears do not need to be visible as long as the face is clearly visible.
- Makeup:
- Avoid reflective or excessive makeup that may alter natural facial features.
- Do not use contouring, avoid lip liners, and do not wear fake eyelashes.
- Avoid glossy and shimmery products.
- Avoid dark and bold colors.
- Glasses:
- Glasses are generally not allowed, including corrective eyewear, unless there’s a medical reason supported by a doctor’s statement.
- Quality:
- The image should be sharp and clear, with no blurring or pixelation.
- There should be no digital editing that alters the natural appearance.
3. Can You Wear A Turtleneck In A Passport Photo?
The short answer is: It is generally not recommended to wear a turtleneck in a passport photo. While the official guidelines don’t explicitly prohibit turtlenecks, the concern lies in whether the clothing item obscures or casts shadows on your neck or face.
Here’s a more detailed explanation:
- Visibility: Passport photo requirements emphasize that your face and neck must be fully visible. A turtleneck, especially one with a high or bulky collar, might cover part of your neck.
- Shadows: Depending on the thickness and fit of the turtleneck, it could potentially cast shadows on your face, which is not permitted.
- Best Practice: To avoid any potential issues, it’s best to wear a crew neck, v-neck, or button-down shirt that clearly displays your neck and ensures no shadows are cast on your face.
4. Decoding the Passport Photo Dress Code
Navigating the world of passport photo dress codes can seem like walking through a fashion minefield. While the regulations aren’t as strict as a black-tie event, understanding the nuances can save you from rejection and the hassle of retakes. Here’s a closer look at what to wear—and what to avoid—in your passport photo, ensuring you present your best self while adhering to official guidelines.
4.1. Essential Clothing Guidelines
- Everyday Attire: Stick to everyday clothing that reflects your usual appearance. This helps ensure that the photo accurately represents you.
- Avoiding Uniforms: Uniforms, including those for work or school, are generally not allowed. The goal is to present you in your regular, civilian attire.
- No Camouflage: Similar to uniforms, camouflage patterns should be avoided as they can obscure your appearance.
- Necklines: Opt for necklines that clearly show your neck and collarbone area. Crew necks, V-necks, or button-down shirts are excellent choices.
4.2. Head Coverings: Exceptions and Rules
- Religious Headwear: Head coverings worn daily for religious reasons are permitted. Ensure that the head covering does not obscure any part of your face.
- Medical Headwear: Head coverings worn for medical reasons are also allowed, provided they do not hide your facial features. A signed doctor’s statement may be required.
- No Hats or Fashion Headwear: Hats, caps, or other fashion headwear are not allowed. The focus must be on your face, unobstructed by any non-essential items.
4.3. Jewelry and Accessories: The Dos and Don’ts
- Acceptable Jewelry: Small, everyday jewelry items like earrings, necklaces, and facial piercings are generally acceptable as long as they do not obscure your face.
- Avoiding Large or Reflective Pieces: Large, flashy jewelry can cause glare or shadows, which are not permitted. Keep it simple and understated.
- Eyeglasses Ban: As of November 1, 2016, eyeglasses are not allowed in passport photos unless you have a medical condition supported by a doctor’s note. This includes prescription glasses, reading glasses, and tinted lenses.
4.4. Makeup: Enhancing, Not Altering
- Natural Look: The aim is to look like yourself. Makeup should enhance your features without altering your natural appearance.
- Avoiding Excessive Makeup: Heavy makeup, contouring, and dramatic colors can distort your features and lead to rejection.
- No Reflective Products: Avoid using makeup with shimmer, glitter, or high-shine finishes as they can cause glare.
4.5. Tattoos and Piercings
- Visible Tattoos: Tattoos that are visible on your face or neck are generally acceptable as long as they are a permanent part of your appearance.
- Facial Piercings: Facial piercings are allowed, but ensure they do not obscure your facial features or cause excessive glare. You may need to adjust or remove certain pieces if they interfere with clear visibility.
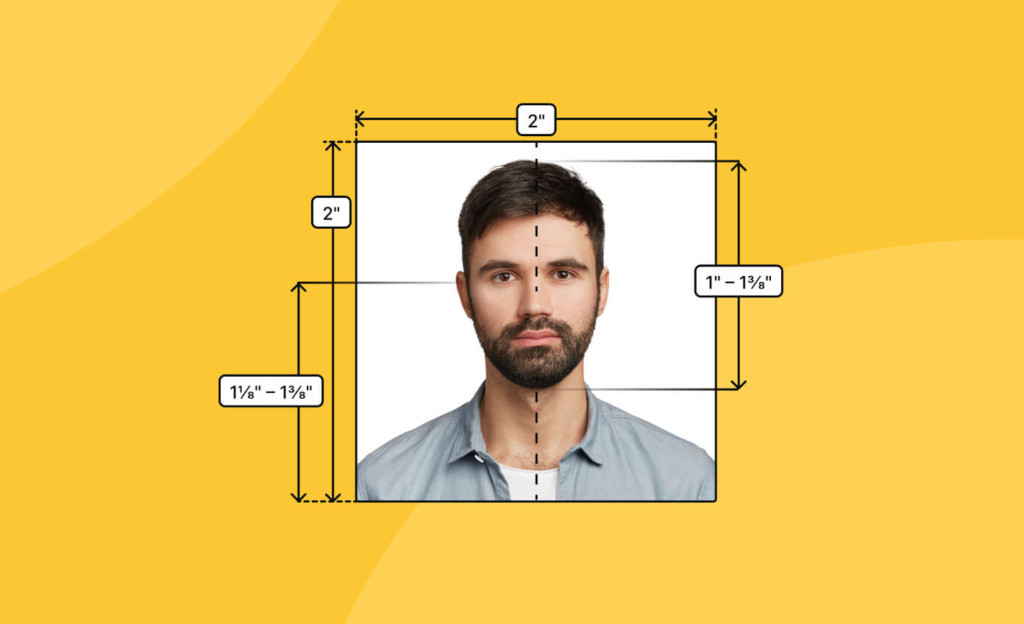 Clear visual guide illustrating US passport photo requirements, showing a person’s head centered within a 2×2 inch frame with precise measurements for eye level and face height.
5. Why Is Clothing Important in a Passport Photo?
While it might seem minor, your attire in a passport photo plays a significant role in meeting the official requirements. Here’s why:
- Visibility: The main goal is to ensure that your face and neck are clearly visible. Clothing that covers these areas can lead to rejection.
- Accuracy: Your clothing should reflect your everyday appearance. Wearing something drastically different from your usual style can raise questions.
- Professionalism: Although it’s not a formal portrait, a neat and appropriate outfit helps convey professionalism and respect for the application process.
6. Common Mistakes to Avoid in Passport Photos
To make sure your passport photo is accepted, be aware of these common mistakes:
- Poor Lighting: Shadows on your face or in the background are a common reason for rejection. Ensure even lighting.
- Incorrect Background: The background must be plain white or off-white. Avoid patterned or colored backgrounds.
- Obstructed Face: Hair, hats, or clothing that covers any part of your face can lead to rejection.
- Digital Alterations: Do not digitally alter your photo. This includes removing blemishes, changing the background, or adjusting facial features.
- Incorrect Size: Ensure your photo is exactly 2×2 inches (51×51 mm) with the correct head size.
- Wearing Glasses: Unless medically necessary with a doctor’s note, glasses are not allowed.
- Using Old Photos: The photo must be taken within the last six months to accurately represent your current appearance.
- Smiling Too Much: While a slight smile is permitted, avoid showing your teeth.
7. Step-by-Step Guide to Taking a Compliant Passport Photo
Taking a passport photo that meets all the requirements can be straightforward if you follow these steps:
- Prepare: Understand all the requirements and guidelines. Make sure you have a plain white or off-white background and access to good lighting.
- Dress Appropriately: Choose an outfit that shows your neck and doesn’t cast shadows on your face. Avoid turtlenecks and uniforms.
- Set Up Your Background: Use a plain white wall or hang a white sheet. Ensure there are no shadows.
- Lighting: Use natural light if possible. Avoid direct sunlight, which can cause harsh shadows. If using artificial light, ensure it is evenly distributed.
- Pose: Stand or sit straight, facing the camera directly. Keep your head level and your expression neutral.
- Take the Photo: Use a high-resolution camera or smartphone. Take multiple shots to ensure you have a good one to choose from.
- Review and Adjust: Check the photo against the checklist. Ensure your face is fully visible, the background is plain, and the lighting is even.
- Crop and Size: Use a passport photo tool to crop and size the photo to 2×2 inches (51×51 mm).
- Print (if needed): Print the photo on matte or glossy photo paper. Ensure there are no blemishes or creases.
8. Expert Tips for a Perfect Passport Photo
Here are some additional tips from dfphoto.net to help you capture the perfect passport photo:
- Use a Friend: Have a friend or family member take the photo for you. This can help ensure you are posing correctly and the photo meets all requirements.
- Practice Your Pose: Practice your pose in front of a mirror. This can help you find a natural, neutral expression.
- Check the Lighting: Pay close attention to the lighting. Soft, even lighting is best. Avoid harsh shadows or overexposure.
- Use Online Tools: Utilize online passport photo tools to check compliance and crop the photo correctly.
- Review Examples: Look at examples of accepted and rejected passport photos to understand the requirements better.
- Consider Professional Services: If you are unsure, consider using a professional passport photo service to ensure compliance.
9. The Impact of Hairstyle and Accessories
Your hairstyle and accessories can significantly affect whether your passport photo meets the required standards. Here’s how to ensure they work in your favor:
9.1. Hairstyle Guidelines
- Keep Hair Away from Face: Your hair should not obscure your face. Ensure that your forehead, eyes, and eyebrows are fully visible.
- Avoid Covering Eyes: Bangs or fringes should not cover your eyes. If necessary, use hairpins to keep your hair in place.
- Volume and Height: While some volume is acceptable, avoid hairstyles that add excessive height, as this can distort your head size in relation to the photo.
9.2. Accessory Guidelines
- Minimal Jewelry: Keep jewelry to a minimum. Small earrings and necklaces are generally acceptable, but avoid anything large or reflective.
- No Headbands or Hair Accessories: Headbands, decorative hair clips, and other accessories are not allowed unless they are worn daily for religious or medical reasons.
- Religious Headwear: If you wear a head covering for religious reasons, ensure it does not obscure your face. The forehead, eyes, nose, and mouth must be clearly visible.
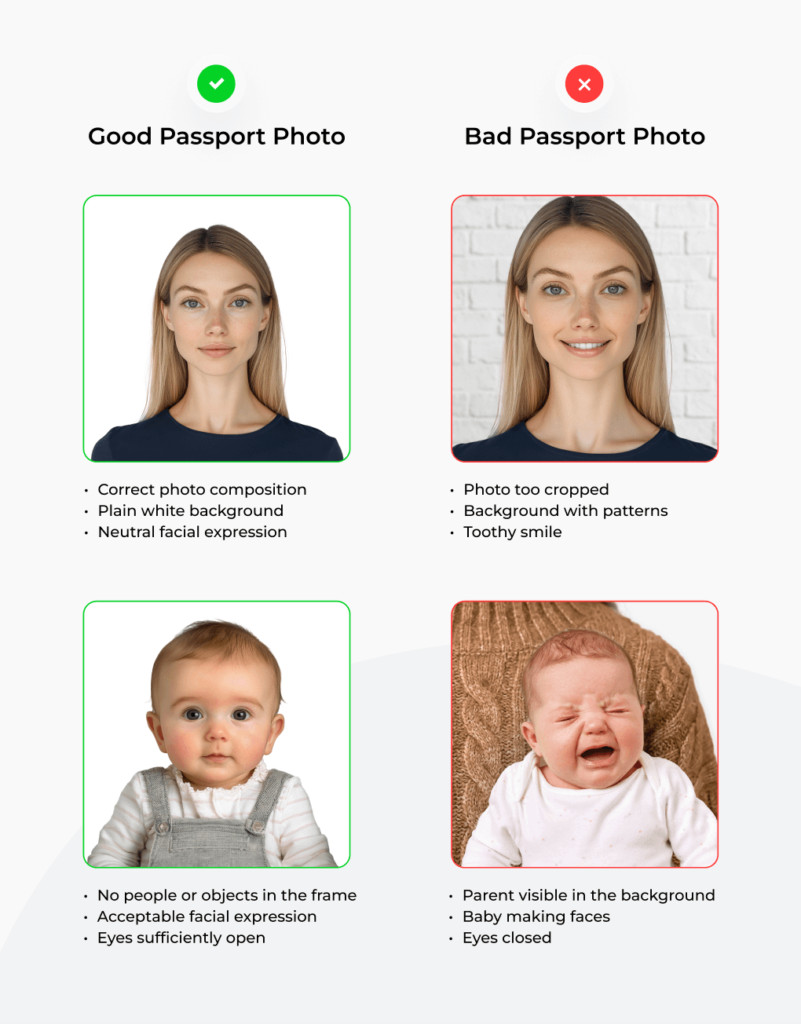 Good and bad passport photo examples based on the official US passport photo requirements.
10. Baby Passport Photo Requirements
Taking a passport photo of a baby or infant requires extra care and attention. Here are the key differences and considerations:
- Eyes Open: Newborns and infants may have their eyes partially open or closed.
- Mouth Open: Babies can have their mouths open in the photo.
- No Objects: Pacifiers and other objects are not allowed.
- Support: Hands and arms can be present in the photo as long as they are not covering the baby’s face and are below the shoulders.
- Solo Photo: Only the child may be present in the photo. Other people cannot be seen holding them up.
- Facing the Camera: The baby must be facing the camera directly.
Tips for Success:
- Timing: Choose a time when the baby is well-rested and content.
- Assistance: Have someone assist you in holding the baby and keeping them still.
- Background: Use a plain white sheet or blanket as the background.
- Lighting: Ensure even lighting without shadows.
- Multiple Shots: Take multiple photos to increase your chances of getting a good one.
11. Harnessing dfphoto.net for Passport Perfection
At dfphoto.net, we understand the challenges of capturing the perfect passport photo. That’s why we provide a wealth of resources to guide you through every step of the process:
- Detailed Guides: Access comprehensive articles and tutorials on passport photo requirements, clothing guidelines, and common mistakes to avoid.
- Expert Tips: Benefit from expert tips and advice on lighting, posing, and composition to help you achieve professional-quality results.
- Community Support: Join our vibrant community forum to ask questions, share experiences, and receive feedback from fellow photographers and travelers.
- Service Provider Directory: Connect with trusted local photographers and passport photo services to ensure compliance and convenience.
With dfphoto.net, you can confidently navigate the complexities of passport photos and ensure your application process is smooth and successful.
12. The Future of Passport Photography: Innovations and Trends
As technology continues to evolve, so does the landscape of passport photography. Here are some emerging trends and innovations to watch for:
- AI-Powered Compliance Tools: Artificial intelligence (AI) is being used to analyze passport photos in real-time, ensuring they meet all official requirements. These tools can detect issues with lighting, background, and facial features, providing instant feedback and guidance.
- Mobile Passport Photo Apps: Smartphone apps are making it easier than ever to take compliant passport photos from the comfort of your own home. These apps often include features such as cropping tools, background removal, and automated compliance checks.
- Biometric Identification: Biometric technology is becoming increasingly integrated into passport systems, allowing for faster and more secure identity verification. This includes facial recognition, iris scanning, and fingerprinting.
- Digital Passports: Some countries are exploring the use of digital passports stored on smartphones or other electronic devices. This could streamline the application process and reduce the risk of fraud.
- Enhanced Security Features: Passport photos are incorporating advanced security features such as holograms, microprinting, and UV inks to prevent counterfeiting and tampering.
These innovations promise to make passport photography more accessible, efficient, and secure in the years to come.
13. Submitting Passport Photos Online
Submitting passport photos online is convenient, but it requires adherence to specific digital requirements:
- Image Dimensions: The photo must be between 600×600 pixels (minimum) and 1200×1200 pixels (maximum).
- File Size: Ensure your image is a JPEG file sized 240 kB or less.
- Compression: If you compress the file, the compression ratio should be 20:1 or less.
- No Scans: Do not scan printed photos for online submission.
The MyTravelGov tool will crop the photo and perform an initial quality check. If your photo is rejected, an error code will be generated. However, the tool isn’t always accurate, so a passport agent will manually verify the image.
Common rejection reasons include incorrect file format, size, and quality.
14. Attaching Printed Passport Photos
When renewing your passport via mail or applying for the first time, you must submit a passport-style photo printed on high-quality matte or glossy photographic paper.
Ensure your printouts are impeccable, with no creases, ink marks, bends, smudges, or cuts.
For mail renewals, staple one 2 x 2-inch photo to Form DS-82 at four designated points. Do not use glue or sticky tape.
15. Frequently Asked Questions About Passport Photos
Navigating the intricacies of passport photo requirements can often leave applicants with numerous questions. Here, we address some of the most frequently asked questions to provide clear and concise answers, ensuring a smooth and stress-free application process.
15.1. Can you smile in a passport photo?
- Yes, a slight smile is permitted, but it should be natural and not show your teeth. A neutral expression is always a safe bet.
15.2. Do you have to show your ears in a passport photo?
- No, your ears do not need to be visible as long as the oval of your face is not obscured. Hair can cover your ears.
15.3. Can you wear makeup in a passport photo?
- Yes, but keep it natural. Avoid excessive or reflective makeup that alters your natural features.
15.4. Can you wear glasses in a passport photo?
- Generally, no. Glasses are not allowed unless you have a medical condition supported by a doctor’s note.
15.5. What color shirt should you wear for a passport photo?
- There are no specific color requirements. Wear everyday clothing that is comfortable and reflects your usual appearance. Avoid uniforms or camouflage patterns.
15.6. Can you wear a hat or head covering in a passport photo?
- No, unless worn daily for religious or medical reasons. Even then, the head covering must not obscure your face.
15.7. How often do passport photos get rejected?
- Passport photos can be rejected for various reasons, including poor lighting, incorrect background, obstructed face, and digital alterations. Following the guidelines carefully can minimize the risk of rejection.
15.8. Can I take my passport photo with my phone?
- Yes, you can take your passport photo with your phone, provided it meets all the requirements for size, quality, and background. Use a high-resolution camera and ensure proper lighting.
15.9. Where can I get a passport photo taken?
- You can get a passport photo taken at various locations, including pharmacies, photo studios, and online passport photo services. Ensure the service you choose is familiar with the latest requirements.
15.10. How long is a passport photo valid?
- A passport photo must be taken within the last six months to accurately represent your current appearance.
16. Final Thoughts
While a turtleneck might seem like a cozy choice, it’s best to avoid it for your passport photo to ensure compliance with visibility and shadow requirements. Opt for a simple shirt that clearly displays your neck. Follow our tips on dfphoto.net for a seamless passport application process!
FAQ: Additional Questions Answered
Can you wear a turtleneck in a passport photo?
Turtlenecks aren’t recommended for a passport photo. The applicant’s face and neck must be visible, and this clothing can obscure part of them. It’s better to opt for a simple shirt or even a T-shirt.
Do your ears have to show in a passport photo?
A US passport photo must be a close-up of your entire head and the top of your shoulders. Your face, eyes, and eyebrows must be visible, but your ears don’t need to show.
Ready to take the perfect passport photo? Visit dfphoto.net for detailed guides, expert tips, and a vibrant photography community! Explore our articles on lighting, posing, and attire, and connect with fellow photographers to share your experiences and get inspired. Don’t miss out—visit dfphoto.net today and embark on your journey to photography perfection!
Address: 1600 St Michael’s Dr, Santa Fe, NM 87505, United States
Phone: +1 (505) 471-6001
Website: dfphoto.net