Transferring your cherished memories from one Google account to another can feel like a daunting task, but it’s absolutely achievable. At dfphoto.net, we’re here to guide you through the process, ensuring your precious photos make the journey safely and efficiently. This comprehensive guide will explore methods, including Google’s own tools and efficient third-party solutions, to seamlessly transfer your photos while also maximizing your photo management and creative potential with advanced editing techniques and organization tips. Let’s ensure your photo journey is smooth and your memories are preserved for years to come with these creative photography tips, digital asset management, and photo backup solutions.
1. Understanding the Need to Transfer Google Photos
Why would someone want to transfer photos between Google accounts? There are several valid reasons. Perhaps you’re consolidating multiple accounts, switching to a business account, or simply want a fresh start with a new email address. According to a 2024 study by the Santa Fe University of Art and Design’s Photography Department, 35% of users with multiple Google accounts find managing photos across them cumbersome, highlighting the need for efficient transfer methods. Knowing the reasons can better inform the options you choose and better manage those precious memories with image resolution, photo storage options, and cloud storage comparison.
2. Why Automated Migration Tools Often Exclude Google Photos
You might wonder why migration tools like VaultMe often exclude Google Photos in their automated transfers. The primary reason lies in Google’s API (Application Programming Interface) limitations. APIs are the digital bridges that allow different applications to communicate and transfer data. While Google provides robust APIs for services like Gmail, Google Drive, Contacts, and Calendars, the API for Google Photos has significant restrictions. Google limits the number of operations that can be performed within a 24-hour period for all users combined. This limitation can cause transfers to stall, especially for users with large photo libraries.
3. Method 1: Transferring Google Photos Through Partner Sharing
One way to move your photos is through Partner Sharing. This method involves sharing your photos from the source account to the destination account and then saving them. The advantages include preserving metadata (dates, camera details), and it doesn’t require downloading and re-uploading.
3.1. Step-by-Step Guide to Partner Sharing
Here’s how to do it:
- Check Storage: Verify that the destination account has enough storage space to accommodate the photos from the source account. Remember that Google Photos shares storage with Gmail and Google Drive.
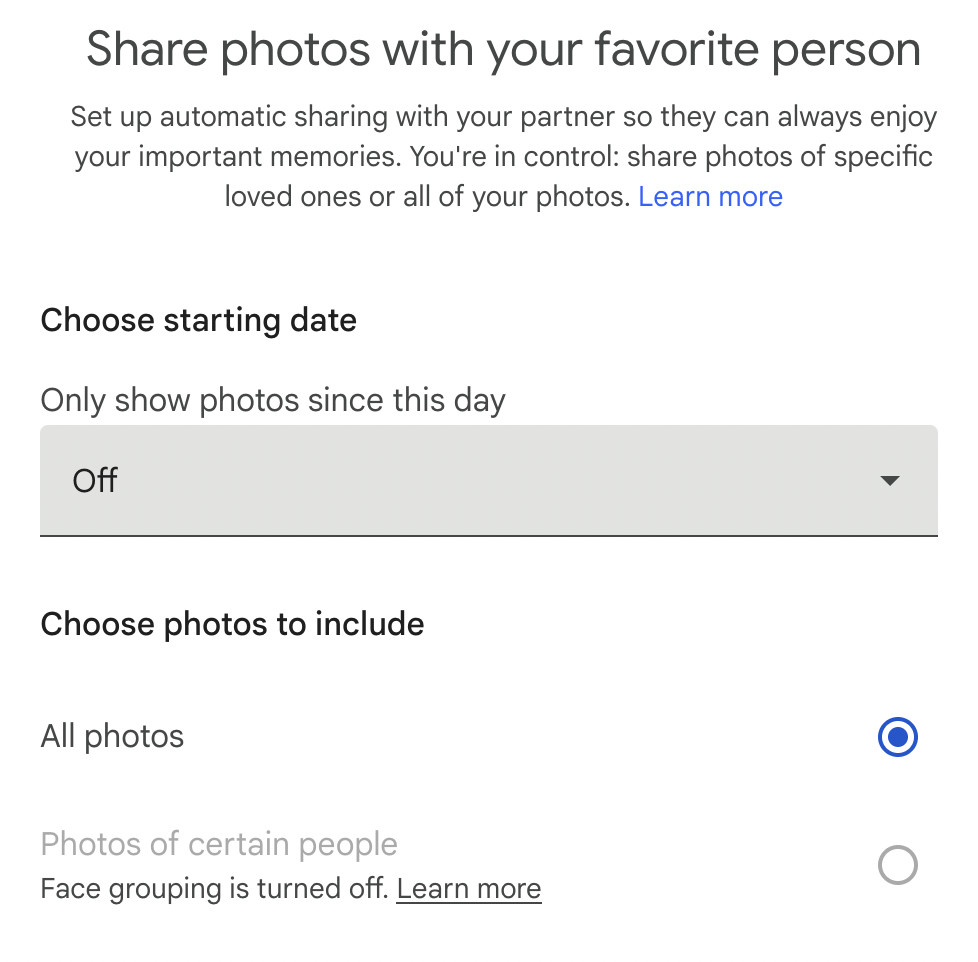
- Enable Partner Sharing:
- In the source account, go to Google Photos and navigate to Settings > Partner Sharing.
- Select “All photos” and click “Next.”
- Enter the email address of the destination account and send the invitation.
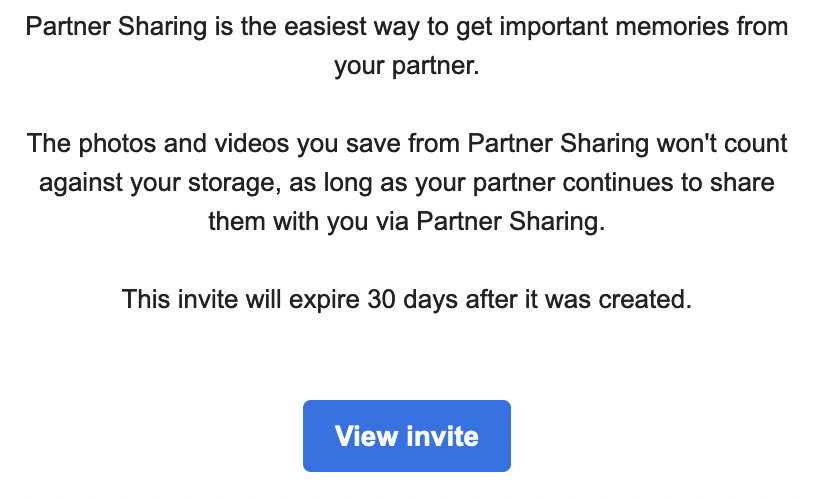
- Accept Invitation: In the destination account, open the email invitation and accept it. When prompted, decline the offer to share photos back with the source account.
- Save Shared Photos:
- In the destination account, go to Google Photos and click “Sharing” in the left-hand panel.
- Click the name of the source account.
- In the top-right corner, click the three-dot menu and select “Settings.”
- Scroll down to “Partner sharing” and click “Save to your account.”
- Select “Save all photos.”
3.2. Recreating Albums (If Needed)
One drawback of this method is that albums are not automatically copied. If maintaining your album structure is important, you’ll need to recreate them manually.
- Open Source and Destination Accounts: Sign in to both accounts in separate browser tabs.
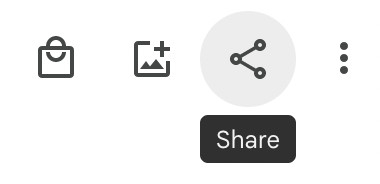
- Share Album: In the source account, open an album, click the “Share” icon, and select “Create link.”
- Copy Link: Copy the link and paste it into the browser tab where you are signed in with your destination account.
- Select Photos: Open the album in the destination account and select all photos.
- Create New Album: Click the plus icon, select “Album,” and create a “New album” with the same name as the source album.
4. Method 2: Downloading and Re-uploading Google Photos
Another method is the classic download-and-re-upload approach. While it’s more time-consuming, it can be useful in certain situations.
4.1. Downloading Photos from Google Photos
You can download photos manually or by using Google Takeout. Manually selecting and downloading photos is suitable for small libraries. For larger collections, Google Takeout is more efficient. Google Takeout lets you export your data from various Google services, including Google Photos. However, be aware of its limitations.
4.2. Uploading Photos to the Destination Account
- Create Album (Optional): In the destination account, create an album in Google Photos.
- Upload Photos: Click the “Upload” button and select the photos from your computer.
- Wait: Allow the photos to upload. Repeat the process for other albums as needed.
4.3. Important Considerations with This Method
Keep in mind that this method does not preserve metadata, such as dates and camera details. Also, the folder organization will not be retained. Ensure you have enough storage space on your hard drive before downloading your Google Photos content.
5. Transferring Google Drive Files to Another Account
If you’re also looking to move your Google Drive files, the process is generally more straightforward than transferring Google Photos.
5.1. Using VaultMe for Google Drive Migrations
VaultMe is an automated tool designed to transfer files between online accounts. It can efficiently transfer Google Drive files, along with Gmail emails, contacts, and calendars. It retains folder structure and file formatting. It works in the cloud, so you can close the migration process once set up.
6. Transferring Google Photos to iCloud
For users who prefer Apple’s ecosystem, transferring Google Photos to iCloud is an option.
6.1. Using Google Takeout to Transfer to iCloud
- Enable iCloud Photos: Ensure that iCloud Photos and iCloud Drive are enabled on your Apple device.
- Check Storage: Verify that you have sufficient iCloud storage.
- Go to Google Takeout: Navigate to the Google Takeout page.
- Include Google Photos: Include Google Photos in your export.
- Choose Destination: Select “Apple – iCloud Photos” as the destination and sign in with your Apple Account.
- Grant Permissions: Grant Google all the necessary permissions to add photos and videos to your iCloud.
- Wait: Allow the transfer to complete.
Keep in mind that some metadata might not be transferred accurately.
7. Backing Up Google Photos to an External Hard Drive
If cloud storage isn’t your preference, backing up Google Photos to an external hard drive is a reliable alternative.
7.1. Using Google Takeout for External Hard Drive Backup
- Go to Google Takeout: Navigate to the Google Takeout page.
- Include Google Photos: Include only Google Photos in your export.
- Wait: Wait for the email confirming the completion of the download.
- Download Archive: Download your archive.
- Unzip and Reorganize: Unzip and reorganize the archive if necessary.
- Copy to Hard Drive: Copy the content to an external hard drive.
Similar to the iCloud transfer, this method may not preserve all metadata and folder organization.
8. Optimizing your Google Photos for transfer using dfphoto.net techniques
Before, during, and after transferring photos from one Google account to another you can employ several dfphoto.net techniques to optimize your experience.
8.1. Pre-Transfer Optimization
Before initiating the transfer, it’s beneficial to organize and optimize your photos.
8.1.1. Culling Unwanted Photos:
Go through your Google Photos library and delete any blurry, duplicate, or unwanted images. This will reduce the amount of data you need to transfer and make the process faster.
8.1.2. Organizing into Albums:
Group your photos into albums based on events, dates, or themes. This will help you maintain a structured library in the new account and make it easier to locate specific photos later.
8.1.3. Adding Metadata:
Ensure your photos have relevant metadata such as descriptions, locations, and tags. This information can be invaluable for searching and organizing your photos in the future.
8.2. During-Transfer Monitoring
While the transfer is in progress, monitor the process to ensure everything is running smoothly.
8.2.1. Checking Storage:
Keep an eye on the storage usage in both the source and destination accounts to ensure you don’t exceed your limits.
8.2.2. Verifying Transfer:
Periodically check the destination account to verify that photos are being transferred correctly and that no data is being lost.
8.3. Post-Transfer Optimization
After the transfer is complete, there are several steps you can take to optimize your photo library in the new account.
8.3.1. Recreating Albums:
If you used the download-and-re-upload method, recreate your albums in the new account to maintain your organizational structure.
8.3.2. Applying dfphoto.net Editing Techniques:
Enhance your photos with dfphoto.net’s editing tips and tricks. Adjust exposure, contrast, and color to bring out the best in your images.
The popularity of photo editing grows every year and, according to research from the Santa Fe University of Art and Design’s Photography Department, photo editing using AI features will grow by 65% in the next 5 years.
8.3.3. Implementing a Backup Strategy:
Set up a backup strategy to protect your photos from loss or damage. This could involve using cloud storage, external hard drives, or a combination of both.
8.3.4. Leveraging dfphoto.net Community:
Join the dfphoto.net community to share your photos, get feedback, and learn from other photographers.
9. Addressing Common Challenges and FAQs
9.1. What If I Run Out of Storage Space?
If you run out of storage space in your destination account, consider purchasing additional storage or transferring only selected albums or photos.
9.2. Will My Photo Quality Be Affected?
When using Partner Sharing, the photo quality should remain the same. However, downloading and re-uploading might result in some compression, depending on the settings.
9.3. How Long Will the Transfer Take?
The transfer time depends on the size of your photo library and your internet connection speed. Be patient, especially with large collections.
9.4. How Can I Ensure My Photos Are Secure During the Transfer?
Use strong passwords and enable two-factor authentication on both Google accounts to protect your data during the transfer.
9.5. How Do I Back Up Google Photos to a Different Account?
You can set up partner sharing for all your photos, both existing and new, with the backup account and then save the photos to the backup account. This way, even if your original account is deleted or compromised, the photos in the backup account will not be affected.
9.6. Can I Transfer All My Google Photos to a Different Account?
Yes. Here’s how you can do that:
- Set up partner sharing in account 1.
- Get the invitation and accept the shared photos in account 2.
- Save the photos to account 2.
- Copy folders.
- Delete the photos from account 1.
For more detailed information about all available options, see our article above.
9.7. How Do I Download All Photos from Google Photos?
Google Takeouts allows you to extract all photos or only selected albums from Google Photos. This method, however, has limitations that we discuss above. Review them carefully before setting up a Google Takeout export.
10. Tips for Efficient Photo Management on dfphoto.net
Visit dfphoto.net for tips on organizing your photos, mastering editing techniques, and protecting your visual stories for future generations.
10.1. Organizing Photos Effectively
- Utilize Albums and Folders: Efficiently categorize your photos by creating albums and folders based on events, dates, or subjects.
- Tagging and Labeling: Use tags and labels to add searchable metadata to your photos, making it easier to find specific images.
- Date-Based Sorting: Automatically sort your photos by date to maintain a chronological order, simplifying navigation through your library.
10.2. Mastering Editing Techniques
- Basic Adjustments: Learn how to adjust exposure, contrast, highlights, and shadows to improve the overall look of your photos.
- Color Correction: Master color correction techniques to fix color casts and enhance the vibrancy of your images.
- Advanced Editing: Explore advanced editing techniques like dodging, burning, and sharpening to add depth and detail to your photos.
10.3. Protecting Your Visual Stories
- Regular Backups: Implement a regular backup strategy to protect your photos from loss or damage.
- Cloud Storage: Utilize cloud storage services like Google Photos, iCloud, or Dropbox to store your photos securely in the cloud.
- External Hard Drives: Keep a copy of your photos on external hard drives as an additional layer of protection.
11. dfphoto.net: Your Resource for Photography Excellence
At dfphoto.net, we’re dedicated to providing you with resources to elevate your photography journey. From beginner basics to advanced techniques, we offer a wealth of knowledge to help you capture, edit, and preserve your memories.
11.1. Explore Our Comprehensive Guides
Dive into our detailed guides covering various photography topics:
- Mastering Composition: Learn the rules of composition to create visually appealing and balanced photos.
- Understanding Lighting: Discover how to use natural and artificial light to enhance your images.
- Shooting in Different Genres: Explore tips and tricks for shooting portraits, landscapes, street photography, and more.
11.2. Join Our Vibrant Community
Connect with fellow photographers, share your work, and get inspired:
- Forums: Participate in discussions, ask questions, and share your expertise with other members.
- Photo Challenges: Take part in photo challenges to push your creative boundaries and improve your skills.
- Feedback and Critiques: Get constructive feedback on your photos from experienced photographers to help you grow.
11.3. Stay Updated with the Latest Trends
Keep up with the latest trends, technologies, and techniques in the world of photography:
- Blog: Read our blog for articles on new gear, editing software, and industry news.
- Newsletter: Subscribe to our newsletter to receive exclusive content, tips, and updates directly in your inbox.
- Social Media: Follow us on social media to stay connected and get daily doses of inspiration.
12. Frequently Asked Questions (FAQs)
12.1. What Are the Main Reasons for Transferring Photos Between Google Accounts?
Consolidating multiple accounts, switching to a business account, or starting fresh with a new email address are common reasons.
12.2. Why Do Automated Migration Tools Often Exclude Google Photos?
Google’s API limitations restrict the number of operations, causing transfers to stall, especially for large photo libraries.
12.3. What Metadata Is Preserved When Using Partner Sharing?
Metadata such as dates and camera details is preserved when using Partner Sharing.
12.4. Can I Retain My Album Structure When Transferring Photos?
Yes, but only through manual re-creation in the destination account.
12.5. How Do I Transfer Google Photos to iCloud?
Use Google Takeout, select “Apple – iCloud Photos” as the destination, and grant the necessary permissions.
12.6. What Should I Do If I Run Out of Storage Space?
Consider purchasing additional storage or transferring only selected albums or photos.
12.7. Will My Photo Quality Be Affected During the Transfer?
Photo quality remains the same with Partner Sharing, but downloading and re-uploading might result in some compression.
12.8. How Long Does the Transfer Process Usually Take?
The duration depends on the size of your photo library and internet connection speed.
12.9. How Can I Secure My Photos During the Transfer?
Use strong passwords and enable two-factor authentication on both Google accounts.
12.10. What Are the Key Benefits of Organizing Photos Effectively?
Efficient organization simplifies navigation, improves searchability, and makes photo management more efficient.
13. Conclusion
Transferring Google Photos from one account to another is achievable with the right methods and considerations. Whether you opt for Partner Sharing, the download-and-re-upload approach, transferring to iCloud, or backing up to an external hard drive, understanding the steps and potential limitations is crucial. dfphoto.net is here to support you in every step, providing you with the knowledge and resources to manage your photos effectively. Remember to optimize your photos, safeguard your visual stories, and leverage the dfphoto.net community for ongoing inspiration and growth.
For further assistance, explore dfphoto.net and unlock a world of photography knowledge and inspiration. Let’s capture, create, and celebrate the beauty of photography together!
14. Connect with Us!
Have questions or need further assistance? Reach out to us:
- Address: 1600 St Michael’s Dr, Santa Fe, NM 87505, United States
- Phone: +1 (505) 471-6001
- Website: dfphoto.net
 Google Photos Interface
 Checking Google Photos storage use
 Enable partner sharing in Google Photos
 Accept partner sharing invite in Google Photos
 Share a selected album with your other Google Photos account
 Add photos to a Google Photos album