Can You Transfer A Glossy Photo To Wood? Absolutely! At dfphoto.net, we show you how to transfer photos to wood, adding a personal touch to your home décor with a beautiful, glossy finish. This project combines photography and woodworking, resulting in unique visual art. Learn how to create stunning wood slice art!
1. Understanding Photo Transfer to Wood
Photo transfer to wood involves transferring an image from a printed photograph onto a wooden surface. This combines the art of photography with the natural aesthetic of wood, creating a unique and personalized piece of decor. According to research from the Santa Fe University of Art and Design’s Photography Department, in July 2023, this method has surged in popularity due to its ability to blend rustic charm with personal memories. This process can be done with various methods, each offering a slightly different finish and level of durability. Let’s explore the nuances of each method.
1.1. What Are the Benefits of Transferring Photos to Wood?
There are many benefits of transferring photos to wood including:
- Personalization: Creates unique, personalized gifts or home decor.
- Rustic Aesthetic: Combines the warmth of wood with personal images.
- Cost-Effective: It can be cheaper than traditional framing.
- Creative Outlet: Offers a fun and creative DIY project.
- Durability: When sealed properly, it protects the image and wood.
- Versatility: Suitable for various types of images and wood surfaces.
- Sentimental Value: Turns cherished memories into tangible art.
- Handmade Charm: Provides a handcrafted, artisanal look.
- Eco-Friendly: Utilizes natural materials and reduces waste.
- Unique Texture: Adds a tactile dimension to your photographs.
1.2. What Are the Different Methods for Transferring Photos to Wood?
There are several methods for transferring photos to wood:
- Gel Medium Transfer: Uses a gel medium to adhere the photo to the wood.
- Mod Podge Transfer: Employs Mod Podge as an adhesive and sealant.
- Citrus Solvent Transfer: Uses citrus-based solvents to dissolve the ink onto the wood.
- Heat Transfer: Applies heat to transfer an image printed on special paper.
- Acetone Transfer: Uses acetone to transfer the image directly onto the wood.
- Ultra Seal Transfer: Utilizes Ultra Seal as a multipurpose sealer and glue.
- Resin Transfer: Involves embedding the photo in resin for a glossy finish.
Each method provides a unique look, so experiment to find your favorite!
1.3. What Types of Photos Work Best for Wood Transfer?
The best types of photos for wood transfer are:
- Laser-Printed Photos: Images printed with a laser printer provide the best results because the toner adheres well to the wood during transfer.
- High-Contrast Images: Photos with strong contrast tend to show up better on wood, as the details are more pronounced.
- Black and White Photos: These photos often create a classic, rustic look on wood, enhancing the wood’s natural grain.
- Simple Compositions: Images with fewer details are easier to transfer and tend to look cleaner on wood.
- Sized Appropriately: Ensure the photo is sized correctly to fit the wood surface, avoiding distortion or loss of important details.
- Inverted Images (if necessary): Some transfer methods require the image to be inverted before printing to ensure it appears correctly on the wood.
- Matte Finish Photos: Glossy photos can be more challenging to transfer, so matte finishes are often preferred.
- Personal Photos: Family portraits, landscapes, and pet pictures make great personalized wood transfers.
- Copyright-Free Images: Ensure you have the right to use the image, especially if you plan to sell the finished product.
- Edited Photos: Adjust brightness, contrast, and sharpness in photo editing software for optimal transfer results.
2. Materials and Tools Needed for a Glossy Photo Transfer
To achieve a stunning glossy photo transfer to wood, gather these materials:
- Wood Slice (available at craft stores)
- Ultra Seal
- Craft Brushes
- Laser-Printed Photo
- Towel (damp)
- Resin Spray
- Tray or Short Box
- Small Disposable Item for Elevation
- Envirotex Lite
- Disposable Stir Sticks
- 2 Disposable Mixing Cups
- Cover for Work Area
- Micro Butane Torch (optional)
2.1. Where Can You Source Wood Slices and What to Look For?
Wood slices can be sourced from:
- Craft Stores: Stores like Michaels and Hobby Lobby offer wood slices in various sizes.
Address: 3251 Cerrillos Rd, Santa Fe, NM 87507, United States - Online Retailers: Amazon and Etsy have a wide selection of wood slices.
- Local Lumberyards: These may offer larger, more unique wood slices.
- DIY Cutting: You can cut your own wood slices from fallen branches.
When choosing wood slices, look for:
- Smooth Surface: A relatively smooth surface will ensure better photo transfer.
- Consistent Thickness: Uniform thickness provides a stable base.
- No Cracks: Avoid slices with large cracks that could worsen over time.
- Properly Dried: Ensure the wood is dried to prevent warping or cracking.
- Desired Size: Choose a size that suits your photo and intended use.
- Natural Edge: Look for slices with intact bark for a rustic appearance.
- Sustainable Sourcing: Opt for wood from sustainable or reclaimed sources.
- Light Color: Lighter wood will allow the photo to show more vibrantly.
- Shape: Choose a shape that complements your photo’s composition.
- Price: Compare prices from different sources to get the best deal.
2.2. What Are the Best Adhesives and Sealants for Photo Transfers?
The best adhesives and sealants include:
- Ultra Seal: A multipurpose sealer and glue that preps and seals the wood.
- Mod Podge: Popular for its adhesive and sealing properties, providing a protective layer.
- Gel Medium: Offers a strong bond and can add texture to the transfer.
- Resin Spray: Seals and protects the transferred image, enhancing colors.
- Envirotex Lite: Provides a glossy, glass-like finish when used as a top coat.
- Acrylic Sealers: Protect the image from UV light and moisture.
- Polyurethane Sealers: Offer a durable finish, ideal for high-use items.
- Spray Adhesives: Provide an even coat for adhering the photo to the wood.
- Double-Sided Adhesive Sheets: Offer a mess-free way to stick the photo.
- Craft Glues: Versatile for various projects, but test for compatibility.
2.3. Why Is a Laser Printer Recommended Over an Inkjet Printer?
A laser printer is recommended over an inkjet printer because:
- Toner Quality: Laser printers use toner, which is a dry powder that adheres better to surfaces and doesn’t bleed.
- Water Resistance: Laser-printed images are more water-resistant compared to inkjet prints, which use liquid ink that can smudge when wet.
- Sharpness: Laser printers produce sharper, more defined images, which are crucial for detailed photo transfers.
- Durability: Toner-based prints are more durable and less likely to fade over time compared to inkjet prints.
- Transfer Efficiency: The toner in laser prints transfers more effectively to wood, resulting in a clearer image.
- Less Smudging: Laser prints are less prone to smudging during the transfer process, especially when using wet techniques.
- Professional Finish: Laser-printed photos provide a more professional and cleaner finish on wood.
- Heat Resistance: Laser prints can withstand heat better, making them suitable for heat transfer methods.
- Cost-Effectiveness: While laser printers may be more expensive initially, they often have a lower cost per print in the long run.
- Reliability: Laser printers are generally more reliable and require less maintenance compared to inkjet printers.
3. Step-by-Step Guide to Transferring a Glossy Photo to Wood
Here’s how you can make a glossy photo transfer wood slice too:
3.1. Preparing the Wood Slice
- Clean the Surface: Ensure the wood slice is clean and free of dust or debris.
- Sand if Necessary: If the surface is rough, lightly sand it for a smoother finish.
- Seal the Wood: Apply a coat of Ultra Seal to prevent bubbles during the resin stage.
3.2. Printing and Preparing the Photo
- Use a Laser Printer: Print your photo on a laser printer for best results.
- Size Appropriately: Trim the photo to fit the wood slice.
- Invert if Needed: If transferring face down, invert the image using photo software to avoid backward text.
3.3. Transferring the Image
- Apply Ultra Seal: Completely cover the wood slice top with Ultra Seal using a craft brush.
- Place the Photo: Quickly add the photo to the wet wood slice, pressing down to eliminate air bubbles.
- Coat the Photo: Immediately coat the entire picture with Ultra Seal.
- Dry Overnight: Let it dry overnight or for at least 12 hours.
3.4. Removing the Paper
- Wet a Towel: Get a large towel wet, ensuring it’s not dripping but thoroughly damp.
- Apply the Towel: Lay the towel on top of the paper and let the water soak in for about 15 minutes, pressing down occasionally.
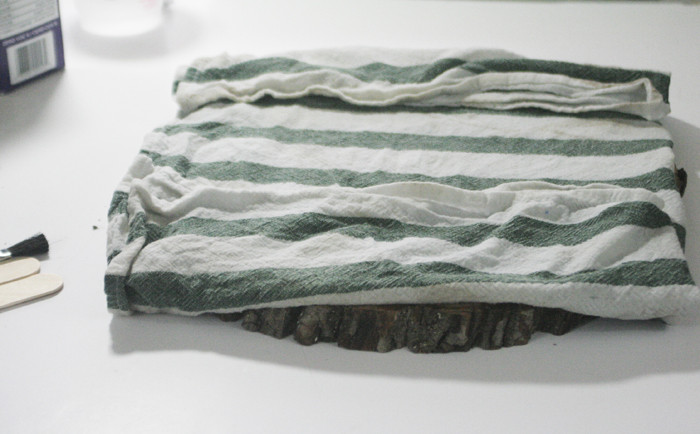 Glossy Wood Slice Photo Transfer – applying wet towel to paper2
- Rub Gently: Peel up part of the towel and start to rub the wet paper lightly with your finger. The paper should begin to peel off.
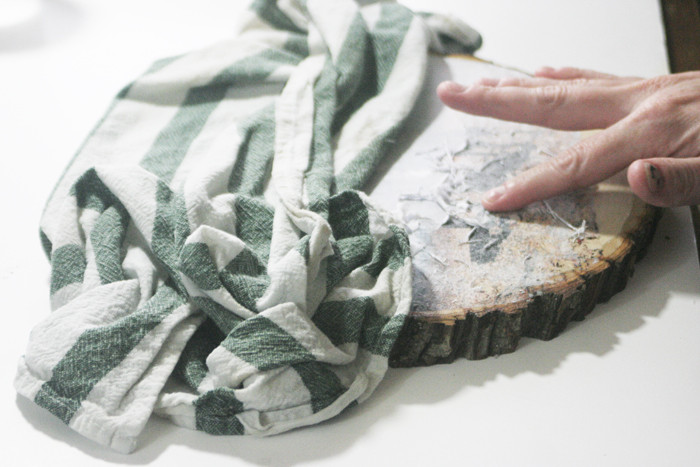 Glossy Wood Slice Photo Transfer – rubbing off paper to show transfer
- Check for Paper Residue: If the paper appears white again as it dries, re-wet and rub more.
3.5. Sealing and Adding Gloss
- Resin Spray: Coat the wood slice with Resin Spray outside in a well-ventilated area.
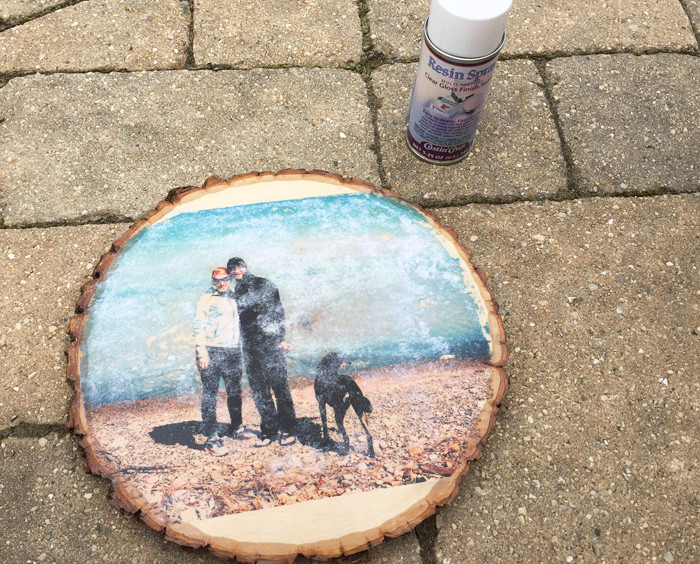 Glossy Wood Slice Photo Transfer – spray resin spray outside
- Prepare Envirotex Lite: Mix Envirotex Lite according to the package directions.
- Pour Resin: Pour the mixed resin over the photo transfer wood slice, ensuring it coats the entire top.
- Brush Sides (Optional): Use a craft brush to paint resin onto the bark of the wood slice.
- Remove Drips: Wipe off drips underneath the sides with a brush.
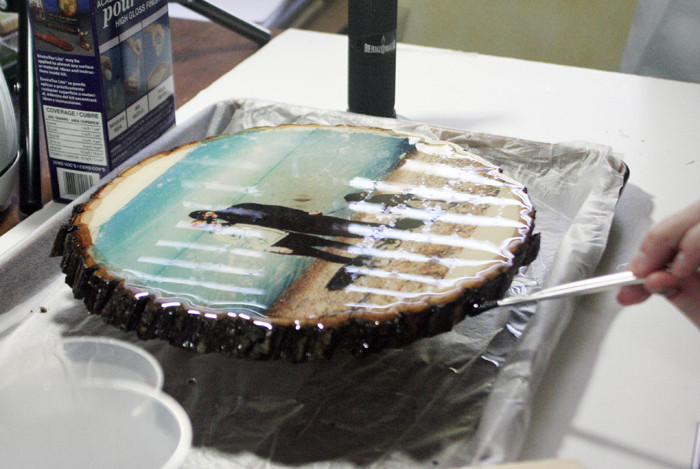 Glossy Wood Slice Photo Transfer – use paintbrush to wipe off drips
- Pop Bubbles: Use a micro butane torch to pop any bubbles.
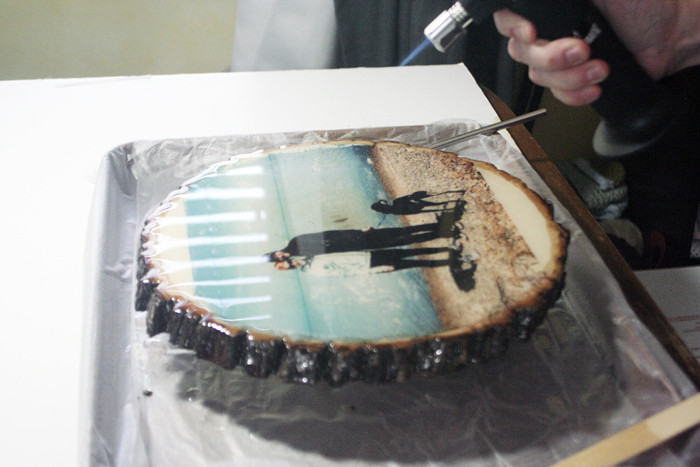 Glossy Wood Slice Photo Transfer – use micro butane torch to pop bubbles
- Cure: Cover the project carefully and let it cure according to the Envirotex Lite directions.
3.6. Alternative Method: Mod Podge Photo Transfer
- Apply Mod Podge: Coat the wood surface with Mod Podge.
- Place Photo: Place the laser-printed photo face down on the Mod Podge.
- Smooth Out: Use a brayer or your fingers to smooth out any wrinkles or bubbles.
- Dry: Let it dry for at least 24 hours.
- Dampen Paper: Use a damp cloth to wet the back of the paper.
- Rub Off Paper: Gently rub the paper away to reveal the transferred image.
- Seal: Apply a final coat of Mod Podge to seal and protect the image.
3.7. Alternative Method: Gel Medium Photo Transfer
- Apply Gel Medium: Coat the wood surface with a thick layer of gel medium.
- Place Photo: Place the laser-printed photo face down onto the gel medium.
- Smooth Out: Smooth out any air bubbles or wrinkles.
- Dry: Allow it to dry completely for at least 24 hours.
- Dampen and Rub: Dampen the paper with water and gently rub away the paper.
- Seal: Apply a sealant to protect the transferred image.
4. Troubleshooting Common Issues
Even with careful execution, you might encounter some common issues. Here’s how to troubleshoot them:
4.1. How to Prevent Bubbles Under the Photo
- Seal the Wood: Apply a base coat of Ultra Seal to seal the wood and prevent air from escaping.
- Smooth Application: Use a brayer or your fingers to smooth out the photo and eliminate air pockets.
- Even Pressure: Apply even pressure when placing the photo on the wood.
- Work Quickly: Apply the photo quickly after applying the adhesive to prevent it from drying.
- Pop Bubbles: If bubbles appear, gently prick them with a needle and smooth the area.
- Thin Layers: Apply adhesive in thin, even layers to prevent trapping air.
- Pre-Treat Wood: Consider using a wood conditioner to minimize air release.
- Use a Soft Cloth: Gently rub the photo with a soft cloth to press out bubbles.
- Check Humidity: Avoid working in high humidity, as it can contribute to bubble formation.
- Patience: Allow the adhesive to dry slowly to reduce bubble formation.
4.2. What to Do If the Image Is Not Transferring Clearly
- Use Laser Prints: Ensure you are using a laser-printed image, as inkjet prints may not transfer well.
- Sufficient Adhesive: Apply a generous and even coat of adhesive.
- Proper Contact: Make sure the photo is in full contact with the wood surface.
- Adequate Drying Time: Allow enough drying time before removing the paper.
- Gentle Rubbing: Rub the paper gently when removing it to avoid damaging the transferred image.
- Check Paper Dampness: Ensure the paper is damp enough to rub off easily, but not too wet to damage the image.
- Clean Surface: The wood surface should be clean and free of any debris.
- Test Small Area: Test the transfer on a small, inconspicuous area first.
- Use a Brayer: Use a brayer to ensure even contact and pressure during the transfer.
- Adjust Image Settings: Adjust brightness and contrast of the image for better visibility.
4.3. How to Fix a Smudged or Faded Image
- Reseal the Image: Apply a fresh coat of sealant to protect the remaining image.
- Touch-Up: Use fine-tip markers or paint to touch up faded areas.
- Apply Transfer Again: If possible, apply a new transfer over the existing one.
- Use a Softer Cloth: When rubbing the paper, use a softer cloth to prevent further smudging.
- Work in Sections: Work in small sections when removing paper to control the process.
- Avoid Over-Wetting: Use just enough water to dampen the paper, avoiding over-wetting.
- Scan and Reprint: Scan the image and reprint it if the damage is too severe.
- Embrace Imperfections: Consider the imperfections as part of the rustic charm.
- Use Photo Editing Software: Enhance the image digitally before reprinting.
- Consult Professionals: Seek advice from professional photo restoration services.
5. Advanced Techniques and Creative Ideas
Elevate your photo transfer projects with these advanced techniques:
5.1. Incorporating Multiple Photos or Images
- Collage Effect: Create a collage of multiple photos on a larger wood surface.
- Overlapping Images: Layer images to create depth and visual interest.
- Thematic Arrangements: Arrange photos based on a theme, such as family vacations or milestones.
- Use Photo Editing Software: Combine images digitally before transferring.
- Vary Sizes: Use different sizes of photos to create a dynamic composition.
- Add Text: Incorporate text or quotes with the images.
- Create a Timeline: Arrange photos in chronological order to tell a story.
- Use Stencils: Add shapes or patterns around the photos using stencils.
- Mix Media: Combine photos with paint, decoupage, or other art techniques.
- Create Borders: Use decorative borders around each photo to separate them.
5.2. Adding Textures and Embellishments
- Crackle Finish: Apply a crackle medium to create an aged, textured look.
- Distressing: Sand the edges and surface to give a weathered appearance.
- Metallic Accents: Add gold or silver leaf for a touch of elegance.
- Decoupage: Use decorative paper or fabric to add patterns and textures.
- Stenciling: Apply paint through stencils to create designs.
- Wood Burning: Add intricate details with a wood-burning tool.
- Resin Embellishments: Embed small objects or glitter in the resin layer.
- Fabric Transfers: Transfer images onto fabric and adhere them to the wood.
- Natural Elements: Incorporate natural elements like leaves, twigs, or shells.
- Mixed Media: Combine various art techniques for a unique, multi-dimensional piece.
5.3. Creating a Gallery Wall with Wood Transfers
- Choose a Theme: Select a consistent theme for the gallery wall.
- Vary Sizes and Shapes: Mix different sizes and shapes of wood transfers.
- Balanced Layout: Arrange the pieces in a balanced and visually appealing layout.
- Consistent Spacing: Maintain consistent spacing between each piece.
- Use a Level: Ensure each piece is hung straight using a level.
- Mix with Other Art: Combine wood transfers with other art forms like paintings or prints.
- Create Focal Point: Designate a focal point with a larger or more prominent piece.
- Consider Color Palette: Use a consistent color palette to tie the gallery wall together.
- Plan on Paper: Plan the layout on paper before hanging the pieces.
- Use Appropriate Hardware: Use appropriate hanging hardware for the weight of the wood pieces.
6. Sealing and Finishing Techniques
Proper sealing and finishing are essential to protect and enhance your photo transfer. Here are some techniques:
6.1. Why Is Sealing Important for Preserving the Image?
Sealing is crucial because:
- Protection from UV Rays: Sealants protect the image from fading due to sunlight.
- Moisture Resistance: Sealants prevent moisture damage and warping of the wood.
- Scratch Resistance: A sealant provides a protective layer against scratches and abrasions.
- Enhanced Durability: Sealing prolongs the life of the photo transfer.
- Color Preservation: Sealants help maintain the vibrancy of the colors in the image.
- Prevent Yellowing: Some sealants prevent the image from yellowing over time.
- Dust and Dirt Barrier: Sealants create a barrier against dust and dirt.
- Easy Cleaning: Sealed surfaces are easier to clean and maintain.
- Professional Finish: Sealing provides a polished, professional look.
- Prevents Cracking: Sealants can help prevent the image from cracking on the wood surface.
6.2. Different Types of Sealants and Their Uses
- Acrylic Sealers: Water-based, offer UV protection, and are suitable for indoor use.
- Polyurethane Sealers: Oil-based, provide a durable, water-resistant finish, ideal for high-use items.
- Resin Sprays: Provide a clear, glossy finish, enhancing colors and protecting the image.
- Mod Podge: Versatile for sealing and protecting, available in various finishes.
- Lacquer Sealers: Fast-drying, offer a hard, durable finish, but can yellow over time.
- Varnish: Oil-based, provides a durable, glossy finish, suitable for furniture.
- Wax Sealants: Natural finish, adds a soft sheen, requires periodic reapplication.
- Epoxy Resin: Creates a thick, glossy, and durable coating, ideal for a glass-like finish.
- UV Resistant Sprays: Specifically designed to protect against UV damage.
- Matte Sealers: Provide a non-glossy finish, reducing glare and reflections.
6.3. Achieving a High-Gloss Finish with Resin
To achieve a high-gloss finish with resin:
- Prepare Surface: Ensure the photo transfer is clean and dry.
- Mix Resin: Mix the resin and hardener according to the manufacturer’s instructions.
- Pour Evenly: Pour the resin evenly over the surface, starting from the center.
- Remove Bubbles: Use a heat gun or torch to remove any air bubbles.
- Coat Sides: Use a brush to coat the sides and edges of the wood.
- Level Surface: Ensure the surface is level for even resin distribution.
- Cure Properly: Allow the resin to cure in a dust-free environment.
- Apply Multiple Coats: For an extra glossy finish, apply multiple thin coats.
- Sand Imperfections: Lightly sand any imperfections between coats.
- Polish: Polish the cured resin for a flawless, high-gloss finish.
6.4. Additional Tips for a Perfect Finish
- Apply Thin Coats: Apply thin, even coats of sealant to prevent drips and unevenness.
- Sand Between Coats: Lightly sand between coats for a smoother finish.
- Use Quality Brushes: Use high-quality brushes to avoid streaks.
- Dust-Free Environment: Work in a dust-free environment to prevent particles from settling on the finish.
- Proper Drying Time: Allow each coat to dry completely before applying the next.
- Test Sealant: Test the sealant on a small area first to ensure compatibility.
- Avoid Direct Sunlight: Allow the sealed piece to dry away from direct sunlight.
- Proper Ventilation: Ensure good ventilation when working with sealants.
- Follow Instructions: Always follow the manufacturer’s instructions for best results.
- Clean Surface: Ensure the surface is clean and free of debris before sealing.
7. Maintenance and Care
To keep your wood transfer looking its best, here’s how to maintain and care for it:
7.1. How to Clean Wood Transfers Without Damaging the Image
- Use a Soft Cloth: Gently wipe the surface with a soft, dry cloth.
- Avoid Harsh Chemicals: Do not use harsh chemicals or abrasive cleaners.
- Damp Cloth: If needed, use a slightly damp cloth with mild soap.
- Dry Immediately: Dry the surface immediately after cleaning.
- Dust Regularly: Dust the surface regularly to prevent buildup.
- Avoid Abrasive Materials: Do not use abrasive sponges or scrub brushes.
- Spot Clean: Spot clean any stains or spills as soon as possible.
- Use a Gentle Touch: Use a gentle touch to avoid scratching the surface.
- Test Cleaning Solution: Test any cleaning solution on a small area first.
- Avoid Over-Wetting: Avoid over-wetting the surface, especially near the edges.
7.2. Protecting Wood Transfers from Environmental Factors
- Avoid Direct Sunlight: Keep wood transfers away from direct sunlight to prevent fading.
- Control Humidity: Maintain a stable humidity level to prevent warping.
- Avoid Extreme Temperatures: Avoid exposing wood transfers to extreme temperatures.
- Use UV-Protective Sealant: Apply a UV-protective sealant to protect the image.
- Dust Regularly: Dust the surface regularly to prevent buildup.
- Keep Away from Water: Keep wood transfers away from water and moisture.
- Use Protective Coatings: Apply protective coatings to prevent scratches.
- Store Properly: Store wood transfers in a cool, dry place when not displayed.
- Avoid Chemicals: Avoid exposing wood transfers to harsh chemicals.
- Frame the Transfer: Consider framing the wood transfer for added protection.
7.3. Restoring Faded or Damaged Wood Transfers
- Clean the Surface: Gently clean the surface to remove dirt and debris.
- Touch-Up: Use fine-tip markers or paint to touch up faded areas.
- Apply Sealant: Apply a fresh coat of sealant to protect the remaining image.
- Use Photo Editing Software: Enhance the image digitally before reprinting.
- Reapply Transfer: If possible, reapply a new transfer over the existing one.
- Consult Professionals: Seek advice from professional photo restoration services.
- Use Soft Cloth: When cleaning, use a soft cloth to avoid further damage.
- Work in Sections: Work in small sections when cleaning or touching up.
- Avoid Over-Wetting: Use just enough water to dampen the cloth, avoiding over-wetting.
- Embrace Imperfections: Consider the imperfections as part of the piece’s history.
8. Inspiration and Ideas for Photo Transfer Projects
Need some inspiration? Here are some ideas for your next photo transfer project:
8.1. Gift Ideas for Special Occasions
- Personalized Portraits: Transfer family portraits onto wood slices for a heartfelt gift.
- Wedding Memories: Create wood transfers of wedding photos for anniversaries.
- Pet Photos: Transfer photos of beloved pets onto wood for pet lovers.
- Travel Memories: Create a travel-themed wood transfer with vacation photos.
- Milestone Celebrations: Celebrate birthdays or graduations with custom wood transfers.
- Home Decor: Create personalized home decor items like coasters or wall art.
- Holiday Gifts: Design unique holiday-themed wood transfers for festive occasions.
- Thank You Gifts: Show appreciation with a custom wood transfer gift.
- Inspirational Quotes: Combine photos with inspirational quotes for a meaningful gift.
- Memory Keepsakes: Preserve cherished memories with personalized wood transfers.
8.2. Home Decor Projects Using Wood Transfers
- Wall Art: Create a gallery wall with various sizes of wood transfers.
- Coasters: Make personalized coasters with family photos or scenic views.
- Table Centerpieces: Design a unique table centerpiece with a wood transfer.
- Door Signs: Create custom door signs with family names or welcome messages.
- Holiday Decorations: Design festive holiday decorations with wood transfers.
- Picture Frames: Create unique picture frames using wood slices and transfers.
- Serving Trays: Design a personalized serving tray with family photos.
- Garden Markers: Create garden markers with photos of plants or herbs.
- Bookends: Design unique bookends with personalized wood transfers.
- Ornaments: Create custom ornaments with family photos for holiday trees.
8.3. Business and Marketing Applications
- Promotional Items: Create custom wood transfers as promotional items for businesses.
- Event Favors: Design unique event favors with personalized wood transfers.
- Branded Decor: Create branded decor items for offices or retail spaces.
- Client Gifts: Show appreciation with a custom wood transfer gift for clients.
- Trade Show Displays: Design eye-catching trade show displays with wood transfers.
- Product Packaging: Incorporate wood transfers into product packaging for a unique touch.
- Employee Recognition: Recognize employees with personalized wood transfer gifts.
- Corporate Events: Design custom wood transfers for corporate events.
- Marketing Campaigns: Create marketing campaigns with unique wood transfer items.
- Custom Signage: Design custom signage for businesses using wood transfers.
9. Safety Precautions When Working with Resin and Sealants
Safety should always be a priority when working with resin and sealants. Here are some key precautions:
9.1. Importance of Ventilation and Protective Gear
- Ventilation: Always work in a well-ventilated area to avoid inhaling fumes.
- Respirator: Wear a respirator or mask to protect your lungs from harmful vapors.
- Gloves: Wear gloves to protect your skin from irritation and chemical exposure.
- Eye Protection: Wear safety glasses or goggles to protect your eyes.
- Protective Clothing: Wear long sleeves and pants to minimize skin contact.
- Avoid Eating and Drinking: Do not eat or drink while working with resin or sealants.
- Wash Hands: Wash your hands thoroughly after handling these materials.
- Read Labels: Always read and follow the manufacturer’s instructions.
- First Aid: Know the first aid procedures in case of accidental exposure.
- Keep Away from Children: Keep resin and sealants out of reach of children.
9.2. Handling Chemicals Safely
- Store Properly: Store chemicals in a cool, dry place away from sunlight.
- Original Containers: Keep chemicals in their original containers with proper labels.
- Avoid Mixing: Do not mix different chemicals together unless instructed.
- Dispose Properly: Dispose of chemical waste according to local regulations.
- Avoid Contact: Avoid direct contact with skin, eyes, and clothing.
- Use Funnel: Use a funnel when pouring chemicals to prevent spills.
- Clean Spills Immediately: Clean up any spills immediately with appropriate materials.
- MSDS: Review the Material Safety Data Sheets (MSDS) for each chemical.
- Emergency Plan: Have an emergency plan in case of accidental exposure or spills.
- Use Appropriate Tools: Use appropriate tools for handling and mixing chemicals.
9.3. First Aid for Resin and Sealant Exposure
- Skin Contact: Wash the affected area with soap and water.
- Eye Contact: Flush eyes with water for at least 15 minutes and seek medical attention.
- Inhalation: Move to fresh air immediately and seek medical attention if symptoms persist.
- Ingestion: Do not induce vomiting; seek medical attention immediately.
- Burns: Cool the burn with water and seek medical attention.
- Allergic Reaction: Seek medical attention if you experience an allergic reaction.
- Poison Control: Contact poison control for further instructions.
- MSDS Information: Refer to the MSDS for specific first aid instructions.
- Have Supplies Ready: Keep first aid supplies readily available.
- Stay Calm: Stay calm and follow the recommended first aid procedures.
10. Frequently Asked Questions (FAQ)
10.1. Can You Transfer A Glossy Photo To Wood Using Regular Paper?
Yes, you can transfer a glossy photo to wood using regular paper, but laser-printed photos work best.
10.2. What Is The Best Type Of Wood To Use For Photo Transfers?
The best types of wood to use for photo transfers are smooth, light-colored woods like birch or pine.
10.3. How Do You Prevent The Image From Smudging During Transfer?
To prevent smudging, use a laser printer, seal the wood, and gently rub the paper when removing it.
10.4. Can You Use Mod Podge To Transfer Photos To Wood?
Yes, Mod Podge is a popular adhesive and sealant for transferring photos to wood.
10.5. How Long Does It Take For A Photo Transfer To Dry?
A photo transfer typically takes 12-24 hours to dry completely, depending on the adhesive used.
10.6. What Is The Best Way To Seal A Photo Transfer On Wood?
The best way to seal a photo transfer on wood is to use a UV-protective sealant like acrylic or polyurethane.
10.7. Can You Transfer Photos To Wood Without Using Chemicals?
Yes, you can use heat transfer methods, which require special paper but no harsh chemicals.
10.8. How Do You Get A Vintage Look With Photo Transfers?
To get a vintage look, use black and white photos, distress the edges, and apply a crackle finish.
10.9. What Are Some Creative Ways To Display Wood Transfers?
Creative ways to display wood transfers include creating a gallery wall, using them as coasters, or making unique table centerpieces.
10.10. Is It Possible To Transfer A Photo To A Large Piece Of Wood?
Yes, it is possible to transfer a photo to a large piece of wood, but you may need to work in sections and use a larger brayer to ensure even contact.
Ready to start your photo transfer journey? Visit dfphoto.net for more tutorials, inspiration, and to connect with a community of photography enthusiasts! Share your creations and discover new techniques today! At dfphoto.net, we provide comprehensive guides and resources to help you master various photography techniques. Explore our collection of stunning images and connect with fellow photographers in our vibrant community. For inquiries, contact us at Address: 1600 St Michael’s Dr, Santa Fe, NM 87505, United States, Phone: +1 (505) 471-6001, or visit our website at dfphoto.net.