Can You Recover Photos From Sd Card? Absolutely, recovering deleted photos from an SD card is often possible with the right tools and techniques, and dfphoto.net is here to guide you through the process. Whether you accidentally deleted cherished family memories or important professional work, understanding the recovery process can help you retrieve those valuable images. We’ll explore various methods, including data recovery software, backup options, and tips to maximize your chances of success in lost picture retrieval.
This article provides a comprehensive guide to SD card recovery, covering data retrieval, photo restoration, and file recovery techniques.
1. Why Do You Need to Know How to Recover Deleted Photos From an SD Card?
Understanding how to recover deleted photos from an SD card is crucial because data loss can happen to anyone, regardless of their technical expertise. Accidents like accidentally deleting photos or formatting the card can occur, and knowing how to respond is essential.
- Accidental Deletion: One wrong click can erase precious memories.
- Card Formatting: Formatting an SD card without backing up data can lead to significant photo loss.
- Data Corruption: SD cards can become corrupted due to various reasons, rendering photos inaccessible.
- Device Issues: Problems with cameras or card readers can sometimes result in photo loss.
These situations can be extremely stressful, especially if the photos are irreplaceable. According to research from the Santa Fe University of Art and Design’s Photography Department, in July 2025, understanding data recovery techniques provides peace of mind and the ability to restore cherished moments or critical work files. Therefore, it’s vital to be prepared with the knowledge and tools necessary for SD card photo recovery.
2. What Are The 6 Ways To Recover Deleted Photos From An SD Card?
Depending on your situation, here are six effective methods to recover deleted photos from an SD card:
2.1 Way 1: Using Data Recovery Software
Using data recovery software is often the most reliable way to recover deleted photos from an SD card. Tools like Disk Drill are designed to scan your SD card deeply, identifying recoverable files even if they’ve been deleted or the card has been formatted. Disk Drill can recover almost any file format, including RAW images.
How to recover deleted pictures from an SD card on Windows with Disk Drill:
-
Download and Install Disk Drill: Download Disk Drill from the official website and install it on your Windows computer. The free version allows you to preview recoverable files and recover up to 500 MB of data for free.
-
Connect the SD Card: Connect the SD card to your Windows PC using an SD card adapter or the built-in SD card slot.
-
Launch Disk Drill: Launch Disk Drill and select your memory card from the list of available disks. Click on Search for lost data to start the scanning process.
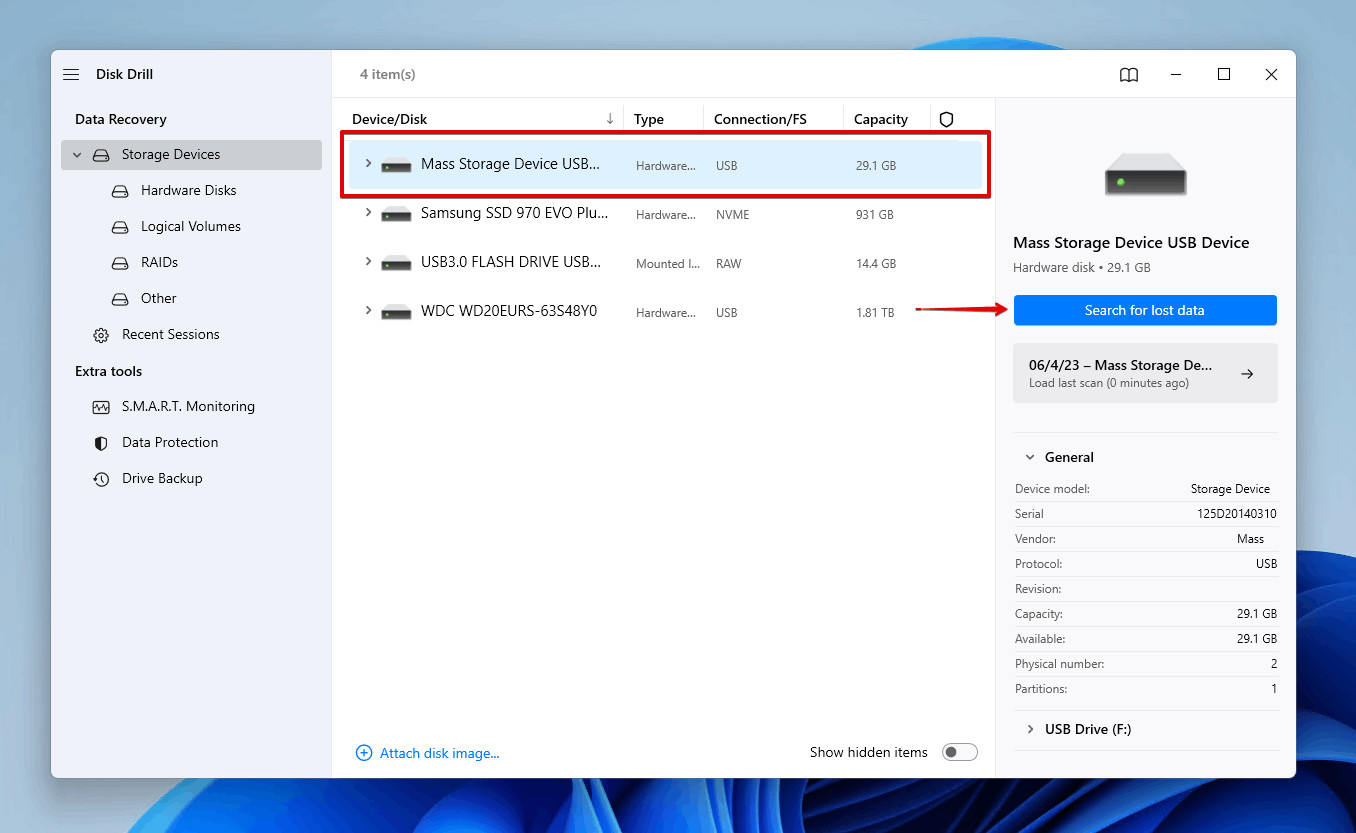 Scanning the SD card for deleted photos on Windows PC
- Wait for the Scan to Complete: Allow Disk Drill to thoroughly scan your SD card for lost data. The duration of the scan will depend on the size of the card and the amount of data.
 Scanning memory card using data recovery software
-
Browse and Preview Photos: Once the scan is finished, browse the photos that Disk Drill has found. Use the Preview icon to view the pictures before you choose to recover them, ensuring they are the files you need.
-
Select and Recover Files: Check the boxes next to the files you want to recover, then click the Recover button.
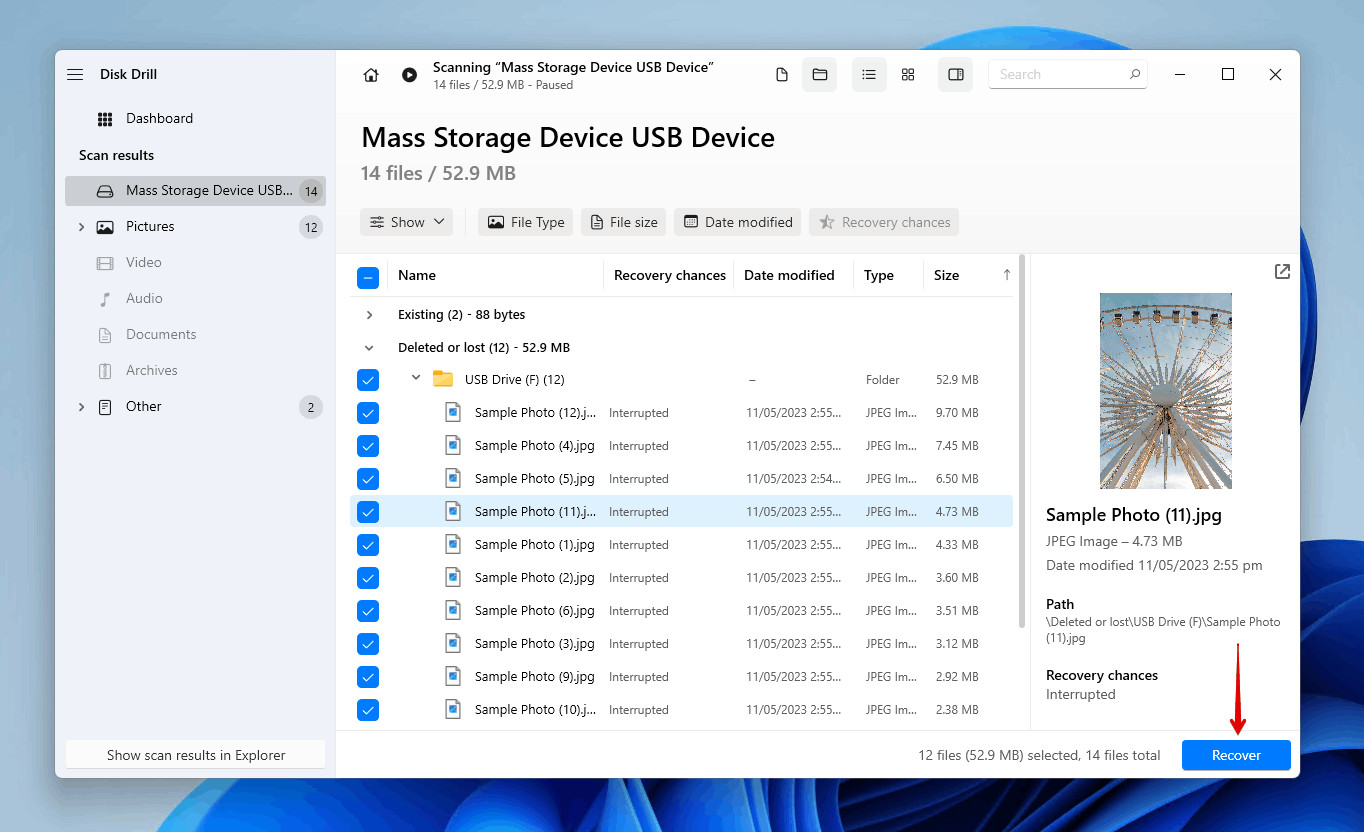 Selecting the SD card photos
- Choose a Recovery Destination: Select a suitable recovery destination for the files, preferably on a separate storage device to avoid overwriting the data on the SD card.
 Choosing a recovery destination
How to recover deleted pictures from an SD card on Mac with Disk Drill:
- Download and Install Disk Drill: Download Disk Drill from the official website and install it on your Mac.
- Connect the SD Card: Connect the SD card to your Mac using an SD card reader or port.
- Select the SD Card: Launch Disk Drill and select the SD card from the list of disks.
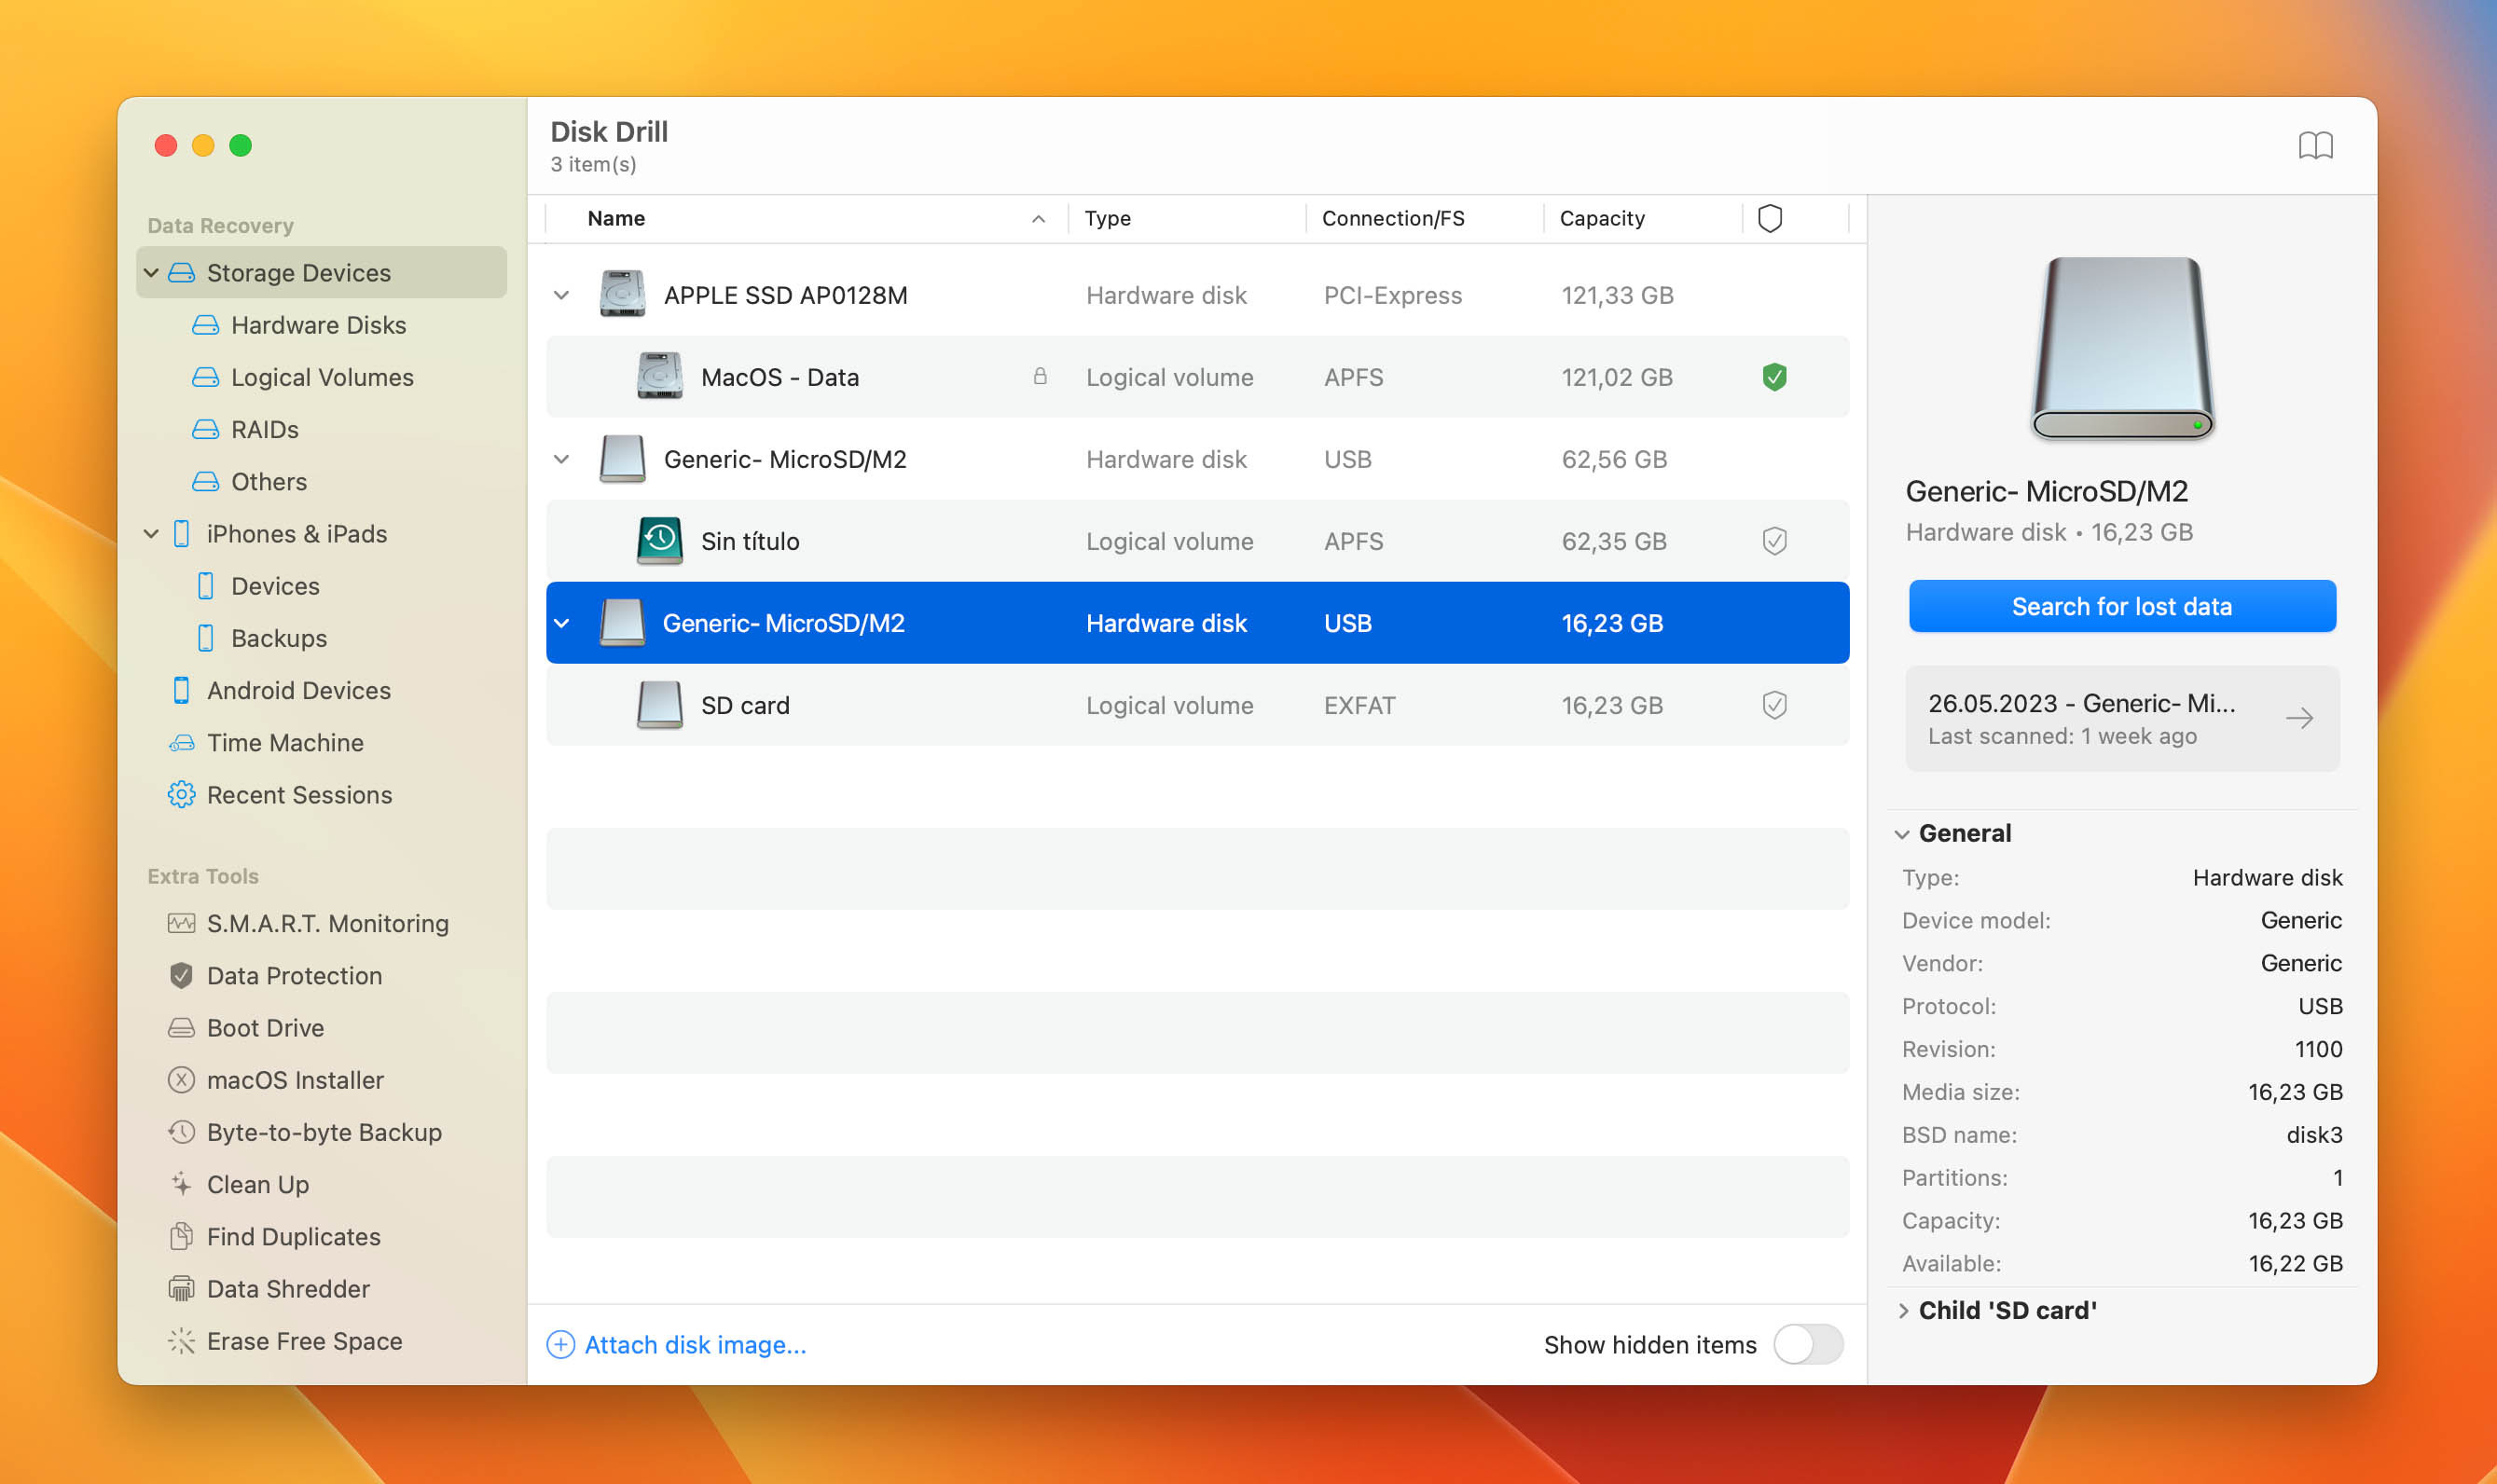 sd card in disk drill
- Wait for the Scan to Complete: Allow Disk Drill to scan the SD card for lost data. This process may take some time depending on the amount of data to be scanned.
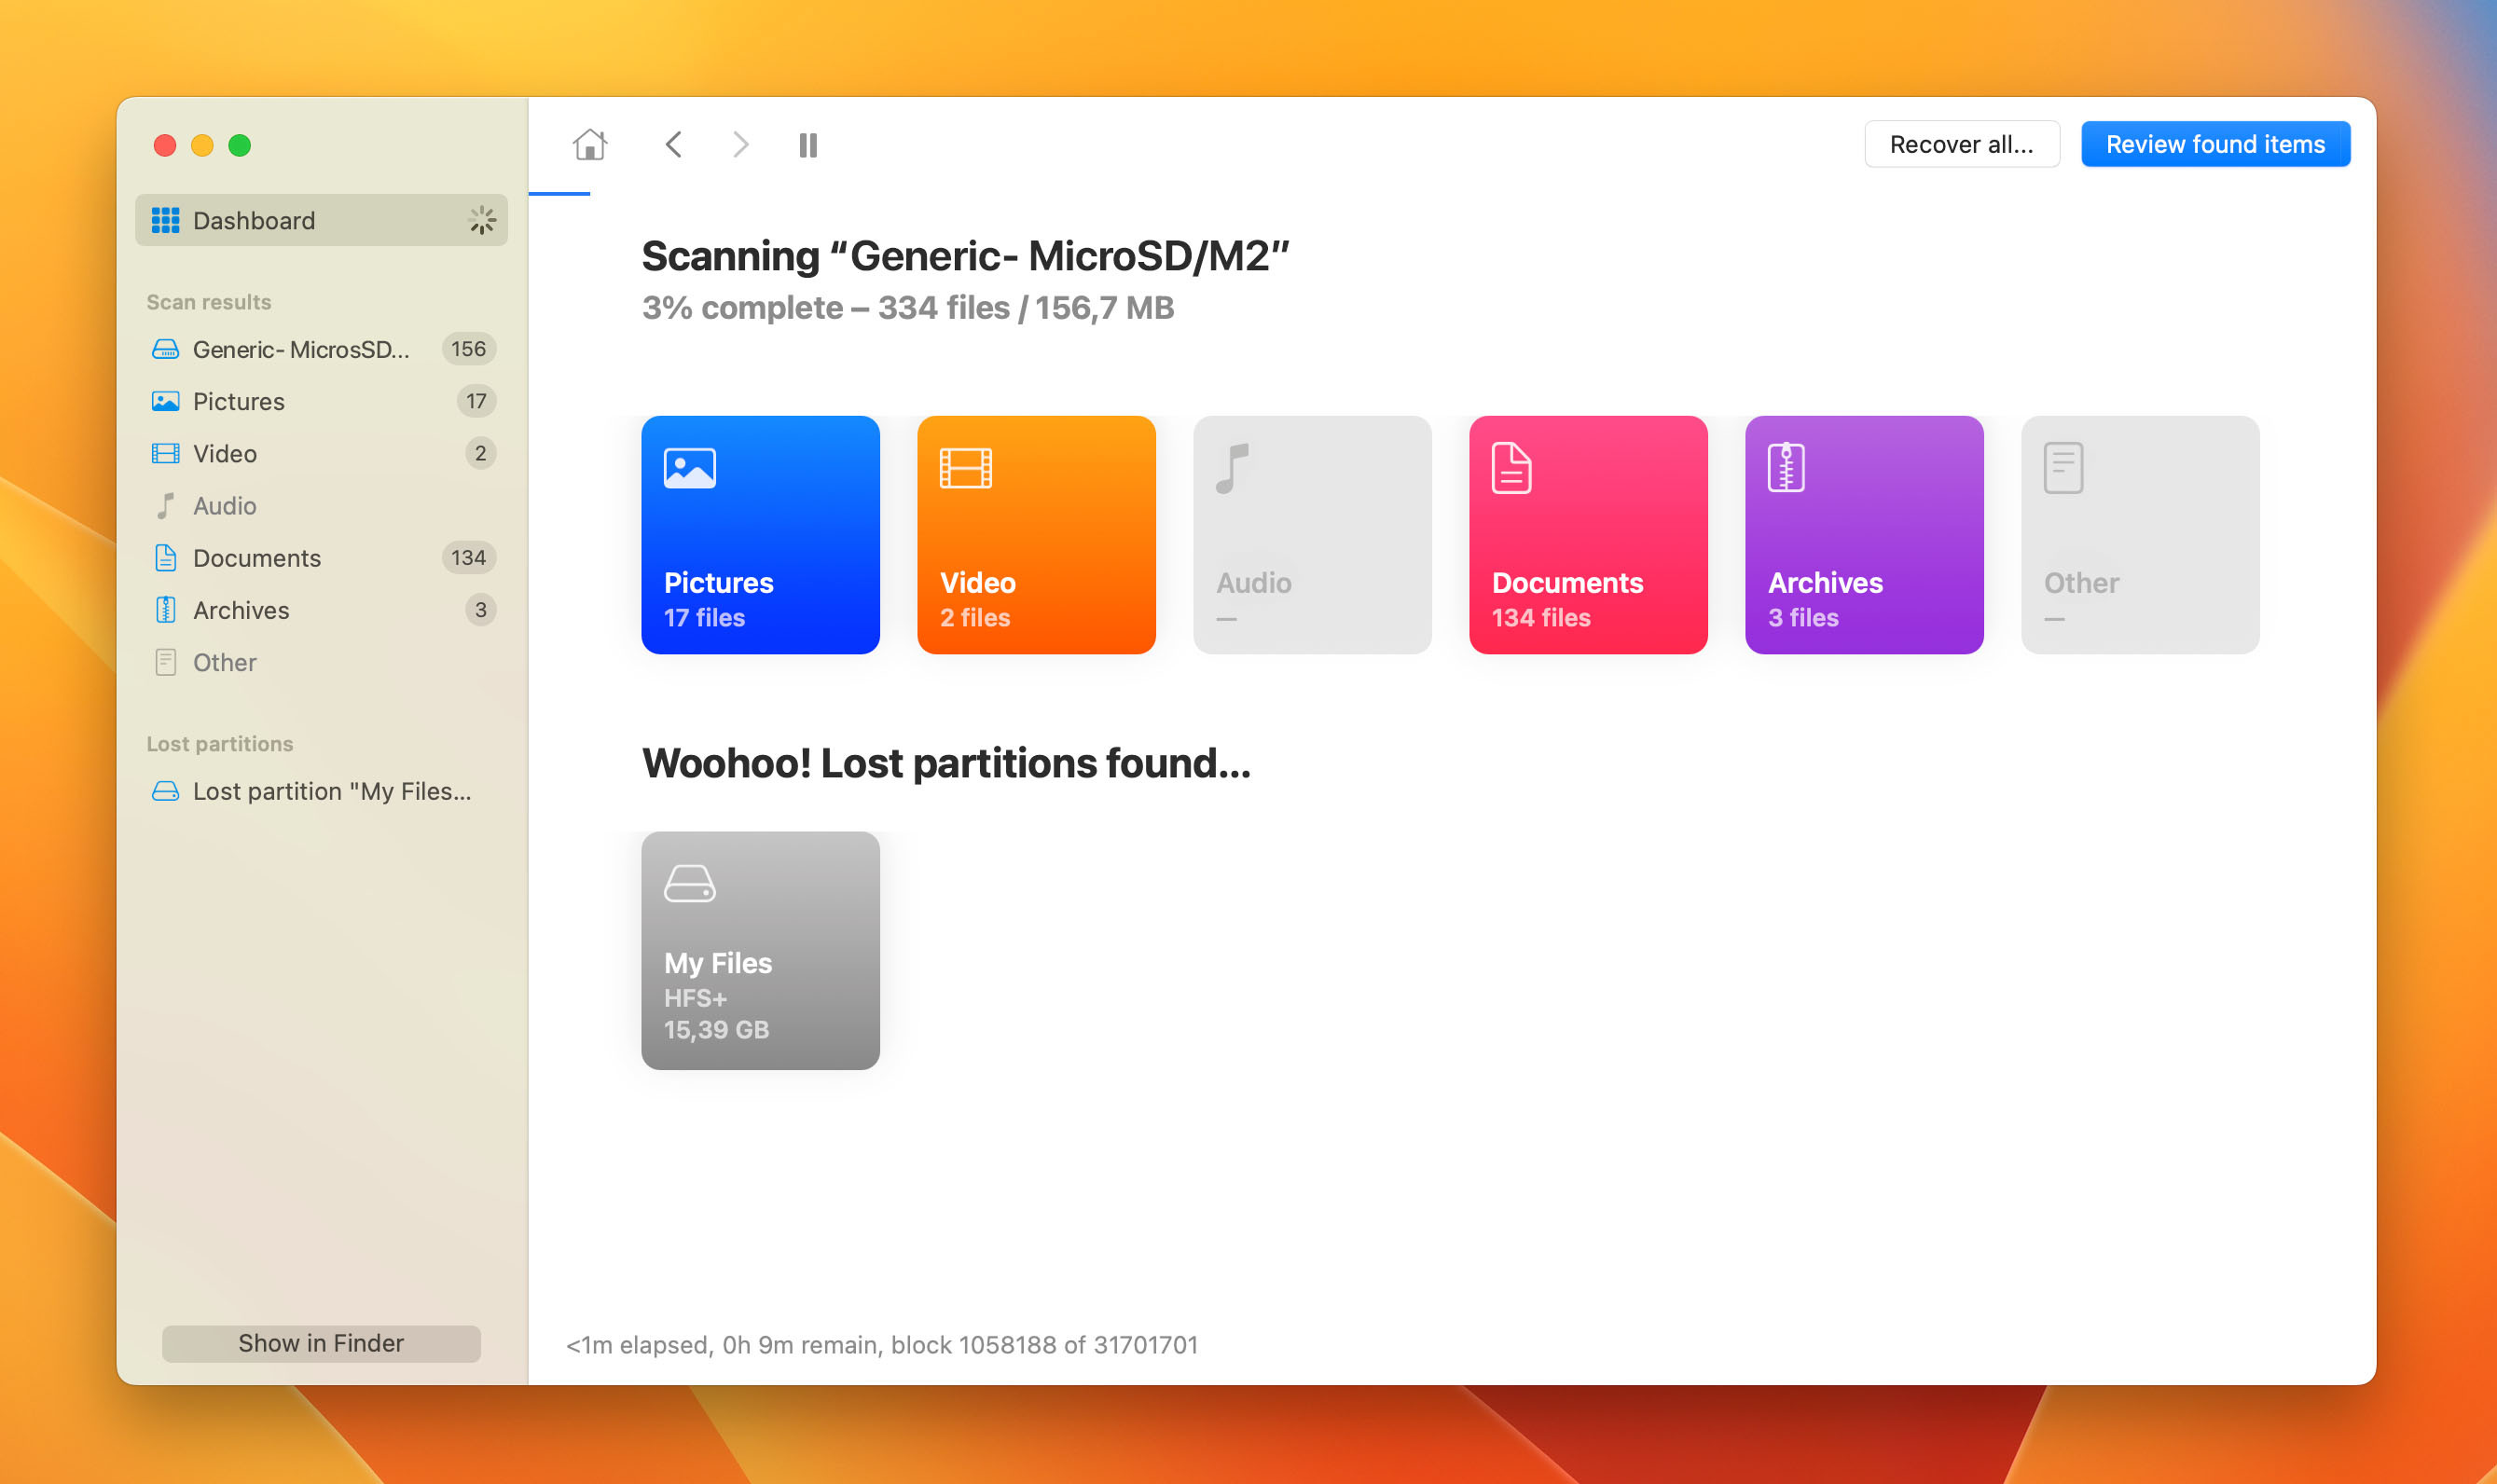 scan in progress
- Browse and Preview Recovered Items: After the scan is complete, review the items that Disk Drill was able to recover. You can browse the files, use the search box to find specific files, and use the Preview function to view files before recovery.
- Select Files for Recovery: Look through the files and check the box next to the ones you want to recover. Click the blue Recover button to start the recovery process.
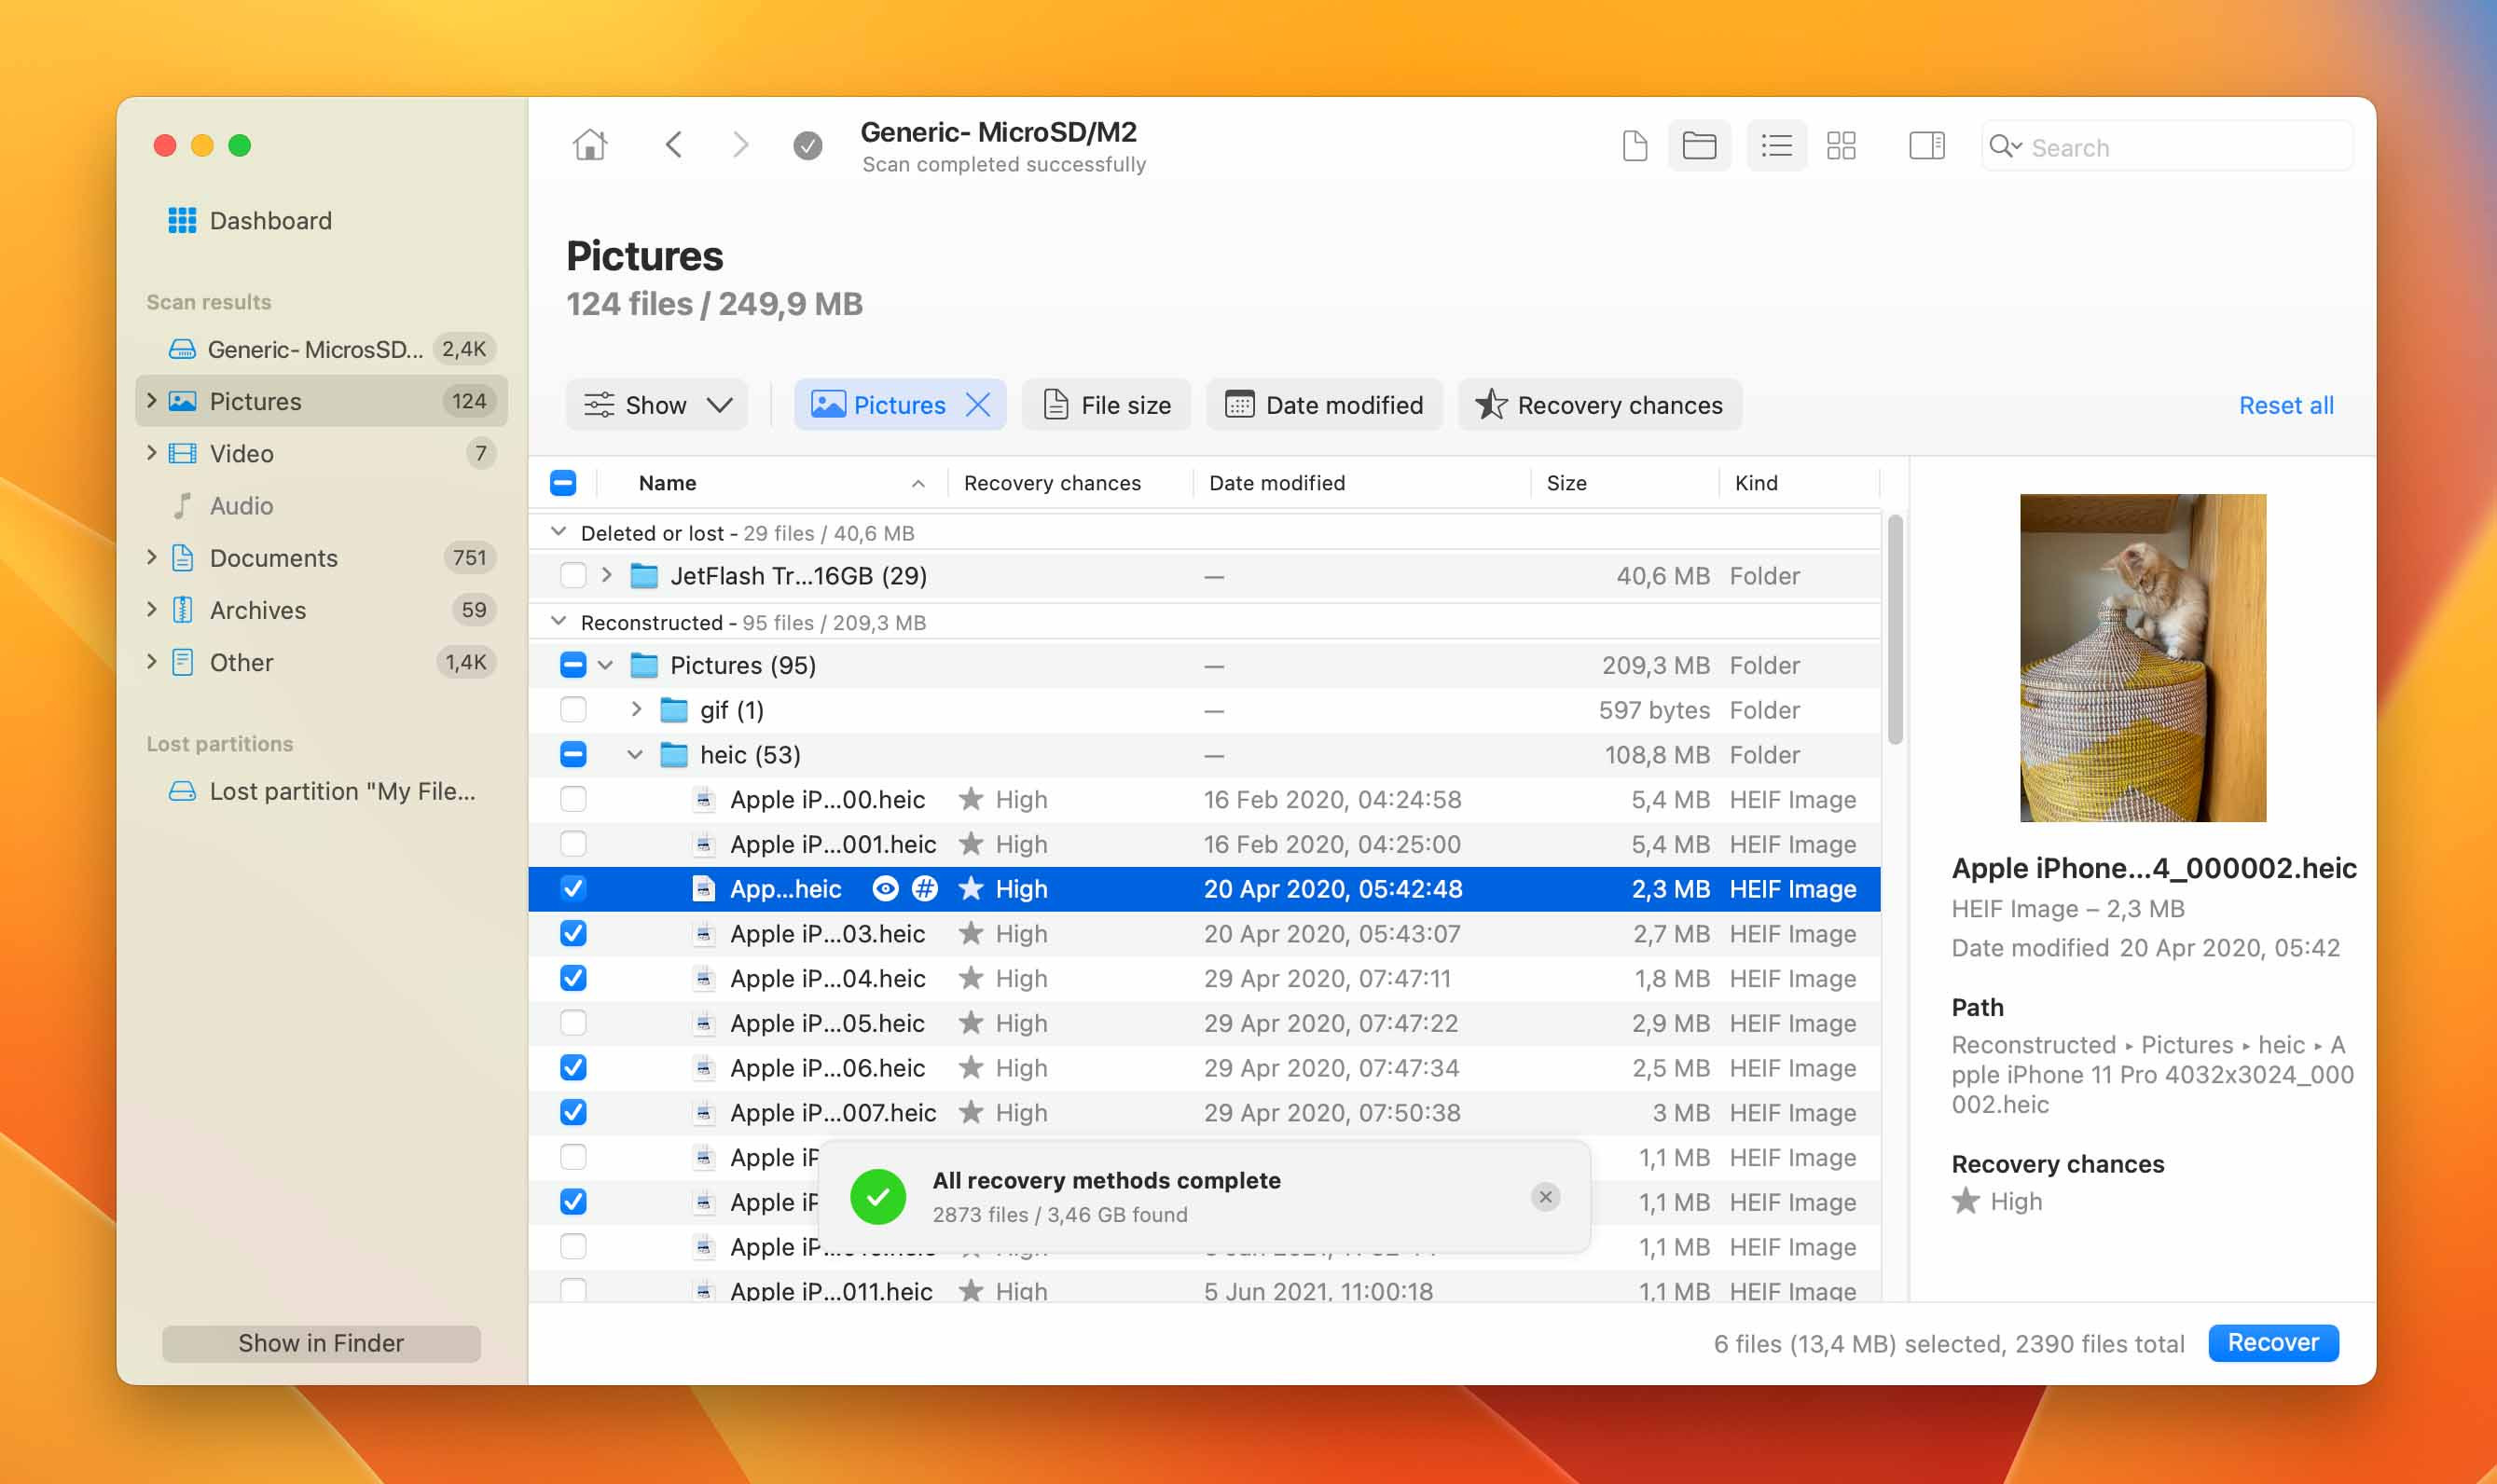 selecting files for recovery in disk drill
- Choose a Recovery Location: Choose an appropriate location for recovery, ensuring that you do not recover the photos to the same SD card, as this can corrupt the files.
Using data recovery software like Disk Drill is a comprehensive approach that maximizes your chances of successful photo recovery, providing a user-friendly interface and powerful scanning capabilities.
2.2 Way 2: Using an Android Data Recovery App
If you need to recover deleted photos from an SD card that was used in your Android smartphone or tablet, using an Android data recovery app is a convenient solution. DiskDigger photo recovery is a popular choice available on the Google Play Store.
Steps to Recover Deleted Photos with DiskDigger:
- Download and Install DiskDigger: Download the DiskDigger photo recovery app from the Google Play Store.
- Launch the App and Scan SD Card: Launch DiskDigger and select your SD card to scan for deleted photos. The SD card usually appears as “/mnt/sdcard” or a similar designation.
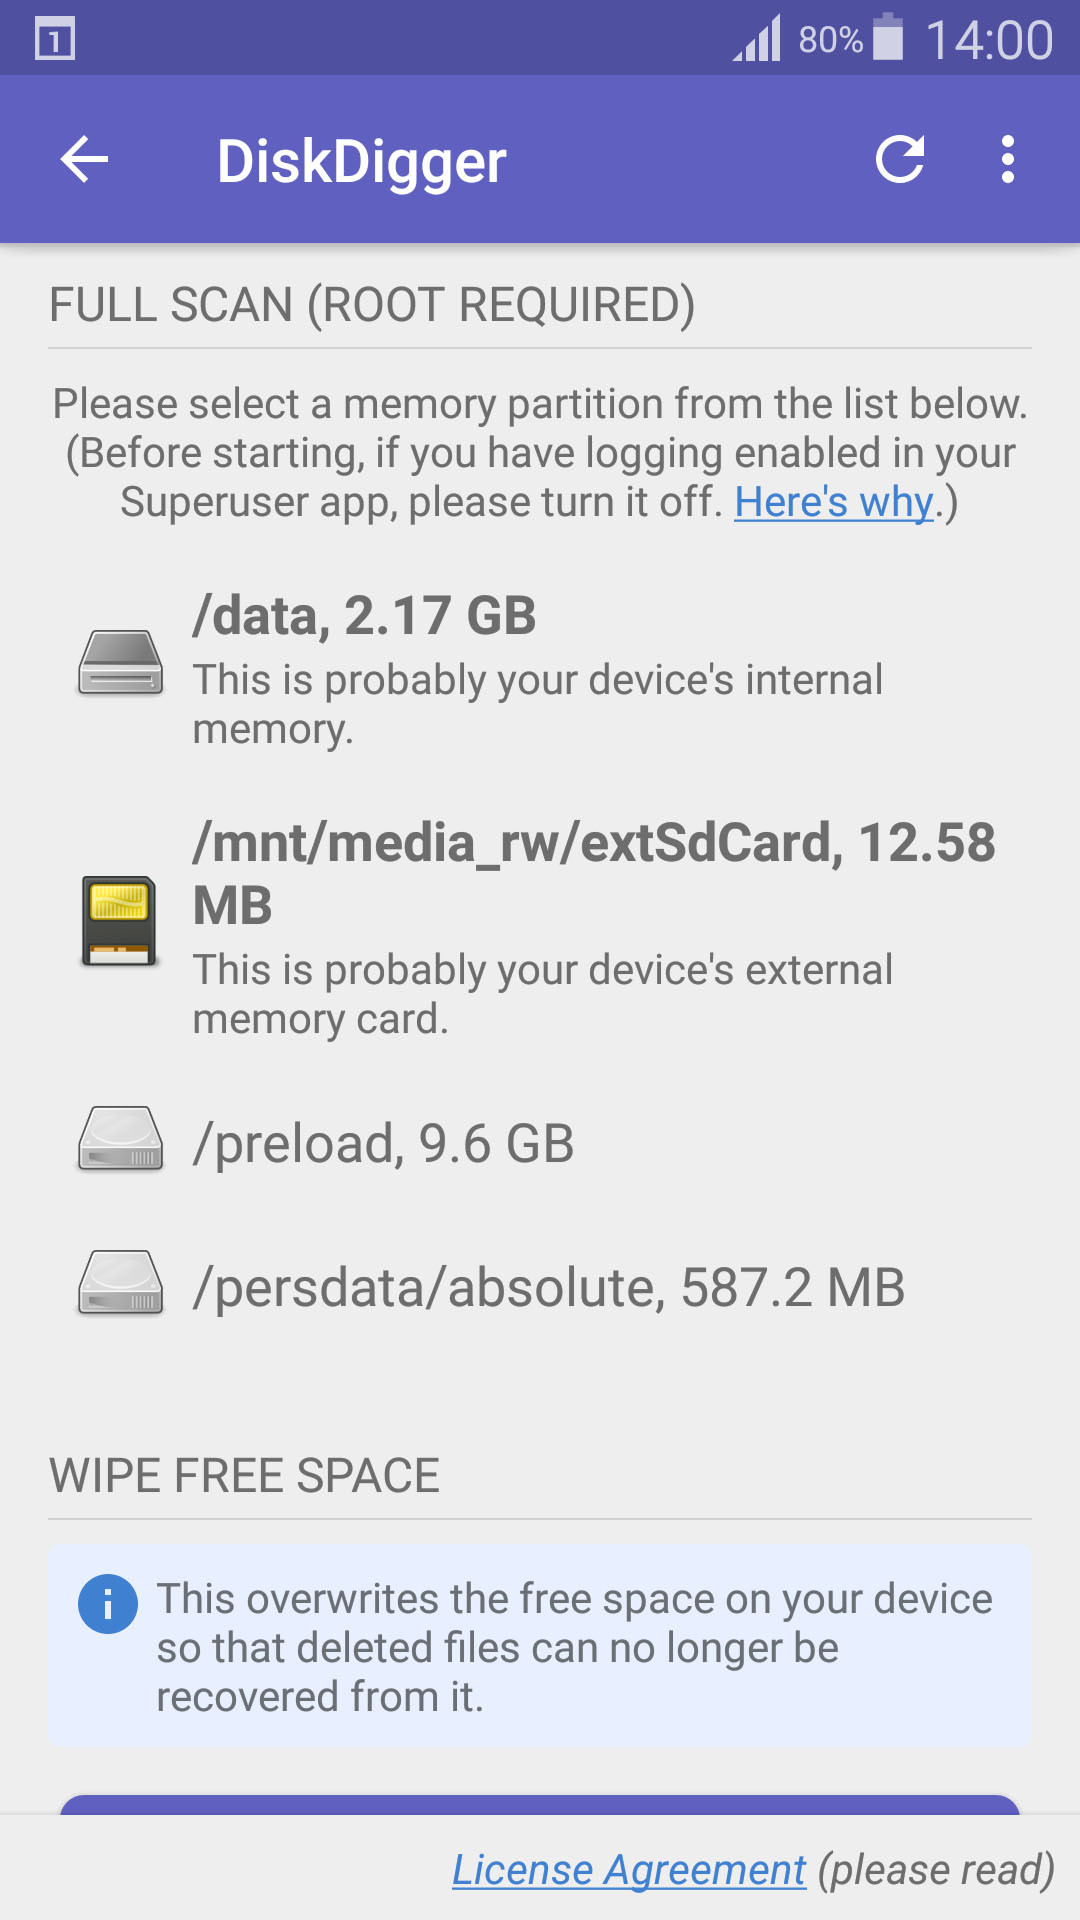 select storage device
- Specify File Types: Choose the file types you want to search for (e.g., JPG, PNG) and tap OK to start the scan.
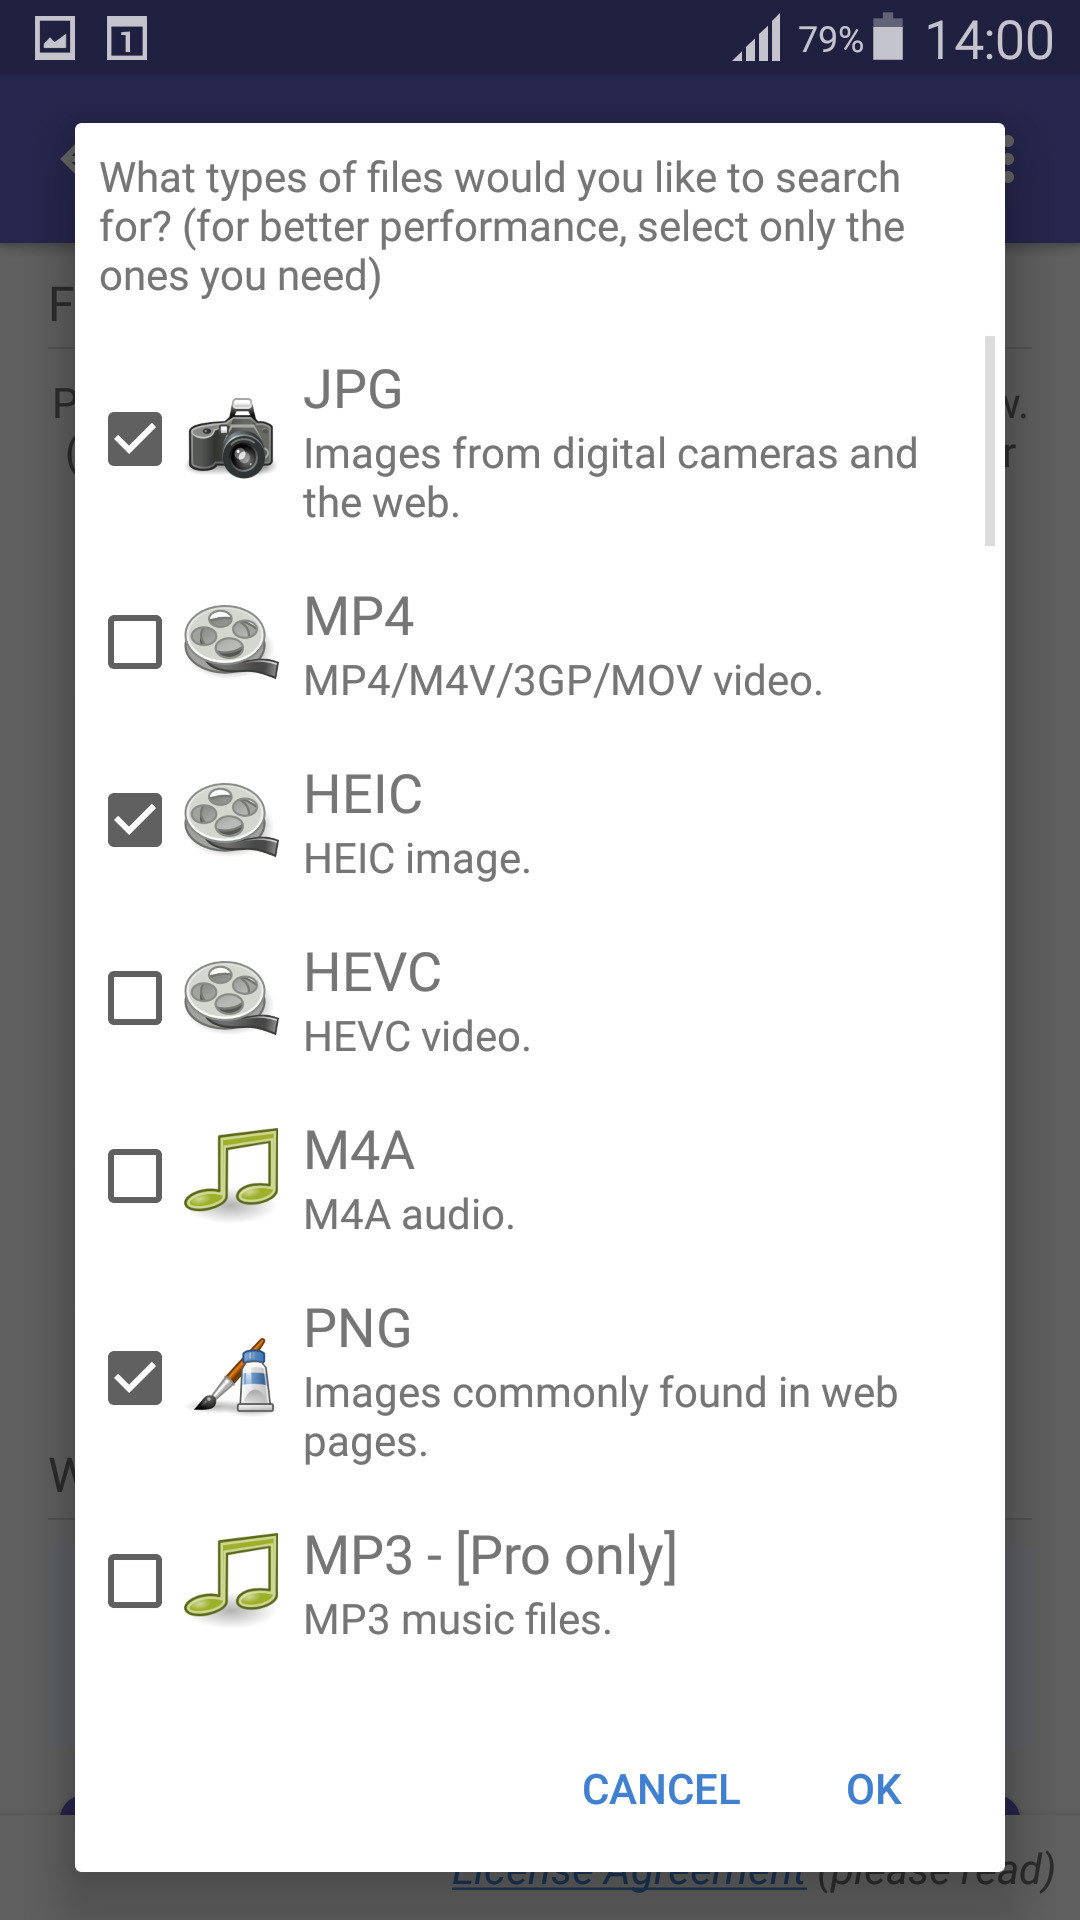 select file types
- Select Files to Recover: Browse through the found files and select the ones you want to recover.
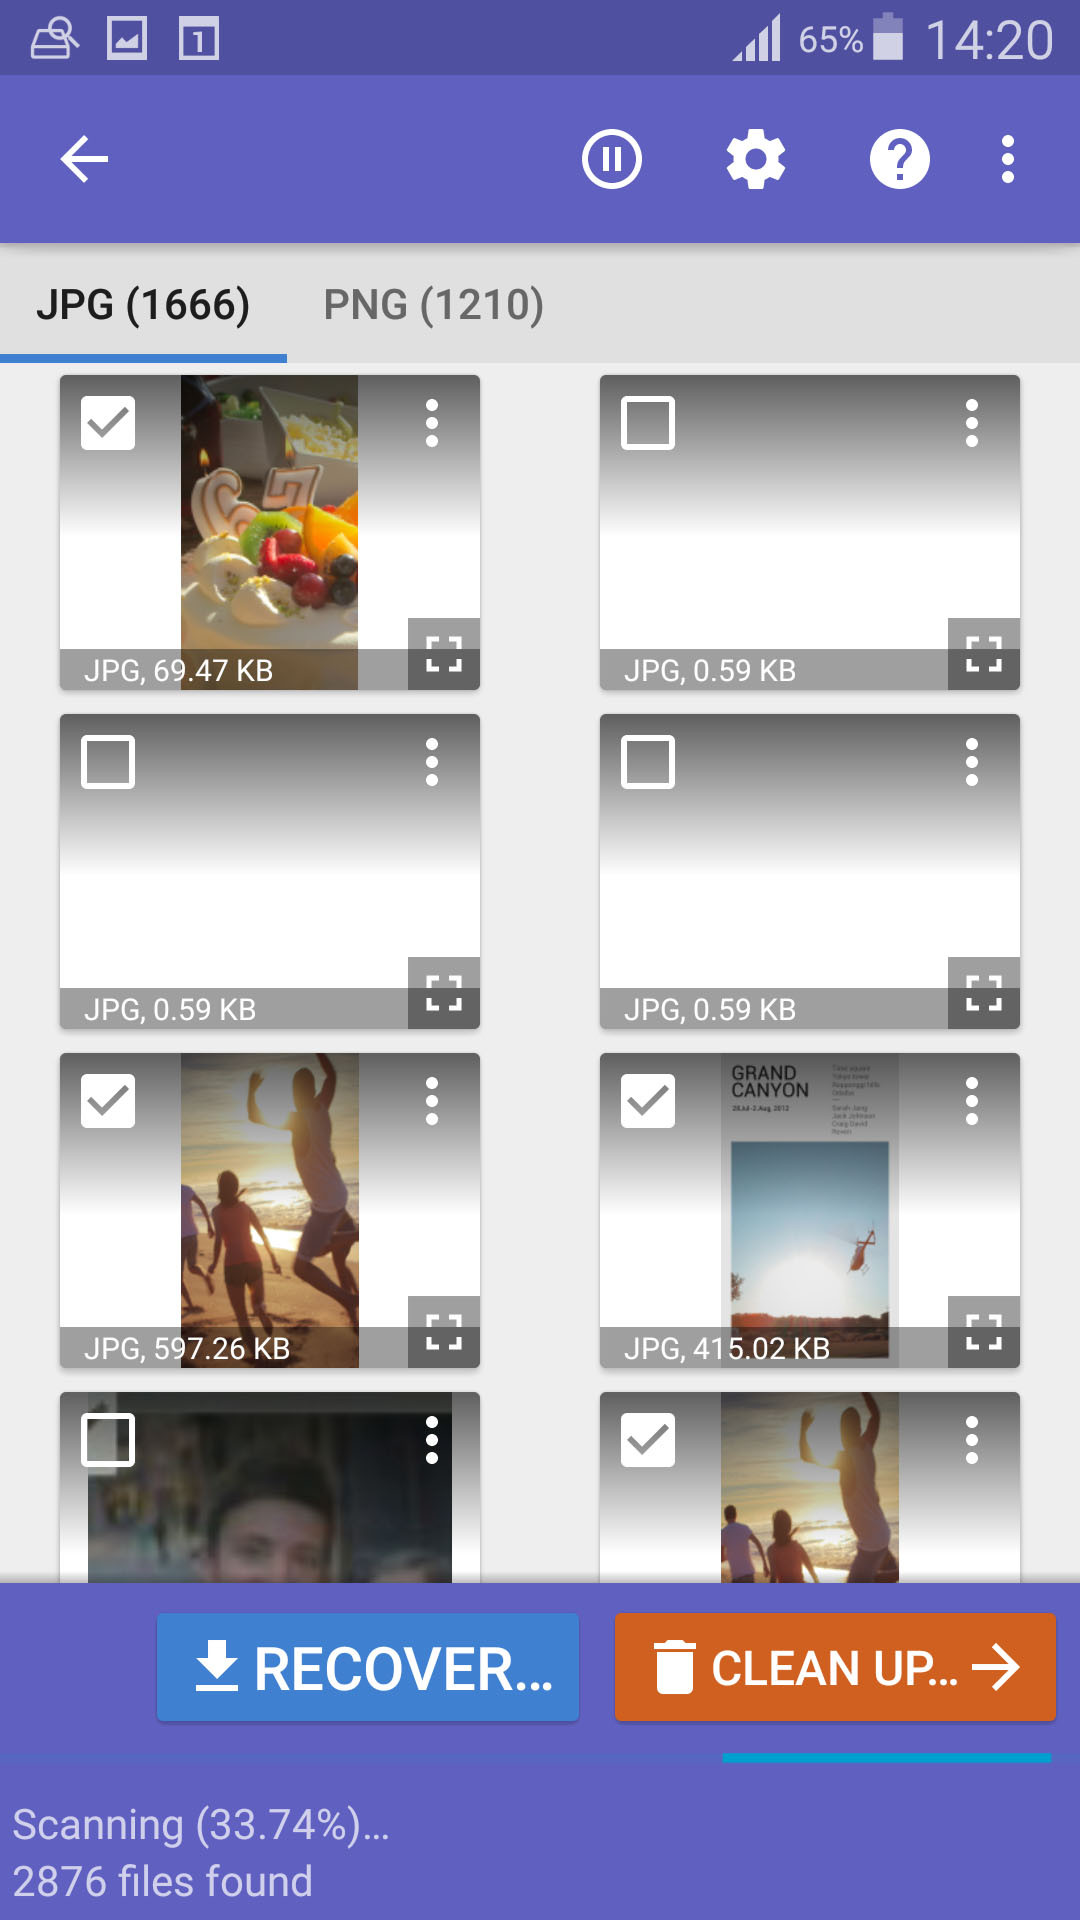 select files for recover
- Recover Photos: Tap the Recover button and choose a destination to save the recovered photos to your device.
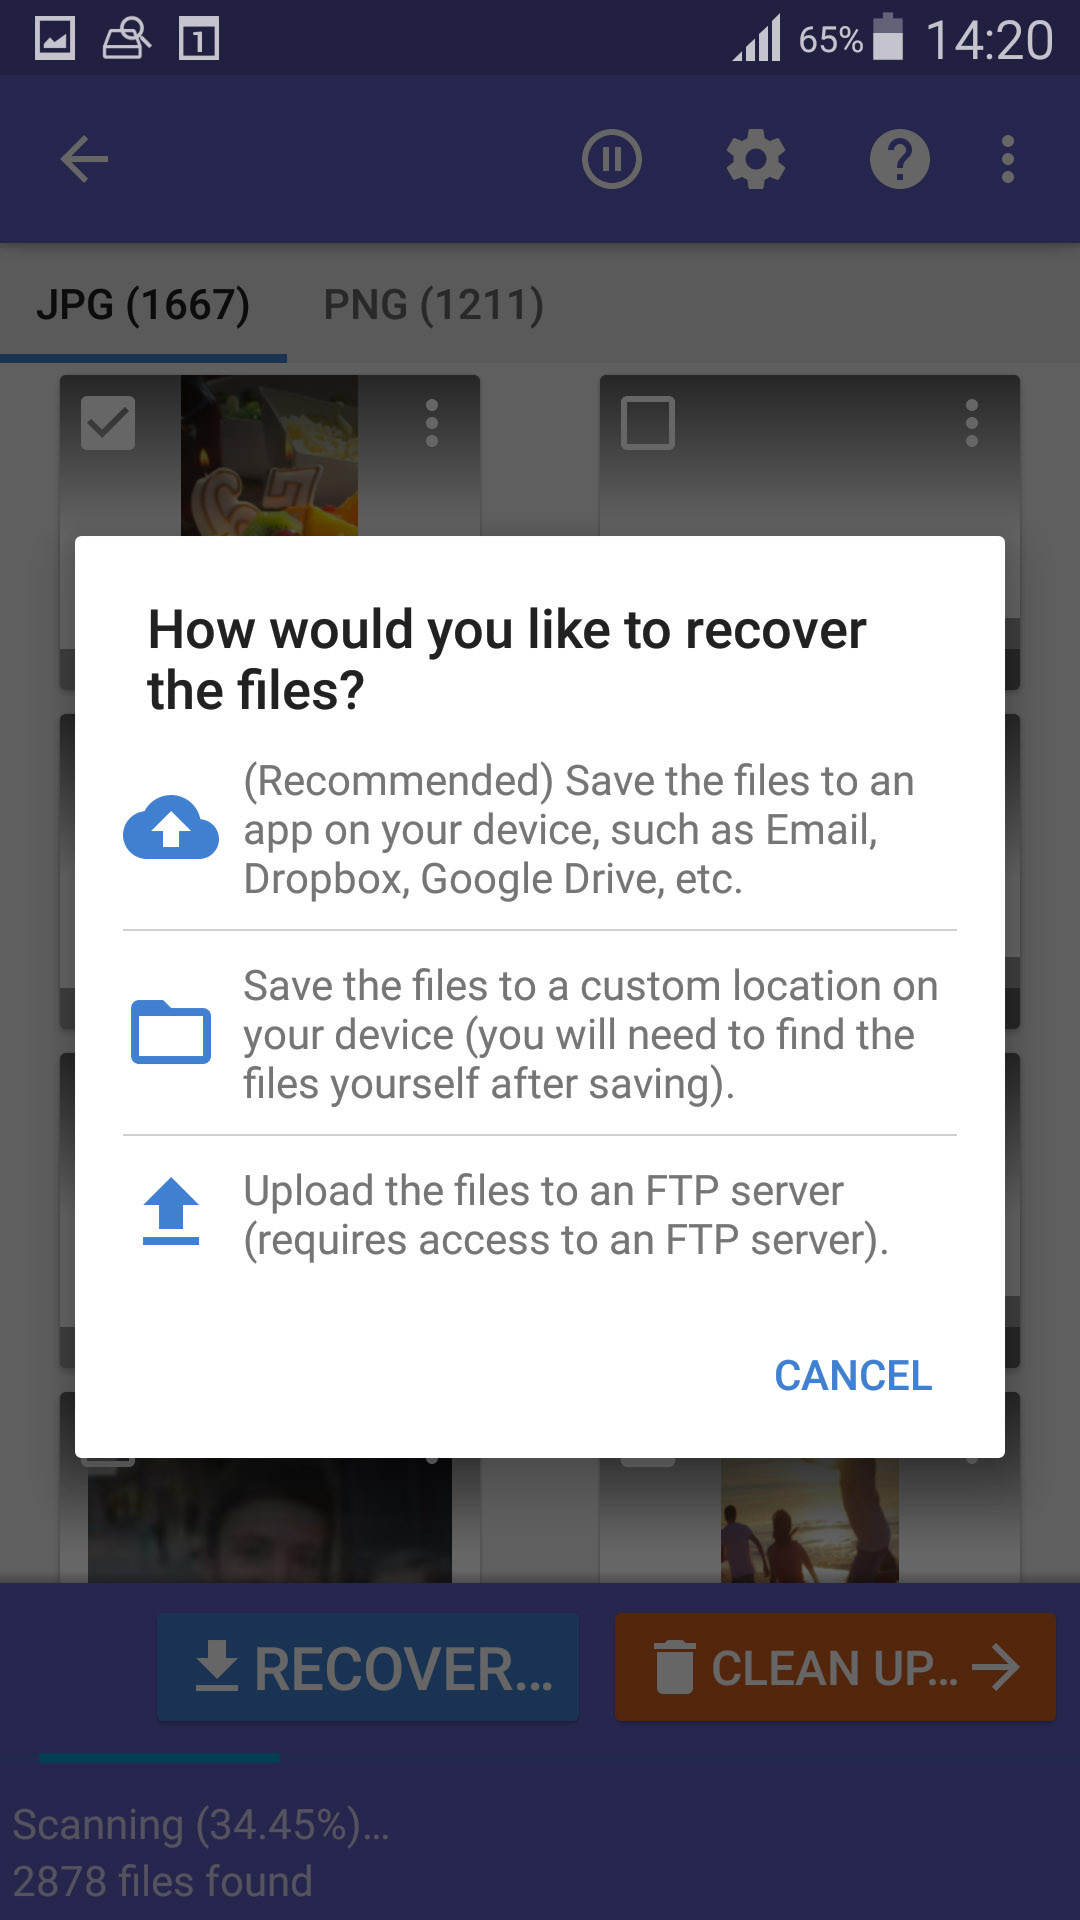 select recover destination
While DiskDigger is effective, rooting your Android device and using DiskDigger Pro can yield even better results. However, desktop data recovery software like Disk Drill generally provides more comprehensive recovery capabilities.
2.3 Way 3: Restoring Photos from a Backup
Restoring photos from a backup is a reliable method to recover deleted photos from an SD card, provided you have a backup in place. Regular backups ensure that your valuable photos are safe and can be easily restored in case of accidental deletion or card corruption.
Restoring from a Backup on Windows Using File History:
File History is a native backup utility in Windows 10 and 11 that can back up your personal files, including data on external storage devices like SD cards. If you have set up File History to back up your SD card photos, you can easily restore them.
- Open File History: Click the Start button and search for File History. Open the File History control panel.
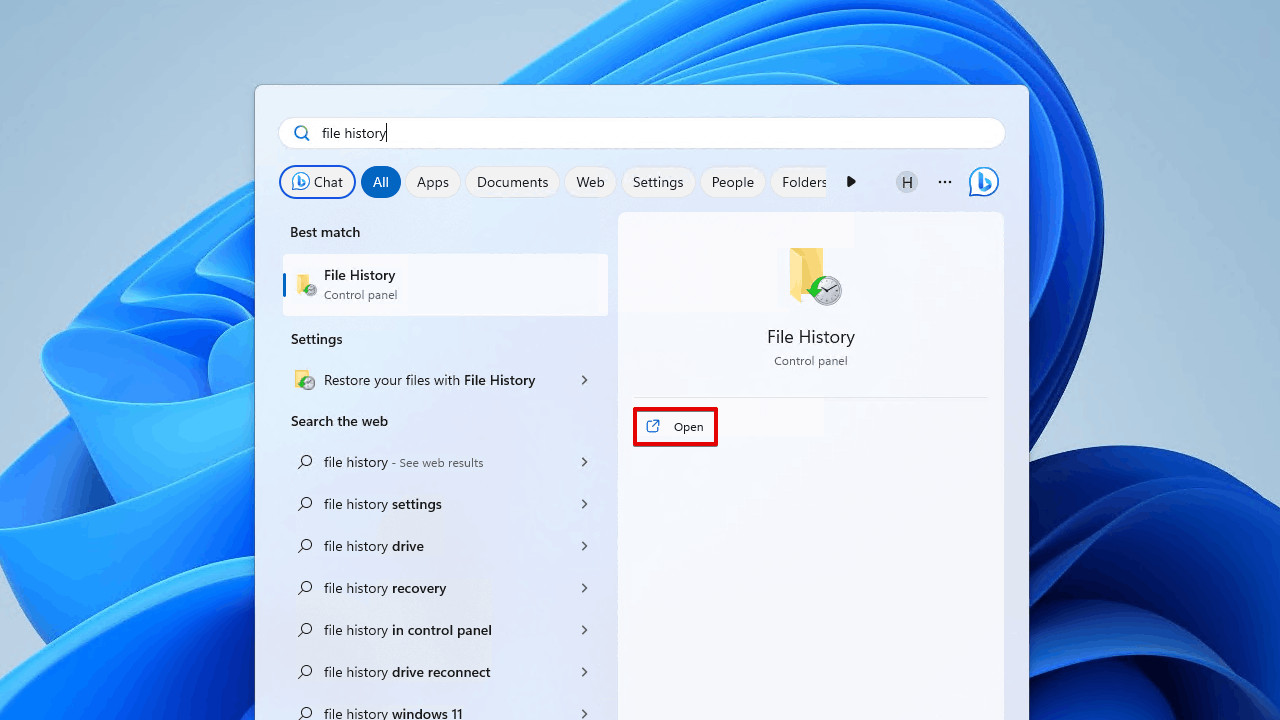 Opening File History
- Restore Personal Files: In the File History window, click on Restore personal files.
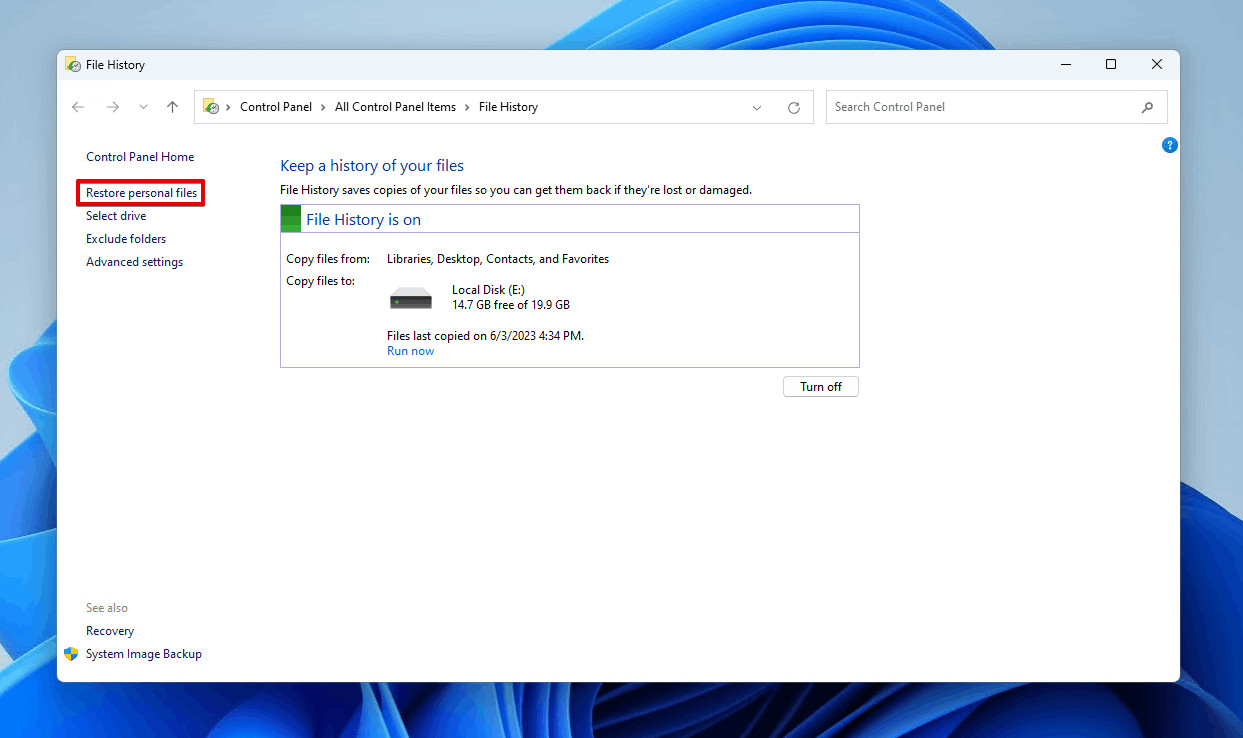 Restoring personal files
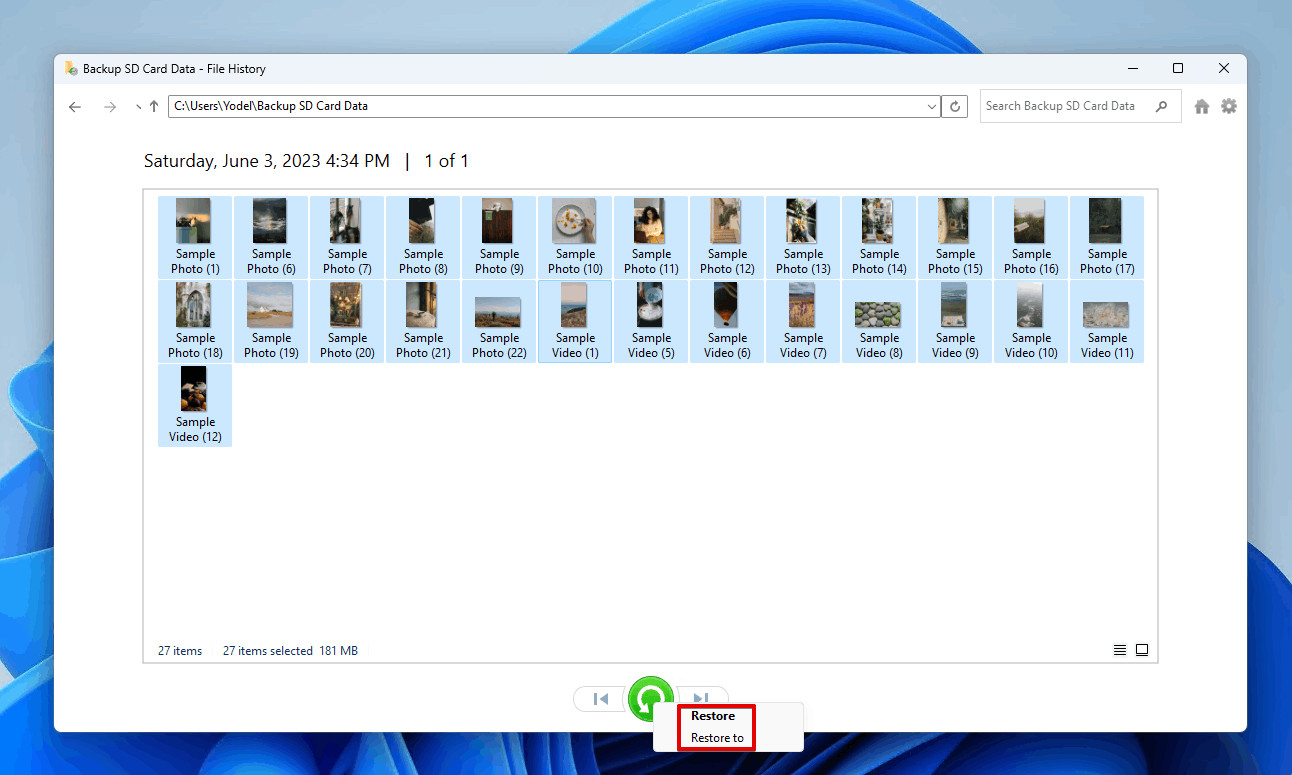
- Navigate to Backed-Up Photos: Navigate through the backed-up files and folders to find the photos you want to restore. Select the desired photos.
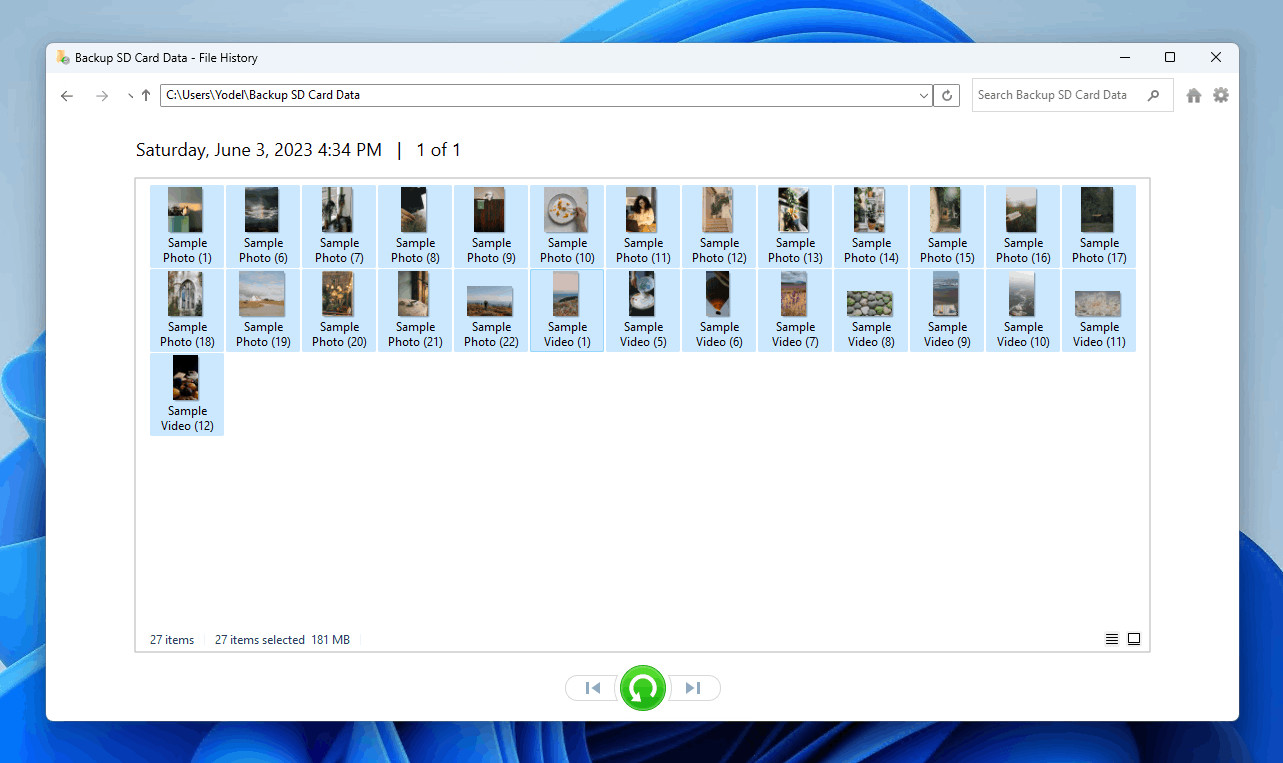 Selecting the SD card photos
- Restore Photos: Right-click the green Restore button. Choose Restore to restore the photos to their original location or Restore to to select a custom destination.
 Choosing how to restore the photos
Restoring from a Backup on Mac Using Time Machine:
Time Machine is macOS’s built-in backup feature, allowing you to automatically back up your data, including files on external devices like SD cards.
- Open Time Machine: Click the Time Machine icon in the menu bar and select Enter Time Machine.
- Navigate to Backed-Up Photos: Use the timeline or Finder window to navigate to the backed-up photos you want to restore.
- Select Photos and Restore: Select the photos and click the Restore button to restore them to their original location.
Using backup solutions like File History and Time Machine provides a secure way to protect your photos, ensuring they can be recovered in case of accidental deletion or data loss. It’s a great way to achieve peace of mind.
2.4 Way 4: Retrieving Photos from a Cloud Backup
Retrieving photos from a cloud backup is an excellent method to recover deleted photos from an SD card, especially for Android users who often utilize cloud services like OneDrive, Dropbox, or Google Photos. These services automatically back up your photos to the cloud, providing an accessible and secure way to restore your images.
 Recovering from a Cloud Backup
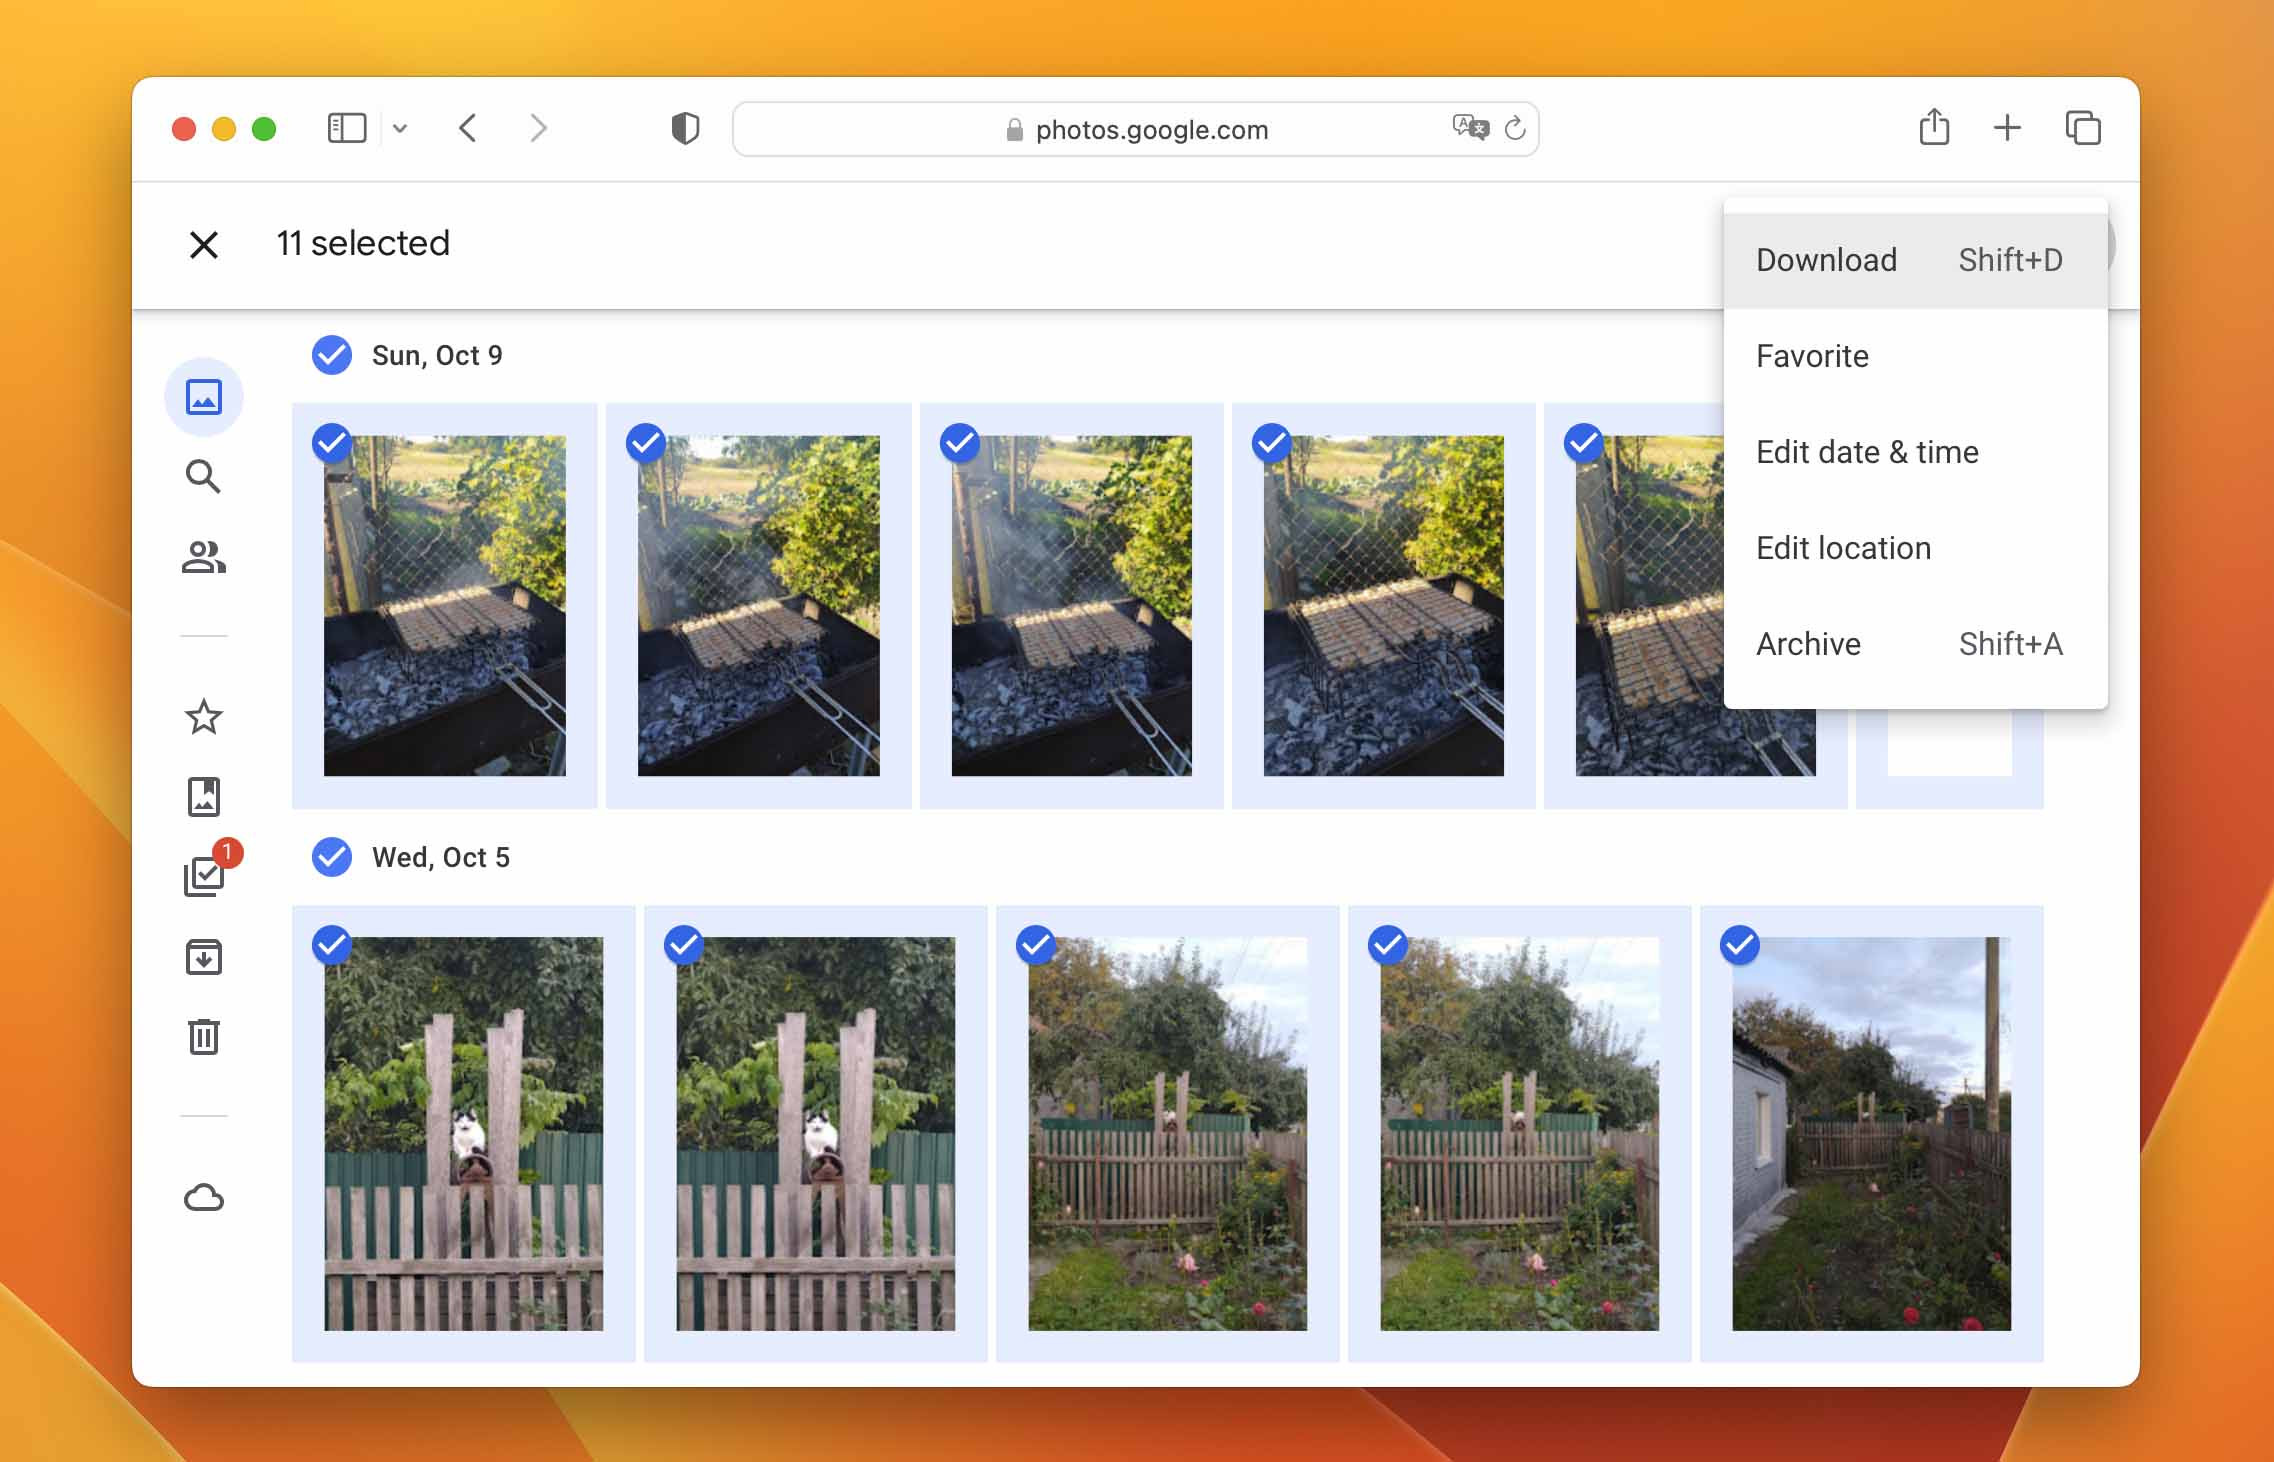
Steps to Retrieve Photos from Cloud Services:
- Access Your Cloud Storage: Open the cloud storage app (e.g., Google Photos, OneDrive, Dropbox) on your device or computer.
- Locate Deleted Photos: Navigate to the section where deleted or archived photos are stored.
- Download and Restore: Select the photos you want to recover and download them back to your device or a preferred location.
Cloud backups offer the flexibility to recover photos from anywhere and on any device, which is particularly useful if your original device is lost or stolen.
2.5 Way 5: Checking Your Device’s Internal Memory or Storage
Checking your device’s internal memory or storage can sometimes help recover deleted photos from an SD card. When you delete a photo, it is often logically deleted, meaning the storage space is marked as available, but the data might still be present until overwritten by new data.
- Stop Using the Device Immediately: To maximize the chances of recovery, stop using the device as soon as you realize a photo has been deleted. This prevents new data from overwriting the deleted photo.
- Check Photo Apps: Many devices and photo apps retain copies of your photos. For example, macOS Photos app has a “Recently Deleted” folder where deleted photos are stored for 30 days.
This method works best if you act quickly and the deleted photos have not been overwritten.
2.6 Way 6: Recovering Photos From the Recycle Bin/Trash
Recovering photos from the Recycle Bin (on Windows) or Trash (on macOS) is a straightforward way to retrieve accidentally deleted files. Before files are permanently deleted, they are typically moved to these temporary storage locations.
On Windows:
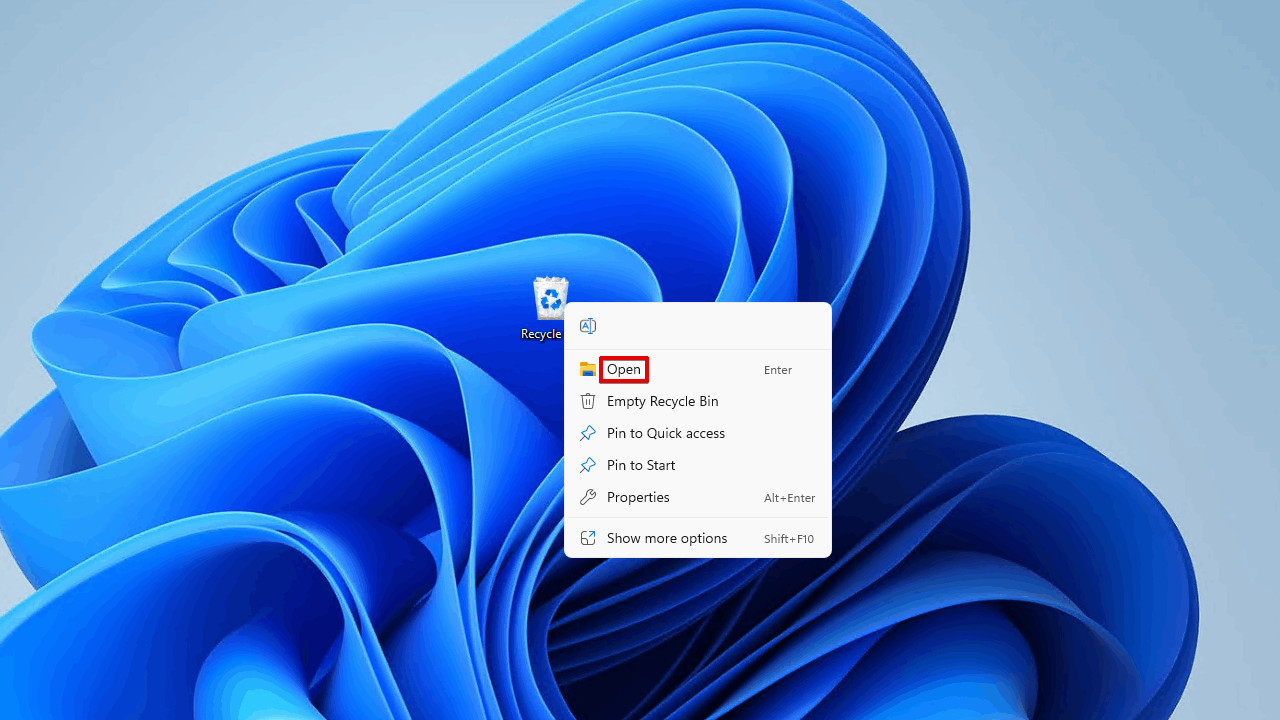
- Open Recycle Bin: Double-click the Recycle Bin icon on your desktop to open it.
 Opening Recycle Bin
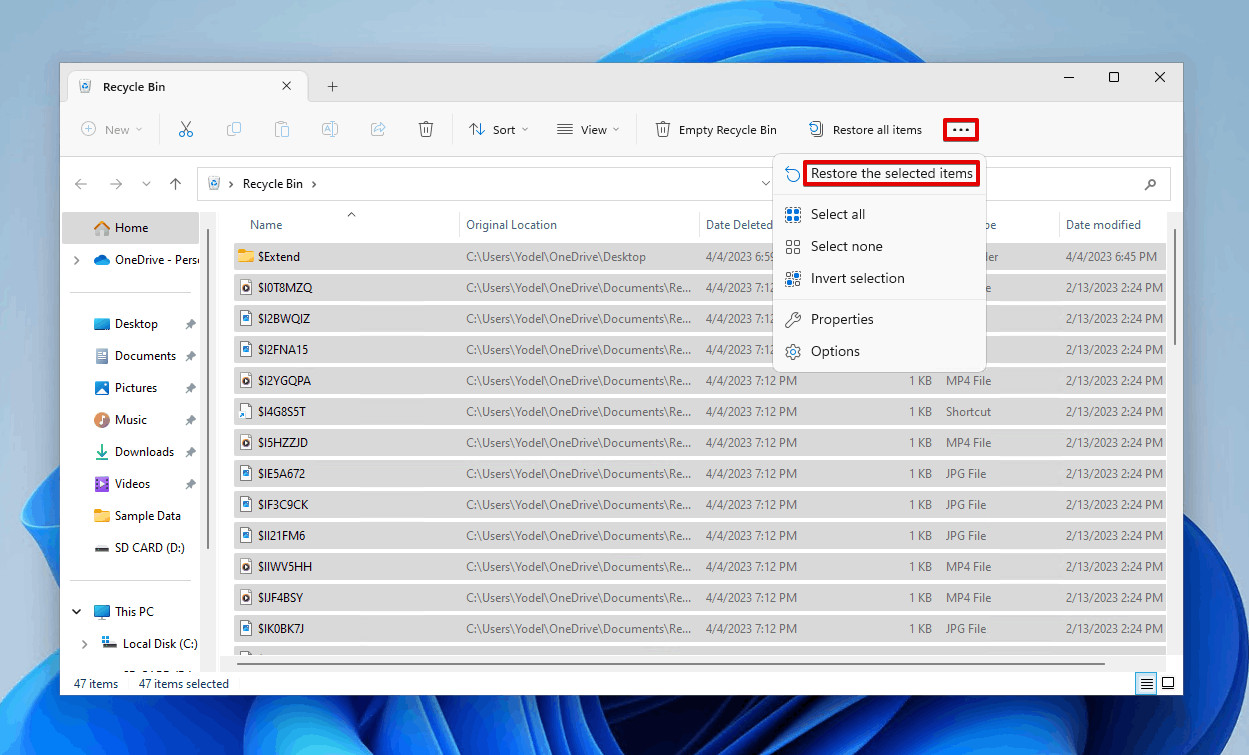
- Select and Restore Files: Browse the files in the Recycle Bin and select the photos you want to restore. Right-click on the selected files and choose Restore.
 Restoring the selected files
On Mac:
- Open Trash: Click the Trash icon in the Dock to open it in Finder.
- Drag and Drop Files: Locate the photos you want to restore and drag them out of the Trash to a safe location on your Mac.
Recovering photos from the Recycle Bin or Trash is a quick and easy solution for recently deleted files, but it’s important to remember that files deleted from external storage devices like SD cards might not always be sent to the Recycle Bin or Trash.
3. Key Considerations for Successful Photo Recovery
To enhance your chances of successfully recovering deleted photos from an SD card, consider these key factors:
- Act Quickly: The sooner you attempt to recover deleted photos, the better. The longer you wait, the higher the risk of the data being overwritten by new data.
- Avoid Using the SD Card: To prevent overwriting, stop using the SD card immediately after realizing that photos have been deleted. Remove it from the camera or device and store it safely until you’re ready to perform the recovery process.
- Choose Reliable Recovery Software: Select reputable data recovery software like Disk Drill, which is known for its effectiveness and user-friendly interface.
- Backup Regularly: Implement a regular backup routine to protect your photos. Use a combination of local backups (e.g., external hard drives) and cloud backups (e.g., Google Photos, OneDrive) for maximum protection.
- Handle SD Cards Carefully: Protect your SD cards from physical damage, extreme temperatures, and magnetic fields, which can lead to data corruption.
- Check for Hidden Files: Sometimes, deleted photos might still be present on the SD card as hidden files. Ensure your file explorer is set to show hidden files and folders.
- Use a Reliable Card Reader: Use a high-quality card reader to connect the SD card to your computer. A faulty card reader can cause data corruption or hinder the recovery process.
- Consider Professional Help: If you’re unable to recover your photos using DIY methods, consider seeking professional data recovery services. Professionals have specialized tools and expertise to handle complex data loss situations.
By following these guidelines, you can significantly increase your chances of successfully recovering deleted photos from an SD card and minimize the impact of data loss.
4. The Impact of File Systems on SD Card Recovery
The file system used on an SD card significantly impacts the ease and success of photo recovery. Understanding the different file systems and their implications is crucial for effective data retrieval.
- FAT32: Commonly used on smaller SD cards (up to 32GB), FAT32 is compatible with a wide range of devices but has limitations in terms of file size (maximum 4GB). Data recovery from FAT32 SD cards is generally straightforward due to its simple file structure.
- exFAT: Typically found on larger SD cards (64GB and above), exFAT supports larger file sizes and is compatible with most modern devices. exFAT is designed to minimize file fragmentation, which can improve data recovery prospects.
- NTFS: While less common on SD cards, NTFS is used by Windows operating systems and offers advanced features like file compression and permissions. Data recovery from NTFS SD cards can be more complex due to its sophisticated file structure.
- HFS+ and APFS: Used by macOS, HFS+ and APFS offer robust file management and security features. Data recovery from HFS+ and APFS SD cards requires specialized tools that can understand these file systems.
Understanding the file system of your SD card helps you choose the right recovery tools and methods, increasing your chances of successful photo retrieval. Disk Drill supports a wide variety of filesystems.
5. How to Prevent Photo Loss in the Future
Preventing photo loss is better than having to recover deleted photos. Here are some practical tips to help you safeguard your precious memories:
- Regular Backups: Implement a routine for backing up your photos regularly. Use a combination of local backups (e.g., external hard drives) and cloud backups (e.g., Google Photos, OneDrive) for maximum redundancy.
- Use Multiple SD Cards: When shooting important events, use multiple SD cards to distribute the risk of data loss. If one card fails, you’ll still have the photos on the other cards.
- Eject SD Cards Safely: Always use the “safely remove” option when ejecting SD cards from your computer or device to prevent data corruption.
- Avoid Filling SD Cards Completely: Leaving some free space on your SD cards can help prevent data corruption and improve performance.
- Protect SD Cards from Physical Damage: Store your SD cards in protective cases to prevent physical damage, such as bending, scratching, or exposure to extreme temperatures.
- Use Reliable SD Cards: Invest in high-quality SD cards from reputable brands to reduce the risk of card failure or data corruption.
- Check SD Card Health Regularly: Use software tools to check the health of your SD cards periodically. This can help you identify potential issues before they lead to data loss.
- Be Careful with Formatting: Avoid formatting SD cards unless necessary. If you do need to format a card, make sure you have a backup of all the data first.
- Enable Cloud Syncing: Enable automatic cloud syncing for your photos on your smartphone or camera. This ensures that your photos are backed up to the cloud as soon as they are taken.
- Educate Yourself: Stay informed about data recovery techniques and best practices for SD card maintenance. This will help you respond quickly and effectively in the event of data loss.
By following these preventive measures, you can significantly reduce the risk of photo loss and ensure that your precious memories are safe and accessible.
6. Common Mistakes to Avoid During SD Card Recovery
To maximize your chances of successful SD card photo recovery, avoid these common mistakes:
- Writing New Data to the SD Card: One of the biggest mistakes is continuing to use the SD card after realizing that photos have been deleted. Writing new data to the card can overwrite the deleted photos, making them unrecoverable. Stop using the card immediately and store it safely until you’re ready to perform the recovery process.
- Using Unreliable Recovery Software: Using unreliable or untrusted recovery software can damage your SD card or compromise your data. Stick to reputable and well-known data recovery tools like Disk Drill, which have a proven track record of success.
- Recovering Files to the Same SD Card: Recovering the recovered files to the same SD card can overwrite the remaining deleted photos, making them unrecoverable. Always recover the files to a separate storage device, such as an external hard drive or a different SD card.
- Performing Multiple Scans: Performing multiple scans with different recovery tools can potentially damage the SD card and reduce the chances of successful recovery. Stick to one reliable recovery tool and perform a thorough scan.
- Ignoring Physical Damage: If your SD card is physically damaged (e.g., cracked, bent, or water-damaged), attempting to recover data yourself can further damage the card and make recovery impossible. Seek professional data recovery services if your card is physically damaged.
- Not Backing Up Your Data: One of the most common mistakes is not having a backup of your important photos. Regular backups are essential for preventing data loss and ensuring that you can recover your photos in the event of accidental deletion or card failure.
- Using the Wrong Recovery Method: Using the wrong recovery method for your situation can reduce your chances of success. For example, using a simple undelete tool when the SD card has been formatted is unlikely to work. Understand the cause of data loss and choose the appropriate recovery method.
- Panicking: Data loss can be stressful, but panicking can lead to mistakes that make recovery more difficult. Stay calm, follow the recommended steps, and seek professional help if needed.
- Assuming the Card is Dead: Even if your SD card appears to be dead or unresponsive, it may still be possible to recover data from it. Don’t assume the card is unrecoverable until you’ve exhausted all available recovery options.
- Overlooking Simple Solutions: Sometimes, the solution to data loss is simple. Check the Recycle Bin or Trash for deleted photos before resorting to more complex recovery methods.
By avoiding these common mistakes, you can significantly increase your chances of successfully recovering deleted photos from an SD card and minimizing the impact of data loss.
7. Understanding SD Card Types and Their Impact on Recovery
Different SD card types have varying specifications and performance characteristics, which can influence the data recovery process. Here’s a breakdown of common SD card types and how they affect recovery:
| SD Card Type | Capacity | Performance | Recovery Implications |
|---|---|---|---|
| SD (Standard Capacity) | Up to 2GB | Slow | Older technology; recovery tools may have limited support. |
| SDHC (High Capacity) | 2GB to 32GB | Moderate | Widely supported; recovery is generally straightforward. |
| SDXC (eXtended Capacity) | 32GB to 2TB | Fast | Requires modern recovery tools that support exFAT file system. |
| SDUC (Ultra Capacity) | 2TB to 128TB | Very Fast | Newer technology; ensure recovery tools are compatible with ultra-high capacities. |
| microSD | Varies (similar to SD) | Varies (similar to SD) | Smaller size increases risk of physical damage; use care when handling during recovery. |
Understanding the type of SD card you’re working with can help you choose the right recovery tools and methods, optimizing your chances of successful photo retrieval.
8. Exploring the Role of Forensic Data Recovery
Forensic data recovery is a specialized field that involves using advanced techniques and tools to recover data from damaged or inaccessible storage devices. While most users can handle basic data recovery tasks with software like Disk Drill, certain situations require the expertise of forensic data recovery professionals.
When to Consider Forensic Data Recovery:
- Physically Damaged SD Cards: If your SD card is physically damaged due to water, fire, or impact, forensic data recovery may be necessary.
- Severely Corrupted Data: In cases of severe data corruption, standard recovery tools may not be able to retrieve all the data. Forensic experts can use specialized techniques to reconstruct the data.
- Deleted Data Overwritten Multiple Times: When data has been overwritten multiple times, standard recovery methods may not be effective. Forensic data recovery can sometimes retrieve fragments of the original data.
- Complex Data Loss Scenarios: Forensic data recovery is useful in complex data loss scenarios involving multiple storage devices, RAID arrays, or encrypted data.
Forensic data recovery involves a meticulous and thorough process that includes:
- Device Assessment: Forensic experts will carefully assess the condition of the SD card to determine the extent of the damage and the feasibility of data recovery.
- Cleanroom Environment: Data recovery is often performed in a cleanroom environment to prevent contamination and further damage to the SD card.
- Advanced Imaging Techniques: Forensic experts use advanced imaging techniques to create a bit-by-bit copy of the SD card, ensuring that no data is lost during the recovery process.
- Data Reconstruction: Using specialized tools and techniques, forensic experts will reconstruct the file system and recover the data from the SD card.
Forensic data recovery is a valuable resource for recovering data from SD cards that have experienced severe damage or complex data loss scenarios. While it can be more expensive than DIY data recovery, it offers the best chance of retrieving valuable photos and other data.
9. What Are Some Real-World Scenarios and Recovery Tips
Understanding real-world scenarios and applying targeted recovery tips can significantly improve your chances of retrieving deleted photos from an SD card. Here are some common scenarios and specific recovery strategies:
-
Accidental Deletion During a Photoshoot:
- Scenario: You accidentally delete a set of photos while reviewing them on your camera during a photoshoot.
- Recovery Tip: Immediately stop using the camera and remove the SD card. Use data recovery software like Disk Drill to scan the card and recover the deleted photos. Avoid taking more photos until the recovery is complete to prevent overwriting.
-
SD Card Formatting:
- Scenario: You accidentally format the SD card in your camera or computer, erasing all the photos.
- Recovery Tip: Do not add any new data to the formatted SD card. Use data recovery software to perform a deep scan of the card. Look for options like “recover from formatted drive” to increase the chances of success.
-
SD Card Corruption:
- Scenario: Your SD card becomes corrupted, and your computer or camera can’t recognize it, making your photos inaccessible.
- Recovery Tip: First, try connecting the SD card to a different device or computer to rule out compatibility issues. If the card is still unreadable, use data recovery software that can handle corrupted file systems. Consider using CHKDSK on Windows or First Aid on macOS to attempt to repair the file system before running the recovery software.
-
Water Damage:
- Scenario: Your SD card gets wet, leading to potential damage and data loss.
- Recovery Tip: Remove the SD card from the device immediately and allow it to dry completely before attempting to recover data. Place the card in a bag of silica gel to absorb moisture. If the card still doesn’t work, consider professional data recovery services.
-
Physical Damage:
- Scenario: Your SD card is physically damaged, such as being bent, cracked, or broken.
- Recovery Tip: Do not attempt to repair the card yourself. Physical damage requires professional data recovery services with specialized equipment.
-
Data Overwriting:
- Scenario: You accidentally continue using the SD card after deleting photos, and new data overwrites the deleted files.
- Recovery Tip: The chances of recovering overwritten data are slim, but you can still try using data recovery software with deep scanning capabilities. The sooner you attempt the recovery, the better the chances of retrieving some of the photos.
-
Firmware Issues:
- Scenario: The SD card’s firmware is corrupted, causing the card to malfunction and preventing access to the photos.
- Recovery Tip: Firmware issues often require specialized tools and expertise. Contact the SD card manufacturer or a professional data recovery service for assistance.
-
Power Surge or Electrical Damage:
- Scenario: Your SD card is affected by a power surge or electrical damage, leading to data corruption or loss.
- Recovery Tip: Do not attempt to use the card. Send it to a professional data recovery service that specializes in electrical damage.
By understanding these real-world scenarios and applying the appropriate recovery tips, you can increase your chances of successfully retrieving deleted photos from an SD card.
10. Why Choose dfphoto.net for Your Photography Needs?
At dfphoto.net, we understand the importance of preserving your cherished memories and valuable work. That’s why we provide comprehensive resources and guidance on data recovery, photography techniques, and equipment to empower photographers of all levels. Whether you are a professional photographer in Santa Fe or an amateur enthusiast, dfphoto.net has resources for you.
Here’s why you should visit dfphoto.net:
- Extensive Learning Resources: Access detailed guides and tutorials on various photography techniques, from mastering exposure and composition to advanced editing tips.
- Equipment Reviews and Recommendations: Get unbiased reviews and recommendations on the latest cameras, lenses, and accessories to help you make informed decisions.
- Inspiration and Creativity: Explore stunning photo galleries and stories from talented photographers around the world to spark your creativity and inspire your next project.
- Community Engagement: Connect with a vibrant community of photographers, share your work, and get feedback to improve your skills.
- Data Recovery Solutions: Find reliable data recovery software and services to help you retrieve lost photos from SD cards and other storage devices.
- Photography Tips and Tricks: Learn valuable tips and tricks to enhance your photography skills, whether you’re shooting portraits, landscapes, or wildlife.
- Stay Updated: Keep up with the latest trends and technologies in the photography industry through our informative articles and news updates.
Visit dfphoto.net today to explore our vast collection of resources, connect with fellow photographers, and take your photography skills to the next level. Whether you’re looking for inspiration, guidance, or solutions to your photography challenges, dfphoto.net is your ultimate resource. Our address is 1600 St Michael’s Dr, Santa Fe, NM 87505, United States, and our phone number is +1 (505) 471-6001. Visit our website dfphoto.net.
Don’t let data loss ruin your memories. Explore dfphoto.net today and discover how you can protect your photos and enhance your photography journey.
FAQ
1. How to recover deleted photos from an SD card?
To recover deleted photos from an SD card, download and install data recovery software like Disk Drill, connect the SD card to your computer, scan the card for lost data, select the photos you want to recover, and save them to a safe location on your computer or another storage device.
2. How to recover photos from a corrupted SD card?
To recover photos from a corrupted SD card, first, try connecting the card to a different device to rule out compatibility issues. Then, use data recovery software that can handle corrupted file systems to scan the card. If the card is severely corrupted, you may need to use CHKDSK on Windows or First Aid on macOS to repair the file system before running the recovery software.
3. How can I recover deleted photos from my SD card for free?
You can recover deleted photos from your SD card for free by using free data recovery software like Disk Drill (offers up to 500 MB of free recovery), PhotoRec, or Windows File Recovery. These tools scan your SD card for recoverable files and allow you to save them to your computer.
4. How to recover deleted photos from memory card without software?
Unfortunately, it’s not possible to recover deleted photos from a memory card without software. You can, however, go through your backups and look for them there. Some digital cameras automatically create backup copies and store them on in the internal memory, so make sure to look there as well.
5. How to recover deleted photos from an SD card on Android phone?
To recover deleted photos from an SD card on an Android phone, download and install a data recovery app like DiskDigger from the Google Play Store. Launch the app, select the SD card to scan, choose the file types you want to recover, and then select and save the recovered photos to your device.
6. How Do I Recover Photos From a Sandisk SD Card?
To recover photos from a SanDisk SD card, download and install data recovery software like Disk Drill on your computer. Connect the SanDisk SD card to your computer using a card reader, launch Disk Drill, select the SD card, and start the scanning process. After the scan is complete, preview the recoverable files, select the photos you want to recover, and save them to a safe location.
7. Can You Recover Photos From a Formatted SD Card?
Yes, you can recover photos from a formatted SD card using data recovery software. After formatting, the data may still be recoverable until it is overwritten. Use recovery software with deep scanning capabilities to search for any recoverable files, and be sure to act quickly to prevent overwriting.