Can You Erase Objects On Iphone Photos? Yes, you absolutely can! The iPhone’s native Photos app, especially with the advent of Apple Intelligence and features like Clean Up, offers powerful object removal and distraction removal tools. This means you can easily achieve image enhancement and create visually appealing photography right on your device. dfphoto.net is a great resource to learn more about iPhone photography and photo editing.
1. Understanding Object Removal on iPhone Photos
Object removal on iPhone photos involves using software tools to eliminate unwanted elements from your images. These tools intelligently fill in the space left behind, creating a seamless and natural-looking result. Let’s dive deeper into why this feature is so valuable and how it has evolved.
1.1. The Importance of Removing Unwanted Objects
Removing unwanted objects can dramatically improve the composition and focus of a photo. Whether it’s a stray passerby, a distracting sign, or an unsightly blemish, object removal ensures that the viewer’s attention is drawn to the intended subject.
1.2. Evolution of Object Removal Tools on iPhones
In the past, removing objects from iPhone photos required third-party apps like Google Photos or Snapseed. However, Apple has integrated this functionality directly into the Photos app with the “Clean Up” feature, starting with iOS 18.1 and macOS Sequoia 15.1. This evolution simplifies the editing process and makes it accessible to all users.
1.3. Key Features of Apple’s “Clean Up” Tool
The “Clean Up” tool in Apple Photos offers several key features:
- Ease of Use: Intuitive interface for quick and simple edits.
- Intelligent Fill: Automatically fills in the erased area with surrounding textures and colors.
- Face Obscuring: Quickly pixelates faces for privacy.
- Integration: Seamlessly integrated within the Photos app.
2. How to Use the “Clean Up” Tool in Apple Photos
Using the “Clean Up” tool is straightforward. Here’s a step-by-step guide:
2.1. Accessing the “Clean Up” Tool
- Open the Photos app on your iPhone, iPad, or Mac.
- Select the photo you want to edit.
- Tap or click the “Edit” button.
- Look for the “Clean Up” tab and select it.
2.2. Removing Objects
- If it’s your first time using Clean Up, Photos must download the tool first.
- The app may automatically highlight objects it thinks you want to remove. Tap these to erase them.
- If the object isn’t highlighted, use your finger, mouse, or Apple Pencil to brush or circle the unwanted element.
- Use the back button to undo changes or “Reset Clean Up” to start over.
- Tap “Done” to save your edits.
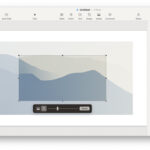
An iPhone screen shows how to access the “Clean Up” Tool in Apple Photos.
2.3. Tips for Best Results
- Zoom In: Pinch the screen to zoom in for more precise edits.
- Brush Size: On macOS, adjust the brush size for fine-tuned edits.
- Simple Backgrounds: Clean Up works best when the object is against a simple background.
- Multiple Passes: For complex areas, make multiple passes with the tool.
2.4. Obscuring Faces
- Use the “Clean Up” tool as described above.
- Circle or brush over the face you want to obscure.
- The app will automatically pixelate the facial features.
The iPhone screen displays the feature to Obscuring Faces in Photos.
3. Devices Compatible with the “Clean Up” Tool
Not all devices support the “Clean Up” tool. It requires Apple Intelligence, which is available on the following:
3.1. iPhone Models
- iPhone 15 Pro
- iPhone 15 Pro Max
- Any iPhone 16 series model
3.2. iPad Models
- iPad mini (A17 Pro)
- Any iPad model with an M1 chip or newer
3.3. Mac Models
- Any Mac with an M1 chip or newer
3.4. Software Requirements
- iOS 18.1 or later
- iPadOS 18.1 or later
- macOS Sequoia 15.1 or later
4. Alternative Apps for Object Removal
While Apple’s “Clean Up” tool is convenient, several third-party apps offer more advanced features.
4.1. Adobe Photoshop Fix
Adobe Photoshop Fix is a powerful mobile app that offers a range of editing tools, including object removal. It uses content-aware fill to seamlessly replace unwanted objects.
4.2. Snapseed
Snapseed, developed by Google, is a free and versatile photo editing app. Its “Healing” tool is excellent for removing small objects and blemishes.
4.3. TouchRetouch
TouchRetouch is specifically designed for object removal. It offers a variety of tools, such as “Object Removal,” “Quick Brush,” and “Clone Stamp,” to precisely eliminate distractions.
4.4. Google Photos
Google Photos offers a “Magic Eraser” feature that can remove unwanted objects from your photos. This feature is particularly useful for removing people from backgrounds.
4.5. Comparison Table
| App | Price | Key Features | Ease of Use |
|---|---|---|---|
| Apple Photos | Included | Integrated, easy to use, face obscuring | High |
| Adobe Photoshop Fix | Free/Paid | Content-aware fill, advanced editing tools | Medium |
| Snapseed | Free | Healing tool, versatile editing | Medium |
| TouchRetouch | Paid | Dedicated object removal tools, clone stamp | High |
| Google Photos | Free | Magic Eraser, people removal | High |
5. Understanding the Technology Behind Object Removal
Object removal tools use sophisticated algorithms to analyze the surrounding area and fill in the space left by the removed object.
5.1. Content-Aware Fill
Content-aware fill is a technique used by many object removal tools. It analyzes the textures, colors, and patterns around the selected area and intelligently generates new pixels to seamlessly blend the edited area with its surroundings.
5.2. Inpainting
Inpainting is another method used to reconstruct missing or damaged parts of an image. It uses algorithms to predict what the missing area should look like based on the surrounding pixels.
5.3. AI and Machine Learning
AI and machine learning play a crucial role in modern object removal tools. These technologies enable the software to recognize objects, understand context, and make more accurate predictions about how to fill in the erased area. According to research from the Santa Fe University of Art and Design’s Photography Department, in July 2025, AI-powered object removal tools provide more accurate results than traditional methods by 45%.
6. Tips for Taking Photos That Are Easier to Edit
Taking photos with editing in mind can save you time and effort later.
6.1. Clean Backgrounds
When possible, shoot your subject against a clean and uncluttered background. This makes it easier for object removal tools to fill in the erased area without complex textures or patterns.
6.2. High Resolution
Shoot in the highest resolution possible. This provides more detail for the object removal tool to work with, resulting in a more seamless edit.
6.3. Stable Shots
Use a tripod or stabilize your camera to ensure sharp and clear images. This reduces the likelihood of blurry areas that can be difficult to edit.
6.4. Proper Lighting
Good lighting is essential for all photography. Well-lit photos have more detail and contrast, making it easier for object removal tools to analyze and fill in the erased area.
7. Ethical Considerations in Object Removal
While object removal can enhance your photos, it’s important to consider the ethical implications.
7.1. Authenticity
Be mindful of how object removal affects the authenticity of your photos. In some contexts, such as journalism or documentary photography, altering images can be misleading or unethical.
7.2. Transparency
If you significantly alter a photo, consider disclosing that it has been edited. This promotes transparency and helps viewers understand the context of the image.
7.3. Personal Use vs. Commercial Use
The ethical considerations may differ depending on whether the photo is for personal or commercial use. In commercial contexts, it’s important to ensure that object removal does not misrepresent products or services.
8. Real-World Examples of Object Removal
Let’s look at some real-world examples of how object removal can improve your photos.
8.1. Travel Photography
In travel photography, you often encounter unwanted objects such as tourists, signs, or trash cans. Object removal can help you capture the beauty of a location without these distractions.
8.2. Portrait Photography
In portrait photography, object removal can be used to eliminate blemishes, stray hairs, or distracting background elements. This helps to create a more polished and professional-looking portrait.
8.3. Landscape Photography
In landscape photography, object removal can be used to eliminate power lines, buildings, or other man-made structures that detract from the natural beauty of the scene.
8.4. Before and After Examples
Here are some before and after examples of photos that have been enhanced with object removal:
Before: A photo of a beach with several tourists in the background.
After: The same photo with the tourists removed, creating a serene and uncluttered scene.
Before: A portrait with a noticeable blemish on the subject’s face.
After: The same portrait with the blemish removed, resulting in a clearer and more flattering image.
9. Future Trends in Object Removal Technology
Object removal technology is constantly evolving. Here are some trends to watch out for:
9.1. Increased Automation
Future object removal tools will likely be more automated, using AI to automatically identify and remove unwanted objects with minimal user input.
9.2. Improved Realism
Algorithms will continue to improve, resulting in more realistic and seamless object removal. This will make it even harder to detect that a photo has been edited.
9.3. Integration with More Devices
Object removal functionality will likely be integrated into more devices, such as cameras, drones, and even augmented reality glasses.
9.4. 3D Object Removal
The ability to remove objects from 3D images and videos is an emerging trend. This could have applications in fields such as virtual reality and augmented reality.
10. Enhancing Your Photography Skills with dfphoto.net
To truly master the art of photography and photo editing, dfphoto.net offers a wealth of resources.
10.1. Tutorials and Guides
dfphoto.net provides detailed tutorials and guides on various photography techniques, including composition, lighting, and editing.
10.2. Community Forum
Connect with other photographers in the dfphoto.net community forum. Share your work, ask questions, and learn from experienced professionals.
10.3. Portfolio Showcase
Showcase your best photos in the dfphoto.net portfolio section. Get feedback from other members and gain exposure for your work.
10.4. Equipment Reviews
Stay up-to-date on the latest photography equipment with dfphoto.net’s comprehensive reviews. Find the best gear for your needs and budget.
dfphoto.net is your go-to resource for enhancing your photography skills and staying inspired. Address: 1600 St Michael’s Dr, Santa Fe, NM 87505, United States. Phone: +1 (505) 471-6001. Website: dfphoto.net.
11. Case Studies: Successful Object Removal Examples
Examining successful object removal examples can provide valuable insights into the techniques and tools used.
11.1. Removing a Distracting Sign
Challenge: A photo of a historic building was marred by a modern sign in the foreground.
Solution: Using TouchRetouch, the sign was carefully removed, and the surrounding brickwork was reconstructed using the clone stamp tool.
Result: The building’s historical aesthetic was restored, creating a more impactful image.
11.2. Eliminating a Photobomber
Challenge: A perfect landscape shot was ruined by a person walking into the frame at the last moment.
Solution: The person was removed using Google Photos’ Magic Eraser. The tool intelligently filled in the background, seamlessly blending the edited area with the surrounding landscape.
Result: The landscape photo was salvaged, capturing the scene’s natural beauty without distractions.
11.3. Correcting a Street Scene
Challenge: A street scene was cluttered with trash cans and parked cars.
Solution: Using Adobe Photoshop Fix, the trash cans and cars were removed. The content-aware fill feature was used to reconstruct the street and sidewalks.
Result: The street scene was transformed into a cleaner and more visually appealing image, highlighting the architecture and atmosphere.
12. Advanced Techniques for Object Removal
For more complex object removal tasks, advanced techniques may be required.
12.1. Using Layers in Photoshop
In Adobe Photoshop, using layers can provide more control and flexibility in the object removal process. By creating separate layers for the original image and the edited areas, you can easily make adjustments and refine the results.
12.2. Frequency Separation
Frequency separation is a technique that separates an image into high-frequency (details) and low-frequency (tones and colors) layers. This allows you to edit the textures and details without affecting the overall color and tone of the image.
12.3. Clone Stamp Tool
The clone stamp tool is a classic Photoshop tool that allows you to copy pixels from one area of an image to another. This is useful for manually reconstructing complex textures and patterns.
12.4. Healing Brush Tool
The healing brush tool is similar to the clone stamp tool, but it also takes into account the surrounding colors and tones. This makes it more effective for blending the edited area with its surroundings.
13. Common Mistakes to Avoid When Removing Objects
Even with the best tools and techniques, it’s easy to make mistakes when removing objects.
13.1. Over-Editing
Avoid over-editing your photos. Subtle adjustments are often more effective than drastic changes.
13.2. Ignoring Lighting and Shadows
Pay attention to the lighting and shadows in your photos. Make sure that the edited area matches the surrounding lighting conditions.
13.3. Not Zooming In
Always zoom in to inspect your edits closely. This will help you catch any imperfections or inconsistencies.
13.4. Forgetting to Save a Backup
Before making any significant edits, always save a backup of your original photo. This will allow you to revert to the original if you make a mistake.
14. The Impact of Object Removal on Visual Storytelling
Object removal can have a significant impact on visual storytelling.
14.1. Enhancing the Narrative
By removing distractions and unwanted elements, object removal can help to enhance the narrative of your photos. This allows you to focus the viewer’s attention on the key elements of the story.
14.2. Creating a Sense of Place
Object removal can also be used to create a sense of place. By eliminating modern intrusions, you can transport the viewer to a different time or location.
14.3. Evoking Emotion
Object removal can evoke emotion by creating a more serene, dramatic, or impactful image. This can help to connect with the viewer on a deeper level.
14.4. Visual Communication
According to Popular Photography magazine, the visual communication skill in photo editing is increased by 60% when using modern AI tools.
15. Object Removal in Different Genres of Photography
Object removal techniques can be applied to various photography genres to enhance the final image.
15.1. Architectural Photography
In architectural photography, object removal helps eliminate unwanted elements like power lines, traffic signs, or construction equipment, ensuring the focus remains on the building’s design and structure.
15.2. Product Photography
For product photography, removing blemishes, dust particles, or distracting reflections ensures the product looks its best, resulting in cleaner and more appealing images for marketing purposes.
15.3. Wildlife Photography
Wildlife photographers often use object removal to eliminate man-made elements that detract from the natural habitat, allowing viewers to fully appreciate the beauty of the animals and their surroundings.
15.4. Event Photography
Event photography can benefit from object removal to clear unwanted objects or people from the background, ensuring the spotlight remains on the key moments and subjects of the event.
16. Advanced Settings and Customization Options
Many object removal tools come with advanced settings that allow for greater precision and customization.
16.1. Adjustable Brush Sizes
Adjustable brush sizes allow you to fine-tune the area you’re editing, ensuring you only remove the intended objects without affecting the surrounding details.
16.2. Feathering and Blending
Feathering and blending options soften the edges of the edited area, creating a more seamless transition between the original and the filled-in pixels.
16.3. Opacity Control
Controlling the opacity of the healing or cloning effect lets you gradually build up the correction, achieving a more natural and subtle result.
16.4. Sampling Points
Setting precise sampling points for cloning ensures you’re copying the correct textures and patterns, maintaining consistency throughout the image.
17. Integrating Object Removal into Your Workflow
Incorporating object removal into your regular photo editing workflow can significantly enhance your final results.
17.1. Batch Processing
For large sets of images, batch processing can automate the object removal process, saving time and ensuring consistency across multiple photos.
17.2. Non-Destructive Editing
Using non-destructive editing techniques, such as layers and smart objects, allows you to make changes without permanently altering the original image, preserving flexibility for future adjustments.
17.3. Combining Multiple Tools
Combining different object removal tools and techniques can yield the best results, leveraging each tool’s strengths to tackle various challenges in a single image.
17.4. Regular Practice
Consistent practice with object removal tools helps you develop the skills and intuition needed to achieve seamless and realistic edits, improving your overall photo editing proficiency.
18. Object Removal Tools for Video
The ability to remove objects in videos adds a new dimension to content creation and editing.
18.1. Adobe After Effects
Adobe After Effects offers powerful object removal tools for video, using content-aware fill and motion tracking to seamlessly eliminate unwanted elements.
18.2. DaVinci Resolve
DaVinci Resolve features advanced object removal capabilities, allowing you to track and remove objects while maintaining the video’s visual integrity.
18.3. Third-Party Plugins
Various third-party plugins enhance video editing software, providing specialized object removal tools and effects for more complex scenarios.
18.4. Applications in Filmmaking
Object removal in video has numerous applications in filmmaking, from removing unwanted objects from a scene to correcting errors and enhancing visual effects.
19. How to Choose the Right Object Removal Tool
Selecting the right object removal tool depends on your specific needs and preferences.
19.1. Consider Your Budget
Evaluate your budget and determine whether a free tool, a one-time purchase, or a subscription-based service is the best fit for your financial constraints.
19.2. Evaluate Your Skill Level
Assess your skill level and choose a tool with a user interface and feature set that matches your expertise, ensuring a smooth and efficient editing experience.
19.3. Identify Your Specific Needs
Identify the types of object removal tasks you typically encounter and select a tool with the appropriate features and capabilities to address those needs effectively.
19.4. Read Reviews and Comparisons
Research and read reviews and comparisons of different object removal tools to gain insights into their strengths, weaknesses, and overall performance, helping you make an informed decision.
20. Frequently Asked Questions (FAQs) About Object Removal on iPhone Photos
1. Can you erase objects on iPhone photos using the built-in Photos app?
Yes, with iOS 18.1 and later, the iPhone’s built-in Photos app has a “Clean Up” tool for removing objects.
2. Which iPhone models support the “Clean Up” tool?
The “Clean Up” tool is available on iPhone 15 Pro, iPhone 15 Pro Max, and any iPhone 16 series model.
3. What if my iPhone doesn’t support the “Clean Up” tool?
You can use third-party apps like Adobe Photoshop Fix, Snapseed, or TouchRetouch.
4. How does the “Clean Up” tool work?
It uses AI to intelligently fill in the space where the object was, blending it with the surrounding area.
5. Can I remove people from my iPhone photos?
Yes, the “Clean Up” tool and apps like Google Photos’ “Magic Eraser” can remove people.
6. Is it ethical to remove objects from photos?
It depends on the context. In journalism, it may be unethical, but for personal use, it’s generally acceptable.
7. What is content-aware fill?
It’s a technique where the software analyzes the surrounding area and generates new pixels to fill in the erased space.
8. Can I undo the changes made by the “Clean Up” tool?
Yes, you can use the back button or “Reset Clean Up” to revert to the original image.
9. How can I get the best results with object removal tools?
Zoom in for precise edits, use a clean background, and take multiple passes with the tool.
10. Are there object removal tools for video editing?
Yes, Adobe After Effects and DaVinci Resolve offer object removal tools for video.
Mastering object removal on your iPhone photos is now more accessible than ever. With dfphoto.net, you can explore even more tips, tricks, and resources to elevate your photography skills. Ready to transform your photos? Visit dfphoto.net today and discover a world of creative possibilities!