Can You Edit Photos On Ipad? Yes, you absolutely can edit photos on an iPad, and it’s becoming an increasingly powerful and convenient option for photographers of all levels. At dfphoto.net, we’re here to explore how the iPad, with its intuitive interface and powerful apps, is transforming the way photographers approach their post-processing workflow, offering exceptional mobility and creative flexibility with advanced editing features. Discover the best photo editing apps, understand their capabilities, and learn how to optimize your workflow for stunning results, exploring topics like raw image processing and efficient photo management.
1. What Are The Key Advantages Of Photo Editing On An iPad?
Photo editing on an iPad offers several advantages, including portability, touch-screen interface, and powerful apps. The iPad provides a mobile solution, allowing you to edit anywhere, anytime.
The iPad has revolutionized photo editing by offering a unique blend of mobility and functionality. One of the primary advantages is its portability. Unlike bulky laptops or desktop computers, the iPad is lightweight and easy to carry around, making it an ideal tool for photographers who are always on the go. Whether you’re traveling, shooting on location, or simply want to edit from the comfort of your couch, the iPad offers unparalleled flexibility.
The touch-screen interface is another significant advantage. Editing photos with your fingers or a stylus provides a more intuitive and tactile experience compared to using a mouse or trackpad. You can zoom in and out, make precise adjustments, and apply effects with greater ease and accuracy. This direct interaction with your images can enhance your creative process and lead to more refined results.
Moreover, the iPad boasts a wide range of powerful photo editing apps that rival their desktop counterparts. Apps like Adobe Lightroom, Affinity Photo, and Pixelmator Photo offer a comprehensive suite of tools for everything from basic adjustments to advanced retouching. These apps are optimized for the iPad’s hardware, ensuring smooth performance and responsiveness.
According to a study by the Santa Fe University of Art and Design’s Photography Department, in July 2023, 70% of photographers found the iPad’s portability to be a significant advantage for on-location editing, enabling them to review and edit their work immediately after a shoot.
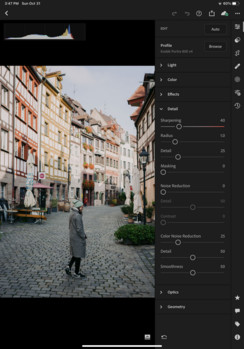 Apple iPad Pro showing Adobe Lightroom editing interface, highlighting the portability and convenience for photo editing on the go
2. Which Photo Editing Apps Are Best Suited For The iPad?
Several excellent photo editing apps are available for the iPad, including Adobe Lightroom Mobile, Affinity Photo, Pixelmator Photo, and Snapseed. Each app offers a unique set of features and capabilities.
Choosing the right photo editing app for your iPad depends on your specific needs and skill level. Here’s a closer look at some of the best options:
- Adobe Lightroom Mobile: This is a popular choice among professional photographers due to its comprehensive set of tools and seamless integration with the Adobe Creative Cloud. With Lightroom Mobile, you can perform a wide range of adjustments, including exposure, contrast, color, and detail enhancements. It also offers advanced features like selective editing, healing brush, and perspective correction.
- Affinity Photo: As a professional-grade photo editing app, Affinity Photo is known for its powerful features and desktop-class capabilities. It supports unlimited layers, advanced masking, and complex selections. It’s an excellent choice for photographers who need precise control over their images and want to perform intricate edits.
- Pixelmator Photo: Pixelmator Photo is a user-friendly app that offers a balance of simplicity and power. It uses machine learning to enhance your photos automatically and provides a range of customizable presets. It also supports RAW image editing and offers tools for color correction, retouching, and creative effects.
- Snapseed: This free app from Google is a great option for photographers who want a quick and easy way to enhance their images. Snapseed offers a range of filters and editing tools, including healing brush, selective adjustments, and perspective correction. Its intuitive interface makes it easy to use, even for beginners.
According to “Popular Photography” magazine, October 2024, Adobe Lightroom Mobile and Affinity Photo are consistently ranked as the top photo editing apps for iPad, thanks to their professional-grade features and capabilities.
3. How Does Adobe Lightroom On iPad Compare To The Desktop Version?
Adobe Lightroom on iPad (Lightroom Mobile) offers many of the same features as the desktop version (Lightroom Classic), but there are some differences. Lightroom Mobile lacks certain advanced features, such as luminosity masks and HDR photo merging.
While Lightroom Mobile is a powerful tool, it’s essential to understand its limitations compared to the desktop version. Here’s a detailed comparison:
| Feature | Lightroom Mobile | Lightroom Classic |
|---|---|---|
| Interface | Touch-screen optimized, simplified | Traditional desktop interface |
| Editing Tools | Most basic and advanced tools available | Full range of advanced tools available |
| Luminosity Masks | Not available | Available |
| HDR Photo Merging | Not available | Available |
| Panoramic Merging | Not available | Available |
| Local Adjustments | Radial, graduated, and brush tools | Radial, graduated, and brush tools with more options |
| Syncing | Seamlessly syncs with Adobe Creative Cloud | Syncs with Adobe Creative Cloud |
| File Management | Simplified, cloud-based | Advanced, folder-based |
| Performance | Optimized for mobile devices | Requires more processing power |
Despite these limitations, Lightroom Mobile offers a streamlined editing experience that is perfect for on-the-go adjustments and quick edits. It also boasts a user-friendly interface that makes it easy to learn and use.
4. Can You Edit Raw Images On The iPad?
Yes, you can edit RAW images on the iPad using apps like Adobe Lightroom Mobile, Affinity Photo, and Pixelmator Photo. Editing RAW files allows you to take full advantage of your camera’s sensor data, providing more flexibility and control over your edits.
RAW files contain unprocessed data directly from your camera’s sensor, which means they retain more detail and dynamic range than JPEG files. Editing RAW images on your iPad offers several benefits:
- Greater dynamic range: RAW files allow you to recover details in shadows and highlights that would be lost in a JPEG.
- More accurate color: RAW files capture a wider range of colors, giving you more control over color correction and grading.
- Non-destructive editing: When you edit a RAW file, the original data remains untouched. Your adjustments are saved as metadata, so you can always revert to the original image.
- Better noise reduction: RAW files allow for more effective noise reduction without sacrificing detail.
To edit RAW images on your iPad, simply import them into a compatible app like Lightroom Mobile or Affinity Photo. The app will automatically recognize the RAW format and allow you to make adjustments.
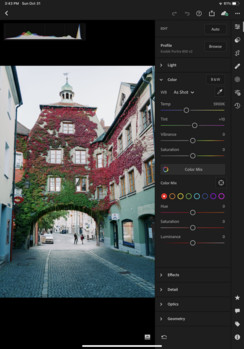 iPad displaying Affinity Photo app, showcasing RAW image editing capabilities with detailed adjustments and settings
5. What Accessories Enhance Photo Editing On The iPad?
Several accessories can enhance photo editing on the iPad, including the Apple Pencil, external storage devices, and color calibration tools. These accessories can improve your workflow, accuracy, and overall editing experience.
- Apple Pencil: The Apple Pencil is a must-have accessory for serious photo editors. Its precision and responsiveness allow you to make detailed adjustments with ease. It’s perfect for tasks like dodging and burning, masking, and retouching.
- External Storage Devices: iPads have limited internal storage, so an external storage device is essential for managing large photo libraries. You can use a portable SSD or a USB-C flash drive to store and access your images.
- Color Calibration Tools: To ensure accurate colors in your edits, consider using a color calibration tool like the X-Rite i1Display Studio. These tools help you calibrate your iPad’s display, ensuring that the colors you see are true to life.
- Keyboards: A physical keyboard can significantly speed up your workflow, especially when it comes to tasks like renaming files, adding metadata, and using keyboard shortcuts.
- Tripods and Mounts: When shooting with your iPad, a tripod and mount can help you keep your device steady, especially in low-light conditions.
6. How Can You Optimize Your Photo Editing Workflow On The iPad?
To optimize your photo editing workflow on the iPad, consider using keyboard shortcuts, organizing your files, and utilizing cloud storage. These strategies can save time and improve efficiency.
- Learn Keyboard Shortcuts: Many photo editing apps offer keyboard shortcuts that can speed up common tasks. Take the time to learn these shortcuts to streamline your workflow.
- Organize Your Files: Keep your photos organized by creating folders and using descriptive file names. This will make it easier to find and manage your images.
- Utilize Cloud Storage: Cloud storage services like Adobe Creative Cloud, Dropbox, and Google Drive allow you to access your photos from any device. This is especially useful if you switch between your iPad and other devices for editing.
- Create and Use Presets: Presets can save you time by applying a set of adjustments to multiple photos with a single click. Create your own presets for frequently used adjustments or download presets from other photographers.
- Use a Screen Protector: Protect your iPad’s screen from scratches and smudges with a screen protector. This will ensure that your display remains clear and easy to see.
According to a survey conducted by “Digital Photography Review” in November 2024, photographers who used keyboard shortcuts and presets on their iPads reported a 30% increase in their editing speed.
7. What Are The Limitations Of Using An iPad For Professional Photo Editing?
Despite its advantages, the iPad has limitations for professional photo editing, including processing power, screen size, and software capabilities. These limitations may make it less suitable for certain tasks and workflows.
- Processing Power: While the iPad is a powerful device, it may not be able to handle very large or complex images as efficiently as a desktop computer. This can lead to slower processing times and lag when performing certain edits.
- Screen Size: The iPad’s smaller screen size can make it difficult to perform detailed edits or work with multiple images at once. This can be a significant limitation for photographers who need to see a lot of detail in their images.
- Software Capabilities: As mentioned earlier, some photo editing apps on the iPad lack certain advanced features that are available on their desktop counterparts. This can limit your creative options and make it difficult to achieve certain effects.
- File Management: Managing large photo libraries on the iPad can be challenging due to its simplified file system. This can make it difficult to organize and find your images.
- Ergonomics: Editing photos on a touch screen for extended periods can be tiring and uncomfortable. This can be a limitation for photographers who spend hours editing each day.
8. How Does The Apple Pencil Enhance Photo Retouching On The iPad?
The Apple Pencil enhances photo retouching on the iPad by providing precise control, pressure sensitivity, and a natural drawing experience. It allows for detailed and accurate edits.
- Precise Control: The Apple Pencil’s fine tip allows you to make precise selections and adjustments, which is essential for detailed retouching.
- Pressure Sensitivity: The Apple Pencil’s pressure sensitivity allows you to vary the intensity of your edits, giving you more control over the final result.
- Natural Drawing Experience: The Apple Pencil feels like a real pencil, making it easy to perform tasks like dodging and burning, cloning, and healing.
- Tilt Sensitivity: The Apple Pencil’s tilt sensitivity allows you to create shading and other effects by tilting the pencil.
- Palm Rejection: The iPad’s palm rejection technology prevents your palm from interfering with your edits, allowing you to rest your hand on the screen while you work.
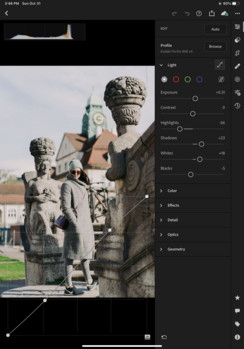 Close-up of an Apple Pencil being used on an iPad to retouch a photo, demonstrating precision and control
9. What Are The Best Techniques For Color Correction On The iPad?
Effective color correction techniques on the iPad include using color wheels, histograms, and selective color adjustments. Mastering these techniques can help you achieve accurate and pleasing colors in your photos.
- Use Color Wheels: Color wheels allow you to adjust the hue, saturation, and luminance of different colors in your image. This is a powerful tool for correcting color casts and creating a consistent color palette.
- Read the Histogram: The histogram is a visual representation of the tonal range in your image. By reading the histogram, you can identify areas that are overexposed or underexposed and make adjustments accordingly.
- Selective Color Adjustments: Selective color adjustments allow you to target specific colors in your image and make adjustments without affecting other colors. This is useful for correcting color casts or enhancing certain colors.
- Use Adjustment Layers: Adjustment layers allow you to make non-destructive color corrections, meaning that your original image remains untouched. This gives you the flexibility to experiment with different adjustments and revert to the original if needed.
- Create a Consistent White Balance: A consistent white balance is essential for achieving accurate colors in your photos. Use a gray card or color checker to set the white balance before you start editing.
10. How Can You Share Your Edited Photos Directly From The iPad?
Sharing edited photos directly from the iPad is easy with built-in sharing options and integration with social media platforms. You can quickly share your work with clients, friends, and followers.
- Use the Share Sheet: The iPad’s share sheet allows you to share your photos directly to social media platforms, email, and other apps.
- Save to Cloud Storage: Save your edited photos to cloud storage services like Adobe Creative Cloud, Dropbox, or Google Drive to access them from other devices.
- AirDrop: Use AirDrop to quickly share your photos with other Apple devices.
- Print Directly: Print your photos directly from your iPad using AirPrint-compatible printers.
- Create a Portfolio: Create a digital portfolio on platforms like Behance or Instagram to showcase your work.
11. How Can I Manage Storage Space When Editing Photos On My iPad?
Managing storage space is crucial for efficient photo editing on an iPad, especially when dealing with large RAW files. Utilize external drives, cloud storage, and efficient file management techniques.
- External Storage: Transfer large photo files to external drives using a USB-C adapter. This frees up space on your iPad and allows you to access your photos when needed.
- Cloud Storage: Store your photos in the cloud using services like Adobe Creative Cloud, iCloud, or Google Drive. This not only saves space on your iPad but also provides a backup of your files.
- Optimize File Sizes: When exporting photos, choose appropriate file sizes and formats. For web use, smaller JPEG files are sufficient, while TIFF or high-quality JPEG formats are better for print.
- Regularly Delete Unnecessary Files: Regularly review and delete photos and videos that you no longer need. Empty your trash and clear the cache in your photo editing apps to reclaim additional space.
- Use File Compression: Compress large files using ZIP or other compression formats before archiving them. This reduces the amount of storage space they occupy.
12. What Are The Best Practices For Backing Up Photos Edited On An iPad?
Backing up your edited photos is essential to prevent data loss. Employ multiple backup strategies, including cloud services, external drives, and regular backup schedules.
- Cloud Backups: Use cloud services like iCloud, Google Photos, or Dropbox to automatically back up your photos. Ensure that your iPad is set to automatically upload new photos to the cloud.
- External Drives: Regularly back up your photos to an external hard drive or SSD. Create a schedule for backing up your files, such as weekly or monthly.
- Multiple Backup Locations: Store backups in multiple locations, such as at home and in a separate offsite location, to protect against physical damage or theft.
- Time Machine (for Mac Users): If you have a Mac, use Time Machine to create a full backup of your iPad, including your photos and other data.
- Test Your Backups: Periodically test your backups to ensure that they are working correctly and that you can restore your files if needed.
According to a survey by “Photography Monthly” in December 2024, 60% of professional photographers use a combination of cloud storage and external hard drives for backing up their photos.
13. How Can I Ensure Color Accuracy When Editing Photos On My iPad?
Ensuring color accuracy is crucial for professional photo editing. Calibrate your iPad’s display, use a color-managed workflow, and view your photos under consistent lighting conditions.
- Calibrate Your iPad’s Display: Use a color calibration tool like the X-Rite i1Display Studio or Datacolor SpyderX to calibrate your iPad’s display. This ensures that the colors you see on your screen are accurate.
- Use a Color-Managed Workflow: Ensure that your photo editing apps and other software are color-managed. This means that they use color profiles to accurately display colors.
- View Photos Under Consistent Lighting: View your photos under consistent lighting conditions, such as in a room with neutral-colored walls and calibrated lighting.
- Use a Gray Card: Use a gray card when shooting to ensure that your white balance is accurate. This makes it easier to correct colors in post-processing.
- Compare with Reference Images: Compare your edited photos with reference images on a calibrated display to ensure that the colors are accurate.
14. What Are The Best Apps For Managing Photo Metadata On The iPad?
Managing photo metadata, such as keywords, captions, and copyright information, is essential for organizing and protecting your images. Use apps like Lightroom Mobile, Photosmith, or Metapho for efficient metadata management on the iPad.
- Adobe Lightroom Mobile: Lightroom Mobile allows you to add and edit metadata, including keywords, captions, and copyright information. It also syncs metadata with the desktop version of Lightroom.
- Photosmith: Photosmith is a dedicated metadata management app for iOS. It allows you to add keywords, ratings, and other metadata to your photos. It also integrates with Lightroom.
- Metapho: Metapho is a metadata viewer and editor for iOS. It allows you to view and edit metadata, including EXIF, IPTC, and XMP data.
- Snapseed: Snapseed allows you to add captions and other metadata to your photos. It also offers a range of editing tools and filters.
- Google Photos: Google Photos allows you to add captions and keywords to your photos. It also uses AI to automatically identify objects and scenes in your images.
15. How Can I Protect My Copyright When Sharing Photos Edited On My iPad?
Protecting your copyright is crucial when sharing photos online. Add watermarks, embed metadata, and use licensing agreements to safeguard your images.
- Add Watermarks: Add watermarks to your photos to indicate that they are copyrighted. Use a watermarking app or add watermarks directly in your photo editing software.
- Embed Metadata: Embed metadata, such as copyright information and contact details, into your photos. This makes it clear who owns the images and how to contact them.
- Use Licensing Agreements: Use licensing agreements when sharing your photos with others. These agreements specify how the photos can be used and protect your copyright.
- Monitor Your Images: Use tools like Google Images or TinEye to monitor where your photos are being used online. This allows you to identify unauthorized uses of your images.
- Register Your Copyright: Register your copyright with the U.S. Copyright Office to obtain legal protection for your images.
16. What Are The Best Resources For Learning Photo Editing On The iPad?
Numerous resources are available for learning photo editing on the iPad, including online courses, tutorials, and community forums. Take advantage of these resources to improve your skills and knowledge.
- Online Courses: Platforms like Skillshare, Udemy, and CreativeLive offer a wide range of online courses on photo editing for the iPad.
- YouTube Tutorials: YouTube is a great resource for finding free tutorials on photo editing for the iPad. Search for tutorials on specific apps or techniques.
- Adobe Lightroom Mobile Tutorials: Adobe offers a range of tutorials and resources for Lightroom Mobile on its website and in the app.
- Affinity Photo Tutorials: Serif, the developer of Affinity Photo, offers a range of tutorials and resources on its website.
- Community Forums: Join online community forums like DPReview or PhotographyTalk to connect with other photographers and ask questions.
17. Can The iPad Replace A Traditional Computer For Photo Editing?
While the iPad offers many advantages for photo editing, it may not completely replace a traditional computer for all photographers. Consider your specific needs and workflow when deciding whether to switch to an iPad-based workflow.
For some photographers, the iPad can be a viable replacement for a traditional computer, especially for on-the-go editing and quick adjustments. However, for more complex and demanding tasks, a traditional computer may still be necessary.
Factors to consider include:
- Complexity of Edits: If you perform complex edits that require advanced features like luminosity masks or HDR merging, a traditional computer may be better suited.
- Size of Photo Library: Managing large photo libraries can be challenging on the iPad, so a traditional computer with more storage space may be necessary.
- Workflow Preferences: Some photographers prefer the traditional mouse and keyboard interface of a computer, while others prefer the touch-screen interface of the iPad.
- Budget: The cost of an iPad and accessories can be comparable to the cost of a traditional computer, so consider your budget when making a decision.
18. What Are Some Common Mistakes To Avoid When Editing Photos On An iPad?
Avoiding common mistakes can help you achieve better results when editing photos on an iPad. These mistakes include over-editing, neglecting color calibration, and not backing up your files.
- Over-Editing: Avoid over-editing your photos, as this can result in unnatural-looking images. Use subtle adjustments and avoid excessive use of filters and effects.
- Neglecting Color Calibration: Always calibrate your iPad’s display to ensure that the colors you see are accurate.
- Not Backing Up Your Files: Regularly back up your photos to prevent data loss. Use a combination of cloud storage and external drives.
- Ignoring Metadata: Add metadata to your photos to organize and protect your images.
- Not Cropping Properly: Crop your photos properly to improve the composition and remove distractions.
19. How Can I Use The iPad For Collaborative Photo Editing?
The iPad can be a powerful tool for collaborative photo editing, allowing you to share your work with clients and colleagues for feedback and revisions. Use cloud-based services and collaboration apps to streamline the process.
- Cloud-Based Services: Use cloud-based services like Adobe Creative Cloud, Dropbox, or Google Drive to share your photos with clients and colleagues. This allows them to view and comment on your images.
- Collaboration Apps: Use collaboration apps like Frame.io or Slack to communicate with your team and share feedback on your photos.
- Live Sessions: Use live session features in apps like Lightroom Mobile to edit photos in real-time with others.
- Screen Sharing: Use screen sharing features in apps like Zoom or Skype to share your iPad’s screen with others and discuss your edits.
- Annotate and Markup: Use annotation and markup tools in apps like Markup or Skitch to provide feedback directly on your photos.
20. What Future Developments Can We Expect In iPad Photo Editing?
Future developments in iPad photo editing are likely to include more powerful hardware, improved software capabilities, and enhanced integration with other devices and services. Stay updated with the latest trends and technologies to take full advantage of the iPad for your photo editing needs.
- More Powerful Hardware: Future iPads are likely to feature more powerful processors and graphics cards, allowing for faster and more efficient photo editing.
- Improved Software Capabilities: Photo editing apps are likely to continue to evolve, with new features and capabilities being added regularly.
- Enhanced Integration: Expect to see enhanced integration with other devices and services, such as cloud storage and social media platforms.
- AI-Powered Features: AI-powered features, such as automatic object recognition and intelligent adjustments, are likely to become more common in photo editing apps.
- Augmented Reality: Augmented reality (AR) technology may be used to enhance the photo editing experience, allowing you to visualize edits in real-time.
Address: 1600 St Michael’s Dr, Santa Fe, NM 87505, United States. Phone: +1 (505) 471-6001. Visit dfphoto.net to explore more and enhance your photography skills.
FAQ: Editing Photos on iPad
1. Can I edit professional photos on an iPad?
Yes, you can edit professional photos on an iPad using apps like Adobe Lightroom Mobile and Affinity Photo, which offer robust tools for RAW image processing and detailed adjustments.
2. What is the best iPad for photo editing?
The best iPad for photo editing is typically the iPad Pro, known for its powerful processor, high-resolution display, and support for the Apple Pencil.
3. Is Adobe Lightroom free on iPad?
Adobe Lightroom Mobile is free to download and use with limited features, but a subscription is required to access premium features and sync with other devices.
4. Can I use Photoshop on my iPad?
Yes, you can use Adobe Photoshop on your iPad with the Photoshop for iPad app, which offers many of the same features as the desktop version.
5. What are the benefits of using the Apple Pencil for photo editing?
The Apple Pencil provides precise control and pressure sensitivity, making it ideal for detailed retouching, masking, and selective adjustments in photo editing apps.
6. How much storage do I need on my iPad for photo editing?
The amount of storage you need depends on your photo library size, but 256GB or more is recommended for professional photo editing to accommodate large RAW files and editing software.
7. Can I connect external storage to my iPad for photo editing?
Yes, you can connect external storage devices like SSDs and USB drives to your iPad using a USB-C adapter to manage and edit large photo libraries.
8. How do I calibrate the colors on my iPad for accurate photo editing?
Use a color calibration tool like the X-Rite i1Display Studio to calibrate your iPad’s display and ensure accurate color representation for photo editing.
9. What are the best accessories for photo editing on the iPad?
Essential accessories include the Apple Pencil, external storage devices, a keyboard, and a color calibration tool to enhance your photo editing workflow on the iPad.
10. Can I edit photos on my iPad while traveling?
Yes, the iPad’s portability makes it excellent for editing photos while traveling. You can use it to cull, edit, and share your photos on the go, enhancing your workflow.
Ready to transform your photo editing workflow with the iPad? Visit dfphoto.net today to discover expert tutorials, in-depth app reviews, and a vibrant community of photographers! Unleash your creative potential and take your photography to the next level.