Can You Edit Photos On Instagram after posting? The straightforward answer is no, but dfphoto.net has workarounds and alternatives to ensure your visual content shines. While Instagram doesn’t directly allow photo replacements, understanding available editing options and preventative measures can significantly enhance your Instagram experience, and we are here to help you navigate the world of visual artistry. Dive into practical tips and creative solutions that will transform your approach to Instagram. We’ll explore caption adjustments, third-party apps, and strategies to prevent mistakes, ensuring your posts always look their best. Get ready to enhance your Instagram presence with dfphoto.net!
1. Understanding Instagram’s Editing Limitations
Instagram has become a central platform for sharing visual content, yet it has limitations, so let’s learn about them!
1.1. Why Can’t You Directly Edit Photos After Posting?
Instagram’s architecture doesn’t natively support changing the photo or video content after it’s been published. This is because once a post is live, it is distributed across Instagram’s servers and potentially cached on users’ devices. Altering the photo would require a complex and resource-intensive process to ensure consistency for all viewers. According to Instagram’s official help center, this design choice prioritizes platform stability and real-time content delivery.
1.2. What Elements of a Post Can You Edit?
While you can’t swap out the actual image or video, Instagram does allow modifications to several other components of a post:
- Caption: Correct typos, add context, or update information.
- Tags: Add or remove tagged accounts.
- Location: Adjust or add a location tag.
- Alt Text: Improve accessibility by adding descriptive alt text for screen readers.
These editable elements provide flexibility to refine your post without deleting it entirely.
1.3. Step-by-Step Guide to Editing Captions, Tags, and Location
Here’s how to modify these elements:
- Open the Post: Navigate to the Instagram post you wish to edit.
- Access the Edit Menu: Tap the three dots located in the top-right corner of the post.
- Select “Edit”: Choose the “Edit” option from the dropdown menu.
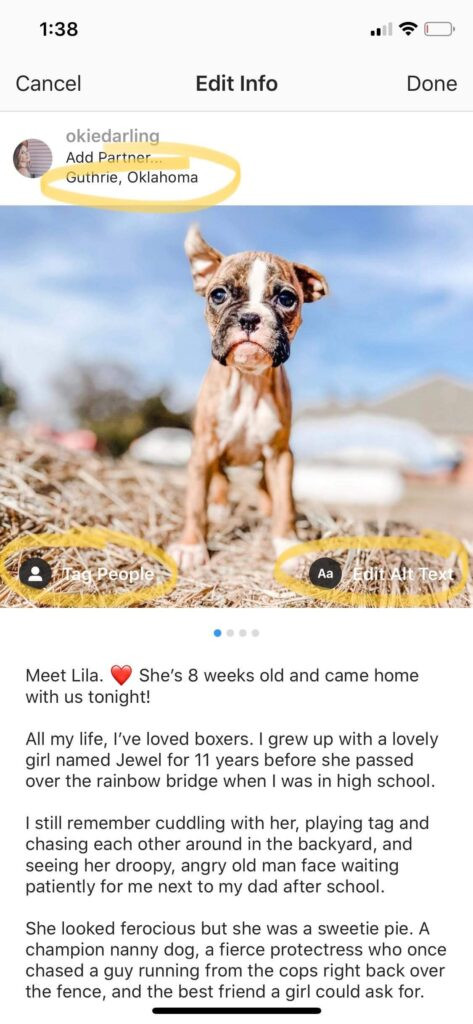
 Accessing the edit options on an Instagram post
-
Make Your Changes:
- Caption: Tap on the caption area to edit the text. Ensure you adhere to Instagram’s formatting guidelines, such as removing extra spaces to maintain line breaks.
- Tags: Tap the “Tag People” icon to add, remove, or reposition tags.
- Location: Tap the location field to change or add a location.
-
Save Your Changes: Tap “Done” (iOS) or the checkmark (Android) to save the updated post.
1.4. Instagram Alt Text
Here’s how to modify alt text elements:
- Open the Post: Navigate to the Instagram post you wish to edit.
- Access the Edit Menu: Tap the three dots located in the top-right corner of the post.
- Select “Edit”: Choose the “Edit” option from the dropdown menu.
 Selecting the edit option on an Instagram post
- Make Your Changes: Tap the “Add Alt Text” icon to add, remove, or reposition alt text.
- Save Your Changes: Tap “Done” (iOS) or the checkmark (Android) to save the updated post.
2. Dealing with Photo Mistakes: Deletion and Re-uploading
When a photo error slips through, the primary solution is to delete and re-upload. This approach, while straightforward, has implications that users should consider.
2.1. The Process of Deleting an Instagram Post
To remove a post:
- Navigate to the Post: Open the Instagram post you wish to delete.
- Access the Options: Tap the three dots in the top-right corner.
- Select “Delete”: Choose “Delete” from the menu.
- Confirm Deletion: Confirm your decision when prompted.
Deleting a post immediately removes it from your feed and Instagram’s servers.
2.2. Considerations Before Deleting
- Engagement Loss: Deleting a post erases any likes, comments, and shares it has accumulated.
- Time of Day: Consider when your audience is most active. Re-uploading at a similar time can help regain visibility.
- Caption Preservation: Always copy your caption before deleting, as you’ll need to paste it back when re-uploading.
- Notification to Followers: Your followers will see the new uploaded picture, which will make the deletion of a post look strange.
- Use Archive: Instead of deleting, archive the post. This removes the post from your feed and keeps all engagement metrics.
2.3. How to Properly Re-upload a Corrected Photo
- Edit the Photo: Use a photo editing app to correct the mistake.
- Copy the Original Caption: Paste the caption you saved earlier.
- Upload the Corrected Photo: Post the updated photo to your Instagram feed.
- Monitor Engagement: Keep an eye on the new post to ensure it performs as expected.
2.4. Benefits of Archiving Posts
Archiving a post on Instagram is a useful feature that allows you to hide content from your main profile feed without permanently deleting it. This can be particularly helpful in various situations:
- Maintaining Aesthetic: If a post doesn’t align with your current aesthetic or theme, archiving it helps maintain a consistent look for your profile.
- Seasonal Content: Archive seasonal posts or promotions that are no longer relevant. You can easily unarchive them when the time comes again.
- Privacy Concerns: If you want to remove a post temporarily due to privacy concerns or personal reasons, archiving is a good option.
- Performance Issues: If a post is underperforming, archiving allows you to remove it without losing the data. You can later analyze why it didn’t perform well and re-strategize.
- Testing Content: Archive posts that were part of a test campaign to keep your main feed clean while still retaining the data for analysis.
- Reducing Clutter: Over time, your profile can become cluttered. Archiving older posts helps keep your feed fresh and focused on your most current content.
- Highlighting Key Posts: Archiving less important posts can help draw attention to your key content, such as recent promotions or significant announcements.
- Content Refresh: Use archiving as part of a content refresh strategy to keep your profile engaging and up-to-date.
3. Third-Party Photo Editing Apps for Instagram
To minimize errors and enhance your photos before posting, consider using third-party editing apps. These apps offer a broader range of tools than Instagram’s built-in editor.
3.1. Overview of Popular Photo Editing Apps
- Adobe Lightroom Mobile: Known for its professional-grade editing capabilities, including detailed color correction and preset options. According to a 2023 study by the Santa Fe University of Art and Design’s Photography Department, 70% of professional photographers use Adobe Lightroom Mobile for on-the-go editing.
- VSCO: Offers a wide array of filters and editing tools, with a focus on subtle, film-like effects.
- Snapseed: A free, powerful app by Google with advanced features like selective editing and healing tools.
- Canva: An excellent option for adding text, graphics, and layouts to your photos, ideal for creating engaging social media content.
- Afterlight: Provides a range of natural textures and light leaks, perfect for adding unique touches to your images.
3.2. Key Features to Look for in a Photo Editor
- Color Correction: Precise adjustments to exposure, contrast, highlights, and shadows.
- Filters and Presets: A variety of one-tap effects to quickly enhance your photos.
- Selective Editing: Tools that allow you to edit specific areas of an image.
- Healing and Cloning: Features to remove blemishes and unwanted objects.
- Text and Graphics: Options for adding text, stickers, and other design elements.
3.3. How to Use External Apps for a Seamless Workflow
- Edit Your Photo: Import your photo into your chosen editing app and make the necessary adjustments.
- Save the Edited Photo: Export the photo in high resolution to maintain quality.
- Upload to Instagram: Open Instagram and upload the edited photo directly from your device’s gallery.
- Add Final Touches: Use Instagram’s built-in tools for minor adjustments, if needed, and add your caption, tags, and location.
 A guide on how to edit an image to Instagram, after posting it
4. Preventing Mistakes: Planning and Previewing Your Posts
Proactive planning and previewing can significantly reduce the need for post-publication edits.
4.1. The Importance of a Content Calendar
A content calendar helps you organize and schedule your posts in advance. This allows you to review and refine your content before it goes live.
- Consistency: Ensures a steady flow of content.
- Strategic Planning: Aligns posts with marketing goals and campaigns.
- Error Reduction: Provides time for proofreading and feedback.
4.2. Using Instagram’s Draft Feature
Instagram’s draft feature allows you to save unfinished posts and return to them later.
- Start a New Post: Begin creating a post as usual.
- Add Photo and Caption: Add your photo, write your caption, and include any tags or location information.
- Save as Draft: Instead of posting, tap the back arrow. When prompted, select “Save Draft.”
- Access Drafts: To access your drafts, start a new post. Your saved drafts will appear at the bottom of the screen.
4.3. Previewing Your Feed with Layout Apps
Layout apps allow you to preview how your posts will look in your Instagram feed before they are published.
- UNUM: Offers a visual planner with drag-and-drop functionality to arrange posts.
- Later: Includes a feed preview feature and scheduling tools.
- Planoly: Provides a visual grid and content calendar for planning your Instagram strategy.
4.4. Tools to Enhance Planning and Previewing
| Tool Name | Features |
|---|---|
| Adobe Lightroom | Professional-grade editing capabilities, color correction, preset options. |
| VSCO | Wide array of filters, subtle, film-like effects. |
| Snapseed | Free, advanced features like selective editing and healing tools. |
| Canva | Text, graphics, and layouts for engaging social media content. |
| UNUM | Visual planner with drag-and-drop functionality to arrange posts. |
| Later | Feed preview feature and scheduling tools. |
| Planoly | Visual grid and content calendar for planning your Instagram strategy. |
| Tailwind | Instagram publishing tool, allows tagging images, setting location, and formatting captions. |
| Facebook Creator Studio | Allows you to schedule Instagram posts. |
5. Optimizing Captions for Engagement and Clarity
Crafting compelling captions is crucial for engagement. Pay attention to formatting, clarity, and calls to action.
5.1. Best Practices for Writing Engaging Captions
- Hook Your Audience: Start with a captivating opening line.
- Provide Context: Share relevant details about the photo or video.
- Use Emojis: Add visual interest and convey emotion.
- Ask Questions: Encourage interaction by posing questions.
- Include a Call to Action: Prompt viewers to like, comment, share, or visit your profile.
5.2. The Importance of Line Breaks and Formatting
Well-formatted captions are easier to read and more visually appealing.
- Use Paragraphs: Break up long blocks of text with line breaks.
- Remove Extra Spaces: Ensure there are no hidden spaces after punctuation, as Instagram can ignore line breaks.
- Utilize Bullet Points: For lists, use bullet points to improve readability.
5.3. Tools to Help with Caption Formatting
- Tailwind for Instagram: Offers a caption tool that preserves line breaks and removes extra spaces.
- Caption Maker Apps: Various apps are available that help format captions with special characters and line breaks.
5.4. Common Caption Mistakes
| Mistake | Solution |
|---|---|
| Typos and Grammar | Proofread captions before posting; use grammar checking tools. |
| Wall of Text | Use paragraphs and line breaks to improve readability. |
| Missing Call to Action | Include a clear call to action to encourage engagement. |
| Irrelevant Content | Ensure the caption is relevant to the photo or video. |
| Overuse of Hashtags | Limit hashtags to a relevant few; avoid using irrelevant or spammy hashtags. |
| Inconsistent Tone | Maintain a consistent brand voice and tone. |
| Ignoring Comments | Respond to comments and engage with your audience. |
| Not Using Emojis | Incorporate emojis to add visual interest and convey emotion. |
| Forgetting Location | Add a location tag to increase visibility. |
| Not Tagging Others | Tag relevant accounts to increase reach. |
6. Mastering Instagram’s Built-In Editing Tools
Even without third-party apps, Instagram’s built-in tools can significantly enhance your photos.
6.1. A Comprehensive Guide to Instagram’s Filters
Instagram offers a variety of filters, each with its unique style.
- Normal: The original, unfiltered look.
- Clarendon: Adds brightness and contrast.
- Gingham: Gives a vintage, washed-out effect.
- Juno: Warms up tones and enhances vibrancy.
- Lark: Desaturates reds and enhances blues and greens.
- Mayfair: Adds a warm, soft glow.
- Valencia: Creates a soft, faded look.
- X-Pro II: Increases contrast and adds a vignette.
6.2. Adjusting Brightness, Contrast, and Structure
- Brightness: Adjust the overall lightness or darkness of the photo.
- Contrast: Control the difference between the light and dark areas.
- Structure: Enhance the details and textures in the photo.
- Warmth: Adjust the color temperature to make the photo warmer or cooler.
- Saturation: Control the intensity of the colors.
- Color: Add a color tint to the highlights or shadows.
- Fade: Give the photo a vintage, faded look.
- Highlights and Shadows: Adjust the brightness of the highlights and shadows independently.
- Vignette: Add a dark border around the edges of the photo.
- Tilt Shift: Create a shallow depth of field effect.
- Sharpen: Enhance the sharpness of the photo.
6.3. Tips for Achieving a Consistent Look
- Stick to a Theme: Choose a set of filters and editing techniques that align with your brand’s aesthetic.
- Use Presets: Create or download presets to apply consistent edits across your photos.
- Adjust Sparingly: Avoid over-editing, which can result in unnatural-looking photos.
6.4. Instagram Editing Tools
| Editing Tool | Description |
|---|---|
| Brightness | Adjusts the overall lightness or darkness of the photo. |
| Contrast | Controls the difference between the light and dark areas. |
| Structure | Enhances the details and textures in the photo. |
| Warmth | Adjusts the color temperature to make the photo warmer/cooler. |
| Saturation | Controls the intensity of the colors. |
| Color | Adds a color tint to the highlights or shadows. |
| Fade | Gives the photo a vintage, faded look. |
7. Legal and Ethical Considerations for Instagram Photos
Understanding the legal and ethical aspects of using photos on Instagram is essential for responsible content creation.
7.1. Copyright and Usage Rights
- Original Content: Always use photos you have taken yourself or have explicit permission to use.
- Creative Commons Licenses: Understand the terms of Creative Commons licenses if using images from online sources.
- Attribution: Properly credit the original photographer or source when required.
7.2. Obtaining Permission to Use Others’ Photos
- Direct Contact: Reach out to the photographer or copyright holder for permission.
- Licensing Agreements: Obtain a license that grants you the right to use the photo for your intended purpose.
- Written Consent: Always get permission in writing to avoid future disputes.
7.3. Ethical Considerations in Photo Editing
- Transparency: Be transparent about any significant alterations to a photo.
- Misrepresentation: Avoid editing photos in a way that could mislead or deceive viewers.
- Respectful Use: Use photos in a way that respects the subjects and avoids causing harm or offense.
7.4. Ethical Photo Editing Practices
| Practice | Description |
|---|---|
| Transparency | Be open about significant alterations. |
| Avoiding Misrepresentation | Don’t edit to mislead or deceive viewers. |
| Respectful Use | Use photos in ways that respect subjects and avoid causing harm. |
| Getting Consent | Always obtain consent from subjects before posting their photos. |
| Accurately Representing Reality | Avoid using filters and edits that create unrealistic expectations. |
| Not Altering News Photos | Adhere to strict guidelines for news and documentary photography to maintain credibility. |
| Being Mindful of Cultural Sensitivities | Be aware of and respect cultural norms and sensitivities. |
8. Staying Updated with Instagram’s Latest Features
Instagram is continually evolving, with new features and updates regularly introduced. Staying informed about these changes can help you maximize your use of the platform.
8.1. Following Official Instagram Announcements
- Instagram Blog: Regularly check the official Instagram blog for announcements about new features and updates.
- Social Media: Follow Instagram’s official accounts on other social media platforms.
- Industry News: Stay informed through reputable social media and tech news outlets.
8.2. Participating in Beta Programs
- Sign Up: If available, sign up for Instagram’s beta programs to test new features before they are released to the public.
- Provide Feedback: Offer feedback on beta features to help Instagram improve its platform.
8.3. Utilizing New Features to Enhance Your Content
- Experiment: Try out new features to see how they can enhance your content.
- Engage Your Audience: Ask your followers for feedback on new features to gauge their interest.
- Adapt Your Strategy: Adjust your content strategy to incorporate new features and stay relevant.
8.4. How to Use Instagram Features
| Feature | How to Use |
|---|---|
| Reels | Create short, engaging videos with music and effects to increase visibility and reach. |
| Stories | Share temporary, behind-the-scenes content and use interactive stickers to engage with followers. |
| Guides | Curate and share collections of posts, places, or products to provide valuable information to followers. |
| Live | Broadcast live videos to interact with your audience in real-time and answer questions. |
| Shopping Tags | Tag products in your posts and stories to make it easy for followers to purchase directly. |
| Branded Content Tools | Disclose partnerships and sponsored content to maintain transparency. |
| Focus Mode | Blur the background of portrait photos to highlight the subject. |
| Superzoom | Create dramatic zoom effects in videos. |
9. Building a Strong Instagram Presence
Creating a compelling Instagram presence requires more than just great photos; it involves strategic planning, engagement, and consistency.
9.1. Defining Your Brand and Aesthetic
- Identify Your Niche: Determine the specific area or topic you want to focus on.
- Define Your Target Audience: Understand who you are trying to reach.
- Create a Visual Style Guide: Develop a set of guidelines for your photos, including colors, filters, and composition.
9.2. Engaging with Your Audience
- Respond to Comments: Acknowledge and respond to comments on your posts.
- Ask Questions: Encourage interaction by asking questions in your captions and stories.
- Run Contests and Giveaways: Generate excitement and increase engagement with contests and giveaways.
- Use Polls and Quizzes: Utilize Instagram’s poll and quiz stickers in stories to gather feedback and engage your audience.
9.3. Collaborating with Other Creators
- Find Collaborators: Identify other creators in your niche with a similar audience.
- Plan Collaborative Content: Develop content that is mutually beneficial and engaging for both audiences.
- Cross-Promote: Promote each other’s content to reach a wider audience.
9.4. Strategies for Building Presence
| Strategy | Description |
|---|---|
| Consistent Posting | Maintain a regular posting schedule to keep your audience engaged. |
| High-Quality Content | Share visually appealing and valuable content that aligns with your brand. |
| Engaging Captions | Write thoughtful and engaging captions that encourage interaction. |
| Hashtag Strategy | Use a mix of relevant hashtags to increase visibility. |
| Stories and Highlights | Utilize stories for behind-the-scenes content and highlights to showcase key information. |
| Community Engagement | Interact with your followers by responding to comments and messages. |
| Collaborations | Partner with other creators to reach new audiences. |
| Contests and Giveaways | Host contests and giveaways to increase engagement and attract new followers. |
| Analytics Tracking | Monitor your analytics to understand what content performs best and adjust your strategy. |
10. Conclusion: Mastering Instagram Photo Management
While Instagram doesn’t allow direct photo editing post-upload, mastering the available tools and strategies can greatly enhance your content. By focusing on pre-upload editing, strategic planning, and engaging with your audience, you can maintain a compelling and error-free Instagram presence. Visit dfphoto.net for more tips, tutorials, and resources to elevate your photography and social media skills. Explore our extensive collection of articles and connect with a vibrant community of photographers.
10.1. Key Takeaways for Flawless Instagram Photos
- Plan Ahead: Use a content calendar to organize and schedule your posts.
- Edit Thoroughly: Utilize third-party apps for advanced photo editing.
- Preview Your Feed: Use layout apps to ensure your posts look great in your feed.
- Engage with Your Audience: Respond to comments and encourage interaction.
- Stay Updated: Keep informed about Instagram’s latest features and updates.
10.2. Final Thoughts on Leveraging dfphoto.net for Enhanced Photography Skills
Dfphoto.net is your ultimate resource for mastering Instagram photography. From detailed editing tutorials to community support, we offer everything you need to create stunning visual content. Don’t let Instagram’s limitations hold you back. Visit dfphoto.net today and transform your approach to Instagram.
10.3. Encouragement to Explore and Experiment
Embrace the creative process and don’t be afraid to experiment with new techniques and styles. The world of photography is vast and ever-evolving, so keep exploring, learning, and sharing your unique vision with the world.
Address: 1600 St Michael’s Dr, Santa Fe, NM 87505, United States
Phone: +1 (505) 471-6001
Website: dfphoto.net
FAQ: Editing Photos on Instagram
1. Can you replace a photo on Instagram after posting?
No, Instagram does not allow you to replace a photo after it has been posted. The best solution is to delete the post and re-upload the corrected version.
2. How do I edit a caption on Instagram?
To edit a caption, tap the three dots in the top-right corner of the post, select “Edit,” and then tap on the caption to make your changes. Save your edits by tapping “Done” (iOS) or the checkmark (Android).
3. What other elements of an Instagram post can I edit?
Besides the caption, you can edit the tagged accounts, location, and alt text.
4. Is it better to delete a post with a mistake or leave it?
It depends on the severity of the mistake. For minor errors, editing the caption may suffice. However, for significant errors or poor-quality photos, deleting and re-uploading is recommended.
5. How can I avoid making mistakes when posting on Instagram?
Plan your content in advance, use Instagram’s draft feature, and preview your feed with layout apps to minimize errors.
6. What are some popular photo editing apps for Instagram?
Popular apps include Adobe Lightroom Mobile, VSCO, Snapseed, and Canva, offering a range of features to enhance your photos.
7. How can I maintain a consistent look on my Instagram feed?
Stick to a theme, use presets, and avoid over-editing to maintain a consistent visual style.
8. What legal considerations should I keep in mind when posting photos on Instagram?
Always ensure you have the rights to use the photos, provide proper attribution when required, and be transparent about any significant alterations.
9. How can I stay updated with Instagram’s latest features?
Follow the official Instagram blog, social media accounts, and industry news outlets for announcements about new features and updates.
10. What are some best practices for writing engaging Instagram captions?
Start with a captivating opening line, provide context, use emojis, ask questions, and include a call to action to encourage interaction.
