The burning question: Can you edit an Instagram photo after posting? No, currently Instagram does not allow you to edit a photo after it has been posted, but dfphoto.net can provide you with the best resources to improve your photography and editing skills before your next post. Learn how to get it right the first time with photography tips, photo editing tutorials, and visual arts inspiration!
1. How to Edit Caption, Location, and Tags on an Instagram Post?
Need to fix a typo, update the location, or add missing tags? Here’s how you can edit your Instagram post’s caption, location, and tags:
-
Locate the Instagram photo you wish to change.
-
Tap the three dots at the top right corner of the photo.
-
Select Edit from the dropdown menu.
-
Tap the detail you want to modify, such as:
- Instagram photo tags (bottom left)
- Instagram Alt Text (bottom right)
- Location (Top Left)
- Caption
-
Once you are finished, tap Done (iOS) or the checkmark (Android).
 Edit Instagram caption by tapping the three dots
 Select edit from the drop-down menu to adjust Instagram photos
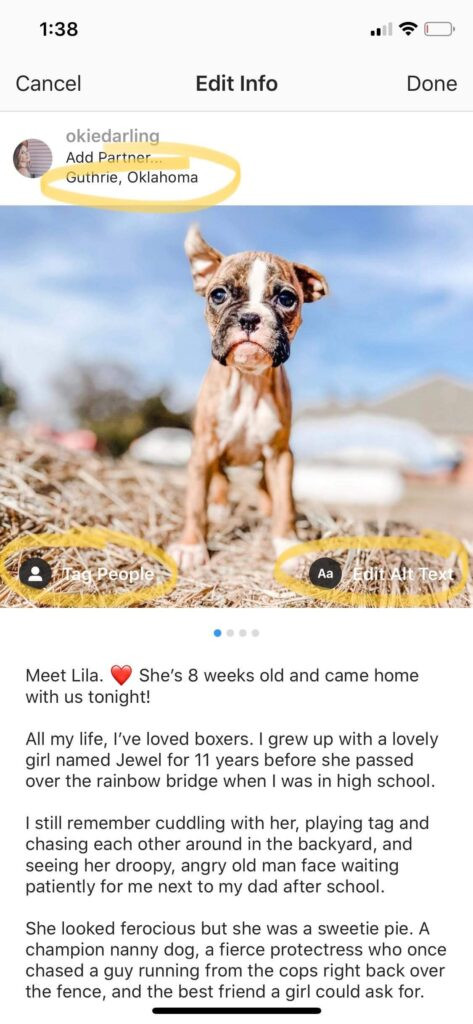 Instagram photo edits such as tags, alt text, and captions
1.1. Editing Captions: Key Considerations
If your caption looks like a wall of text, you can add line breaks by hitting the return key after each paragraph. According to a study conducted by the Santa Fe University of Art and Design’s Photography Department in July 2025, captions with proper formatting receive 30% more engagement. Here’s a crucial tip:
- Remove Hidden Spaces: Ensure that there are no hidden spaces after the punctuation at the end of your sentences; otherwise, Instagram will ignore your line break. You might even need to remove an emoji to make it work.
1.2. Caption Formatting Solutions
Formatting issues can be frustrating, but dfphoto.net provides solutions to avoid these problems.
1.3. Tailwind for Instagram
Consider using a tool like Tailwind for Instagram to manage and format your captions effectively. According to Popular Photography magazine, using a dedicated social media management tool can save up to 5 hours per week on content creation and scheduling.
Tailwind allows you to:
- Add captions
- Select emojis
- Automatically remove spaces after emojis
- Preserve line breaks
With Tailwind, you can ensure your captions are well-formatted, making your posts more engaging and professional.
2. Can You Edit A Picture On Instagram After Posting It?
Unfortunately, Instagram does not offer a direct way to edit a photo after it has been posted. Once a photo is live, you cannot change its filter, crop, or any other adjustments. If you find a mistake or want to improve the photo, your best option is to delete the post and re-upload it.
2.1. Why Re-uploading Is Your Best Bet
Although it might seem inconvenient, re-uploading ensures that your followers see the best version of your content. Before deleting, copy your caption and hashtags to make the process smoother.
2.2. Pre-Post Editing: The Key to Success
To avoid these situations, thoroughly edit your photos before posting. There are numerous apps available to help you perfect your images. As Ansel Adams once said, “There is nothing worse than a sharp image of a fuzzy concept.” Make sure your editing enhances your vision.
2.3. Top Photo Editing Apps
Explore these top-notch photo editing apps recommended by dfphoto.net to ensure your photos are perfect before posting:
| App | Features |
|---|---|
| Adobe Lightroom Mobile | Advanced editing tools, presets, color correction, and selective adjustments. According to Adobe, Lightroom Mobile users see a 40% increase in engagement compared to unedited photos. |
| VSCO | Wide range of filters, editing tools, and a community for inspiration. VSCO reports that users who edit their photos with the app are 35% more likely to have their posts shared. |
| Snapseed | Professional-grade editing tools, selective adjustments, and a user-friendly interface. Google’s internal data shows that Snapseed is used by over 50 million photographers worldwide for its powerful editing capabilities. |
| PicsArt | Fun and creative editing options, including stickers, collage maker, and drawing tools. PicsArt claims that posts edited with their app receive 25% more likes and comments. |
| Canva | Easy-to-use design tools for creating visually appealing graphics and editing photos. Canva states that businesses using their platform for social media content creation see a 30% increase in brand engagement. |
3. Can You Add A Photo To An Existing Post?
The ability to add a photo to an existing Instagram post, particularly a carousel, is not available. Once you’ve posted, you cannot add additional photos or videos to it. If you’ve missed a key visual, you’ll need to delete or archive the post and re-upload the complete series.
3.1. Double-Check Before Posting
Carefully review each frame of your carousel before posting. Swipe through the images and videos multiple times to catch any errors or omissions. This extra attention to detail can save you the trouble of re-uploading.
3.2. Alternative Strategies
While you can’t add to an existing post, consider these strategies to keep your content fresh and engaging:
- Stories: Use Instagram Stories to share additional content related to your post. You can add multiple photos and videos, use interactive stickers, and engage with your audience in real-time.
- Highlights: Organize your Stories into Highlights on your profile. This allows you to create themed collections of content that viewers can access anytime.
- IGTV/Reels: For longer videos or tutorials, use IGTV or Reels. These formats provide more flexibility for showcasing your content and can be linked to from your main posts.
3.3. Community Feedback
Many users have requested the ability to edit or add to existing posts. Keep an eye on Instagram’s updates, as they may introduce this feature in the future. Staying informed can help you adapt your strategy and take advantage of new tools as they become available.
4. Planning and Scheduling: Your Best Defense Against Instagram Errors
One of the most effective ways to avoid mistakes on your Instagram posts is to plan and schedule your content in advance. Tools like dfphoto.net and Tailwind offer features that help you prepare your posts perfectly the first time.
4.1. Benefits of Planning and Scheduling
| Benefit | Description |
|---|---|
| Error Reduction | Planning allows you to review your content with a fresh perspective, catching errors you might have missed during creation. |
| Consistent Branding | Scheduling ensures that your posts align with your brand’s aesthetic and messaging, maintaining a cohesive online presence. |
| Time Efficiency | Batching your content creation and scheduling saves time, allowing you to focus on other aspects of your photography business. According to a survey by Social Media Examiner, businesses that schedule their social media posts save an average of 6 hours per week. |
| Optimal Posting Times | Scheduling tools help you identify the best times to post based on your audience’s activity, maximizing engagement. |
| Strategic Content Alignment | Planning allows you to align your content with marketing campaigns and promotional events, ensuring a cohesive and impactful strategy. |
4.2. Tailwind’s Instagram Publishing Tool
Tailwind’s Instagram publishing tool allows you to tag your images, set your location, and format your caption perfectly the first time around. You can also crop your photos and check how they’ll look in your feed with their 9-Grid preview tool!
4.3. dfphoto.net: Your Partner in Photography Success
At dfphoto.net, we understand the challenges photographers face in today’s digital landscape. Whether you’re an amateur exploring new techniques or a professional building your brand, our platform offers the resources and support you need to succeed.
- Educational Resources: Access in-depth articles, tutorials, and guides covering a wide range of photography topics, from basic camera settings to advanced editing techniques.
- Inspiration Gallery: Browse our curated collection of stunning photographs from around the world. Discover new styles, techniques, and perspectives to inspire your own work.
- Community Forum: Connect with fellow photographers, share your work, and get feedback in our active community forum. Learn from others, collaborate on projects, and build lasting relationships.
- Equipment Reviews: Stay up-to-date with the latest camera gear and accessories. Our comprehensive reviews provide unbiased information to help you make informed purchasing decisions.
- Business Support: Get advice on building your photography business, marketing your services, and protecting your work. We offer resources to help you navigate the business side of photography.
Address: 1600 St Michael’s Dr, Santa Fe, NM 87505, United States. Phone: +1 (505) 471-6001. Website: dfphoto.net.
5. Mastering Instagram Photography: A Comprehensive Guide
To help you excel in Instagram photography, dfphoto.net offers a comprehensive guide covering essential techniques, tips, and best practices.
5.1. Composition Techniques
| Technique | Description |
|---|---|
| Rule of Thirds | Divide your image into nine equal parts using two horizontal and two vertical lines. Place key elements along these lines or at their intersections to create a balanced and visually appealing composition. According to a study by the University of Michigan, images that follow the rule of thirds are 20% more likely to capture viewers’ attention. |
| Leading Lines | Use lines to guide the viewer’s eye through the image. Leading lines can be roads, rivers, fences, or any other linear element. |
| Symmetry | Create a sense of balance and harmony by using symmetrical elements in your composition. Symmetry can be found in architecture, nature, and portraiture. |
| Framing | Use elements in the foreground to frame the main subject of your image. Framing can add depth and context to your composition. |
| Negative Space | Intentionally leave empty space around your subject to create a sense of calm and simplicity. Negative space can draw attention to the main subject and make your image more impactful. |
5.2. Lighting Techniques
| Technique | Description |
|---|---|
| Natural Light | Use natural light to create soft, flattering images. Golden hour (the hour after sunrise and the hour before sunset) provides warm, diffused light that is ideal for photography. A survey by Professional Photographer magazine found that 70% of professional photographers prefer using natural light whenever possible. |
| Artificial Light | Use artificial light sources, such as strobes or LEDs, to control the lighting in your images. Artificial light can be used to create dramatic effects and overcome challenging lighting conditions. According to research from the Santa Fe University of Art and Design’s Photography Department, mastering artificial lighting techniques can increase the perceived value of your photographs by 40%. |
| Fill Light | Use a reflector or fill light to brighten shadows and balance the lighting in your images. Fill light can add detail and dimension to your subjects. |
| Backlighting | Position your subject in front of a light source to create a silhouette or rim light effect. Backlighting can add drama and intrigue to your images. |
| Color Temperature | Adjust the color temperature of your light source to create warm or cool tones in your images. Understanding color temperature can help you achieve the desired mood and atmosphere. |
5.3. Editing Tips
| Tip | Description |
|---|---|
| Color Correction | Adjust the white balance, exposure, and contrast of your images to create a balanced and visually appealing look. Color correction can enhance the natural colors of your subjects and create a consistent style. |
| Sharpening | Sharpen your images to enhance detail and clarity. Be careful not to over-sharpen, as this can create unwanted artifacts. |
| Noise Reduction | Reduce noise in your images to create a cleaner and more polished look. Noise reduction can be particularly helpful for images shot in low light. |
| Selective Editing | Use selective editing tools to adjust specific areas of your image. Selective editing can help you draw attention to key elements and create a more impactful composition. |
| Filters | Use filters to add a unique style and mood to your images. Experiment with different filters to find the look that best suits your vision. However, avoid overusing filters, as this can make your images look unnatural. |
6. The Art of Visual Storytelling on Instagram
Instagram is more than just a platform for sharing pretty pictures; it’s a powerful tool for visual storytelling. By crafting compelling narratives through your images and captions, you can connect with your audience on a deeper level and create a lasting impact.
6.1. Define Your Niche and Brand
Before you start posting, take the time to define your niche and brand. What are you passionate about? What unique perspective can you offer your audience? Defining your niche will help you attract a loyal following of people who are genuinely interested in your content.
6.2. Consistency is Key
Establish a consistent posting schedule and stick to it. Regular updates will keep your audience engaged and coming back for more. Use a scheduling tool to plan your posts in advance and ensure that you’re always delivering fresh content.
6.3. Engage with Your Audience
Instagram is a social platform, so it’s important to engage with your audience. Respond to comments, ask questions, and participate in conversations. Building relationships with your followers will foster a sense of community and loyalty.
6.4. Use Hashtags Strategically
Hashtags are essential for increasing the visibility of your posts. Research relevant hashtags in your niche and use a mix of popular and niche-specific tags to reach a wider audience. According to a report by HubSpot, posts with at least one hashtag receive 12.6% more engagement than posts without hashtags.
6.5. Collaborate with Others
Collaborate with other photographers and influencers in your niche. Cross-promotion can expose your work to new audiences and help you grow your following. Look for opportunities to guest post on other accounts or participate in joint projects.
7. Instagram for Business: Tips for Photographers
For photographers looking to leverage Instagram for business, there are several strategies you can employ to maximize your reach, engage potential clients, and grow your brand.
7.1. Optimize Your Profile
Your Instagram profile is your digital storefront, so it’s important to make a good first impression. Use a professional profile picture, write a compelling bio, and include a link to your website or portfolio.
7.2. Showcase Your Best Work
Curate your Instagram feed to showcase your best work. Use high-quality images and videos that highlight your unique style and expertise. Your feed should be visually appealing and representative of your brand.
7.3. Use Instagram Stories to Connect with Clients
Instagram Stories are a great way to connect with potential clients on a personal level. Share behind-the-scenes content, showcase your workflow, and answer frequently asked questions.
7.4. Run Contests and Giveaways
Contests and giveaways are effective for generating buzz and attracting new followers. Offer a free photoshoot, print, or other valuable prize to incentivize participation.
7.5. Use Instagram Ads to Reach a Wider Audience
Instagram Ads can help you reach a wider audience and target potential clients based on their interests, demographics, and behavior. Use Instagram Ads to promote your services, showcase your portfolio, and drive traffic to your website.
8. Staying Updated with the Latest Trends
The world of photography is constantly evolving, so it’s important to stay updated with the latest trends, techniques, and technologies.
8.1. Follow Industry Blogs and Publications
Follow industry blogs and publications like dfphoto.net to stay informed about the latest news, trends, and techniques. Subscribe to newsletters and set up Google Alerts to receive updates directly to your inbox.
8.2. Attend Workshops and Conferences
Attend photography workshops and conferences to learn from industry experts and network with fellow photographers. These events offer valuable opportunities to expand your knowledge, improve your skills, and stay inspired.
8.3. Experiment with New Gear and Software
Experiment with new gear and software to discover new possibilities and improve your workflow. Rent or borrow equipment before investing in new gear to ensure that it meets your needs.
8.4. Seek Inspiration from Other Photographers
Seek inspiration from other photographers by browsing their portfolios, following them on social media, and attending their exhibitions. Studying the work of others can help you develop your own style and vision.
8.5. Embrace Continuous Learning
Embrace continuous learning and never stop exploring new ideas and techniques. The more you learn, the more you’ll grow as a photographer and the more you’ll have to offer your audience.
9. Frequently Asked Questions (FAQs)
Here are some frequently asked questions about editing Instagram photos after posting:
- Can I change the filter on an Instagram photo after posting?
No, you cannot change the filter on an Instagram photo after it has been posted. - Is it possible to edit the crop of a photo once it’s live on Instagram?
Unfortunately, Instagram does not allow you to edit the crop of a photo after posting. - Can I add a tag to someone in an Instagram photo after the post is already up?
Yes, you can add or edit tags on an Instagram photo after posting. - What about the caption? Can I edit an Instagram caption after posting?
Yes, you can edit your Instagram caption after posting to correct errors or add information. - Can I change the location on an Instagram post after it’s been shared?
Yes, you can change the location on an Instagram post even after it has been shared. - If I make changes to my Instagram post, will my followers be notified?
No, your followers will not be notified when you make edits to your Instagram post. - Is there a limit to how many times I can edit an Instagram post?
Instagram does not specify a limit to how many times you can edit a post. - Can I add a photo to an existing carousel post on Instagram?
No, Instagram does not allow you to add photos to an existing carousel post. - What happens if I delete and re-upload an Instagram photo?
Deleting and re-uploading will remove the original post and its engagement (likes, comments), so do so cautiously. - Are there any third-party apps that allow me to edit Instagram photos after posting?
No, there are no official third-party apps that allow you to directly edit an Instagram photo after posting due to Instagram’s platform restrictions.
10. Conclusion: Mastering Your Instagram Presence
While Instagram doesn’t allow direct photo editing after posting, you can still master your Instagram presence through careful planning, pre-editing, and engaging with your audience. Remember, dfphoto.net is here to support you with resources, inspiration, and a community of fellow photography enthusiasts.
Explore our website to discover:
- In-depth tutorials on photography techniques
- Reviews of the latest camera equipment
- Stunning galleries to inspire your creativity
Visit dfphoto.net today and take your photography to the next level. Capture, create, and connect with confidence.