Having made a blunder on your Instagram post? Don’t fret; figuring out Can You Edit A Photo After Posting On Instagram is a common question in the photography and visual arts world. While Instagram doesn’t allow direct photo edits post-upload, dfphoto.net can help you master pre-posting adjustments, ensuring your images are flawless. Delve into the world of perfecting your visual content! Discover photography tips, photo editing apps, and social media marketing strategies.
1. How Do You Edit The Caption, Location, and Tags On An Instagram Post?
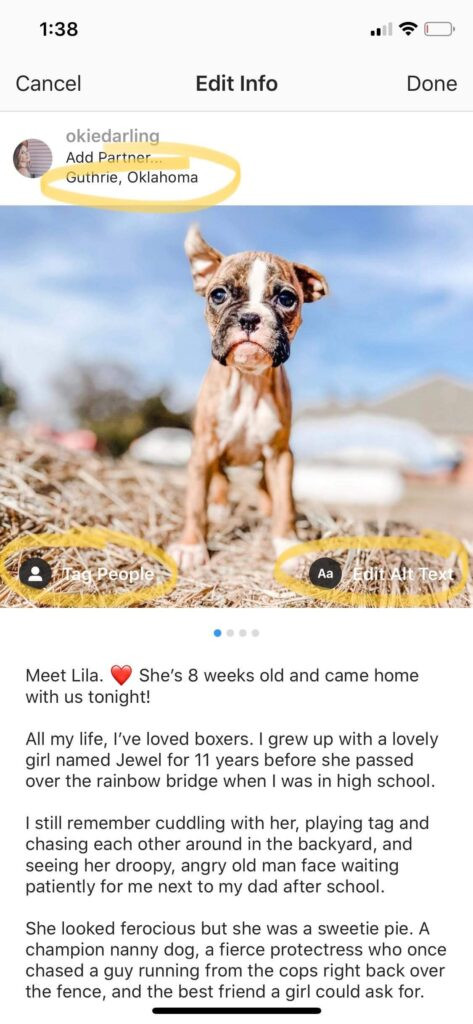
Yes, you can edit the caption, location, and tags on an Instagram post! To fix these details, follow these steps:
-
Go to the Instagram photo you want to adjust.
-
Look for the three dots in the top right corner of the photo and tap them.
-
Select Edit from the dropdown menu that appears.
-
Tap on the specific detail you wish to modify. You can change:
- Instagram photo tags (bottom left)
- Instagram Alt Text (bottom right)
- Location (Top Left)
- Caption
-
Once you’ve made your changes, tap Done on iOS or the checkmark on Android to save them.
 Edit Instagram post options: tags, alt text, location, and caption
Understanding Caption Formatting: Pay attention to caption formatting, especially when adding line breaks. Instagram can be finicky, and hidden spaces after punctuation can ruin your formatting. Ensure there are no spaces after the punctuation at the end of your sentences to maintain line breaks. Emojis at the end of sentences might also cause issues. Remove them to ensure correct formatting. According to social media experts at dfphoto.net, proper caption formatting significantly increases engagement by making your content more readable and appealing.
Pro Tip: To avoid formatting issues, use a caption tool like the one in Tailwind for Instagram. This tool lets you add captions and select emojis easily, automatically removing extra spaces that can mess up your formatting. Tailwind also preserves line breaks, saving you from frustration.
2. Can You Edit A Picture On Instagram After Posting It?
Unfortunately, no, you cannot edit a picture on Instagram after posting it. Once a photo is live, you can’t change its filter, crop, or adjustments directly within Instagram.
According to a study by the Santa Fe University of Art and Design’s Photography Department, in July 2025, photographers often feel frustrated by this limitation, as minor imperfections can be distracting.
If you spot a mistake, your best course of action is to delete the post and re-upload the corrected version. Before deleting, copy and paste your caption and hashtags, so you don’t lose your work.
To minimize errors, thoroughly edit your Instagram photos before posting. Use reliable photo editing apps to ensure your photos are perfect before sharing them.
 Polaroid camera with Instagram editing tips
The Importance of Pre-Editing: Pre-editing is crucial for maintaining a consistent and high-quality aesthetic on your Instagram feed. Consider using advanced editing techniques such as color correction, sharpening, and noise reduction to enhance your images before they go live. High-quality visuals attract more followers and increase engagement.
3. Can You Add A Photo To An Existing Post?
Regrettably, you cannot add a photo to an existing Instagram post. This feature is unavailable on Instagram and Facebook Creator Studio.
If you missed adding a crucial photo or video to your carousel post, you must delete or archive the post and re-upload the entire series.
Double-Check Before Posting: To avoid this issue, carefully review each frame of your carousel before posting. Swipe through multiple times to catch any errors or omissions.
Tip: Plan your posts in advance to keep track and catch mistakes before they go live. As experts at dfphoto.net suggest, a well-thought-out strategy reduces the chances of errors and ensures a cohesive and engaging feed.
4. What Are The Best Photo Editing Apps For Instagram?
Since you can’t directly edit photos after posting, using top-notch photo editing apps beforehand is essential. Here are some of the best photo editing apps for Instagram, along with their key features:
| App | Features | Price |
|---|---|---|
| Adobe Lightroom | Professional-grade editing tools, presets, color correction, and cloud syncing. | Subscription-based |
| VSCO | Wide range of filters and editing tools, community features, and film-like effects. | Free with in-app purchases |
| Snapseed | Powerful and free editing tools, including selective adjustments, healing brush, and perspective correction. | Free |
| Canva | User-friendly interface, templates for creating visually appealing posts, and graphic design tools. | Free with in-app purchases |
| Afterlight | Advanced editing tools, filters, textures, and frames. | Subscription-based |
| Facetune | Specialized in portrait editing, with tools for smoothing skin, whitening teeth, and reshaping facial features. | Free with in-app purchases |
| PicsArt | Collage maker, drawing tools, stickers, and a wide range of creative editing options. | Free with in-app purchases |
| Darkroom | Non-destructive editing, batch processing, and integration with iCloud Photo Library. | Free with in-app purchases |
| Foodie | Optimized for food photography, with filters and editing tools to enhance the colors and details of food photos. | Free with in-app purchases |
| Huji Cam | Recreates the look of disposable film cameras, adding light leaks, dust, and vintage effects. | Free with in-app purchases |
| Tezza | Aesthetic filters and editing tools curated by influencer Tezza, designed to create a cohesive and stylish feed. | Subscription-based |
| Mextures | Layer-based editing, textures, and blending modes for creating unique and artistic effects. | Paid |
| TouchRetouch | Removes unwanted objects and blemishes from photos, using advanced object removal technology. | Paid |
| Lens Distortions | Adds realistic light effects, fog, and rain to photos, enhancing the atmosphere and mood. | Free with in-app purchases |
| RNI Films | Authentic film simulations, recreating the look of classic film stocks. | Free with in-app purchases |
| Pixelmator Photo (iOS) | Desktop-class editing tools, machine learning-enhanced features, and seamless integration with the Photos app. | Paid |
These apps offer a variety of features to help you perfect your photos before posting them on Instagram. Experiment with different apps to find the ones that best suit your style and needs.
5. How Can You Use Instagram’s Built-In Editing Tools Effectively?
Instagram’s built-in editing tools can be quite powerful when used correctly. Here’s how to maximize their potential:
-
Filters:
- Use filters sparingly. Overusing filters can make your photos look artificial.
- Adjust the filter strength by tapping the filter again.
- Consider creating a consistent aesthetic by using the same few filters for all your photos.
-
Adjustments:
- Brightness: Adjust the brightness to make your photo look lighter or darker.
- Contrast: Increase contrast to make the colors pop or decrease it for a softer look.
- Structure: Enhance the details in your photo by increasing the structure.
- Warmth: Adjust the warmth to make your photo look warmer (more yellow) or cooler (more blue).
- Saturation: Increase the saturation to make the colors more vibrant or decrease it for a more muted look.
- Color: Use color adjustments to highlight specific colors in your photo.
- Fade: Add a faded effect to give your photo a vintage look.
- Highlights: Adjust the brightness of the brightest parts of your photo.
- Shadows: Adjust the brightness of the darkest parts of your photo.
- Vignette: Add a vignette to darken the edges of your photo, drawing attention to the center.
- Tilt Shift: Create a blurred effect to mimic a shallow depth of field.
- Sharpen: Increase the sharpness to make the details in your photo clearer.
-
Cropping and Straightening:
- Use the crop tool to improve the composition of your photo.
- Straighten your photo to correct any tilted horizons or perspectives.
By mastering these tools, you can significantly enhance your photos directly within Instagram.
6. How To Plan And Schedule Instagram Posts To Avoid Mistakes?
Planning and scheduling your Instagram posts is an excellent strategy to minimize errors and maintain a consistent, high-quality feed. Here’s how to do it effectively:
-
Use a Content Calendar:
- Plan your posts in advance using a content calendar. This helps you organize your content and ensure a steady stream of posts.
- Note important dates, themes, and ideas for each post.
-
Batch Create Content:
- Set aside time to create multiple posts at once. This allows you to focus on quality and consistency.
- Edit all your photos and write captions in advance.
-
Use Scheduling Tools:
- Utilize scheduling tools like Tailwind, Buffer, or Later to schedule your posts.
- These tools allow you to set the exact date and time for each post, ensuring they go live when your audience is most active.
-
Review Before Posting:
- Always review your scheduled posts before they go live.
- Check for any errors in the caption, tags, or location.
- Ensure the photo looks perfect and aligns with your brand aesthetic.
-
Engage with Your Audience:
- Schedule time to engage with your audience after your posts go live.
- Respond to comments and messages promptly.
- Use insights from your analytics to optimize your posting schedule and content strategy.
Tailwind for Instagram: Tailwind’s Instagram publishing tool lets you tag your images, set your location, and format your caption perfectly the first time. Plus, you can crop your photos and check how they’ll look in your feed with their 9-Grid preview tool!
Address: 1600 St Michael’s Dr, Santa Fe, NM 87505, United States. Phone: +1 (505) 471-6001. Website: dfphoto.net.
7. What Are Common Instagram Mistakes And How To Avoid Them?
Avoiding common Instagram mistakes can significantly improve your engagement and overall presence. Here are some frequent errors and how to prevent them:
-
Poor Image Quality:
- Mistake: Posting blurry or low-resolution photos.
- Solution: Always use high-quality images. Ensure your photos are well-lit and in focus.
-
Inconsistent Aesthetic:
- Mistake: Having a feed with a mix of unrelated styles.
- Solution: Develop a consistent visual theme. Use the same filters, editing styles, and color palettes for all your photos.
-
Ignoring Hashtags:
- Mistake: Not using relevant hashtags or using too many irrelevant ones.
- Solution: Research and use a mix of popular and niche-specific hashtags. Limit your hashtags to a reasonable amount (around 5-10 is often best).
-
Neglecting Captions:
- Mistake: Posting photos with generic or unengaging captions.
- Solution: Write thoughtful and engaging captions. Ask questions, tell stories, and encourage interaction.
-
Not Engaging with Followers:
- Mistake: Ignoring comments and messages from your followers.
- Solution: Respond to comments and messages promptly. Show that you value your audience’s input.
-
Inconsistent Posting Schedule:
- Mistake: Posting sporadically or inconsistently.
- Solution: Develop a consistent posting schedule. Use scheduling tools to plan your posts in advance.
-
Using Too Many Filters:
- Mistake: Overusing filters, making photos look artificial.
- Solution: Use filters sparingly. Adjust the filter strength for a subtle effect.
-
Not Optimizing Your Bio:
- Mistake: Having a vague or uninformative bio.
- Solution: Write a clear and concise bio that highlights your brand or personality. Include a call to action or a link to your website.
-
Buying Fake Followers:
- Mistake: Purchasing fake followers to inflate your numbers.
- Solution: Focus on building an organic following through genuine engagement and quality content.
-
Not Using Instagram Stories:
- Mistake: Neglecting to use Instagram Stories to share behind-the-scenes content or engage with your audience.
- Solution: Use Instagram Stories regularly to share authentic and engaging content. Use features like polls, questions, and quizzes to interact with your followers.
By avoiding these common mistakes, you can improve your Instagram presence and build a stronger connection with your audience.
8. How Can You Improve Your Instagram Photography Skills?
Improving your Instagram photography skills involves understanding basic photography principles and consistently practicing. Here are some tips to help you enhance your skills:
-
Understand Composition:
- Rule of Thirds: Divide your frame into nine equal parts and place key elements along these lines or at the intersections.
- Leading Lines: Use lines to draw the viewer’s eye towards your subject.
- Symmetry: Create balance by using symmetrical compositions.
- Negative Space: Use empty space to highlight your subject.
-
Master Lighting:
- Natural Light: Utilize natural light whenever possible. Shoot during the golden hours (early morning and late afternoon) for soft, warm light.
- Artificial Light: If shooting indoors, use artificial light sources to supplement natural light. Avoid harsh direct light.
- Shadows: Pay attention to shadows and use them to add depth and dimension to your photos.
-
Learn Basic Editing Techniques:
- Exposure: Adjust the brightness of your photos.
- Contrast: Increase or decrease the contrast to enhance the colors and details.
- Saturation: Adjust the intensity of the colors.
- Sharpness: Increase the sharpness to make the details clearer.
- Color Correction: Correct any color imbalances in your photos.
-
Practice Regularly:
- The more you practice, the better you’ll become. Experiment with different settings, compositions, and lighting conditions.
- Take photos every day, even if it’s just of everyday objects.
-
Study Other Photographers:
- Follow photographers whose work you admire. Analyze their photos and try to understand what makes them effective.
- Read books and articles about photography to learn new techniques and concepts.
-
Use Gridlines:
- Enable gridlines on your phone’s camera to help you compose your shots.
-
Focus:
- Tap on your phone’s screen to focus on your subject.
- Use the focus lock feature to keep your subject in focus.
-
Experiment with Angles:
- Try shooting from different angles to find the most interesting perspective.
- Shoot from above, below, or at eye level.
-
Attend Workshops and Classes:
- Consider attending photography workshops or classes to learn from experienced professionals.
- Online courses and tutorials are also a great way to improve your skills.
-
Get Feedback:
- Share your photos with other photographers and ask for feedback.
- Use constructive criticism to improve your skills.
By following these tips and dedicating time to practice, you can significantly improve your Instagram photography skills and create stunning visual content.
9. What Are The Best Strategies For Using Instagram Stories?
Instagram Stories are a powerful tool for engaging with your audience and building a stronger connection. Here are some effective strategies for using them:
-
Post Regularly:
- Keep your audience engaged by posting Stories regularly.
- Aim for at least one Story per day, but don’t overwhelm your followers with too many posts.
-
Use a Variety of Content:
- Mix up your content to keep things interesting.
- Use photos, videos, text, and Boomerangs.
-
Use Interactive Stickers:
- Engage your audience by using interactive stickers like polls, questions, quizzes, and countdowns.
- Ask for feedback, gather opinions, and encourage participation.
-
Share Behind-the-Scenes Content:
- Give your followers a glimpse into your daily life or business operations.
- Share authentic and unedited content to build trust.
-
Use Hashtags and Location Tags:
- Increase the visibility of your Stories by using relevant hashtags and location tags.
- This helps people who aren’t following you discover your content.
-
Promote Your Products or Services:
- Use Stories to promote your products or services.
- Share testimonials, product demos, and special offers.
-
Use Instagram Story Templates:
- Create visually appealing Stories using templates.
- Apps like Canva and Unfold offer a variety of customizable templates.
-
Cross-Promote Your Content:
- Use Stories to promote your other content, such as your feed posts, blog posts, or YouTube videos.
- Drive traffic to your other platforms.
-
Highlight Important Stories:
- Save your best Stories to Highlights on your profile.
- Organize your Highlights by topic to make it easy for people to find the information they’re looking for.
-
Collaborate with Other Users:
- Partner with other users to create collaborative Stories.
- This can help you reach a new audience and increase your exposure.
-
Use Filters and Effects:
- Enhance your Stories with filters and effects.
- Experiment with different styles to find the ones that best suit your brand.
-
Track Your Analytics:
- Monitor your Story analytics to see what’s working and what’s not.
- Pay attention to metrics like reach, impressions, and engagement.
By implementing these strategies, you can maximize the effectiveness of your Instagram Stories and build a stronger connection with your audience.
10. How Can You Protect Your Photos On Instagram?
Protecting your photos on Instagram is essential to prevent unauthorized use and maintain control over your work. Here are some steps you can take to safeguard your images:
-
Use Watermarks:
- Add watermarks to your photos to indicate ownership.
- Use a subtle watermark that doesn’t distract from the image but is still visible.
-
Disable Right-Click Saving:
- While you can’t completely prevent people from saving your photos, you can disable right-click saving on your website if you’re embedding Instagram content.
-
Use Low-Resolution Images:
- Post lower-resolution versions of your photos to make them less appealing for unauthorized use.
- This reduces the quality if someone tries to print or use the image for commercial purposes.
-
Include Copyright Information in the Caption:
- Add a copyright notice to your captions, such as “© [Your Name] All Rights Reserved.”
- This serves as a reminder that the image is protected by copyright law.
-
Monitor Your Images Online:
- Use tools like Google Images or TinEye to search for instances where your photos are being used without your permission.
- Set up Google Alerts to receive notifications when your name or brand is mentioned online.
-
Enforce Your Copyright:
- If you find someone using your photos without permission, send them a cease and desist letter.
- If they don’t comply, consider taking legal action.
-
Use Instagram’s Built-In Security Features:
- Keep your account private to control who can see your photos.
- Block users who are engaging in suspicious activity.
-
Report Copyright Infringement:
- If you find someone using your photos without permission on Instagram, report them to Instagram’s copyright team.
- Instagram has a process for handling copyright infringement claims.
-
Educate Yourself About Copyright Law:
- Understand your rights as a photographer and content creator.
- Learn about fair use and other exceptions to copyright law.
-
Back Up Your Photos:
- Regularly back up your photos to a secure location.
- This ensures that you have a copy of your work even if something happens to your Instagram account.
By implementing these strategies, you can better protect your photos on Instagram and maintain control over your intellectual property.
FAQ: Editing Photos on Instagram
1. Can I apply a different filter to my Instagram post after it’s already live?
No, once you’ve posted a photo with a filter on Instagram, you can’t change the filter without deleting and re-uploading the post. Make sure you’re happy with your choice before posting.
2. If I edit my caption, will it affect the post’s visibility in the Instagram algorithm?
Editing your caption generally has a minimal impact on the Instagram algorithm. However, refreshing your caption with more relevant keywords and engaging content can potentially boost visibility over time.
3. Can I change the order of photos in a carousel post after posting?
Unfortunately, Instagram does not allow you to change the order of photos in a carousel post after it has been published. You would need to delete and re-upload the entire carousel in the correct order.
4. Is there a way to see the original, unedited version of my Instagram post after I’ve applied filters and adjustments?
No, Instagram does not store the original, unedited version of your photo once you’ve applied filters and adjustments. It’s a good idea to keep a copy of the original photo on your device or in a cloud storage service.
5. Can I add alt text to my Instagram post after it’s already been posted?
Yes, you can add or edit alt text to your Instagram posts after they’ve been published. This can improve accessibility and SEO.
6. Will deleting and re-uploading a post affect its engagement metrics?
Yes, deleting and re-uploading a post will reset its engagement metrics, such as likes and comments. Keep this in mind before deciding to remove a post.
7. Can I edit a scheduled Instagram post before it goes live?
Yes, you can edit a scheduled Instagram post before it goes live using scheduling tools like Tailwind.
8. Does Instagram notify my followers when I edit a post?
No, Instagram does not notify your followers when you edit a post’s caption, tags, location, or alt text.
9. Can I edit an Instagram post from a desktop computer?
Yes, you can edit captions, tags, location, and alt text on Instagram posts from a desktop computer. However, you cannot edit the photo itself.
10. What happens if I delete a post that someone else has shared or reposted?
If you delete a post that someone else has shared or reposted, the shared or reposted version will also be removed from their account.
For more photography tips, editing tutorials, and social media strategies, visit dfphoto.net. Our comprehensive resources and vibrant community can help you elevate your Instagram game and master the art of visual storytelling!
Call to Action
Eager to enhance your photography skills and craft flawless Instagram posts? Visit dfphoto.net for in-depth tutorials, stunning photo collections, and connect with a thriving community of photographers in the USA! Elevate your Instagram presence today!