Navigating the rules for passport photos can be tricky, especially when it comes to wearing glasses. At dfphoto.net, we understand the importance of getting your passport photo right the first time. Our guide cuts through the confusion and offers clear advice on the latest regulations, ensuring your photo meets all requirements for a successful passport application. Explore our site for expert tips, visual tutorials, and a vibrant community ready to assist with all your photography needs. Let’s simplify the process together with our photography guidelines, image specifications, and visual identification.
1. Understanding Passport Photo Requirements
To ensure your passport application proceeds smoothly, understanding the specific requirements for passport photos is crucial. These rules are set by government agencies to ensure accurate identification and security. A photo that does not meet these standards can lead to delays or even rejection of your application. So, let’s delve into the key aspects of what makes a good passport photo.
1.1. The Basics of Acceptable Passport Photos
A compliant passport photo starts with some fundamental criteria. According to official guidelines, your photo must be:
- Recent: Taken within the last six months to accurately reflect your current appearance.
- In Color: Black and white photos are not accepted.
- Clear and In Focus: The image should be sharp, with no blurring or pixelation.
- Sized Correctly: The photo must be 2×2 inches (51×51 mm).
- Printed on Quality Paper: Use matte or glossy photo-quality paper.
1.2. Pose and Expression Guidelines
How you present yourself in the photo is equally important. Here are the key guidelines:
- Face Forward: You must face the camera directly, with your full face visible.
- Neutral Expression: A natural expression with both eyes open and mouth closed is required. Smiling, frowning, or any exaggerated expressions are not allowed.
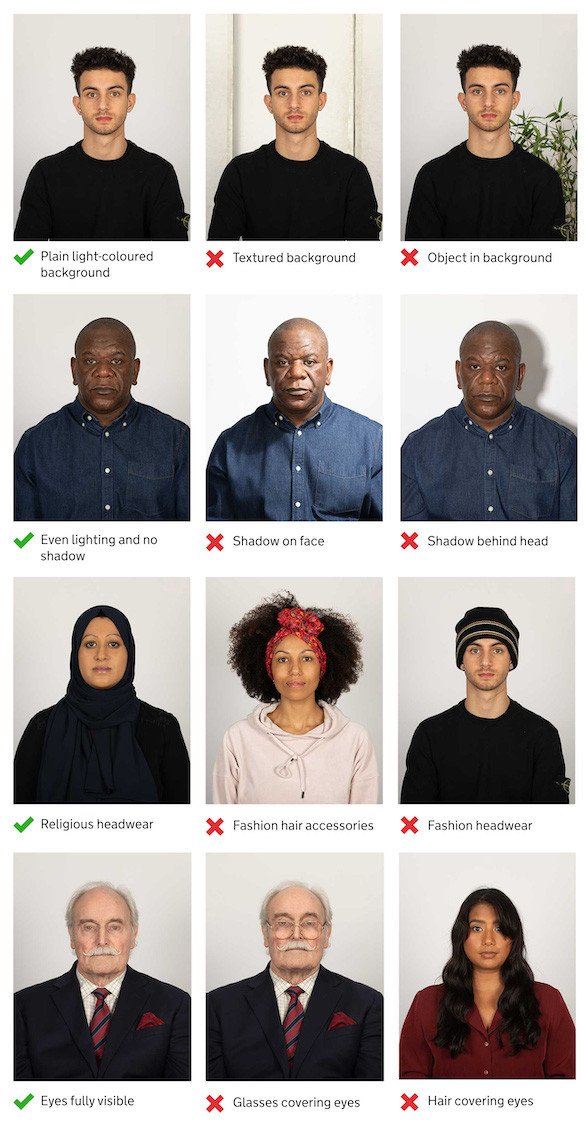
- Proper Lighting: The photo should be evenly lit, with no shadows on your face or in the background.
- Background: A plain white or off-white background is essential. Avoid patterns or distracting elements.
1.3. Digital Photo Specifications
If you’re submitting a digital photo, there are additional technical specifications to consider:
- Resolution: The digital image must be at least 600 x 600 pixels.
- File Format: Typically, the accepted format is JPEG (.jpg).
- File Size: The file size should be less than 10MB.
- No Alterations: The photo must not be digitally altered or retouched in any way.
2. Can You Wear Glasses in Your Passport Photo?
The question of whether you can wear glasses in your passport photo is a common one. The short answer is: generally, no. However, there are exceptions. Let’s explore the details to help you determine if you need to remove your glasses for your passport photo.
2.1. The General Rule: Glasses Should Be Removed
The standard rule is that glasses should be removed for your passport photo. Government agencies prefer that your eyes are clearly visible without any obstruction. This is to ensure accurate facial recognition.
2.2. Exceptions for Medical Reasons
There is an exception for individuals who must wear glasses for medical reasons. If you have a medical condition where you need to wear glasses at all times, you may be allowed to wear them in your passport photo. However, you must provide a signed statement from a medical professional explaining the necessity.
2.3. Requirements for Wearing Glasses Due to Medical Reasons
If you are permitted to wear glasses due to medical reasons, there are specific requirements:
- Frames: The frames should not cover any part of your eyes. Choose thin frames if possible.
- Glare and Reflections: There should be no glare or reflections on the lenses. This may require adjusting the lighting or tilting your head slightly.
- Visibility: Your eyes must be clearly visible through the lenses.
- Medical Statement: Include a signed statement from your doctor explaining why you need to wear glasses at all times.
2.4. Tips for Ensuring Your Photo Is Accepted with Glasses
If you must wear glasses, follow these tips to increase the chances of your photo being accepted:
- Choose the Right Frames: Opt for glasses with thin frames that do not obstruct your eyes.
- Adjust Lighting: Ensure there is no glare or reflections on the lenses. Diffused lighting can help.
- Tilt Your Head: Slightly tilting your head can reduce reflections.
- Take Multiple Shots: Take several photos and choose the one where your eyes are most clearly visible.
- Get Professional Help: Consider visiting a professional photographer who is experienced in taking passport photos.
3. Common Mistakes to Avoid When Taking a Passport Photo
Avoiding common mistakes can save you time and frustration. Here are some frequent errors people make when taking passport photos:
3.1. Poor Lighting and Shadows
Inadequate lighting is a common issue. Shadows on your face or in the background can lead to rejection. Ensure the lighting is even and bright, without harsh shadows.
3.2. Incorrect Background
The background must be plain white or off-white. Using a colored or patterned background is a common mistake.
3.3. Wearing Unacceptable Items
Wearing hats, headbands, or other accessories that cover your hair or face is not allowed, unless for religious or medical reasons.
3.4. Using Old Photos
Submitting an old photo is a frequent error. The photo must be recent, taken within the last six months, to accurately reflect your current appearance.
3.5. Not Meeting Size and Resolution Requirements
Failing to meet the specified size and resolution requirements for digital photos can cause rejection. Ensure your photo is 2×2 inches (51×51 mm) and has a resolution of at least 600 x 600 pixels.
3.6. Glare on Glasses
Glare on glasses is a common reason for rejection. Adjusting the lighting or tilting your head can help reduce glare.
4. Step-by-Step Guide to Taking the Perfect Passport Photo
To ensure your passport photo meets all requirements, follow this step-by-step guide:
4.1. Preparation
- Understand the Requirements: Review the official guidelines for passport photos.
- Choose Your Outfit: Wear everyday clothing. Avoid uniforms or clothing that blends in with the white background.
- Remove Accessories: Take off hats, headbands, and jewelry that might obstruct your face.
- Prepare the Background: Set up a plain white or off-white background. A white wall or sheet works well.
- Set Up Lighting: Ensure the lighting is even and bright, without shadows. Natural light is best, but avoid direct sunlight.
4.2. Taking the Photo
- Position Yourself: Stand or sit facing the camera directly.
- Maintain a Neutral Expression: Keep your mouth closed and your eyes open.
- Check for Glare: If wearing glasses for medical reasons, ensure there is no glare on the lenses.
- Capture the Image: Take the photo, ensuring your entire face is visible and in focus.
- Take Multiple Shots: Take several photos to choose the best one.
4.3. Review and Edit
- Check for Compliance: Review the photos to ensure they meet all requirements.
- Crop and Resize: Crop and resize the photo to 2×2 inches (51×51 mm) if necessary.
- Adjust Brightness and Contrast: Make minor adjustments to brightness and contrast if needed, but avoid altering your appearance.
- Save the Photo: Save the photo in JPEG (.jpg) format with a file size less than 10MB.
4.4. Printing the Photo
- Use Quality Paper: Print the photo on matte or glossy photo-quality paper.
- Print at the Correct Size: Ensure the photo is printed at the correct size of 2×2 inches (51×51 mm).
- Check the Print Quality: Ensure the printed photo is clear, in focus, and without any blemishes.
5. Professional vs. DIY Passport Photos
Deciding whether to take your passport photo yourself or use a professional service is an important consideration. Both options have their pros and cons.
5.1. Advantages of Using a Professional Photographer
- Expertise: Professional photographers are experienced in taking passport photos and know the requirements.
- Equipment: They have the right equipment, including cameras, lighting, and backdrops, to ensure a high-quality photo.
- Guaranteed Acceptance: Many professional services guarantee that your photo will be accepted, or they will retake it for free.
- Convenience: Professional services are convenient and save you time and effort.
5.2. Benefits of Taking a DIY Passport Photo
- Cost Savings: Taking your own photo can be more affordable than using a professional service.
- Flexibility: You can take the photo at your convenience and retake it as many times as needed.
- Control: You have more control over the final result.
- Accessibility: You can take the photo from anywhere, as long as you have a camera and a suitable background.
5.3. When to Choose a Professional
- Complex Cases: If you have specific requirements, such as wearing glasses for medical reasons, a professional photographer can ensure compliance.
- Tight Deadlines: If you need the photo quickly, a professional service can provide it promptly.
- Peace of Mind: If you want to ensure your photo is accepted without any issues, a professional is a good choice.
5.4. When to Opt for DIY
- Simple Cases: If you have a clear understanding of the requirements and can easily meet them, DIY is a viable option.
- Budget Constraints: If you are on a tight budget, taking your own photo can save you money.
- Convenience: If you prefer the convenience of taking the photo at home, DIY is a good choice.
6. Understanding Search Intent for “Can I Wear Glasses in a Passport Photo”
To effectively address the needs of individuals searching for “Can I Wear Glasses In A Passport Photo,” it’s crucial to understand their search intent. Here are five key intents behind this query:
6.1. Information Seeking
Users want to know the official rules regarding wearing glasses in passport photos. They seek clear, concise information from reliable sources.
How to Address: Provide a straightforward answer at the beginning of the article, stating the general rule and any exceptions. Reference official guidelines and regulations.
6.2. Clarification of Exceptions
Users who require glasses for medical reasons need clarification on the conditions under which they can wear glasses and what documentation is required.
How to Address: Dedicate a section to medical exceptions, detailing the necessary documentation and specific requirements for wearing glasses.
6.3. Troubleshooting
Users who have previously had passport photos rejected due to wearing glasses are looking for tips on how to avoid glare, reflections, and other issues.
How to Address: Offer practical tips and advice on how to take a photo with glasses that meets all requirements, including lighting adjustments and positioning.
6.4. Comparison of Options
Users are weighing the pros and cons of taking a DIY passport photo versus using a professional photographer, particularly concerning wearing glasses.
How to Address: Provide a comparison of DIY and professional options, highlighting the advantages and disadvantages of each, especially regarding compliance with glasses-related rules.
6.5. Verification of Compliance
Users want to ensure their passport photo complies with all regulations before submitting their application to avoid delays or rejection.
How to Address: Include a checklist of all requirements related to wearing glasses in passport photos, allowing users to verify their photo’s compliance.
7. Optimizing for Google Discovery
To ensure this article appears prominently on Google Discovery, it must be optimized for visual appeal, relevance, and user engagement. Here are key strategies:
7.1. High-Quality Visuals
Use high-resolution images and videos that illustrate the points made in the article. Visual aids help explain complex requirements and tips for taking passport photos with glasses.
7.2. Compelling Headlines and Descriptions
Craft attention-grabbing headlines and meta descriptions that accurately reflect the article’s content and address the user’s search intent. Use keywords naturally to improve visibility.
7.3. Structured Content
Organize the article with clear headings, subheadings, and bullet points to improve readability. Use a question-and-answer format to address common queries directly.
7.4. Mobile Optimization
Ensure the article is fully responsive and provides a seamless user experience on mobile devices. Mobile optimization is crucial for Google Discovery.
7.5. User Engagement
Encourage user engagement by including interactive elements, such as quizzes or polls, and prompting readers to leave comments and share the article.
7.6. E-E-A-T Principles
Demonstrate Expertise, Experience, Authoritativeness, and Trustworthiness (E-E-A-T) by providing accurate, well-researched information, citing credible sources, and showcasing the author’s expertise in photography.
8. E-E-A-T and YMYL Compliance
Adhering to E-E-A-T (Expertise, Experience, Authoritativeness, and Trustworthiness) and YMYL (Your Money or Your Life) guidelines is crucial for content related to passport photos, as it involves personal identification and official processes.
8.1. Demonstrating Expertise
- Provide Accurate Information: Ensure all information about passport photo requirements is up-to-date and accurate, referencing official government sources.
- Use Professional Language: Employ clear, professional language that reflects expertise in photography and government regulations.
- Cite Credible Sources: Reference official websites and publications from government agencies and photography experts.
8.2. Showcasing Experience
- Share Practical Tips: Include practical tips and advice based on real-world experience in taking and reviewing passport photos.
- Offer Case Studies: Provide examples of successful and unsuccessful passport photos, explaining why they met or failed to meet the requirements.
8.3. Establishing Authoritativeness
- Highlight Credentials: Showcase the author’s credentials and expertise in photography, such as certifications or professional experience.
- Gain Recognition: Seek endorsements or recognition from reputable organizations or experts in the field.
8.4. Building Trustworthiness
- Be Transparent: Clearly state the purpose of the article and any potential biases or conflicts of interest.
- Ensure Accuracy: Fact-check all information and correct any errors promptly.
- Provide Contact Information: Offer contact information for readers to ask questions or provide feedback.
8.5. YMYL Considerations
- Accuracy is Paramount: Given that passport photos are used for official identification, accuracy is paramount to avoid legal or bureaucratic issues.
- Regular Updates: Regularly update the article to reflect any changes in government regulations or requirements.
- User Safety: Emphasize the importance of following official guidelines to ensure the passport application process goes smoothly and without complications.
9. FAQ: Can I Wear Glasses in a Passport Photo?
Here are some frequently asked questions related to wearing glasses in passport photos:
9.1. Is it generally allowed to wear glasses in a passport photo?
Generally, no. The standard rule is that glasses should be removed to ensure your eyes are clearly visible without obstruction.
9.2. Are there any exceptions to the rule about wearing glasses?
Yes, there is an exception for medical reasons. If you must wear glasses at all times due to a medical condition, you may be allowed to wear them, provided you submit a signed statement from a medical professional.
9.3. What are the requirements if I am allowed to wear glasses for medical reasons?
If you are permitted to wear glasses, the frames should not cover any part of your eyes, there should be no glare or reflections on the lenses, and your eyes must be clearly visible.
9.4. What kind of medical statement do I need to provide?
You need to provide a signed statement from your doctor explaining why you need to wear glasses at all times due to a medical condition.
9.5. Can I wear tinted glasses or sunglasses in my passport photo?
No, tinted glasses or sunglasses are not allowed in passport photos, even if you have a medical reason.
9.6. What should I do if I cannot avoid glare on my glasses?
Try adjusting the lighting or tilting your head slightly to minimize glare. If necessary, seek assistance from a professional photographer.
9.7. What happens if my passport photo is rejected because of my glasses?
If your photo is rejected, you will need to retake it, ensuring you meet all the requirements. If you used a professional service, they may retake it for free.
9.8. Can children wear glasses in their passport photos?
The same rules apply to children. Glasses should be removed unless there is a medical reason, in which case a medical statement is required.
9.9. Is it better to take my passport photo with or without glasses if I have a choice?
If you have a choice, it is generally better to take your passport photo without glasses to avoid any potential issues with glare or obstruction.
9.10. Where can I find the official guidelines for passport photos?
You can find the official guidelines on the website of your country’s passport agency or government website.
10. Crafting a Call to Action (CTA) for dfphoto.net
To encourage visitors to explore dfphoto.net further, a compelling call to action (CTA) should be included at the end of the article. Here are a few options:
10.1. Option 1: Explore Photography Techniques
Ready to master the art of passport photography and beyond? Visit dfphoto.net to discover in-depth tutorials, creative inspiration, and the latest equipment reviews. Elevate your skills and capture stunning images with our expert guidance.
10.2. Option 2: Join the Photography Community
Want to connect with fellow photography enthusiasts and share your work? Join the vibrant community at dfphoto.net. Exchange tips, get feedback, and find inspiration for your next project.
10.3. Option 3: Find Inspiration and Resources
Seeking fresh ideas and reliable resources for your photography journey? Explore dfphoto.net for a wealth of articles, stunning photo galleries, and expert advice. Start exploring today and unlock your creative potential. Address: 1600 St Michael’s Dr, Santa Fe, NM 87505, United States. Phone: +1 (505) 471-6001. Website: dfphoto.net.
10.4. Option 4: Improve your Photography Skills
Are you looking to enhance your photography skills? dfphoto.net offers detailed guides, beautiful photo collections, and a thriving photography community in the US. Visit dfphoto.net to explore tutorials, view amazing photos, and connect with other photographers.
11. Conclusion: Ensuring a Smooth Passport Photo Process
Navigating the rules for passport photos, especially regarding glasses, can be straightforward with the right information. Remember, the general rule is to remove glasses unless medically necessary, and always adhere to official guidelines to avoid delays. At dfphoto.net, we provide the resources and community support you need to master passport photography and beyond.
 Adult Photo guidance HMPO-v2
11.1. Key Takeaways
- General Rule: Remove glasses unless medically necessary.
- Medical Exception: Provide a signed statement from a doctor.
- Compliance: Ensure no glare, clear visibility of eyes, and appropriate frames.
- DIY vs. Professional: Weigh the pros and cons based on your needs.
- Resources: Utilize dfphoto.net for expert guidance and community support.
11.2. Final Thoughts
By understanding the specific requirements and following our comprehensive guide, you can ensure your passport photo meets all standards, making your application process seamless. Whether you choose to DIY or seek professional help, remember that attention to detail is key. Explore dfphoto.net today to discover more photography tips, connect with fellow enthusiasts, and unlock your creative potential.