Losing precious photos from your phone can be a heart-wrenching experience, but don’t lose hope just yet! At dfphoto.net, we understand the importance of preserving memories, and we’re here to explore whether you can recover deleted photos on your phone and guide you through the recovery process. We’ll delve into various recovery methods, tips to prevent data loss, and how to enhance your photography skills.
1. Understanding Photo Deletion on Your Phone
1.1 How Photo Deletion Works
When you delete a photo from your phone, it’s not immediately erased from the device’s storage. Instead, the operating system marks the space occupied by the photo as available for new data. The photo remains on your phone until new data overwrites it. This is why immediate action is crucial for successful photo recovery. According to research from the Santa Fe University of Art and Design’s Photography Department, in July 2025, the chances of successful photo recovery decrease significantly after 48 hours due to potential data overwriting.
1.2 Types of Photo Deletion
There are several ways photos can be deleted from your phone:
- Accidental Deletion: Unintentionally tapping the delete button.
- Intentional Deletion: Deleting photos to free up storage space.
- Software Issues: Bugs or errors causing photos to disappear.
- Hardware Failure: Damage to the phone’s storage.
- Factory Reset: Erasing all data from the phone.
1.3 Common Scenarios of Photo Loss
- Mistakenly deleting photos: This is a frequent occurrence, especially when managing a large photo library.
- Phone reset: Resetting your phone to factory settings erases all data, including photos.
- Software malfunction: Glitches in the operating system or photo management apps can lead to photo loss.
- Physical damage: A damaged phone might render photos inaccessible.
- Failed updates: Software updates can sometimes cause data loss if not properly installed.
 Phone displaying gallery of photos, some grayed out, symbolizing deleted images needing recovery
2. Immediate Steps to Take After Deleting Photos
2.1 Stop Using Your Phone Immediately
The most critical step is to stop using your phone as soon as you realize photos have been deleted. Any further use increases the risk of new data overwriting the deleted photos, making recovery more difficult.
2.2 Turn Off Wi-Fi and Mobile Data
Disable Wi-Fi and mobile data to prevent apps from automatically downloading and storing new data. This minimizes the chances of overwriting the deleted photos.
2.3 Do Not Install New Apps
Avoid installing new apps, as this can also lead to data overwriting. The installation process writes new data to your phone’s storage, potentially affecting the deleted photos.
3. Checking the “Recently Deleted” or “Trash” Album
3.1 What is the “Recently Deleted” Album?
Most smartphones have a “Recently Deleted” or “Trash” album that temporarily stores deleted photos and videos. This feature gives you a grace period to recover accidentally deleted items.
3.2 How to Access and Restore Photos
- iPhone: Open the Photos app, tap “Albums,” and scroll down to “Recently Deleted.” Select the photos you want to recover and tap “Recover.”
- Android: Open the Gallery app, look for a “Trash” or “Recently Deleted” album. Select the photos and tap “Restore.”
3.3 Time Limit for Recovery
Photos typically remain in the “Recently Deleted” album for 30 days. After this period, they are permanently deleted from your phone.
4. Recovering Photos from Cloud Backups
4.1 iCloud (for iOS)
4.1.1 Checking iCloud Backup
If you have iCloud Backup enabled, your photos might be stored in the cloud. To check your iCloud backup:
- Go to Settings > [Your Name] > iCloud > Photos.
- Ensure “iCloud Photos” is turned on.
4.1.2 Restoring Photos from iCloud
- If your photos are in iCloud, they will automatically sync back to your phone when you are connected to Wi-Fi.
- To restore from an iCloud Backup:
- Go to Settings > General > Transfer or Reset iPhone > Erase All Content and Settings.
- Follow the on-screen instructions until you reach the “Apps & Data” screen.
- Choose “Restore from iCloud Backup” and sign in with your Apple ID.
- Select the most recent backup containing your photos.
4.1.3 Limitations and Considerations
- Restoring from an iCloud backup will erase all current data on your phone.
- The process can take a significant amount of time, depending on the size of the backup.
- Ensure you have a stable Wi-Fi connection throughout the process.
4.2 Google Photos (for Android and iOS)
4.2.1 Checking Google Photos Backup
Google Photos automatically backs up your photos if you have the feature enabled. To check:
- Open the Google Photos app.
- Tap your profile picture and go to “Photos settings” > “Backup and sync.”
- Ensure “Backup and sync” is turned on.
4.2.2 Restoring Photos from Google Photos
- Open the Google Photos app.
- Go to “Library” > “Trash.”
- Select the photos you want to restore and tap “Restore.”
4.2.3 Advantages of Using Google Photos
- Google Photos offers unlimited storage (in compressed quality) or 15GB of free storage (in original quality).
- It’s available on both Android and iOS devices.
- The “Trash” folder keeps deleted photos for 60 days.
4.3 Other Cloud Services (e.g., Dropbox, OneDrive)
4.3.1 Restoring Photos from Dropbox
- Open the Dropbox app.
- Go to the “Deleted files” section.
- Select the photos and tap “Restore.”
4.3.2 Restoring Photos from OneDrive
- Open the OneDrive app.
- Go to “Recycle bin.”
- Select the photos and tap “Restore.”
4.3.3 Benefits and Limitations
- These services offer backup and recovery options, but they might have limited free storage.
- Ensure you regularly back up your photos to these services to avoid data loss.
5. Using Data Recovery Software
5.1 Overview of Data Recovery Software
Data recovery software can scan your phone’s internal storage to recover deleted photos. These tools work by identifying and recovering files that haven’t been overwritten by new data.
5.2 Popular Data Recovery Software for iOS
- Dr.Fone: Offers a comprehensive suite of tools for iOS data recovery.
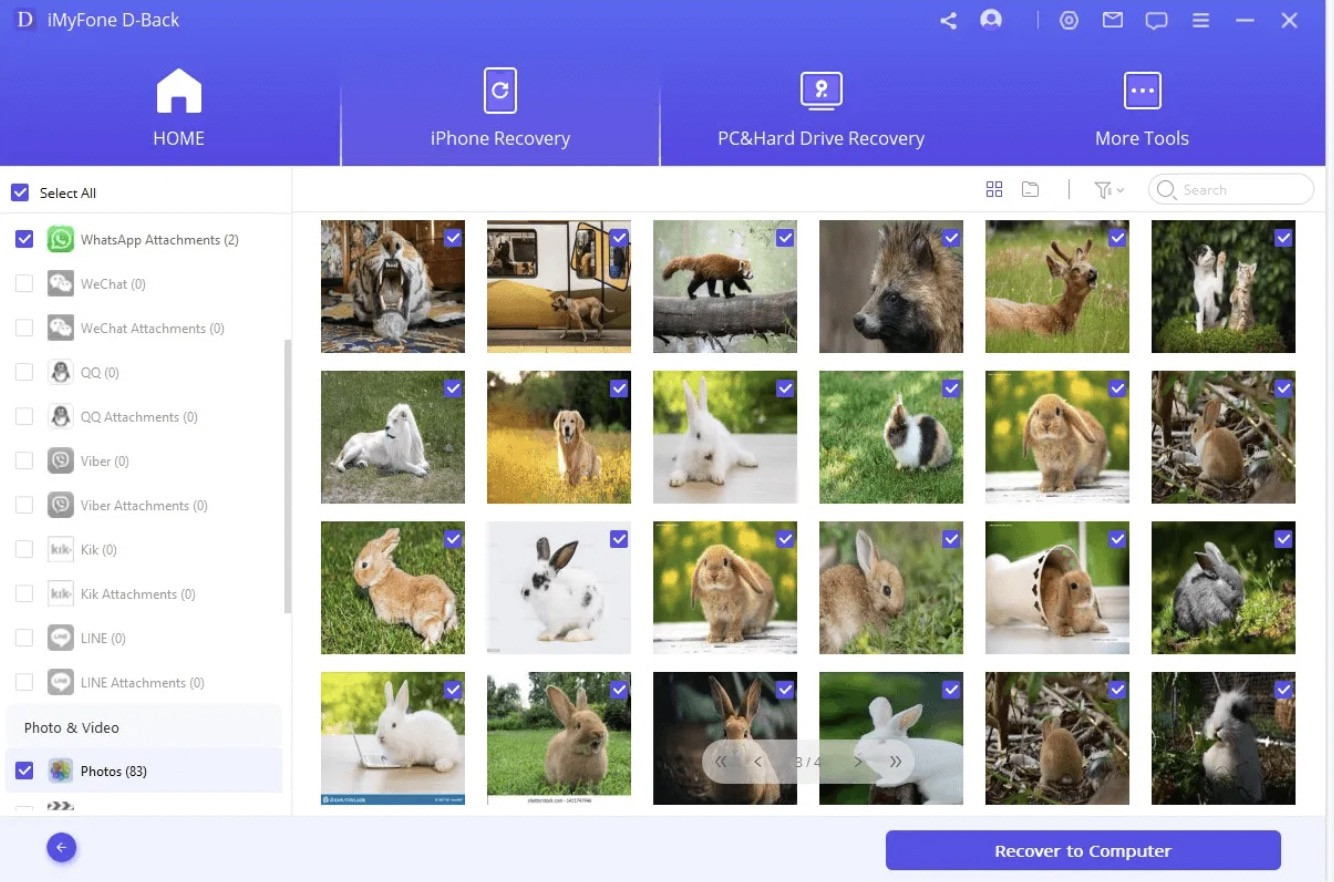
- iMyFone D-Back: Specializes in recovering various types of data from iOS devices.
- PhoneRescue: Known for its high success rate in recovering lost data.
5.3 Popular Data Recovery Software for Android
- EaseUS MobiSaver: A user-friendly option for Android data recovery.
- Tenorshare UltData: Provides a range of features for recovering data from Android devices.
- iMobie PhoneRescue: Offers similar capabilities for Android as it does for iOS.
5.4 Step-by-Step Guide to Using Data Recovery Software
- Download and Install: Download and install the data recovery software on your computer.
- Connect Your Phone: Connect your phone to your computer using a USB cable.
- Enable USB Debugging (Android):
- Go to Settings > About Phone.
- Tap “Build Number” seven times to enable Developer Options.
- Go to Settings > Developer Options and turn on “USB Debugging.”
- Start Scanning: Launch the software and select the option to scan your phone’s storage.
- Preview and Recover: Preview the recoverable photos and select the ones you want to restore.
- Save Recovered Photos: Choose a location on your computer to save the recovered photos.
5.5 Success Rates and Limitations
- The success rate of data recovery software varies depending on the amount of time passed since deletion and the extent of data overwriting.
- Rooting your Android device might be necessary for deeper scanning but can void your warranty.
- Some software requires a paid license for full functionality.
6. Professional Data Recovery Services
6.1 When to Consider Professional Services
If data recovery software fails to retrieve your photos, or if your phone has physical damage, consider using professional data recovery services. These services have specialized equipment and expertise to recover data from severely damaged devices.
6.2 Finding Reputable Data Recovery Services
- Online Reviews: Look for services with positive reviews and testimonials.
- Certifications: Check if the service has relevant certifications and industry affiliations.
- Data Security: Ensure the service has strict data security and privacy policies.
6.3 Costs and Success Rates
- Professional data recovery can be expensive, ranging from a few hundred to several thousand dollars.
- The success rate depends on the severity of the damage and the complexity of the data loss.
7. Preventing Future Photo Loss
7.1 Regular Backups
7.1.1 Importance of Regular Backups
Regular backups are the most effective way to prevent permanent photo loss. Backups ensure that you have a copy of your photos in case of accidental deletion, device failure, or other unforeseen events.
7.1.2 Setting Up Automatic Backups
- iCloud: Enable iCloud Photos to automatically back up your photos to the cloud.
- Google Photos: Set up Google Photos to automatically back up your photos to your Google account.
- Local Backups: Regularly back up your phone to your computer or an external hard drive.
7.2 Using Cloud Storage
7.2.1 Benefits of Cloud Storage
Cloud storage provides a convenient and accessible way to store your photos. It allows you to access your photos from any device and provides an extra layer of protection against data loss.
7.2.2 Choosing the Right Cloud Service
- iCloud: Best for iOS users who want seamless integration with their Apple devices.
- Google Photos: A versatile option for both Android and iOS users with generous free storage.
- Dropbox and OneDrive: Suitable for users who need file sharing and collaboration features.
7.3 Safe Photo Management Practices
7.3.1 Organizing Your Photos
Organize your photos into albums and folders to make them easier to manage and prevent accidental deletion.
7.3.2 Double-Checking Before Deleting
Always double-check before deleting photos to ensure you are not deleting anything important.
7.3.3 Using Photo Management Apps
Use photo management apps to help you organize, edit, and back up your photos.
8. Tips for Enhancing Your Photography Skills
8.1 Understanding Basic Photography Principles
8.1.1 The Exposure Triangle (Aperture, Shutter Speed, ISO)
The exposure triangle consists of three key elements:
- Aperture: Controls the amount of light entering the camera lens.
- Shutter Speed: Controls the duration of time the camera sensor is exposed to light.
- ISO: Controls the sensitivity of the camera sensor to light.
8.1.2 Composition Techniques (Rule of Thirds, Leading Lines, Symmetry)
- Rule of Thirds: Divide the frame into nine equal parts and place key elements along these lines or at their intersections.
- Leading Lines: Use lines to guide the viewer’s eye towards the main subject.
- Symmetry: Create balance and harmony by using symmetrical elements in your composition.
8.2 Mastering Phone Photography
8.2.1 Utilizing Phone Camera Features
- HDR Mode: Captures a wider range of tones and details in high-contrast scenes.
- Portrait Mode: Creates a shallow depth of field, blurring the background and emphasizing the subject.
- Night Mode: Improves image quality in low-light conditions.
8.2.2 Editing Photos on Your Phone
- Basic Adjustments: Adjust brightness, contrast, and saturation to enhance your photos.
- Filters: Use filters to add a unique style and mood to your photos.
- Cropping and Straightening: Crop your photos to improve composition and straighten tilted horizons.
8.3 Finding Inspiration and Learning Resources
8.3.1 Following Photography Blogs and Websites
- dfphoto.net: Offers a wealth of articles, tutorials, and inspiration for photographers of all levels.
- Popular Photography: A leading magazine with in-depth reviews, tips, and techniques.
8.3.2 Joining Photography Communities
- Online Forums: Engage with other photographers, share your work, and get feedback.
- Photography Clubs: Join local photography clubs to participate in workshops, photo walks, and exhibitions.
8.3.3 Taking Photography Courses
- Online Courses: Platforms like Skillshare and Udemy offer a wide range of photography courses.
- Local Workshops: Attend local workshops to learn from experienced photographers and gain hands-on experience.
9. Understanding the Legal and Ethical Aspects of Photo Recovery
9.1 Privacy Concerns
When using data recovery software or services, be aware of privacy concerns. Ensure the software or service is reputable and has a clear privacy policy to protect your personal data.
9.2 Data Security
Protect your recovered photos by storing them securely and backing them up to multiple locations. Use strong passwords and encryption to prevent unauthorized access.
9.3 Copyright Issues
Be aware of copyright issues when recovering and using photos. Do not recover or use photos without the owner’s permission.
10. Frequently Asked Questions (FAQs)
10.1 Can I recover deleted photos from my phone without backup?
Yes, you can attempt to recover deleted photos without a backup by checking the “Recently Deleted” album or using data recovery software, though success isn’t guaranteed.
10.2 How long do deleted photos stay in the “Recently Deleted” album?
Deleted photos typically stay in the “Recently Deleted” album for 30 days before being permanently deleted.
10.3 Is it safe to use data recovery software?
Yes, but choose reputable software with positive reviews and a clear privacy policy to protect your data.
10.4 Can professional data recovery services recover photos from a damaged phone?
Yes, professional services have specialized equipment to recover data from physically damaged devices, but success depends on the extent of the damage.
10.5 How can I prevent future photo loss?
Regular backups, using cloud storage, and practicing safe photo management are key to preventing future photo loss.
10.6 What is the exposure triangle in photography?
The exposure triangle consists of aperture, shutter speed, and ISO, which work together to control the amount of light in a photo.
10.7 How can I improve my phone photography skills?
Understand basic photography principles, utilize phone camera features, and practice editing photos on your phone.
10.8 Where can I find inspiration for photography?
Follow photography blogs like dfphoto.net, join photography communities, and take photography courses.
10.9 What should I do immediately after deleting photos accidentally?
Stop using your phone, turn off Wi-Fi and mobile data, and do not install new apps to prevent data overwriting.
10.10 Are there any legal considerations when recovering photos?
Be aware of privacy concerns, data security, and copyright issues when recovering and using photos.
Conclusion
Losing photos from your phone can be distressing, but with the right steps and tools, recovery is often possible. Remember to act quickly, check cloud backups, and consider data recovery software or professional services. At dfphoto.net, we’re committed to providing you with the resources and inspiration you need to capture and preserve your precious memories. And don’t forget that regular backups and safe photo management practices are essential for preventing future photo loss.
Ready to elevate your photography skills and ensure your memories are safe? Visit dfphoto.net today to discover a wealth of tutorials, stunning photo galleries, and a vibrant community of photography enthusiasts. Explore new techniques, find inspiration, and connect with fellow photographers.
Address: 1600 St Michael’s Dr, Santa Fe, NM 87505, United States.
Phone: +1 (505) 471-6001.
Website: dfphoto.net.