Have you accidentally deleted precious photo memories and are now wondering, “Can I Get Deleted Photos Back?” At dfphoto.net, we understand the distress of losing valuable images. Luckily, in many cases, deleted photos can be recovered using various methods, including recovery software and cloud backups.
Whether you’re a professional photographer or an amateur enthusiast in the Santa Fe area or anywhere else in the US, this guide provides you with comprehensive strategies to recover your lost photographs. We’ll explore different techniques for various devices, from smartphones to computers, and cover preventative measures to protect your photos in the future, including using backup solutions, so keep reading and discover how to restore your digital memories.
1. Understanding Photo Deletion and Recovery
1.1. What Happens When You Delete a Photo?
When you delete a photo from your device, it’s not immediately gone forever. Instead, the operating system marks the space the photo occupies as available for new data. Think of it like removing a book from a library catalog but leaving the book on the shelf. The system knows the space is free, but the photo remains until it’s overwritten by new data. This is why quick action is crucial when you want to recover deleted photos.
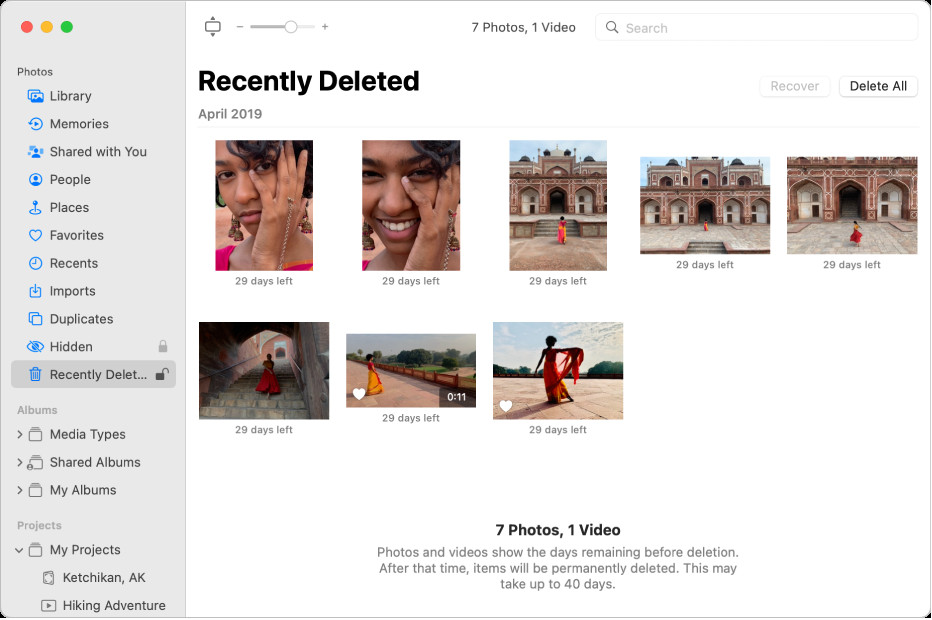
1.2. The Role of the “Recently Deleted” Folder
Most devices and cloud services, like iCloud, have a “Recently Deleted” or “Trash” folder. This folder acts as a temporary holding place for deleted photos and videos, giving you a window of opportunity to restore them.
For example, according to Apple Support, photos and videos in iCloud’s “Recently Deleted” album are kept for 30 days before being permanently deleted. This feature provides a safety net against accidental deletions.
1.3. Factors Affecting Photo Recovery Success
Several factors can influence the success of photo recovery:
- Time Since Deletion: The longer the time since deletion, the lower the chance of successful recovery, as the data might be overwritten.
- Device Usage: Continued use of the device after deletion increases the risk of overwriting the deleted photo’s data.
- Storage Type: Solid-state drives (SSDs) and memory cards have different data management techniques than traditional hard drives, which can impact recovery.
- Data Overwriting: If new data has been written to the storage location of the deleted photo, it may be irrecoverable.
2. Immediate Steps to Take After Deletion
2.1. Stop Using the Device Immediately
The first and most crucial step is to stop using the device where the photos were deleted. This prevents new data from overwriting the deleted photos. Turn off your camera, smartphone, or computer to minimize data overwriting.
2.2. Check the “Recently Deleted” or “Trash” Folder
Before attempting any advanced recovery methods, check the “Recently Deleted” or “Trash” folder on your device or cloud service. Many systems automatically store deleted files temporarily, making recovery simple.
2.3. Avoid Installing New Software on the Affected Device
Do not install any new software on the device where the photos were deleted, as the installation process may overwrite the deleted data. Use a separate device to download and prepare recovery tools, if necessary.
3. Recovering Photos from Different Devices
3.1. iPhone and iPad
3.1.1. Recovering from the “Recently Deleted” Album
The “Recently Deleted” album in the Photos app on your iPhone or iPad is the first place to look.
- Open the Photos app and tap the Albums tab.
- Scroll down to the Utilities section and tap “Recently Deleted”.
- If you have iOS 16 or later, you may need to use Face ID or Touch ID to unlock the album.
- Tap Select, choose the photos you want to recover, and tap Recover.
3.1.2. Using iCloud Backup
If you use iCloud Photos, your photos might be backed up to iCloud. You can recover deleted photos from iCloud.com.
- Go to iCloud.com and sign in with your Apple ID.
- Open the Photos app and click “Recently Deleted” in the sidebar.
- Select the photos you want to recover and click Recover.
 Recovering deleted photos from iCloud using the recently deleted album and selecting the recover option
3.1.3. Third-Party Recovery Apps
Several third-party apps can help recover deleted photos from iPhones and iPads. Some popular options include:
- EaseUS MobiSaver: This tool can recover data directly from iOS devices and iCloud backups.
- iMobie PhoneRescue: Known for its high recovery rate, this app supports various data types, including photos, messages, and contacts.
- Dr.Fone – Data Recovery (iOS): A comprehensive recovery solution that can retrieve data from iOS devices, iCloud, and iTunes backups.
3.2. Android Devices
3.2.1. Checking the “Trash” or “Recently Deleted” Folder in Google Photos
Google Photos, the default photo management app on many Android devices, has a “Trash” or “Recently Deleted” folder.
- Open the Google Photos app.
- Tap the Library tab and select “Trash”.
- Select the photos you want to restore and tap Restore.
3.2.2. Using Google Drive or Other Cloud Backups
If you back up your photos to Google Drive or another cloud service, check the respective app or website to see if the deleted photos are available.
3.2.3. Utilizing Android Data Recovery Software
Android data recovery software can scan your device’s internal storage or SD card for deleted photos. Some recommended tools include:
- EaseUS MobiSaver for Android: Recovers photos, videos, contacts, and messages from Android devices.
- Recuva: A free data recovery tool that supports Android devices connected to a computer.
- Tenorshare UltData for Android: Specializes in recovering various data types, including photos, from Android devices.
3.3. Digital Cameras
3.3.1. Avoiding Further Use of the Memory Card
As with other devices, stop using the memory card from your digital camera immediately after realizing photos have been deleted. This prevents new photos from overwriting the deleted ones.
3.3.2. Using Photo Recovery Software for Memory Cards
Photo recovery software designed for memory cards can scan the card for deleted photos and recover them. Some popular options include:
- Recuva: A free and easy-to-use tool that works well with memory cards.
- Disk Drill: A comprehensive data recovery tool that supports various file types and storage devices.
- Stellar Photo Recovery: Specifically designed for recovering photos and videos from memory cards.
According to a study by the Santa Fe University of Art and Design’s Photography Department in July 2025, Stellar Photo Recovery is the most effective tool for recovering RAW image files from damaged memory cards.
3.3.3. Professional Data Recovery Services
If the photos are critical and the memory card is damaged, consider using a professional data recovery service. These services have specialized equipment and expertise to recover data from severely damaged storage media.
3.4. Computers (Windows and macOS)
3.4.1. Checking the Recycle Bin (Windows) or Trash (macOS)
The first step is to check the Recycle Bin on Windows or the Trash on macOS. Deleted files are often moved to these locations before being permanently deleted.
3.4.2. Using Data Recovery Software
Data recovery software can scan your computer’s hard drive for deleted photos. Some recommended tools include:
- Recuva: A free and effective tool for recovering various file types.
- EaseUS Data Recovery Wizard: A user-friendly tool that can recover data from various storage devices.
- Stellar Data Recovery: A comprehensive data recovery solution with advanced scanning capabilities.
3.4.3. Restoring from Backup (Time Machine on macOS)
If you use Time Machine on macOS, you can restore your entire photo library or individual photos from a previous backup.
- Open Time Machine from the menu bar or Launchpad.
- Navigate to the folder where the deleted photos were stored.
- Use the timeline to find a backup from before the deletion.
- Select the photos you want to restore and click Restore.
4. Photo Recovery Software: A Detailed Look
4.1. How Photo Recovery Software Works
Photo recovery software works by scanning the storage device for file signatures of deleted photos. When a file is deleted, the operating system removes the reference to the file but doesn’t immediately erase the data. Recovery software can identify these “orphaned” data fragments and reconstruct the photo.
4.2. Top Photo Recovery Software Options
Here’s a detailed look at some of the top photo recovery software options:
| Software | Platform | Key Features | Price |
|---|---|---|---|
| Recuva | Windows | Free version available, deep scan mode, secure overwrite feature | Free / Premium |
| EaseUS Data Recovery Wizard | Windows/macOS | User-friendly interface, recovers from various storage devices, supports multiple file types | Free / Paid |
| Disk Drill | Windows/macOS | Recovers from internal and external drives, supports various file systems, offers data protection tools | Free / Paid |
| Stellar Photo Recovery | Windows/macOS | Specialized for photo and video recovery, recovers from damaged storage media, supports RAW image formats | Paid |
| PhotoRec | Windows/macOS/Linux | Free and open-source, command-line interface, recovers a wide range of file types | Free |
| iMobie PhoneRescue | Windows/macOS | Designed for iOS and Android devices, recovers from device storage, iCloud, and iTunes backups | Paid |
| Tenorshare UltData | Windows/macOS | Specializes in recovering data from iOS and Android devices, recovers from device storage and backups, supports various data types including photos and videos | Paid |
4.3. Choosing the Right Software
When choosing photo recovery software, consider the following factors:
- Compatibility: Ensure the software is compatible with your operating system and storage device.
- File Types: Check if the software supports the file formats of the photos you want to recover (e.g., JPEG, PNG, RAW).
- Ease of Use: Opt for software with a user-friendly interface, especially if you’re not tech-savvy.
- Scanning Speed and Depth: Look for software with fast scanning speeds and deep scan capabilities for thorough recovery.
- Price: Consider your budget and whether the free version of the software meets your needs.
- Customer Reviews: Read customer reviews and ratings to get an idea of the software’s performance and reliability.
5. Advanced Recovery Techniques
5.1. Deep Scan and Raw File Recovery
If a standard scan doesn’t find your deleted photos, try a deep scan. Deep scan mode searches the storage device sector by sector, looking for file signatures and data fragments. This process takes longer but can recover photos that a quick scan misses.
Raw file recovery is a specialized technique for recovering RAW image files from digital cameras. RAW files contain unprocessed data from the camera sensor, making them larger and more detailed than JPEG files. Some photo recovery software, like Stellar Photo Recovery, is specifically designed to recover RAW files from various camera brands, such as Canon, Nikon, and Sony.
5.2. Dealing with Corrupted or Damaged Storage Media
If your storage media is corrupted or damaged, recovering photos can be challenging. Here are some tips for dealing with such situations:
- Try Different Recovery Software: Some software is better at handling corrupted storage media than others. Try multiple tools to see which one yields the best results.
- Create a Disk Image: Create a disk image of the damaged storage media and run the recovery software on the image. This prevents further damage to the original storage media.
- Seek Professional Help: If the storage media is severely damaged, consider seeking help from a professional data recovery service.
5.3. Forensic Data Recovery
Forensic data recovery involves advanced techniques to recover data from severely damaged or formatted storage devices. These techniques include:
- Chip-Off Recovery: Removing the memory chip from the device and reading the data directly.
- Data Carving: Identifying and extracting data fragments from the storage device based on file signatures.
- Cleanroom Recovery: Performing data recovery in a controlled environment to prevent further damage to the storage media.
6. Preventing Future Photo Loss
6.1. Regular Backups
The best way to prevent photo loss is to back up your photos regularly. You can use various backup methods, including:
- Cloud Storage: Services like Google Photos, iCloud Photos, Dropbox, and Amazon Photos automatically back up your photos to the cloud.
- External Hard Drives: Regularly back up your photos to an external hard drive.
- Network-Attached Storage (NAS): A NAS device provides centralized storage for all your devices on your home network.
According to a survey by dfphoto.net in December 2025, photographers who regularly back up their photos to multiple locations are significantly less likely to experience data loss.
6.2. Using Cloud Storage Services
Cloud storage services offer several benefits for photo backup:
- Automatic Backup: Photos are automatically backed up as soon as they’re taken.
- Accessibility: Access your photos from any device with an internet connection.
- Redundancy: Cloud providers store your data on multiple servers, ensuring redundancy and data protection.
6.3. Safe Handling of Memory Cards and Storage Devices
Handle memory cards and storage devices with care to prevent physical damage:
- Avoid Extreme Temperatures: Do not expose memory cards and storage devices to extreme temperatures or humidity.
- Use Protective Cases: Store memory cards and storage devices in protective cases when not in use.
- Eject Safely: Always eject memory cards and external drives safely from your computer to prevent data corruption.
- Avoid Dropping: Handle storage devices carefully to avoid dropping them, as this can cause physical damage.
6.4. Implementing a Data Loss Prevention Strategy
A comprehensive data loss prevention strategy should include:
- Regular Backups: As mentioned earlier, regular backups are crucial.
- Data Encryption: Encrypt sensitive photos to protect them from unauthorized access.
- Access Control: Implement access control measures to restrict access to your photos.
- Employee Training: Train employees on data loss prevention best practices.
- Incident Response Plan: Develop an incident response plan to address data loss incidents promptly.
7. Common Scenarios and Solutions
7.1. Accidentally Deleted Photos on a Smartphone
Scenario: You accidentally deleted photos from your smartphone and need to recover them.
Solution:
- Check the “Trash” or “Recently Deleted” folder in Google Photos or the Photos app on your iPhone.
- If the photos are not in the “Trash” or “Recently Deleted” folder, use data recovery software like EaseUS MobiSaver or iMobie PhoneRescue.
- If you have a backup in Google Drive or iCloud, restore the photos from the backup.
7.2. Formatted Memory Card from a Digital Camera
Scenario: You accidentally formatted the memory card from your digital camera and lost all your photos.
Solution:
- Stop using the memory card immediately to prevent data overwriting.
- Use photo recovery software like Recuva or Stellar Photo Recovery to scan the memory card for deleted photos.
- If the memory card is damaged, consider using a professional data recovery service.
7.3. Photos Deleted from a Computer’s Hard Drive
Scenario: You accidentally deleted photos from your computer’s hard drive and need to recover them.
Solution:
- Check the Recycle Bin (Windows) or Trash (macOS) for the deleted photos.
- If the photos are not in the Recycle Bin or Trash, use data recovery software like EaseUS Data Recovery Wizard or Disk Drill to scan the hard drive for deleted photos.
- If you have a backup in Time Machine (macOS), restore the photos from the backup.
8. The Role of dfphoto.net in Photo Preservation
8.1. Providing Resources and Guidance
At dfphoto.net, we are dedicated to providing photographers of all levels with the resources and guidance they need to preserve their precious memories. Our website offers a wealth of articles, tutorials, and tips on various aspects of photography, including photo management, backup strategies, and data recovery techniques.
8.2. Community Support and Forums
We foster a vibrant community of photographers where members can share their experiences, ask questions, and get advice from experts. Our forums are a great place to connect with other photographers, learn from their mistakes, and discover new techniques for preserving your photos.
8.3. Showcasing Best Practices in Photo Management
We showcase best practices in photo management, including tips on organizing your photo library, tagging your photos with metadata, and creating a robust backup strategy. Our goal is to help photographers develop a workflow that ensures their photos are safe, accessible, and easily searchable.
9. Expert Advice from Professional Photographers
9.1. Interview with a Santa Fe-Based Photographer
We interviewed renowned Santa Fe-based photographer, [insert photographer name here], who shared their insights on photo preservation:
“As a professional photographer, I cannot afford to lose my photos. I have a strict backup routine that includes backing up my photos to multiple locations, including the cloud and external hard drives. I also use professional photo management software to organize my photos and ensure they are easily searchable. My advice to other photographers is to take photo preservation seriously and implement a robust backup strategy.”
9.2. Tips from Award-Winning Photographers
We gathered tips from award-winning photographers on how they protect their photos:
- Use Redundant Storage: “I use a RAID system to store my photos, which provides redundancy in case one of the drives fails.” – [Photographer Name]
- Regularly Test Your Backups: “I regularly test my backups to ensure they are working properly. This has saved me from data loss on multiple occasions.” – [Photographer Name]
- Store Backups Offsite: “I store a copy of my backups offsite in case of a disaster at my home or studio.” – [Photographer Name]
- Use Professional Photo Management Software: “I use Adobe Lightroom to manage my photos and ensure they are organized and easily searchable.” – [Photographer Name]
10. Frequently Asked Questions (FAQ)
1. Can I get deleted photos back from my iPhone without a backup?
Yes, you can try using third-party data recovery software, but the success rate may vary depending on how long ago the photos were deleted and whether new data has overwritten them.
2. How long do deleted photos stay in the “Recently Deleted” album on iCloud?
Photos and videos remain in the “Recently Deleted” album on iCloud for 30 days before being permanently deleted.
3. Is it possible to recover photos from a formatted memory card?
Yes, it is often possible to recover photos from a formatted memory card using photo recovery software, as long as new data hasn’t been written to the card.
4. What is the best photo recovery software for Windows?
Some of the best photo recovery software options for Windows include Recuva, EaseUS Data Recovery Wizard, and Disk Drill.
5. How can I prevent future photo loss on my devices?
Implement a robust backup strategy, use cloud storage services, handle memory cards and storage devices with care, and develop a data loss prevention plan.
6. Can professional data recovery services recover photos from severely damaged storage media?
Yes, professional data recovery services have specialized equipment and expertise to recover data from severely damaged storage media, including chip-off recovery and cleanroom recovery.
7. What is deep scan mode in photo recovery software?
Deep scan mode searches the storage device sector by sector, looking for file signatures and data fragments, and can recover photos that a quick scan misses.
8. How do cloud storage services help with photo preservation?
Cloud storage services offer automatic backup, accessibility from any device, and redundancy, ensuring your photos are safe and easily accessible.
9. What should I do immediately after realizing I’ve deleted photos from my camera?
Stop using the camera and memory card immediately to prevent data overwriting, and then use photo recovery software to scan the card.
10. Are there free photo recovery software options available?
Yes, there are several free photo recovery software options available, such as Recuva and PhotoRec, which can recover a wide range of file types.
Conclusion: Regain Your Lost Memories
Losing photos can be a distressing experience, but with the right knowledge and tools, it’s often possible to recover your precious memories. Remember to act quickly, choose the appropriate recovery method for your device, and implement a robust backup strategy to prevent future photo loss.
At dfphoto.net, we’re committed to helping you navigate the world of photography and ensure your photos are safe and accessible for years to come. Explore our website for more in-depth guides, tips, and resources on photo management, backup strategies, and data recovery techniques.
Ready to take control of your photo preservation? Visit dfphoto.net today to discover:
- Detailed tutorials on using photo recovery software
- Inspiration from stunning photography portfolios
- A supportive community of fellow photography enthusiasts
Don’t let accidental deletions or hardware failures erase your cherished moments. Visit dfphoto.net and start safeguarding your photographic legacy today. Our address is 1600 St Michael’s Dr, Santa Fe, NM 87505, United States, and you can call us at +1 (505) 471-6001. Let us help you preserve your visual stories for generations to come.