Transferring photos from your Mac to your iPhone is a straightforward process. Whether you want to share a few favorites or your entire photo library, several methods make it easy. This guide provides step-by-step instructions for transferring photos using Finder, AirDrop, and iCloud Photos.
 A person transferring photos from a Macbook to an iPhone using a USB cable.
Using Finder to Transfer Photos
Finder allows you to selectively sync photos and albums from your Mac to your iPhone.
-
Connect Your iPhone: Connect your iPhone to your Mac using a USB cable.
-
Open Finder: Open a Finder window and select your iPhone in the sidebar. If you don’t see your iPhone, ensure it’s unlocked and trust the connection.
-
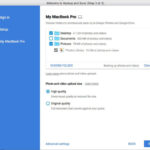
Select Photos: Click the “Photos” tab in the Finder window.
-
Choose Sync Options: Select “Sync photos to your device from” and choose either “Photos” or a specific folder on your Mac. You can sync all photos and albums or select specific ones.
-
Include Videos (Optional): Check “Include videos” to transfer videos as well.
-
Sync Favorites Only (Optional): Check “Only favorites” to sync only photos marked as favorites in the Photos app.
-
Apply Changes: Click “Apply” to start the transfer.
Transferring Photos with AirDrop
AirDrop enables quick wireless transfer of photos between Apple devices.
-
Enable AirDrop: Turn on AirDrop on both your Mac and iPhone. On your Mac, you can find it in Finder under Go > AirDrop. On your iPhone, access it through Control Center.
-
Select Photos: In Finder or Photos on your Mac, select the photos you want to transfer.
-
Share via AirDrop: Right-click on the selected photos and choose Share > AirDrop. Select your iPhone from the list of available devices.
-
Accept on iPhone: On your iPhone, accept the AirDrop transfer. The photos will be saved to your Photos app.
Using iCloud Photos for Seamless Syncing
iCloud Photos automatically syncs your entire photo library across all your Apple devices.
-
Enable iCloud Photos: On your Mac, go to System Preferences > Apple ID > iCloud and check “Photos”. Do the same on your iPhone in Settings > [Your Name] > iCloud > Photos.
-
Choose Storage Options: Select “Optimize Mac Storage” to save space on your Mac while keeping full-resolution photos in iCloud.
-
Automatic Syncing: Once enabled, any new photos or videos you take or add to your Photos library will automatically sync to your iPhone and other devices connected to your iCloud account.
Removing Synced Photos
To remove synced photos, you can either deselect the synced albums or folders in Finder and sync again, or delete the photos from your Mac and then sync. Be aware that deleting synced photos from your Mac will also remove them from your iPhone on the next sync.
Conclusion
Transferring photos from your Mac to your iPhone offers several convenient options. Choose the method that best suits your needs, whether it’s the selective syncing of Finder, the wireless convenience of AirDrop, or the seamless automatic syncing of iCloud Photos. Each method provides a reliable way to share and enjoy your photos on your iPhone. Remember to always back up your photos to prevent data loss.