Switching from an Android phone to a new iPhone can be exciting, but it also brings the question of how to bring all your precious data with you, especially your photos. While Apple offers the “Move to iOS” app for seamless migration, sometimes you might prefer a more manual approach, or need to transfer photos specifically and efficiently. This guide will walk you through the best methods to transfer your photos from your Android phone to your iPhone, ensuring you don’t lose any memories in the process.
Transferring Photos Using a Computer: A Step-by-Step Guide
One reliable method to transfer photos is by using your computer as an intermediary. This method gives you direct control over the files and is particularly useful for large photo libraries. Here’s how to do it:
-
Connect Your Android Phone to Your Computer:
Start by connecting your Android phone to your computer using a USB cable. Ensure your phone is unlocked and allows file transfer. You might need to select “File Transfer” or “MTP” mode from the USB connection options on your Android device. -
Locate Your Photos on Your Android Phone:
Once connected, your Android phone should appear as a drive on your computer. Open the file explorer (File Explorer on Windows, Finder on Mac) and navigate to your phone’s storage. Typically, photos are stored in the “DCIM” folder, often within a subfolder named “Camera.” You might also find photos in other folders depending on your phone’s camera app and other apps that save images, such as screenshots or downloaded pictures. -
Copy Photos to Your Computer:
Browse through the “DCIM” and other relevant folders to find the photos and videos you wish to transfer. Select all the desired photos and drag them to a folder on your computer. Create a new folder specifically for this transfer to keep things organized. Wait for the copying process to complete. The time taken will depend on the size of your photo library. -
Disconnect Android and Connect Your iPhone:
Once the photos are safely copied to your computer, disconnect your Android phone. Now, connect your iPhone to your computer using a USB cable. -
Transfer Photos to Your iPhone:
The process for transferring photos from your computer to your iPhone differs slightly depending on your computer’s operating system:-
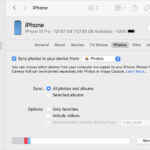
For macOS Catalina and later: Open Finder. In the Finder sidebar, locate your iPhone under “Locations.” Click on it, and then click on the “Photos” tab. Check the box next to “Sync Photos to your device from” and choose the folder where you saved your photos from your Android phone. You can choose to sync “All photos and albums” or “Selected albums.” Click “Apply” in the bottom right corner to start syncing.
-
For macOS Mojave or earlier: Open iTunes. Click on the iPhone icon when it appears in iTunes. In the sidebar, click on “Photos.” Check the box next to “Sync Photos” and choose the folder containing your photos. Select whether to sync all photos or selected albums. Click “Apply” to start the sync.
-
For Windows: Apple recommends using the “Apple Devices” app for Windows, which can be downloaded from the Microsoft Store. Alternatively, you can still use iTunes for Windows. In either application, locate your connected iPhone, navigate to the “Photos” section, and configure photo syncing similarly to the macOS instructions. You will select the folder where you saved your Android photos and initiate the sync.
-
-
Access Photos on Your iPhone:
After the syncing process is complete, you can find your transferred photos in the “Photos” app on your iPhone. They will typically be located in albums based on your sync settings. If you synced folders, they might appear as albums in the Photos app under “Albums.”
 iPhone settings showing Gmail account connected at Settings > Apps > Mail > Accounts > Gmail
Image alt text: iPhone screen displaying Gmail account settings within the Mail app settings, illustrating email account management on iOS.
Utilizing Cloud Services for Photo Transfer
Another convenient way to transfer photos is by leveraging cloud storage services. This method is wireless and can be done directly from your phones, provided you have a stable internet connection.
-
Upload Photos from Android to Cloud:
Choose a cloud storage service you use or are willing to use. Popular options include Google Photos, Google Drive, Dropbox, OneDrive, and iCloud (if you have iCloud for Windows set up on your Android). Install the app for your chosen service on your Android phone and sign in. Upload the photos you want to transfer to the cloud service from your Android phone. For Google Photos, you can back up your entire photo library. For services like Google Drive or Dropbox, you might need to manually select and upload photos to a specific folder. -
Access Cloud Service on iPhone:
On your iPhone, install the app for the same cloud service you used in the previous step and sign in with the same account. Navigate to the folder or section where you uploaded your photos. -
Download Photos to iPhone (Optional but Recommended):
Depending on the service and your needs, you might be able to directly access your photos from the cloud app on your iPhone. However, for offline access and integration with the iPhone’s Photos app, it’s generally recommended to download the photos to your iPhone’s local storage. Most cloud service apps offer options to download photos or albums to your device. For example, in Google Photos, you can select photos and choose “Save to Device.”
Choosing the Right Method
The best method for you depends on your situation and preferences:
- Computer Transfer: Ideal for large photo libraries, users who prefer wired connections, and those who want direct file management. It’s a reliable and often faster method for bulk transfer.
- Cloud Services: Convenient for wireless transfer, users already utilizing cloud storage, and for transferring photos without a computer. It requires a good internet connection and might take longer for large libraries depending on your upload/download speeds.
Tips for a Smooth Photo Transfer
- Organize Your Photos: Before transferring, take some time to organize your photos on your Android phone. Delete duplicates or unwanted photos to streamline the transfer process.
- Check Storage Space: Ensure you have enough free storage space on your iPhone to accommodate all the photos you are transferring.
- Battery Life: Make sure both your Android phone and iPhone are sufficiently charged, especially for wireless cloud transfers which can be battery-intensive.
- Wi-Fi Connection: For cloud transfers, use a stable and fast Wi-Fi connection to speed up the upload and download process and avoid using up mobile data.
- Verify Transfer: After transferring, double-check on your iPhone to ensure all your photos have been successfully moved and are viewable.
Conclusion
Transferring photos from your Android phone to your iPhone doesn’t have to be a daunting task. Whether you choose the computer method for its reliability or cloud services for their convenience, you can successfully bring your cherished photo memories to your new iPhone. By following these steps and tips, you can ensure a smooth and efficient photo transfer, allowing you to enjoy your photos on your new Apple device.
 Finder on macOS Monterey showing music syncing options for iPhone
Image alt text: macOS Monterey Finder interface displaying iPhone music synchronization settings, highlighting the ability to sync music between a Mac and an iPhone.