большинство современных компьютеров Mac оснащены встроенной камерой, незаметно расположенной в верхней части экрана. Эта камера становится вашим личным порталом для фотосъемки, видеозвонков и многого другого, автоматически активируясь, когда вам это нужно. Если вы хотите узнать, как использовать камеру на Mac для личных или профессиональных целей, это руководство проведет вас через все этапы, от основ до продвинутых советов по улучшению качества изображения.
Understanding Your Mac’s Built-in Camera
Mac computers come equipped with an integrated camera, typically found at the top center of your display. This convenient feature is designed for seamless user experience, automatically activating when applications or features requiring camera access are in use. Applications like FaceTime for video calls, Photo Booth for snapshots and fun effects, and even features like Markup and Head Pointer utilize this built-in camera.
A small green light indicator located beside the camera illuminates whenever the camera is active, providing a clear visual cue for when you are on camera. Conversely, this light turns off automatically when all applications and features that use the camera are closed or no longer in use, ensuring privacy and indicating when the camera is not active.
For users concerned about privacy, macOS offers robust controls over application access to your camera. You can manage permissions and decide precisely which applications are allowed to utilize the camera, ensuring your peace of mind. For detailed instructions on managing these settings, refer to Apple’s guide on Controlling camera access on Mac.
Capturing Photos and Videos on Your Mac
Taking photos and recording videos on your Mac is straightforward, primarily through the use of pre-installed applications like Photo Booth and FaceTime.
Using Photo Booth: This application is specifically designed for taking photos and videos, offering a range of fun filters and effects to enhance your captures. Simply launch Photo Booth from your Applications folder, and use the on-screen controls to take photos or record videos.
Using FaceTime: While primarily known for video calls, FaceTime can also be used to take quick photos and videos of yourself. Open FaceTime, and you will see a preview of your camera. Although FaceTime’s main function isn’t photography, it offers a convenient way to use your camera, especially if you’re already using it for calls.
Enhancing Your Visuals with Video Effects
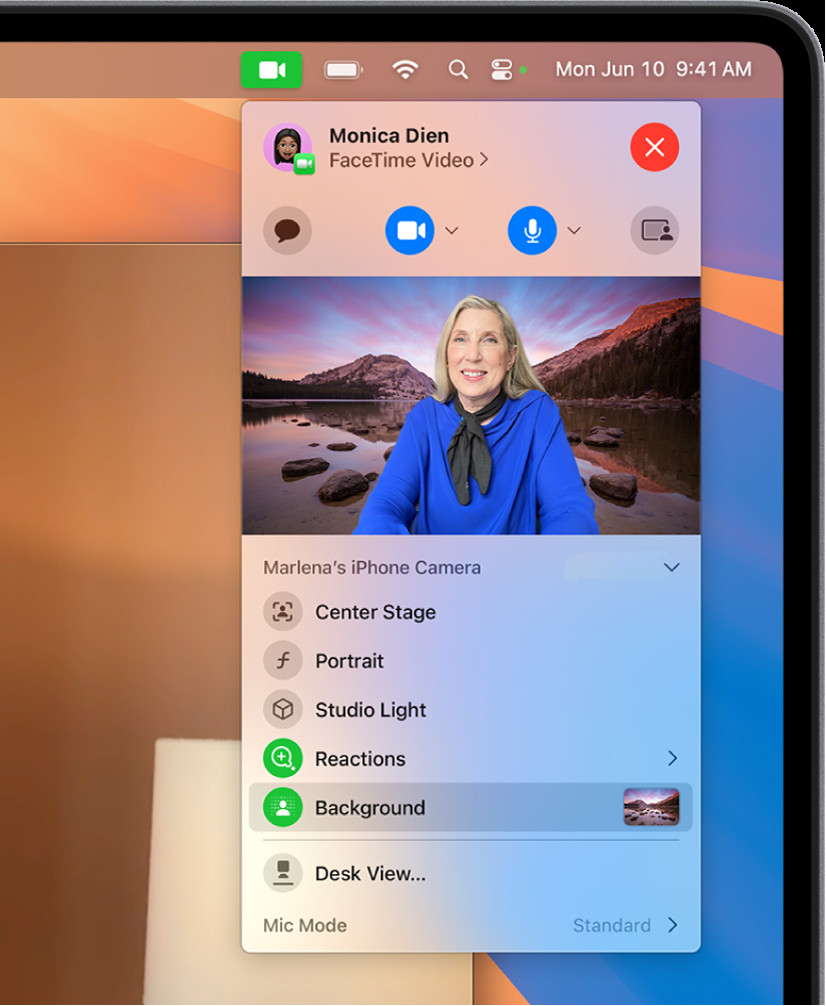
macOS provides built-in video effects that you can use to enhance your camera presence, especially useful for video calls and recordings. These effects are easily accessible through the Control Center menu during a video call in applications like FaceTime.
 Using background effects on FaceTime on a Mac, a creative way to enhance your video presence when learning how to take a photo on Mac and make video calls.
Accessing Video Effects:
-
Initiate a video call or open an application that uses video, such as FaceTime.
-
Look for the Control Center icon in the menu bar (usually located at the top right of your screen).
-
Click on the Control Center icon. You will find options for video effects such as:
- Portrait Mode: Blurs the background, keeping you in sharp focus, ideal for professional-looking video calls.
- Studio Light: Dims the background and brightens your face, simulating professional studio lighting.
- Backgrounds: Allows you to select fun or professional backgrounds, or even blur your actual background for privacy.
- Center Stage: If your Mac supports it, this feature automatically keeps you centered in the frame, even if you move around.
Manually Framing Your Video for the Perfect Shot
For users with wide-angle cameras, especially those with the Center Stage feature, macOS allows manual adjustments to your video framing when Center Stage is disabled. This is particularly useful when you want more control over what is visible in your video.
Manual Framing Controls:
-
Open a video-capturing application like FaceTime.
-
Ensure Center Stage is turned off via the Control Center menu if you intend to manually frame.
-
Hover your cursor over the video preview window. Controls will appear, allowing you to:
- Zoom: Adjust the zoom level by toggling between preset zoom levels (like 0.5x and 1x) or using a slider for more precise zoom adjustments.
- Pan: Click and drag within the preview window to reposition the frame and show different parts of your view.
- Recenter: Click the Recenter button to automatically re-center the frame on your face.
- Reset Framing: Quickly reset to the default framing by clicking the 0.5x or 1x zoom button in the preview.
Tips to Enhance Your Mac Camera Image Quality
To ensure you always look your best when taking photos or on video calls with your Mac, consider these tips to improve your camera’s image quality:
- Clean Your Camera Lens: Regularly wipe your Mac’s camera lens with a soft, lint-free cloth. Fingerprints and dust can significantly degrade image clarity.
- Optimize Lighting: Good lighting is crucial. Position yourself so that the light source is in front of you, illuminating your face directly. Avoid having bright lights behind you, which can create shadows and make you appear darker. Natural light from a window facing you is often ideal.
- Stable Wi-Fi Connection: A poor Wi-Fi connection can affect video quality during calls. Ensure you are close to your Wi-Fi router and that there are no obstructions that could weaken the signal.
- Check App Settings: Some applications may offer settings to adjust camera quality. Explore the preferences or settings menu within your chosen app to see if there are options to enhance video resolution or quality.
Should you encounter any issues with your built-in camera, Apple provides a helpful support article: If the built-in camera isn’t working on your Mac.
Further Resources: For more in-depth information on using your camera with specific applications, Apple offers user guides for FaceTime, Messages, and Photo Booth.
By understanding these features and tips, you can effectively use your Mac’s built-in camera to take great photos and enhance your video communication.