Managing photos across multiple Apple devices like iPhones and iPads can sometimes feel like juggling. You take a stunning photo on your iPhone, but then it’s not readily available when you’re using your iPad. Fortunately, Apple offers a seamless solution to this problem: iCloud Photos. This powerful service ensures all your precious memories, captured in photos and videos, are automatically synchronized and accessible across all your Apple devices.
This guide will walk you through everything you need to know about how to sync photos on your iPhone and iPad using iCloud Photos. We’ll cover how it works, step-by-step instructions to set it up, and tips for managing your photo library effectively.
Understanding How iCloud Photos Works
iCloud Photos acts as a central hub for your entire photo and video library. When you enable it on your iPhone and iPad, every photo and video you capture is automatically uploaded and securely stored in iCloud. Think of it as a cloud-based backup and synchronization service specifically designed for your media.
 iCloud icon on iPhone
The beauty of iCloud Photos is its seamless integration with the Photos app on all your Apple devices. Once set up, you can access your entire library from any device – iPhone, iPad, Mac, Apple TV, and even through iCloud.com on a web browser. Any edits you make on one device, such as cropping, applying filters, or deleting photos, are instantly reflected across all your other devices. This ensures your photo library is always consistent and up-to-date, no matter which device you’re using.
iCloud Photos organizes your media into familiar views like Years, Months, Days, and All Photos, making navigation intuitive. Features like Memories and People & Pets albums are also synchronized, so your automatically curated collections are consistent across your ecosystem. Importantly, your photos and videos are stored in their original formats and at full resolution, supporting a wide range of formats including HEIF, JPEG, RAW, and various video formats like HEVC and MP4. This ensures you’re not losing any quality when using iCloud Photos.
Step-by-Step Guide to Turn on iCloud Photos
Before you begin, ensure you have set up iCloud and are signed in with the same Apple ID on both your iPhone and iPad. This is crucial for iCloud Photos to function correctly and synchronize your data across devices.
Here’s how to enable iCloud Photos on your iPhone and iPad:
- Open the Settings app on your iPhone or iPad. This is the app with the grey gear icon, usually found on your home screen.
- Tap on your name at the very top of the Settings menu. This will take you to your Apple ID account settings.
- Select iCloud. This option is usually located below your name and profile picture.
- Tap on Photos. You might need to scroll down slightly to find this option within the iCloud settings.
- Toggle the switch next to “Sync this [device]” to the ON position. The switch will turn green when iCloud Photos is enabled.
iCloud icon on iPhone
Repeat these exact steps on your iPad to ensure iCloud Photos is activated on both devices. Once enabled, your devices will begin syncing photos and videos to iCloud. The initial sync might take some time depending on the size of your library and your internet connection speed.
Managing Your Photos with iCloud Photos: Edits and Deletions
iCloud Photos not only syncs your photos but also keeps your edits and deletions synchronized across your devices. This means any changes you make to your photos are reflected everywhere.
Edits Sync Seamlessly
When you edit a photo within the Photos app on your iPhone or iPad – whether you’re cropping, adjusting colors, or applying filters – these edits are non-destructive. Your original photo is safely stored in iCloud, and the edits are applied as adjustments. These adjustments are then synced across all your devices. So, if you enhance a photo on your iPhone and then open the Photos app on your iPad, you’ll see the edited version. You can always revert back to the original photo if needed, as iCloud preserves the original files.
Deletions are Reflected Across Devices
Similarly, when you delete a photo or video on one device with iCloud Photos enabled, it’s deleted from iCloud and consequently removed from all your synced devices. This is a powerful feature for maintaining a clean and organized photo library across your ecosystem.
However, to prevent accidental permanent loss, iCloud Photos provides a “Recently Deleted” album. When you delete a photo, it’s moved to this album and remains there for 30 days. During this period, you can recover accidentally deleted photos. After 30 days, photos in the “Recently Deleted” album are permanently removed from iCloud and all your devices.
Downloading Photos and Videos from iCloud Photos
While iCloud Photos provides seamless access to your library across devices, there might be times when you need to download copies of your photos and videos. Here are a few methods to download your media from iCloud Photos:
Downloading via iCloud.com
- Go to iCloud.com in a web browser on your computer.
- Sign in with your Apple ID and password.
- Click on the Photos app icon. This will open your iCloud Photos library in your browser.
- Select the photos and videos you wish to download. You can select multiple items by holding down the Command key (on Mac) or Control key (on Windows) while clicking.
- Click the download button (it looks like a cloud with a downward arrow) at the top right corner of the window.
- Choose your download options. You can typically choose between downloading the “Most Compatible” versions (JPEG and H.264 format) or the “Unmodified Originals” for the highest quality and original formats.
- Click “Download”. Your selected photos and videos will be downloaded to your computer.
Downloading to your iPhone or iPad
You can also download photos and videos directly to your iPhone or iPad from iCloud Photos, although this is generally less common as the purpose of iCloud Photos is to keep them accessible on the device without needing to download them separately.
- Open the Photos app on your iPhone or iPad.
- Select the photos or videos you want to download to the device’s local storage.
- Tap the Share button (the square with an upward arrow).
- Choose “Save Image” or “Save Video”. This will download a copy of the selected media to your device’s camera roll, in addition to it being in iCloud Photos.
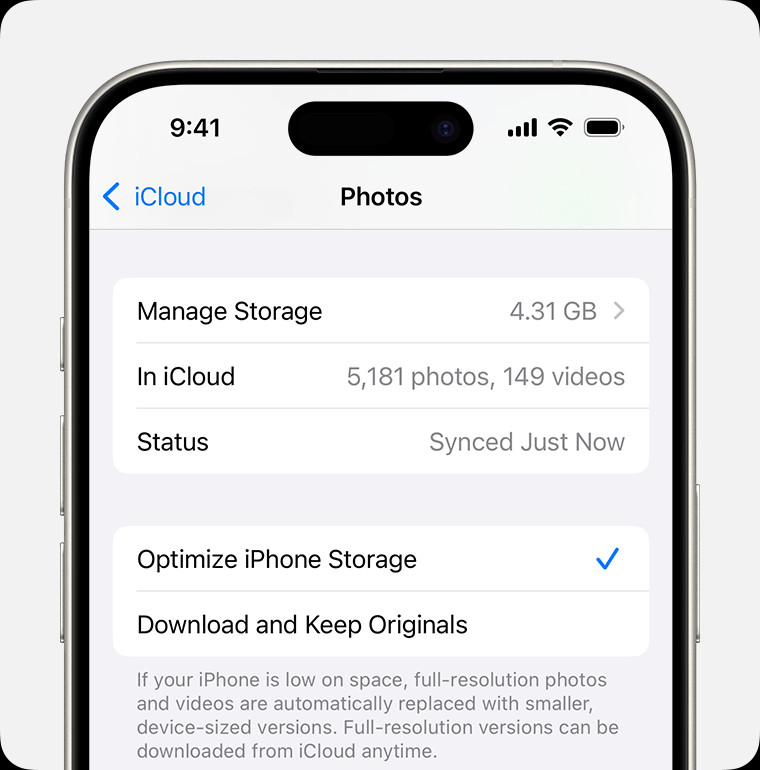
Optimizing Storage and Managing iCloud
iCloud Photos uses your iCloud storage. When you sign up for iCloud, you get 5GB of free storage. For most users with extensive photo and video libraries, this free storage is quickly filled. To continue using iCloud Photos and other iCloud services, you might need to upgrade to iCloud+.
iCloud Storage Options
Upgrading to iCloud+ provides you with more storage and additional premium features. Apple offers various iCloud+ plans with different storage capacities and price points, allowing you to choose the plan that best suits your needs.
Optimize iPhone/iPad Storage
To manage storage space on your iPhone and iPad, especially if you have a large iCloud Photo library, you can use the “Optimize [device] Storage” feature. When enabled, iCloud Photos intelligently manages your device storage by storing space-saving versions of your photos and videos on your device while keeping the original, full-resolution versions safely in iCloud.
To enable “Optimize Storage”:
- Go to Settings > [Your Name] > iCloud > Photos on your iPhone or iPad.
- Select “Optimize [device] Storage”.
With “Optimize Storage” turned on, your device will automatically download the full-resolution version of a photo or video from iCloud only when you need to view or edit it. This helps save significant space on your device without compromising access to your entire photo library.
Pausing iCloud Photo Uploads
In situations where you might have a slow internet connection or are on a limited data plan, you might want to temporarily pause iCloud Photo uploads. This can be useful when you are in a low-bandwidth area or want to avoid using cellular data for large uploads.
To pause iCloud Photo uploads:
- Open the Photos app on your iPhone or iPad.
- Scroll to the bottom of the “Library” tab and look for a “Pause” option. Alternatively, tap on your Profile icon in the Photos app and you may find a “Pause” option there.
- Tap “Pause” to temporarily stop uploads to iCloud. You can typically choose to pause for one day.
The availability of the pause feature might depend on the current upload status of your library. If your library is fully synced, the pause option might not be immediately available.
Conclusion
Syncing photos between your iPhone and iPad using iCloud Photos is a straightforward and incredibly beneficial process. It ensures that all your precious memories are securely backed up, readily accessible across your Apple devices, and consistently up-to-date. By following this guide, you can easily set up and manage iCloud Photos to create a seamless photo experience across your Apple ecosystem, making sure you never miss a moment, no matter which device you’re using.

![You can choose Optimize [device] storage or Download and Keep Originals.](https://dfphoto.net/wp-content/uploads/2025/02/ios-18-iphone-15-pro-settings-apple-account-icloud-photos-optimize-iphone-storage-150x150.jpg)