Digital photography offers incredible flexibility, but dealing with large image files can be cumbersome. Whether you’re preparing photos for the web, email, or specific printing needs, understanding how to shrink photo resolution is essential. This guide will walk you through the process using Adobe Photoshop, explaining not just the steps, but also the why behind each action and the impact on your images.
Understanding image resolution is the first step. Resolution, often measured in Pixels Per Inch (PPI) or Dots Per Inch (DPI), determines the detail in your image. A higher resolution means more pixels packed into each inch, resulting in sharper details and larger file sizes. Conversely, a lower resolution means fewer pixels per inch, leading to smaller file sizes but potentially less detail, especially when printed. Shrinking the resolution effectively reduces the number of pixels per inch, making your image more manageable without drastically altering its appearance for intended uses like online display.
To begin shrinking your photo resolution, you’ll need Adobe Photoshop installed on your computer. Once you’re ready, follow these steps:
Step 1: Open Your Image in Photoshop
The first step is to open the image you wish to modify within Photoshop.
- Launch Adobe Photoshop.
- Navigate to the File menu located at the top left of your screen.
- Select Open… from the dropdown menu.
- Browse your computer to locate the image file you want to work with.
- Select the image and click Open.
 Open Image in Photoshop
Step 2: Access the Image Size Dialog Box
Now that your image is open, you need to access the Image Size dialog box. This is where you’ll make changes to the resolution.
- Go to the Image menu in the top menu bar.
- Select Image Size… from the dropdown options.
This action will open the Image Size dialog box, presenting you with various options to adjust your image’s dimensions and resolution.
Step 3: Uncheck “Resample Image” to Preserve Image Pixels
In the Image Size dialog box, you’ll see a range of settings. To change only the resolution without altering the total number of pixels in your image, it’s crucial to uncheck the “Resample Image” box.
 Uncheck Resample Image in Photoshop
Leaving “Resample Image” unchecked tells Photoshop that you want to change the resolution independently. Resampling involves adding or removing pixels, which is what happens when you resize an image to make it larger or smaller. When shrinking resolution, our goal is to keep the pixel data intact and only change how densely these pixels are printed or displayed per inch.
Step 4: Input Your Desired Resolution Value
With “Resample Image” unchecked, focus on the Resolution field within the dialog box.
- Locate the Resolution field, usually set to a value like 300 pixels/inch by default.
- Type in your desired resolution value. For example, if you’re preparing images for web use, a standard resolution is often 72 PPI. If you’re aiming to reduce resolution for email attachments, you might choose 150 PPI.
As you type a new value into the Resolution field, you’ll notice that the Document Width and Height values also change. This is because Photoshop is maintaining the total pixel count while adjusting how those pixels are distributed per inch.
Step 5: Confirm and Save Your Changes
After entering your desired resolution, review the new Document Width and Height, and ensure they are suitable for your intended use.
- Click OK in the Image Size dialog box to apply the changes.
- To save your modified image, go to File > Save As…
- Choose a new name and location for the file to avoid overwriting your original image.
- Select your preferred file format (JPEG is common for web and general use) and click Save.
Congratulations! You have successfully shrunk the resolution of your photo using Adobe Photoshop.
Let’s illustrate the effect of changing resolution with an example. Imagine an image initially set at 300 PPI, intended for high-quality printing.
Example: Changing Resolution and Its Impact on Print Size
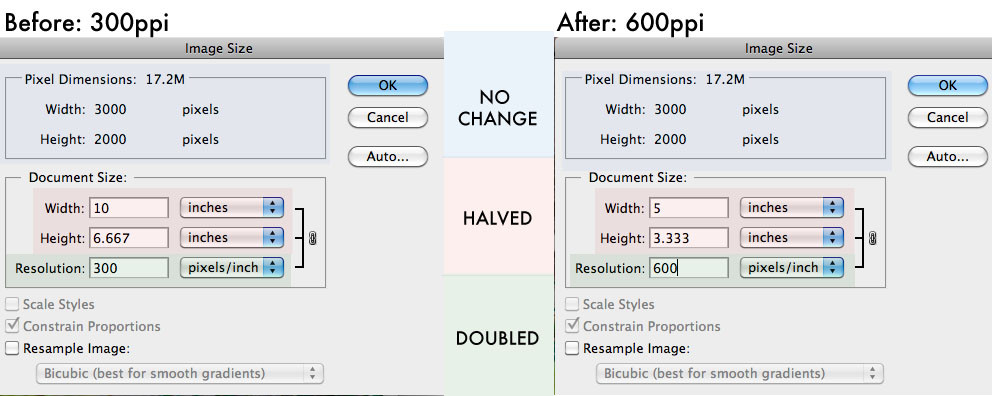
Consider an image with dimensions of 3000 x 2000 pixels, initially set at 300 PPI.
- At 300 PPI: This image will print at approximately 10 inches wide (3000 pixels / 300 PPI) and 6.67 inches tall (2000 pixels / 300 PPI).
If we double the resolution to 600 PPI without resampling, the pixel dimensions remain the same (3000 x 2000). However, the print size decreases:
- At 600 PPI: The same image will now print at 5 inches wide (3000 pixels / 600 PPI) and 3.33 inches tall (2000 pixels / 600 PPI). While the print size is smaller, the print quality at this size will be exceptionally sharp.
 Resolution Increase Example
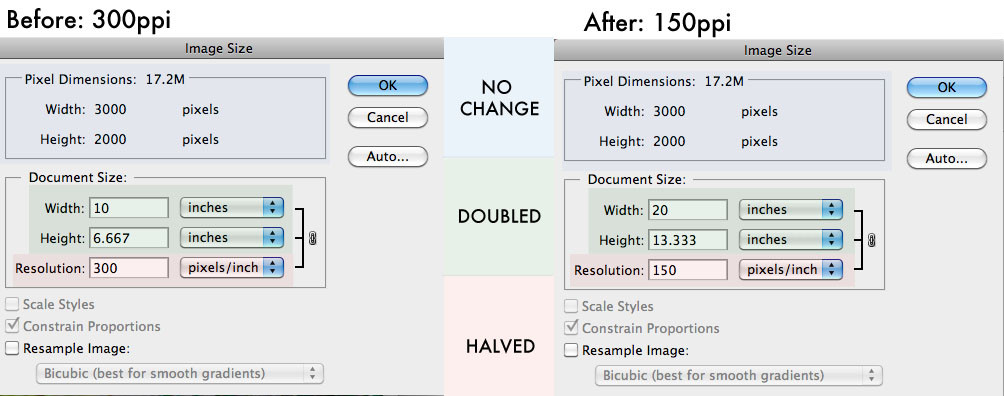
Conversely, if we halve the resolution to 150 PPI:
- At 150 PPI: The image will print at 20 inches wide (3000 pixels / 150 PPI) and 13.33 inches tall (2000 pixels / 150 PPI). The print size increases, but the quality might be less sharp, especially if viewed closely or printed at a smaller size where higher resolution would be beneficial.
 Resolution Decrease Example
Why Does Resolution Matter for Printing?
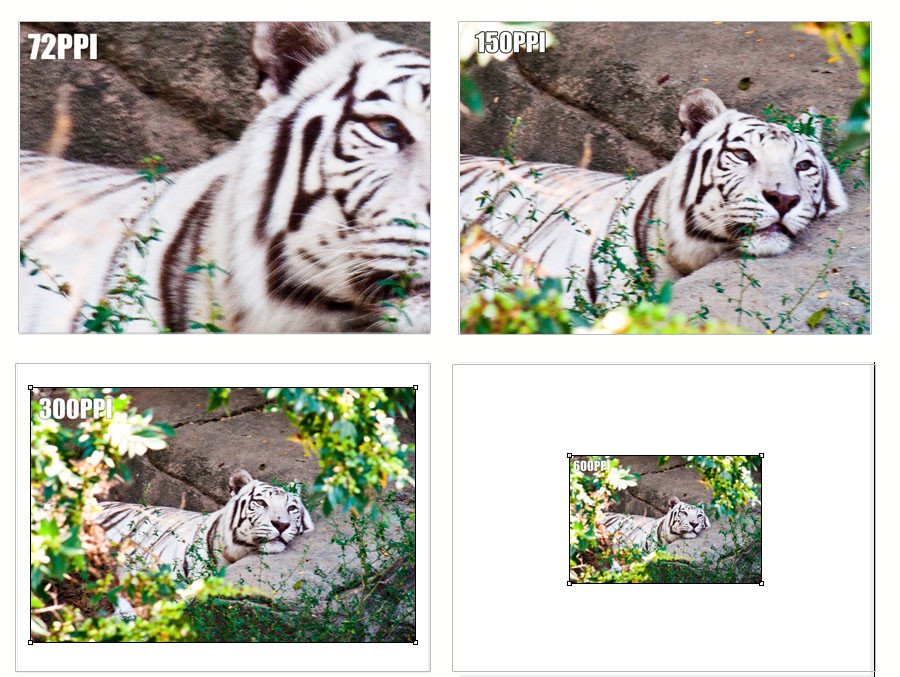
Resolution directly affects print quality and the physical size at which your image is printed. Consider printing the same image at different resolutions on standard 8.5 x 11 inch paper:
 Resolution Print Examples
- 72 PPI: The image would be very large, likely clipped off the edges of the paper, and the print quality would be noticeably poor, appearing blurry and lacking detail.
- 150 PPI: Still quite large for the paper, the quality would be improved but might still appear somewhat soft, not ideal for crisp details.
- 300 PPI: The image size would be well-suited to the paper, and the print quality would be excellent, with sharp and clear details.
- 600 PPI: The image would be significantly smaller on the paper but offer extremely high print quality, potentially beyond what’s necessary for standard prints, but beneficial for very detailed or professional publications.
Choosing the right resolution is a balance between desired print size and required print quality. For most standard prints and online uses, 300 PPI and 72 PPI respectively are good starting points. Experiment to find the best settings for your specific needs.
Conclusion
Shrinking photo resolution is a fundamental skill in digital image handling. By understanding the relationship between resolution, pixel dimensions, and print size, you can effectively prepare your images for various purposes, from web display to high-quality printing. Using Adobe Photoshop’s Image Size dialog, you can easily adjust resolution while preserving image quality for its intended use. Remember to always save a copy of your resized image to keep your original file intact.