Email remains a cornerstone of online communication, indispensable for personal and professional exchanges. However, its original design wasn’t tailored for the demands of modern multimedia, particularly sending large batches of high-resolution photos. If you’ve ever struggled to share a collection of images via email, encountering bounced messages or agonizingly slow uploads, you’re not alone. As cameras and smartphones capture increasingly detailed images, the challenge of emailing numerous photos only intensifies.
This guide provides a step-by-step approach to effectively send a large number of photos through email, minimizing common frustrations and ensuring your images reach their destination. We’ll assume you’re working with a collection of photos, perhaps from a digital camera’s memory card, and aiming to send them from a computer for ease of management. While the principles apply to images from any source, including smartphones and tablets, using a computer generally simplifies the process when dealing with a significant number of files.
Understanding Email Attachment Limits
Before diving into solutions, it’s crucial to understand why sending a large number of photos via email can be problematic. Email services, while robust, operate within infrastructure constraints. Think of email servers as postal sorting offices; they have a finite capacity to handle packages (emails) and their contents (attachments).
Email providers impose attachment size limits to manage server load, prevent abuse, and ensure smooth service for all users. These limitations, typically around 20-25MB per email for major providers, haven’t kept pace with the escalating file sizes of digital photos. A single high-resolution photo from a modern smartphone can easily exceed several megabytes, making it challenging to attach more than a handful to a single email. Attempting to send files exceeding these limits often results in bounced emails, frustrated senders, and undelivered photos.
Step-by-Step Guide to Sending Many Photos via Email
Here’s a structured approach to successfully email a large photo collection:
Step 1: Determine the Total Size of Your Photos
The first step is to assess the total file size of the photos you intend to send. This will help you anticipate potential size limit issues and choose the appropriate method. Organize all the photos you want to send into a single folder on your computer. If you’re selecting from a larger collection, creating a temporary folder for the chosen photos will simplify management.
To check the total size in Windows:
- Open File Explorer and navigate to your folder.
- Select all files within the folder (press
Ctrl + A). - Right-click on the selected files.
- Choose “Properties” from the context menu.
- The “Size” information in the Properties window displays the total file size. Note whether it’s in MB (Megabytes) or GB (Gigabytes).
For macOS:
- Open Finder and navigate to your folder.
- Select all files (press
Cmd + A). - Control-click (or right-click) on the selected files.
- Choose “Get Info” from the context menu.
- The “Size” information in the Info window displays the total file size.
Knowing the total size allows you to compare it against email attachment limits and estimate upload time.
Step 2: Estimate the Upload Time
If you are on a slower internet connection, particularly a mobile connection, understanding the estimated upload time can be beneficial. This helps manage expectations and decide if further optimization is needed. You can use online upload time calculators, readily available through a web search, or estimate it manually.
First, determine your internet upload speed. Websites like speedtest.net can quickly measure your upload and download speeds. Note your upload speed in Mbps (Megabits per second).
To estimate upload time:
- Convert your total photo file size to Megabits (MB to Mb, multiply by 8). For example, 100MB is 800Mb.
- Divide the total file size in Mb by your upload speed in Mbps. This gives you the estimated upload time in seconds.
- Convert seconds to minutes or hours as needed.
Keep in mind this is an estimation and actual upload times can vary based on network congestion and other factors. If the estimated upload time seems excessive, consider the next step to reduce file sizes.
Step 3: Reduce Photo Size if Necessary
For most email sharing scenarios, sending photos at their original, full resolution is unnecessary. Unless the recipient intends to print large-format copies, reducing the image dimensions and file size will not significantly impact viewing quality for digital display and offers substantial benefits in terms of upload speed and email size.
Reducing photo dimensions even by half can significantly decrease file size without a drastic loss in perceived quality, especially for viewing on screens. In some cases, downsized images can even appear sharper, as some cameras apply interpolation at maximum resolution settings.
Resizing photos offers several advantages:
- Smaller File Sizes: Reduced file sizes translate to faster uploads and less storage space used.
- Quicker Sending & Receiving: Smaller emails are quicker to send, receive, and download, especially for recipients with slower connections.
- Less Strain on Email Systems: Reduces the burden on email servers and networks.
Batch Resizing Tools:
To efficiently resize multiple images, use batch image resizing software. Here are some options for different operating systems:
Windows:
IrfanView is a free and powerful image viewer and converter with excellent batch processing capabilities.
Alt text: IrfanView batch conversion window showing advanced options for resizing images, a free Windows software for image processing.
To batch resize in IrfanView:
- Go to “File” > “Batch conversion/rename”.
- Add your photos to the input files list.
- Check “Use advanced options” and click “Advanced”.
- In the “Advanced Options” dialog, check “Resize”.
- Set “Set new size as percentage of original” to 50% (or your desired percentage).
- Set the “Output directory” and click “Start Batch”.
macOS:
The built-in “Preview” application on macOS offers a simple batch resize feature.
- Open all photos in Preview.
- Select all thumbnails in the sidebar (Cmd + A).
- Go to “Tools” > “Adjust Size”.
- Choose “percent” and enter 50% (or your desired percentage).
- Click “OK” and save the resized copies (File > Export Selected Images).
Chromebook:
For Chromebooks, consider web-based tools or Chrome extensions like Bulk Resize Photos.
Important Note: Always work on copies of your original photos when batch resizing. This safeguards your originals in case of any errors during the resizing process. Create a new folder for the resized images to keep them separate.
Step 4: Compress Photos into a ZIP File
For sending more than a few photos, compressing them into a single archive file, like a ZIP file, is highly recommended. This simplifies sending and receiving and can slightly reduce file size through compression.
Benefits of ZIP files:
- Single File for Multiple Photos: Combines all photos into one manageable file for easier sending and downloading.
- Slight Compression: ZIP compression can reduce file size, though the effect is minimal for already compressed image formats like JPEG.
- Organization: Keeps photos organized in a single container.
Creating ZIP Files:
Windows:
7-Zip is a free, open-source file archiver with excellent ZIP capabilities.
- Select all photos you want to send.
- Right-click on the selection.
- Choose “7-Zip” > “Add to archive…”.
- Ensure “Archive format” is set to “zip” and click “OK”.
macOS:
macOS has built-in ZIP archive creation.
- Select the photos.
- Control-click (or right-click) on the selection.
- Choose “Compress Items”.
Chromebook:
Chromebooks also have built-in ZIP support.
- Select the photos.
- Right-click on the selection.
- Choose “Zip selection”.
If you resized your photos in the previous step, ensure you are zipping the resized copies, not the original high-resolution versions, to maximize file size reduction.
Step 5: Send Photos via Email – Utilizing Cloud Links
Even after resizing and zipping, your photo collection might still exceed email attachment limits. Modern email services offer an elegant solution: cloud storage integration. Instead of attaching large files directly, you upload them to your cloud storage (like Google Drive, OneDrive, or Dropbox) and insert a shareable link into your email.
Alt text: Email interface showing options to attach files and insert links, representing different methods of sending photos via email.
This approach bypasses attachment size limits, allowing you to share much larger files. The recipient receives an email with a link; clicking it directs them to download the photos from your cloud storage.
Sending via Cloud Links in Popular Email Services:
Gmail:
Gmail seamlessly integrates with Google Drive.
- Compose a new email.
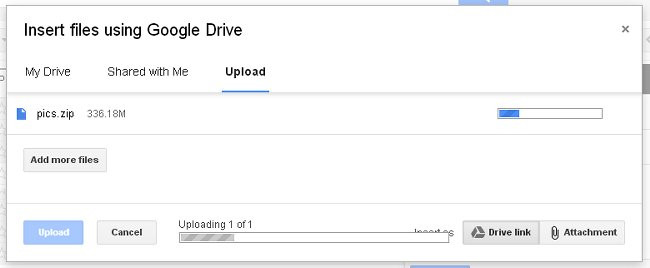
- Click the “Insert files using Drive” icon (Google Drive logo).
- If your file is not already in Drive, go to the “Upload” tab and upload your ZIP file or photo folder.
- Select the file and click “Insert”. Gmail will insert a shareable Google Drive link into your email.
- Gmail will prompt you to set sharing permissions. “Anyone with the link can view” is usually suitable for sharing photos.
 Uploading to Google Drive
Alt text: Gmail interface displaying the Google Drive upload window, illustrating the process of uploading files to Google Drive for sharing via email links.
Outlook.com:
Outlook.com integrates with OneDrive.
- Create a new email.
- Click “Insert” > “Files” > “Browse OneDrive”.
- Upload your ZIP file or photos to OneDrive if needed.
- Select the file and click “Insert”. Outlook will insert a OneDrive sharing link.
Yahoo Mail:
Yahoo Mail integrates with Dropbox.
- Compose a new email.
- Click the “Attach files” icon.
- If your file is larger than 25MB, Yahoo Mail will prompt you to “Share with Dropbox”.
- Follow the prompts to upload your file to Dropbox and insert a shareable link.
Recipients typically do not need an account with the respective cloud storage service to download files shared via links. However, be mindful of sharing permissions to control access to your photos.
Delivery Failures and Recipient Limits:
Even when using cloud links, be aware that recipients’ email systems might have security filters or policies that could block emails containing links, especially from unknown senders. If a recipient reports not receiving the email, advise them to check their spam or junk folders.
Alternative Methods for Sharing Large Photo Collections
While email remains broadly accessible, alternative methods are often more efficient for frequent photo sharing or very large collections:
- Social Media and Photo Sharing Platforms: Facebook, Instagram, Flickr, and similar platforms are designed for sharing photos and albums. They offer features for organizing and controlling access, suitable for social sharing but less ideal for direct, private transfers.
- Messaging Services: WhatsApp, Telegram, and similar messaging apps allow file transfers, but often have file size limits and are best suited for smaller numbers of photos or ongoing communication with known contacts.
- Dedicated Cloud Storage Services: Google Drive, OneDrive, Dropbox, iCloud Photo Sharing, and specialized file transfer services offer robust platforms for sharing and collaborating on large files. These services often provide desktop and mobile apps for easy access and synchronization, ideal for ongoing photo sharing and backup.
- File Transfer Services: Services like WeTransfer, Send Anywhere, and others specialize in large file transfers via web links, offering simplicity and speed without requiring dedicated accounts for recipients.
Conclusion
Sending a lot of photos through email requires a strategic approach to overcome file size limitations. By checking file sizes, resizing images, compressing files into ZIP archives, and leveraging cloud storage links, you can effectively share your photo collections via email. While email may not always be the most efficient method for massive photo transfers, it remains a universally accessible option. Understanding these techniques empowers you to share your visual stories seamlessly, ensuring your photos reach their intended audience without frustration.