Ultrasound examinations are common for various medical reasons, most notably during pregnancy to monitor fetal development. If you’re new to ultrasounds, understanding the images can seem daunting. However, learning How To Read An Ultrasound Photo isn’t as complex as it might first appear. This guide will break down the basics, empowering you to better understand your medical imaging and engage more confidently in discussions about your health or pregnancy.
Medical imaging, including ultrasound technology, has revolutionized healthcare, enabling early diagnosis and preventive care for countless individuals. Beyond pregnancy, ultrasounds are crucial for diagnosing a wide array of conditions and guiding therapeutic procedures.
Whether you’re a patient seeking to understand your own ultrasound, a student embarking on a healthcare career, or simply curious about how to read an ultrasound picture, this article will provide you with the knowledge you need.
Understanding Ultrasound Imaging
 Ultrasound Imaging Explained
Ultrasound imaging is a non-invasive medical technique that utilizes high-frequency sound waves to create images of the body’s internal structures. These sound waves are emitted by a device called a transducer, travel through the body, and reflect back from different tissues and organs. The returning echoes are processed to generate real-time images, allowing medical professionals to assess the condition of organs, tissues, and fluids within the body.
Doctors and sonographers rely on ultrasound readings to diagnose medical conditions, investigate the source of pain or inflammation, and monitor treatment progress. It’s a cornerstone of prenatal care, enabling the monitoring of fetal growth and development throughout pregnancy.
The safety and real-time imaging capabilities of ultrasound make it a preferred diagnostic tool. Unlike X-rays, ultrasound does not use ionizing radiation, making it safe for repeated use, especially during pregnancy.
The ultrasound machine operates by emitting sound waves, typically in the frequency range of 2 to 15 MHz. Higher frequencies provide greater image detail but penetrate less deeply, while lower frequencies offer deeper penetration but with reduced resolution. The machine captures the echoes, and sophisticated software translates these echoes into a visual representation of the body’s internal anatomy.
Deciphering Numbers and Information at the Top of an Ultrasound Image
 What do the numbers mean at the top of an ultrasound image
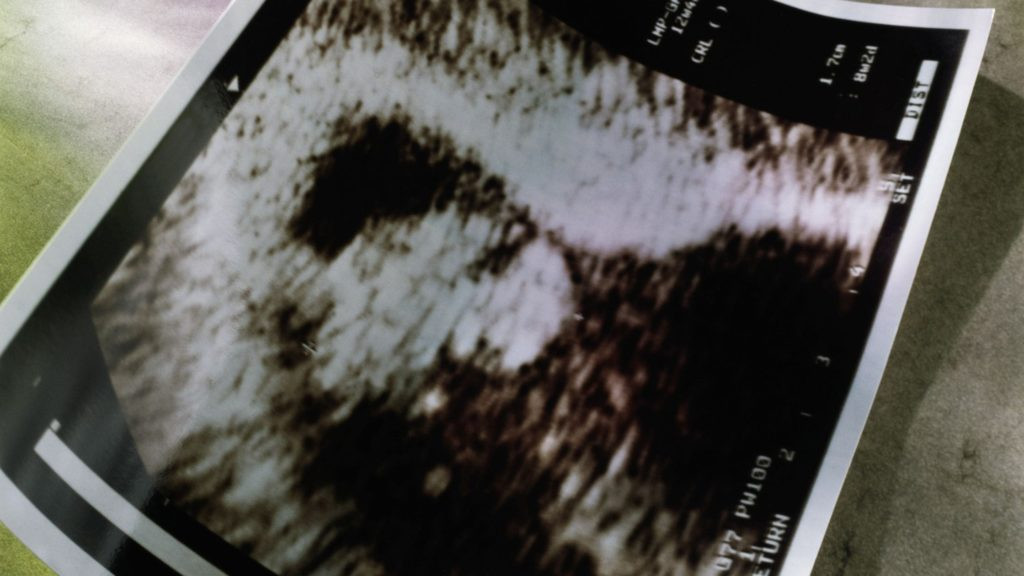
The header section of an ultrasound image usually contains a series of numbers and text, providing crucial contextual information. This area typically displays:
- Patient Identification: The patient’s name and hospital reference number ensure correct image association.
- Machine Settings: Parameters like frequency, depth, and gain settings used during the scan are recorded for diagnostic and comparative purposes.
- Annotations: Technician notes or measurements taken during the examination might be included.
These details are helpful for identification and understanding the technical aspects of the scan. While the header is often at the top, the true “top” of the anatomical image is determined by the transducer’s position. Ultrasound images typically have a cone-shaped appearance, widening from a narrow point. This narrow point indicates the surface where the transducer was placed, and thus, the top of the image in anatomical terms.
Understanding Colors in Ultrasound Images: Black, White, Gray, and Beyond
Ultrasound images are not just black and white; they encompass a range of shades and sometimes colors, each carrying specific diagnostic information. The shades and colors arise from how sound waves interact with different tissue densities and fluids.
Traditionally, ultrasound images were primarily grayscale, with black, white, and shades of gray representing different tissue characteristics. The advent of Color Doppler technology revolutionized ultrasound, particularly in cardiology, by allowing visualization of blood flow direction and velocity.
Black: Fluid-Filled Structures
Black areas on an ultrasound image typically represent fluids. Since sound waves travel easily through fluids with minimal reflection, these areas appear dark or black. Examples include:
- Amniotic Fluid: The fluid surrounding a fetus in pregnancy.
- Bladder: A full bladder will appear black.
- Cysts: Fluid-filled sacs within tissues.
White: Dense Tissue and Bone
White areas indicate dense tissues or structures that strongly reflect sound waves. Bone and calcifications are prime examples:
- Bone: Skeletal structures appear bright white due to their high density.
- Calcifications: Deposits of calcium within tissues also reflect strongly and appear white.
Gray Shades: Soft Tissues and Organs
Gray shades represent varying densities of soft tissues and organs. The spectrum of gray helps differentiate between different tissue types:
- Lighter Grays: Indicate denser soft tissues.
- Darker Grays: Represent less dense tissues or tissues with more fluid content compared to denser tissues.
Orange: Slow Blood Flow (Power Doppler)
Orange color is sometimes seen when using Power Doppler ultrasound, a sensitive technique for detecting slow blood flow. Orange often signifies:
- Small Blood Vessels: Especially in situations where blood flow is minimal or slow.
Red and Blue: Blood Flow Direction and Velocity (Color Doppler)
Red and blue are the hallmark colors of Color Doppler ultrasound, providing information about blood flow dynamics:
- Red: Indicates blood flow moving towards the transducer.
- Blue: Indicates blood flow moving away from the transducer.
Variations in the shades of red and blue represent blood flow velocity:
- Brighter Shades: Indicate faster blood flow.
- Darker Shades: Indicate slower blood flow.
A mosaic of red and blue might suggest turbulent or complex blood flow patterns, requiring further clinical interpretation.
Anatomical Orientation: Top, Left, and Right in Ultrasound Images
Understanding the orientation of an ultrasound image is crucial for accurate interpretation. The “top” of the image, disregarding header information, corresponds to the entry point of the ultrasound beam into the body, where the transducer is positioned.
For instance, in a uterine ultrasound:
- Top of Image: Represents the tissues closest to the transducer, like the abdominal wall and the upper part of the uterus itself.
- Deeper into Image: Progressively shows deeper structures, such as the uterine lining and amniotic fluid in pregnancy.
In fetal ultrasounds, the top often displays denser tissues of the uterus and surrounding structures, followed by the black area of amniotic fluid.
Determining left and right orientation depends on the ultrasound equipment and the scanning technique. Most clinical ultrasound images are displayed in a mirror-image format.
- Mirror Image: The left side of the patient’s body appears on the left side of the ultrasound screen, mimicking a mirror reflection.
However, some techniques, like transvaginal ultrasounds, often use a straight-shot orientation.
- Straight-Shot Image: The left side of the patient’s body appears on the right side of the ultrasound screen.
Always clarify with the sonographer or radiologist if you are unsure about the left-right orientation of your specific ultrasound image.
Common Visual Artifacts in Ultrasound Imaging
Ultrasound images are not perfect representations and can be affected by visual artifacts, which are distortions or misrepresentations of tissue appearance. These artifacts arise from the physics of sound wave propagation and interaction with tissues. Understanding these artifacts is important to avoid misinterpretations. Common artifacts include:
Enhancement (Posterior Enhancement)
Enhancement appears as an area of increased brightness distal to a weakly attenuating structure, typically a fluid-filled cyst. Because sound waves pass through fluid with minimal impedance, the tissues behind the cyst receive a stronger sound beam, leading to a brighter appearance than surrounding tissues.
Attenuation (Shadowing)
Attenuation, or shadowing, presents as a dark area distal to a strongly attenuating or reflective structure, such as bone or gallstones. These dense structures block or reflect most of the sound waves, resulting in a reduced sound beam intensity reaching the tissues behind them, causing a darker “shadow” on the image.
Anisotropy
Anisotropy is an artifact particularly relevant to tendons and muscles. It occurs when the ultrasound beam is not perpendicular to the tissue fibers. When the probe is at a 90-degree angle to the tendon, it appears echogenic (brighter). However, if the angle is slightly off, the tendon can artifactually appear hypoechoic (darker), potentially mimicking pathology. Technicians adjust probe angles to minimize anisotropy and ensure accurate tissue assessment.
Reading Pregnancy Ultrasounds: A Special Focus
 Knowing How to Read Pregnancy Ultrasounds
Pregnancy ultrasounds are a particularly anticipated application of this technology, allowing expectant parents to visualize their developing baby. Ultrasound is safe during pregnancy as it uses sound waves, not radiation, to generate images of the fetus.
Ultrasound scans are performed at various stages of pregnancy to monitor different aspects of fetal development:
-
First Trimester (Weeks 1-12):
- Confirm pregnancy viability and location.
- Determine gestational age and estimated due date (EDD).
- Assess the number of embryos/fetuses.
- Evaluate amniotic fluid and early fetal development.
-
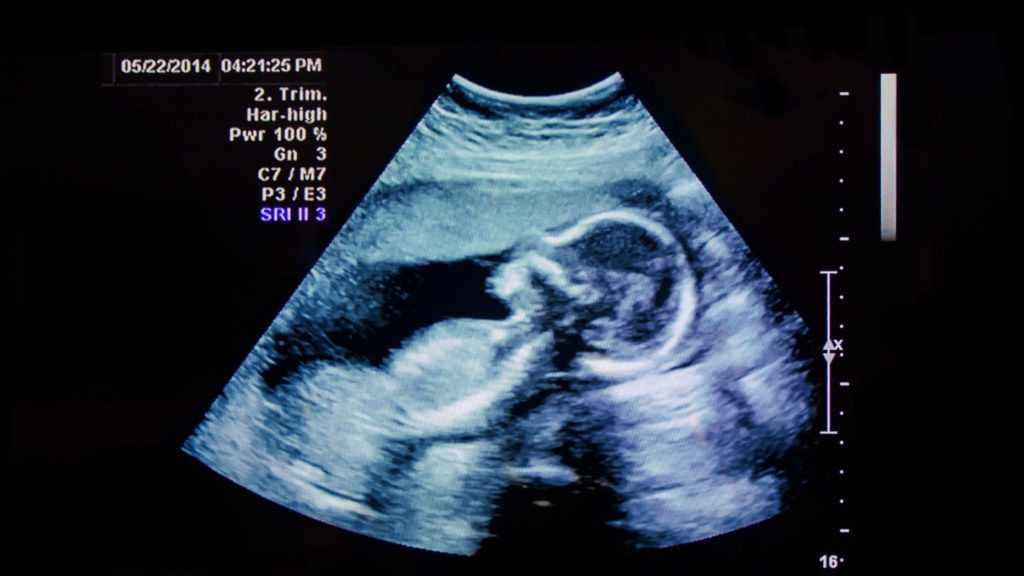
Second Trimester (Weeks 18-22):
- Detailed anatomical survey to assess fetal organs, limbs, spine, brain, and heart.
- Placenta location and condition.
- Fetal growth measurements.
- Optional gender determination.
-
Third Trimester (Week 30 onwards):
- Monitor fetal growth and well-being.
- Assess amniotic fluid volume.
- Placenta location to rule out previa.
- Fetal position before delivery.
Locating the Womb and Baby in a Pregnancy Ultrasound
In a pregnancy ultrasound, identifying the womb and the baby is key.
-
Womb: The uterus is typically outlined by a light gray or white line representing its walls. Inside this outline, a large black area indicates the amniotic fluid.
-
Baby: The fetus appears within the amniotic fluid (black area) and will be shades of gray or white, depending on tissue density. The level of detail visible depends on the gestational age:
- 8 Weeks: May appear as a small, bean-shaped structure.
- 12 Weeks: Head becomes distinguishable.
- 20 Weeks and Later: Detailed anatomy visible, including limbs, heart, spine, and facial features.
Gender Determination on Ultrasound
 How can you tell gender on an ultrasound picture?
Gender determination is often possible during the second-trimester ultrasound (18-20 weeks). Sonographers look for specific anatomical signs:
Signs Indicating a Girl
- Hamburger Sign: The labia majora and minora resemble a hamburger bun, with the clitoris appearing as the patty in between.
- Sagittal Sign: In a profile view (midline sagittal plane), the caudal notch (nub at the end of the spine) angles downwards at less than 10 degrees.
Signs Indicating a Boy
- Sagittal Sign: The caudal notch angles upwards at more than 30 degrees in the sagittal view.
- Urine Flow: Occasionally, upward urine flow can be visualized, suggesting male genitalia.
- Male Genitalia: By weeks 18-20, the penis, scrotum, and testicles may be directly visible.
While ultrasound is generally accurate for gender determination, it’s not 100% foolproof, and factors like fetal position and image quality can influence accuracy.
Conclusion: Empowered Understanding of Ultrasound Imaging
Understanding how to read an ultrasound photo empowers you to be more informed and engaged in your healthcare journey. While this guide provides a foundational understanding, always consult with medical professionals for accurate diagnoses and interpretations of your specific ultrasound images. Ultrasound technology is a powerful tool, and basic knowledge of image interpretation can significantly enhance your understanding and peace of mind during medical examinations.
FAQs
Does cancer show up white or black on an ultrasound picture?
Cancerous tissue typically appears darker (hypoechoic or black) on an ultrasound compared to surrounding normal tissue, which may appear in shades of gray. However, the appearance can vary depending on the type of cancer and surrounding tissues. Dense tissues generally appear lighter.
What does the CM mean on an ultrasound picture?
In pregnancy ultrasounds, “CM” usually stands for centimeters and is used as a unit of measurement. It is often associated with measurements like the crown-rump length (CRL) in early pregnancy, which helps estimate gestational age.
What does shadow on ultrasound mean?
A shadow artifact on an ultrasound image indicates that the sound waves have been blocked or significantly attenuated by a dense structure. This structure could be bone, calcifications, gas, or a very dense mass. Shadowing itself is not a diagnosis but a visual sign that helps in identifying the nature of underlying tissues or structures.