Printing multiple photos on a single page is a great way to save paper and create personalized gifts or keepsakes. This guide provides simple methods to print four photos on one page using various applications on your Mac.
Using the Photos App Contact Sheet
The built-in Photos application on your Mac offers a straightforward way to print multiple photos on a single page using the “Contact Sheet” feature.
- Select Your Photos: Open the Photos app and select the four photos you want to print.
- Access Print Options: Press Command-P (⌘+P) to open the print dialog box.
- Choose Contact Sheet: In the print settings, select “Contact Sheet” from the available options. This layout automatically arranges multiple images on one page.
- Customize Layout: Adjust the number of columns to control the size and arrangement of your photos. For four photos, three columns will often provide a suitable layout on US letter paper. You can also include titles, dates, and other information with each picture.
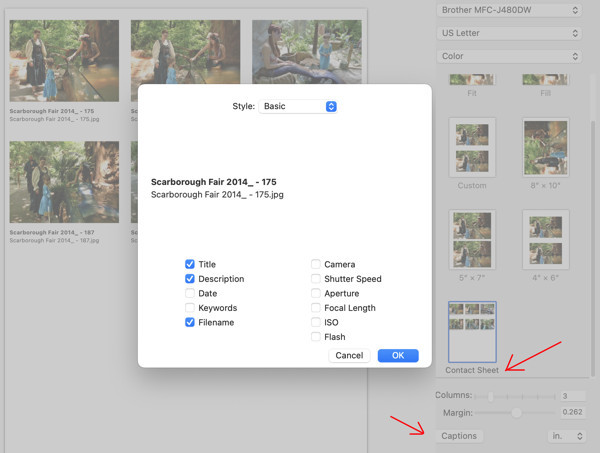 Contact Sheet in Photos app
 - Print or Save as PDF: Click “Print” to print your contact sheet. Alternatively, you can save the layout as a PDF file by selecting “PDF” from the dropdown menu in the print dialog box. This allows you to save the arrangement for later printing or sharing.
Printing with Preview: Creating a Custom Collage
Preview, another pre-installed application on Mac, allows you to create a custom collage by pasting multiple photos onto a blank canvas.
- Create a Blank Canvas: Open Preview and create a new document. You can make a new blank document by using an existing photo, selecting all (Edit/Select All), deleting the content (Edit/Delete), and saving the blank transparent background.
- Copy and Paste Photos: Open each of your four photos in separate Preview windows. Use Command-C (⌘+C) to copy each photo and Command-V (⌘+V) to paste them onto the blank canvas.
- Arrange and Resize: Drag and resize each photo on the canvas to achieve your desired layout. You can reposition images by clicking and dragging, and resize them by dragging the corner handles.
 Arranging photos in Preview
 - Print Your Collage: Once you’re satisfied with the arrangement, use Command-P (⌘+P) to print your custom collage.
Utilizing Pages for Precise Layout
Pages, Apple’s free word processor, provides precise control over image placement and sizing, making it another excellent option for printing four photos on one page.
- Set Up Your Document: Open Pages and create a new document. Adjust the page size to your desired dimensions (e.g., US Letter).
- Insert Your Photos: Drag and drop your four photos into the document or use the “Insert” menu to add them.
- Customize Placement and Size: Click and drag each photo to position it precisely on the page. Resize images using the corner handles. Pages provides guides and rulers for accurate placement.
 Example collage in Pages4. Print: Once you have arranged the photos to your liking, print the document using Command-P (⌘+P).
These three methods offer different approaches to printing four photos on one page. Choose the method that best suits your needs and technical skills. Whether you prefer the simplicity of the Photos app, the flexibility of Preview, or the precision of Pages, you can easily create personalized prints.