Photographing the moon is a captivating pursuit in photography, appealing to both beginners and seasoned professionals. Whether you’re drawn to the serene beauty of a full moon illuminating the night sky or the dramatic spectacle of a lunar eclipse, capturing the moon’s ethereal glow presents a unique set of challenges and rewards.
The journey to lunar photography mastery begins with understanding the essential gear and techniques. While equipment plays a crucial role, mastering shooting techniques and post-processing workflows are equally vital to achieving stunning moon photographs. This guide will walk you through every aspect of moon photography, providing a comprehensive understanding from initial setup to final image enhancement.
 An image of a Waning Gibbous moon phase – how to photograph the moon
Alt text: Detailed view of a waning gibbous moon phase showcasing craters and surface texture, emphasizing the depth achievable in moon photography.
Understanding the Unique Challenges of Moon Photography
If your initial attempts at photographing the moon resulted in a tiny, featureless white disc, rest assured, you’re not alone. Many photographers encounter similar frustrations when first venturing into lunar photography. The process can be surprisingly complex, demanding patience and a strategic approach. This guide aims to demystify these challenges and equip you with the knowledge to overcome them.
Despite these hurdles, moon photography offers an invaluable learning experience. It pushes you to experiment and refine your photographic skills across various domains. You’ll develop expertise in stabilizing your camera in low-light environments, mitigating atmospheric disturbances, mastering manual camera settings, and creatively incorporating the moon into diverse photographic compositions.
The allure of moon photography lies in its versatility. You can isolate the moon with a telephoto lens, revealing intricate surface details and dramatic craters. Alternatively, you can integrate the moon into broader landscape shots, where it acts as a subtle yet significant element, enhancing the overall narrative. Furthermore, you can explore composite imaging, blending a detailed moon photograph with another subject to create surreal or artistic effects, as exemplified below:
 Vampire Drinking Blood on Full Moon – How to Photograph the Moon
Alt text: Creative composite image of a vampire figure silhouetted against a large full moon, demonstrating artistic possibilities in moon photography through digital manipulation.
Decoding Moon Phases for Better Photography
Before delving into the technical aspects of moon photography, a foundational understanding of moon phases is essential. These phases dictate the moon’s appearance and influence the type of images you can capture.
As we know, the moon’s appearance changes cyclically throughout the month due to its orbit around the Earth and the changing angles of sunlight reflection. When the moon is positioned between the Earth and the sun, the side facing us remains unlit, resulting in a “New Moon” phase, invisible to the naked eye. Conversely, when the Earth is between the moon and the sun, the sunlit side of the moon faces us, creating a “Full Moon.”
This lunar cycle, from new moon to new moon, takes approximately 29.53 days, known as a synodic month. The diagram below illustrates the progression of moon phases:
Moon Phases
Alt text: Diagram illustrating the sequence of moon phases, from new moon through waxing crescent, first quarter, waxing gibbous, full moon, waning gibbous, last quarter, waning crescent, and back to new moon, visually explaining the lunar cycle.
Starting from the New Moon, as the illuminated portion increases, the moon transitions through the Crescent, Quarter, and Gibbous phases, culminating in the Full Moon. After the full moon, the illuminated portion begins to decrease, reversing through Gibbous, Quarter, and Crescent phases until the cycle completes with the next New Moon.
The terms “Waxing” and “Waning” describe the increasing and decreasing illumination of the moon, respectively. A Waxing Crescent and a Waning Crescent share a similar shape but appear on opposite sides of the moon, indicating whether the moon is progressing towards or away from a full moon.
It’s important to note that the perceived orientation of moon phases varies depending on your geographical location on Earth. The diagram shown is representative of the Northern Hemisphere, where the moon waxes from the right and wanes to the left. This orientation is reversed in the Southern Hemisphere due to the moon’s apparent “upside-down” perspective.
Understanding these lunar phase basics allows you to easily estimate the time until the next Full Moon. For instance, in the Northern Hemisphere, a crescent moon illuminated on the right signals approximately 10 days until the Full Moon. Conversely, a crescent moon illuminated on the left indicates about two and a half weeks before the next Full Moon.
While these estimations are helpful, precise moon phase information and its position in the sky can be determined using specialized apps. These tools provide accurate lunar phase calculations and track the moon’s celestial path at any given time and location. We’ll explore some of the most useful apps for moon photography later in this guide.
Image with the Moon in Last Quarter Moon Phase
Alt text: Scenic photograph of a last quarter moon phase above a stark Icelandic landscape, demonstrating how moon phases can enhance landscape photography, captured with Nikon D800E and 70-200mm lens.
Here are some additional key facts about the moon that are relevant to photography:
- Tidal Locking: The moon is tidally locked to Earth, meaning it rotates at the same rate it orbits, so we always see the same side of the moon, regardless of time, location, or season.
- Variable Earth-Moon Distance: The distance between the Earth and moon isn’t constant. The closest point in its orbit is called “Lunar Perigee,” leading to a “Supermoon,” while the farthest point, “Lunar Apogee,” results in a “Micromoon.” Supermoons will be discussed further.
- Blue Moon: A “Blue Moon” refers to the rare occurrence of two full moons within a single calendar month.
- Eclipses: Eclipses happen when the Sun, Earth, and Moon align. A Solar Eclipse occurs when the moon blocks the sun, while a Lunar Eclipse happens when the Earth’s shadow falls on the moon.
- Blood Moon: During a Lunar Eclipse, the moon often takes on a reddish hue, known as a “Blood Moon.”
- Hemispheric Illumination Direction: In the Northern Hemisphere, lunar illumination progresses from right to left, while in the Southern Hemisphere, it moves from left to right. At the equator, illumination varies by time of day.
For real-time moon phase information, websites like TimeandDate.com offer detailed lunar calendars, allowing you to check current and future moon phases. These resources, along with specialized apps, are invaluable tools for planning your moon photography sessions.
Supermoon Explained: A Bigger, Brighter Lunar Target
A Supermoon is a captivating celestial event that occurs when a Full or New Moon coincides with the moon’s closest approach to Earth in its orbit, known as the lunar perigee. While the term “Supermoon” technically applies to both Full and New Moons at perigee, it’s the Full Supermoon that captures public attention due to its enhanced visibility and photographic appeal.
The moon’s orbit around Earth is not perfectly circular but elliptical. This elliptical path results in varying distances between the Earth and moon throughout the month. Astronomers have defined two key points in this orbit: Lunar Perigee, the point of closest approach at approximately 363,104 kilometers from Earth, and Lunar Apogee, the farthest point at about 405,696 kilometers.
A Supermoon emerges when a Full Moon phase aligns closely with the Lunar Perigee. This alignment, which happens several times annually, makes the Supermoon appear significantly larger and brighter than a typical Full Moon. Compared to a Full Moon at Lunar Apogee (Micromoon), a Supermoon can appear up to 14% larger in diameter and boast up to 30% greater illuminance. NASA’s illustration effectively demonstrates this size and brightness difference:
NASA Supermoon Comparison
Alt text: NASA illustration comparing the apparent size difference between a Supermoon at perigee and a Micromoon at apogee, highlighting the visual impact of a Supermoon as larger and brighter.
While Supermoons are relatively frequent, occurring multiple times each year, one of these occurrences is usually the “most super”—the largest and closest Supermoon of the year, offering a particularly impressive photographic opportunity.
Lunar Eclipse Demystified: Photographing the Blood Moon
A Lunar Eclipse is a dramatic astronomical event where the Sun, Earth, and Moon align in such a way that the Moon passes into the Earth’s shadow. This celestial alignment can only occur during the nighttime and specifically when the Moon is in its Full phase. Lunar eclipses are not extremely rare, occurring between two to five times per year globally, making them a noteworthy event for photographers and sky watchers.
Total Lunar Eclipse 2010
Alt text: Image of a total lunar eclipse showing the moon in a deep red hue, illustrating the “blood moon” effect caused by Earth’s atmospheric filtering of sunlight, capturing the totality phase of the eclipse.
The distinctive reddish or copper color of a Lunar Eclipse is due to sunlight refracting through Earth’s atmosphere and reaching the moon. The degree of redness varies depending on the amount of dust and cloud cover in Earth’s atmosphere. More atmospheric particles typically result in a darker, more pronounced red shade on the moon.
This reddish coloration has led to Lunar Eclipses being popularly known as “Blood Moons” or “Blood-Red Moons.” For detailed guidance on capturing these spectacular events, refer to specialized resources on photographing lunar eclipses.
Full Moon Names: Folklore and Photography
Full Moons have been assigned distinct names throughout history, often rooted in Native American traditions, as well as Anglo-Saxon and Germanic folklore, with each name reflecting characteristics associated with the month of its occurrence. These names add a layer of cultural richness to our understanding and appreciation of the lunar cycle. Here are the traditional Full Moon names by month:
- January: Wolf Moon
- February: Snow Moon
- March: Worm Moon
- April: Pink Moon
- May: Flower Moon
- June: Strawberry Moon
- July: Buck Moon
- August: Sturgeon Moon
- September: Harvest or Corn Moon
- October: Harvest or Hunter’s Moon
- November: Beaver Moon
- December: Cold Moon
These names are often embraced by popular science media, sometimes leading to sensationalized titles. For example, a Full Moon in January coinciding with a Lunar Eclipse and Supermoon might be dubbed a “Super Wolf Blood Moon.” This catchy phrase combines “super” for proximity to Earth, “wolf” for January, and “blood” for the lunar eclipse’s red color.
Such dramatic naming conventions, while attention-grabbing, are now commonplace in science communication. Imagine a Lunar Eclipse in December; it might be heralded as a “Cold Blood Moon.” Add “Super” if it’s also a Supermoon, and the title becomes even more sensational.
While these names can be informative and engaging, it’s important to understand the astronomical events behind them and not get solely caught up in the hype.
Moon over Cappadocia
Alt text: Wide-angle landscape photo of a full moon rising over the unique rock formations of Cappadocia, Turkey, showcasing how the moon can be integrated into travel and landscape photography, captured with Nikon Z7 and 24-70mm lens.
Essential Moon Photography Basics: Setting the Stage
With a grasp of moon phases and lunar phenomena, let’s explore the fundamental steps for capturing compelling moon photographs. Here’s a summary of key considerations:
- Close-up vs. Foreground Context: Decide whether you want a detailed close-up of the moon or to incorporate it within a broader scene with a foreground. Close-ups demand specialized equipment, while foreground shots are more accessible.
- Moon Phase Selection: Consider which moon phase best suits your photographic vision. Each phase offers unique lighting and shadow patterns, dramatically altering the moon’s appearance. While the Full Moon is popular, it’s not always ideal for showcasing lunar surface detail.
- Strategic Planning: Meticulous planning is paramount in moon photography. Successful shots hinge on considering moon phases, weather conditions, moonrise/set times, location relative to subjects, gear, and camera settings. Planning is crucial, especially for rare lunar events.
- Gear Assessment: Evaluate your camera equipment to determine what type of moon photography is achievable. Gear significantly influences the potential for capturing detailed moon images.
- Optimal Camera Settings: Understanding the right camera settings is vital, particularly when using long telephoto lenses. Incorrect settings can lead to blurry images due to camera shake or motion blur.
- Post-Processing Importance: Raw moon images often appear flat. Basic post-processing is usually necessary to enhance details, sharpness, and overall visual impact. Advanced techniques like blending, stacking, and sharpening can further elevate image quality.
- Composite Image Caution: If creating composite images, strive for realism. Avoid pasting oversized moons into wide-angle landscapes, which often looks unnatural. Ensure consistent lighting and shadow direction between the moon and foreground elements.
Let’s delve into each of these aspects in greater detail to equip you with the knowledge and techniques for successful moon photography.
Photographing the Moon with Foreground Elements: Context and Composition
Integrating the moon with foreground elements adds context and storytelling to your lunar images. This approach can range from capturing the moon rising over a landscape to placing it behind a recognizable landmark. Shooting the moon with a foreground can be achieved in daylight or low-light conditions, each requiring different techniques.
Capturing the Moon in Daylight: Simplicity and Balance
Photographing the moon in daylight is surprisingly straightforward. Because both the moon and the surrounding environment are brightly lit, achieving a balanced exposure in a single shot is easily manageable. Standard camera settings and even smartphone cameras can yield excellent results.
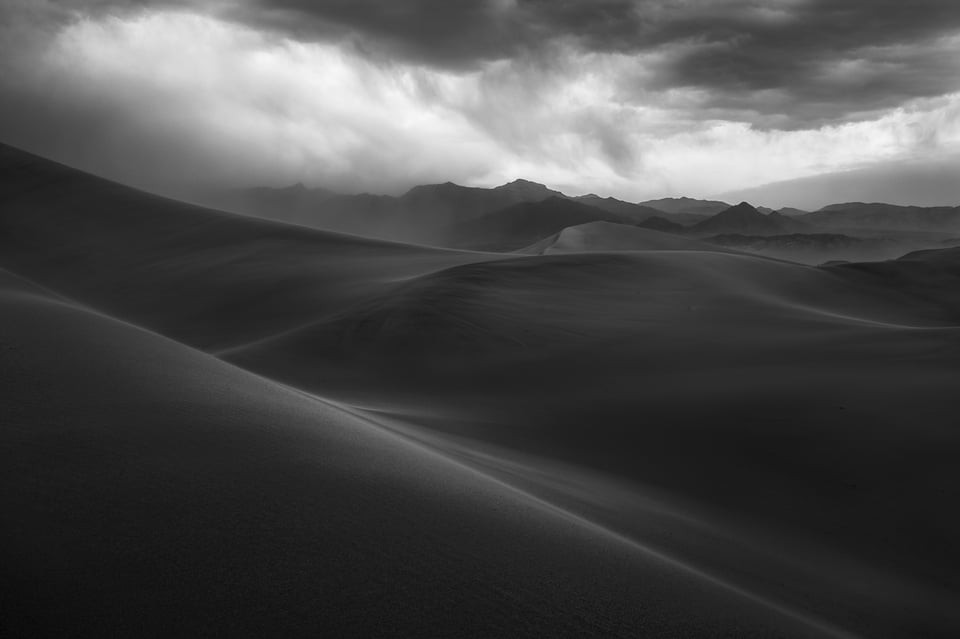
Image of the moon over mountains at sunset – how to photograph the moon
Alt text: Sunset scene with the moon visible above distant mountains in Death Valley, demonstrating daylight moon photography and composition techniques, captured with Canon EOS R.
When using wide-angle lenses, the moon will appear small in the frame. To enlarge the moon, utilize your lens’s optical zoom. However, zooming in also magnifies the foreground, altering the overall composition. You might need to adjust your framing to maintain a balanced image, as demonstrated in the image above.
While digitally enlarging the moon in wide-angle shots is possible, it often results in an artificial appearance. Strive for in-camera compositions that naturally integrate the moon into the scene.
Low-Light Moon Photography with Foreground: Exposure Blending
Photographing the moon with a foreground in low-light conditions presents more challenges due to significant exposure differences. The moon is considerably brighter than the dimly lit foreground, especially during darker moon phases or in heavily shaded environments.
If you expose for the moon to capture its details, the foreground will likely be underexposed and appear too dark. Conversely, exposing for the foreground will overexpose the moon, rendering it a bright, featureless blob.
The solution is to employ exposure blending. This technique involves capturing two or more images: one exposed for the moon, capturing its detail, and another exposed for the foreground, illuminating the landscape. These images are then digitally merged in post-processing software like Photoshop to create a single, balanced image, as shown below:
Moon Blended Image Horizon – moon photography
Alt text: Composite image created by blending two exposures: one for the moon and one for the foreground landscape at twilight, showcasing balanced exposure in challenging lighting conditions, captured with Sony A7R II and 70-200mm lens.
When incorporating the night sky, such as the Milky Way, with the moon, the exposure challenges intensify. The vast difference in brightness between the moon and faint stars requires careful consideration.
For a small, waning moon in a wide-angle shot, capturing both the moon and Milky Way in a single exposure is sometimes achievable:
Milky Way Moonrise
Alt text: Nightscape photograph capturing a waning crescent moon rising alongside the Milky Way, demonstrating single-exposure night sky photography with a subtle lunar element, captured with Canon EOS 5DS R and 24-70mm lens.
However, blending exposures in such scenarios can be complex. The bright moon can introduce artifacts like ghosting and lens flare, and its light can significantly brighten the sky, potentially washing out fainter stars. Full or near-full moons can severely limit star visibility, especially in less-than-perfect atmospheric conditions.
Close-Up Moon Photography: Revealing Lunar Details
Capturing detailed close-up images of the moon is a rewarding pursuit for photographers interested in lunar surface features. The level of detail achievable depends on equipment, atmospheric conditions, and technique. Extreme close-ups require long super-telephoto lenses or telescopes coupled with high-resolution cameras.
Optimal conditions for close-up moon photography often involve venturing away from urban areas to locations with minimal light and air pollution, ideally at higher elevations.
Crescent Moon
Alt text: High-magnification photograph of a crescent moon, showcasing detailed lunar surface texture and crater definition achieved with telephoto lens and teleconverter, captured with Nikon D300 and 200-400mm lens.
Weather conditions are critical. Atmospheric haze, dust, smoke, and moisture can significantly degrade image quality, blurring lunar details. Heat waves, particularly on warm nights, can also distort the moon’s image, making it difficult to capture sharp features.
Ideally, minimize the distance and atmospheric interference between your camera and the moon for optimal results. Clear, cold nights are often best for close-up moon photography.
The subsequent sections will primarily focus on techniques and equipment for capturing detailed close-up moon photographs.
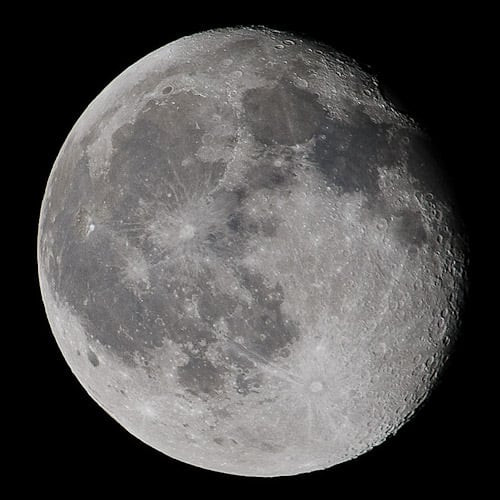
Moon Phase Selection: Shaping Lunar Photography
While the Full Moon is a popular subject, it’s important to understand that it’s not always the most ideal phase for showcasing lunar surface details. During a Full Moon, the sun directly illuminates the moon from our perspective, minimizing shadows. This front-lighting effect flattens the moon’s surface, reducing the visibility of craters and other topographical features. The result is often a less textured, somewhat “flat” looking moon, as seen below:
Full Moon
Alt text: Image of a full moon demonstrating the lack of shadows and flattened appearance due to direct frontal sunlight, highlighting the challenge of capturing surface detail during this phase, captured with Nikon D7000 and 400mm lens.
For photographers new to moon photography, capturing a Full Moon is a good starting point. It provides a valuable learning experience and yields an image that can be used in various creative projects.
However, to truly appreciate the moon’s surface details, explore photographing it during other phases. Phases other than the full moon, such as crescent or gibbous, reveal dramatic differences in surface texture and detail. The oblique lighting during these phases casts shadows that accentuate craters, mountains, and other lunar features, creating more visually compelling and informative images.
Waning Gibbous Moon, Close to Last Quarter
Alt text: Detailed photograph of a waning gibbous moon phase near the last quarter, showcasing rich surface detail and shadow play that enhances the visibility of craters and lunar topography, captured with Nikon Z7 and 600mm lens.
Once you’ve decided on the desired moon phase, meticulous planning is the next crucial step.
Planning Your Moon Photography Session: Key Preparations
Effective planning is indispensable for capturing stunning moon photographs. For regular moon photography, careful planning enhances your chances of success. For rare lunar events like Supermoons or Lunar Eclipses, planning becomes absolutely critical to avoid missing these unique opportunities.
Photographing a Lunar Eclipse, for example, is a more technically demanding endeavor than standard moon photography. It requires specific techniques and careful preparation. Ultra-rare events like Solar Eclipses demand even more rigorous planning and safety precautions.
Weather Monitoring: Ensuring Clear Skies
Checking weather forecasts is an obvious but vital step. Clear skies in the direction of the moon are essential for sharp, detailed moon photographs. While some cloud cover can add artistic interest to wide-angle moon shots, heavy clouds, haze, or atmospheric moisture are detrimental, especially for close-up lunar photography.
High humidity and air pollution, especially prevalent in urban areas and during hot weather, can significantly degrade image quality, causing blur and loss of detail. Heat waves are particularly problematic at long focal lengths, distorting the moon’s appearance. Colder nights generally offer better atmospheric clarity for close-up moon photography.
Utilizing Apps and Websites for Lunar Planning
Leverage specialized apps and websites to pinpoint moon phases, moonrise/set times, and optimal viewing locations. Some apps even incorporate augmented reality features, overlaying the moon’s projected position onto your live camera view for precise composition planning.
Useful online resources for moon photography planning include:
- Time and Date (timeanddate.com): Provides detailed moon phase calendars, moonrise/set times, and eclipse information for any location.
- The Photographer’s Ephemeris (photoephemeris.com): A web and app-based tool for visualizing the position of the sun and moon at any location and time, ideal for landscape photography planning.
Recommended mobile apps for moon photography:
- PhotoPills (photopills.com): A comprehensive photography planning app with augmented reality features for visualizing moon and sun positions, depth of field, time-lapse calculations, and more.
- Planit! for Photographers (planitphoto.com): Another powerful planning app offering similar functionalities to PhotoPills, including augmented reality moon and sun positioning, long exposure calculations, and other tools.
On location, use these apps to determine the precise position of the moon relative to your foreground subject, enabling you to fine-tune your composition.
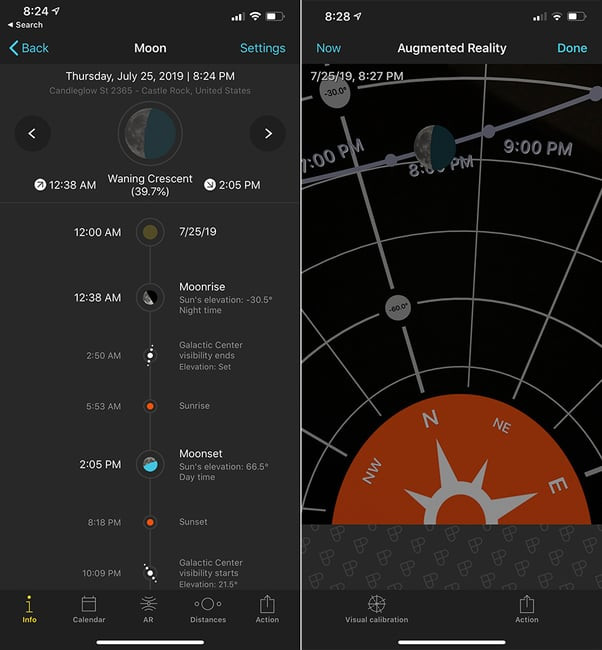 Photo-Pills-Screenshot
Alt text: Screenshots from the Photo Pills app on iOS, demonstrating its moon phase calendar and augmented reality feature for visualizing moon positions in real-time for photography planning.
The Augmented Reality feature in apps like PhotoPills is particularly valuable. You can stand at your intended shooting location, set the date and time to your desired moon phase, and the app will overlay the moon’s predicted path onto your scene, allowing precise compositional adjustments.
Compositional Considerations: Framing the Moon
If your goal is to photograph the moon with a foreground, thoughtful composition is crucial. The type of composition will depend largely on the relative size of the moon in your frame, which is controlled by your lens focal length.
Wide-angle lenses capture a broad scene, making the moon appear small. In these compositions, the moon often acts as a supporting element, adding interest and scale to the overall image.
Moon Above Mountains on iPhone
Alt text: Landscape photograph captured with an iPhone, showing a small moon positioned above the Artist’s Palette in Death Valley, illustrating wide-angle moon photography within a scenic context, captured with iPhone XS Max.
Telephoto lenses, conversely, magnify the moon, making it a more dominant subject. In these shots, the moon can become the primary or secondary focal point, with the foreground serving to enhance its presence and context.
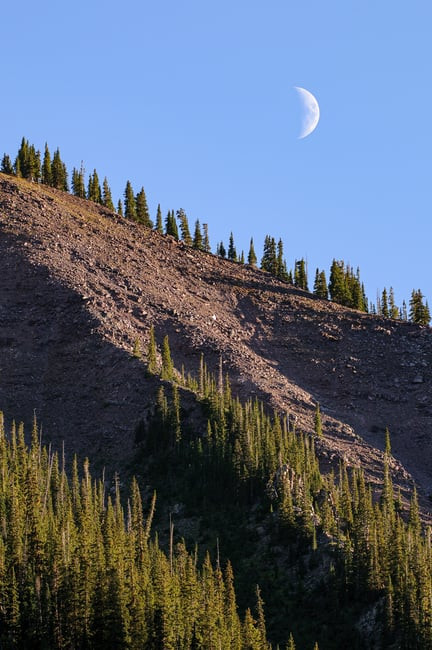 Crescent Moon Rising Over Mountain with Trees
Alt text: Telephoto photograph of a crescent moon rising behind a layered mountain range with silhouetted trees, emphasizing the moon as a prominent subject in the composition, captured with Nikon D300 and 200-400mm lens.
Camera Gear Preparation and Pre-Shoot Testing
Once you’ve scouted your location and determined moonrise/set positions, prepare your camera gear and conduct pre-shoot tests. Familiarize yourself with your equipment and practice setting up in advance, especially in low-light conditions.
Contents that will fit in a Lowepro Pro Roller x200 Roller Bag
Alt text: Image showcasing a range of camera equipment laid out, emphasizing the importance of gear preparation for photography outings, including cameras, lenses, and accessories.
For general moon photography, testing your setup anytime is feasible. However, for time-sensitive events like Lunar Eclipses, advance preparation is crucial. For extremely rare events like Solar Eclipses, even more extensive planning and specialized equipment are necessary.
Essential Camera Equipment for Moon Photography: Gear Up
The ideal camera equipment for moon photography varies depending on your desired outcome. Smartphones and basic cameras with wide-angle lenses are suitable for capturing the moon within a broader scenic context. However, detailed close-up moon photography demands more specialized gear.
Compact cameras with powerful zoom lenses, interchangeable lens cameras paired with super-telephoto lenses, or digital cameras mounted on telescopes are all capable of capturing the moon in greater detail. Equatorial trackers can further enhance image quality by automatically compensating for the moon’s movement across the sky.
Cameras and Lenses: Key Components
While a vast array of cameras, lenses, and telescopes exist, here’s a list of fundamental equipment for close-up moon photography:
- Camera and Lens:
- Interchangeable lens camera with a 300mm+ telephoto lens (35mm equivalent) or a point-and-shoot camera with high optical zoom.
- Tripod: A sturdy tripod is essential for stability.
- Remote Shutter Release (Optional): Minimizes camera shake. A self-timer can also be used.
For detailed moon images, a high-quality telephoto lens with a focal length of 300mm or greater is recommended. Longer focal lengths provide greater magnification.
Teleconverters can extend lens focal length. A 1.4x teleconverter increases a 300mm lens to 420mm, while a 2.0x teleconverter extends it to 600mm. However, teleconverters can slightly reduce lens sharpness and maximum aperture. A 1.4x teleconverter on a Nikon 300mm f/4 PF lens, for example, turns it into a 420mm f/5.6 lens. Due to potential sharpness degradation, 2.0x teleconverters are generally less recommended for high-quality moon photography.
Nikon 800mm vs 600mm vs 500mm
Alt text: Size comparison of Nikon’s 800mm, 600mm, and 500mm super-telephoto lenses, illustrating the physical scale and magnification capabilities of long lenses for wildlife and moon photography.
High-quality zoom lenses, such as Sigma and Tamron’s 150-600mm models, offer a more versatile and often more affordable alternative to prime super-telephoto lenses. Nikon’s 200-500mm f/5.6E VR is also an excellent option.
For maximizing “reach,” cameras with smaller sensors (APS-C or Micro Four Thirds) can be advantageous. These sensors provide a crop factor, effectively increasing the lens’s magnification compared to full-frame cameras. For example, a 300mm lens on an APS-C camera acts like a 450mm lens in terms of field of view.
Point-and-shoot cameras with extreme zoom capabilities, like the Nikon P900 (24-2000mm equivalent), are remarkably capable for moon photography, offering significant zoom range at a relatively affordable price.
For the ultimate in moon photography, consider using a telescope with a camera adapter. While basic telescope setups can be cost-effective, advanced astronomical telescopes with equatorial mounts and cooled CCD cameras are specialized and expensive, typically used by dedicated astrophotographers for deep-sky imaging and detailed lunar surface studies.
Tripods and Accessories: Stability is Key
Camera shake is a major concern at long focal lengths. A robust tripod is essential for sharp moon photographs, especially with lenses exceeding 300mm.
For very long lenses, advanced tripod stabilization techniques are recommended. A solid tripod head is also crucial for smooth and precise adjustments as the moon moves across the sky. Geared pan-and-tilt heads are often preferred over ball heads for moon photography due to their fine-tuning capabilities. The Manfrotto 405 is a heavy-duty geared head, while the Manfrotto 410 is a lighter, more affordable option.
 Manfrotto 405 Geared Head
Alt text: Close-up image of a Manfrotto 405 geared tripod head, highlighting its precision adjustment knobs and robust construction, emphasizing its suitability for precise photographic adjustments.
A remote shutter release or cable release further minimizes camera shake by allowing you to trigger the shutter without physically touching the camera. For DSLR users, mirror lock-up combined with a remote release can reduce mirror-induced vibrations.
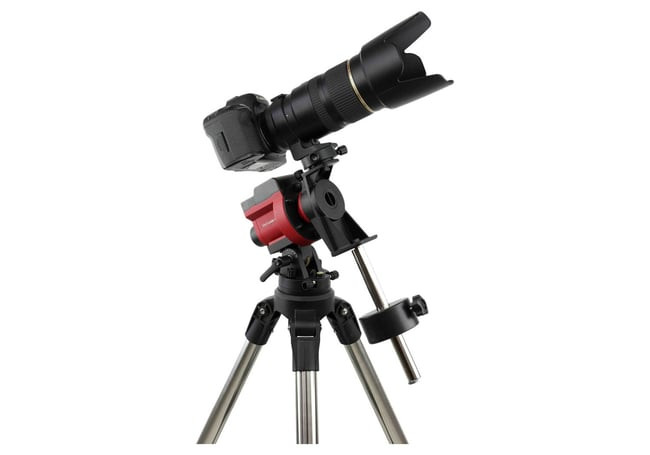
Equatorial Trackers: Advanced Tracking
While not strictly necessary for basic moon photography due to the moon’s brightness and ability to use fast shutter speeds, an equatorial tracker can be beneficial, especially at very long focal lengths. Trackers automatically compensate for the Earth’s rotation, keeping the moon centered in your frame and allowing for longer exposures if needed (though typically not for moon photography itself, but potentially for very faint earthshine). The iOptron SkyGuider Pro is a recommended equatorial tracker known for its ease of use and solid performance.
Equatorial Tracker
Alt text: Image of an equatorial tracker setup, showing a camera mounted on a tracking base, illustrating the equipment used for astrophotography to compensate for Earth’s rotation and enable longer exposures.
Optimal Camera Settings for Moon Photography: Dialing In
For photographing the moon in isolation, filling the frame with lunar detail, the following camera settings provide a solid starting point. Mount your telephoto lens, secure your camera on a tripod, and aim at the moon.
Recommended camera settings for general moon photography:
- Image Format: RAW (if available) for maximum post-processing flexibility.
- Camera Mode: Manual (M) mode for full control.
- ISO: Base ISO (typically ISO 100) for minimal noise. Disable Auto ISO.
- Aperture: f/11 as a starting point.
- Shutter Speed: 1/100 second as a starting point.
- White Balance: Daylight (can be adjusted in RAW processing).
- Focus: Manual focus. Use live view and zoom to achieve sharp focus on the moon, then switch to manual focus to lock it.
- Image Stabilization: Off (when using a tripod).
- Camera Shake Reduction: Enable Mirror Lock-Up (MLU) on DSLRs and Electronic Front Curtain Shutter (EFCS) if available to minimize vibrations.
These settings are loosely based on the “Looney 11 rule,” but adjustments are usually needed for optimal results.
Adjust shutter speed based on moon brightness. If overexposed, use faster shutter speeds (e.g., 1/200 sec). If underexposed, use slower speeds (e.g., 1/50 sec). You can also widen the aperture (e.g., f/8 or f/5.6) or increase ISO (e.g., ISO 200 or 400) to brighten the image, but be mindful of potential noise at higher ISOs. The moon’s rapid movement necessitates relatively fast shutter speeds, especially at long focal lengths.
Bracketing exposures is highly recommended to capture the full dynamic range of the moon. Shoot a series of images at different exposures (e.g., -1 stop, 0 stop, +1 stop). These can be merged in post-processing using HDR techniques to create an image with detail in both highlights and shadows.
The Blue Mosque
Alt text: Night photograph of the Blue Mosque in Istanbul with a full moon in the background, demonstrating exposure bracketing to capture detail in both the brightly lit mosque and the moon, captured with Fuji X-Pro2 and 56mm lens.
Enable Electronic Front Curtain Shutter (EFCS) in your camera settings if available to further reduce shutter shock.
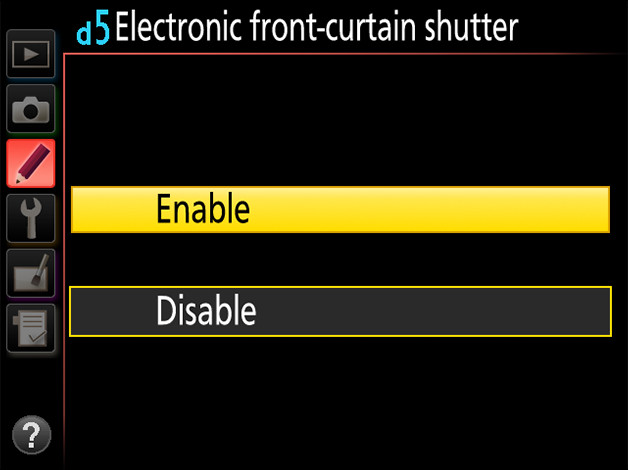 Nikon Electronic Front Curtain
Use a remote shutter release or self-timer to minimize camera shake during exposure. For lenses longer than 300mm, consider enabling Exposure Delay Mode in conjunction with a timer.
Set your camera’s metering mode to spot metering, placing the metering point directly on the moon. Monitor the exposure indicators and adjust settings accordingly to achieve proper moon exposure.
Achieving Sharp Focus on the Moon: Critical Technique
Precise focusing is crucial for sharp moon photographs. Using your camera’s live view feature is highly recommended for accurate manual focusing.
Engage live view to display the sensor’s image on the rear LCD. Zoom in digitally on the moon as much as possible. Attempt autofocus first, as many cameras can autofocus on the moon in live view. If autofocus struggles, try focusing on the moon’s edge or a prominent crater. If autofocus fails, switch to manual focus and carefully adjust the focus ring until the moon appears critically sharp on the zoomed-in live view display.
Some DSLRs may initially display the moon as a white blob in live view. If this occurs, adjust shutter speed to a faster setting until lunar features become visible. If adjusting shutter speed doesn’t help, check your camera’s manual for instructions on disabling automatic exposure boosting in live view, as this can overbrighten the display. On Nikon DSLRs, pressing the OK button in live view often resolves this.
Mirrorless and point-and-shoot cameras inherently display the sensor’s image on the LCD, so live view activation isn’t necessary. Zoom in digitally, then use autofocus or manual focus as described above.
Once focus is critically sharp, disable autofocus completely. Switch your lens to manual focus mode using the lens’s focus mode switch or via camera menu settings. This prevents accidental focus shifts while shooting.
The Looney 11 Rule and Exposure Refinements
The “Looney 11 rule” provides a basic guideline for moon exposure: set aperture to f/11 and shutter speed to the reciprocal of the ISO value (e.g., ISO 100, shutter speed 1/100 sec at f/11).
However, this rule is a simplified starting point and may not be optimal for modern digital cameras and lenses. Moon brightness varies with atmospheric conditions, moon phase, and altitude.
The f/11 aperture in the Looney 11 rule can introduce diffraction, especially on cameras with smaller sensors, reducing image sharpness.
Shutter speed of 1/100 sec at ISO 100 may be too slow for long telephoto lenses, increasing risk of camera shake-induced blur.
A better approach is to start with a wider aperture, such as f/5.6, which is typically sharper than f/11 and allows for faster shutter speeds, reducing camera shake. This wider aperture will also gather more light, potentially allowing for lower ISO settings.
Crescent-Moon-with-Venus
Alt text: Photograph of a crescent moon alongside Venus, illustrating moon photography in conjunction with other celestial objects, captured with Nikon D750 and 300mm lens.
Some lens and teleconverter combinations might require stopping down to f/8 or f/11 for optimal sharpness, but generally, using the widest sharp aperture of your lens is preferable to stopping down to f/11 unnecessarily.
Experiment with aperture and shutter speed combinations to find the best exposure and sharpness balance for your specific equipment and conditions.
Photographing a Supermoon: Capturing Extra Lunar Luminosity
Photographing a Supermoon follows the same principles as regular moon photography. In fact, a Supermoon, being larger and brighter, can be slightly easier to photograph. Use the same settings and techniques as described earlier.
The Supermoon of 06-23-2013 – how to Photograph the Moon
Alt text: Image of the Supermoon of June 23, 2013, showcasing the increased size and brightness of a Supermoon compared to typical full moons, captured with Nikon D800E and 500mm lens.
For the Supermoon image shown, a shutter speed of 1/250 sec at ISO 200 was used, sufficient for sharpness in calm conditions. A Nikon 500mm f/4G VR lens with a 2x teleconverter (1000mm f/8) was used, stopped down to f/13 for improved sharpness due to the teleconverter.
Capturing Earthshine: Revealing the Moon’s Dark Side
Earthshine is the faint illumination of the moon’s dark side caused by sunlight reflected off the Earth. Capturing earthshine requires exposing for the shadowed portion of the moon, which will significantly overexpose the sunlit portion. However, with a very thin crescent moon, earthshine can become visible even at moderate shutter speeds:
Crescent moon and Venus with some foreground
Alt text: Photograph of a crescent moon with Venus, showcasing visible earthshine faintly illuminating the dark portion of the moon, captured with Nikon D850 and 70-300mm lens.
In most cases, capturing prominent earthshine will lead to extreme overexposure of the bright part of the moon. Long exposures needed for earthshine can also introduce motion blur due to the moon’s movement, especially with long lenses.
Moon Photography with Smartphones: Mobile Lunar Captures
Photographing the moon with smartphones is possible, but limitations exist, primarily in zoom capability and precise exposure control. Most smartphones have wide-angle lenses, not ideal for close-up moon photography.
iPhone Moon Photography Tips
iPhones with single-lens cameras are best suited for capturing the moon as a small element within a wider scene due to their wide field of view. At night, the moon may appear as a small white blob with a wide-angle lens.
iPhones with dual or multi-camera systems (iPhone 7 Plus and later) offer telephoto lenses, improving moon photography potential.
To photograph the moon with an iPhone:
- Zoom in digitally as much as possible on the moon.
- Tap the screen to focus on the moon.
- Use the brightness slider (yellow box with sun icon) to reduce exposure until lunar features become visible.
Even with a telephoto lens and digital zoom, the moon will appear relatively small in iPhone photos compared to dedicated camera setups.
iPhone-Moon-Photography-Brightness-Adjustment
Android Phone Moon Photography Tips
Android phones face similar challenges. However, many Android camera apps offer more manual controls, including shutter speed adjustment, which can be advantageous for moon photography.
If your Android phone has a telephoto lens, use it for moon photography. In your camera app, manually adjust shutter speed to properly expose the moon. Lower ISO to minimum and open aperture to maximum if aperture control is available.
Using binoculars or a telescope to magnify the moon in conjunction with a smartphone can improve results, but image quality may be limited by chromatic aberration and distortion. Smartphone lens accessories offering improved zoom capabilities are available but may not deliver professional-quality results.
Exposure Differences: Foreground and Moon Blending Case Study
When photographing the moon with a foreground in low light, exposure blending is often necessary due to the vast brightness difference. Capture separate images: one exposed for the foreground and one for the moon.
Example: Two exposures of a scene with a foreground object and moon:
 Moon properly exposed
Combine these exposures in Photoshop or similar software. Mask out the overexposed moon in the foreground-exposed image and reveal the properly exposed moon from the moon-exposed image. Blending the edges smoothly is key to a realistic composite. If the sky is similarly dark in both images, the blending process is simplified.
Combined shot
Alt text: Composite image created by blending two separate exposures, one for the foreground and one for the moon, to achieve balanced exposure in both elements, captured with Nikon D700 and 420mm lens.
Fireworks with the Full Moon
Alt text: Composite image of fireworks with a full moon in the background, illustrating creative possibilities with moon photography and digital blending techniques.
Post-Processing Your Moon Photos: Enhancing Lunar Detail
Post-processing is almost always beneficial to enhance moon photos, regardless of initial image quality. Even subtle adjustments can significantly improve lunar detail and visual impact.
Example: Moon photo straight out of camera vs. post-processed version:
 Moon photo straight out of the camera
Moon photo edited in Photoshop
Basic Photoshop adjustments for moon photos:
- Curves Adjustment: Apply a “Medium Contrast” preset in Curves for initial contrast enhancement.
- Unsharp Mask Sharpening: Apply Unsharp Mask filter with settings like 150% Amount, 1.0 pixel Radius, and 0 Threshold for detail sharpening.
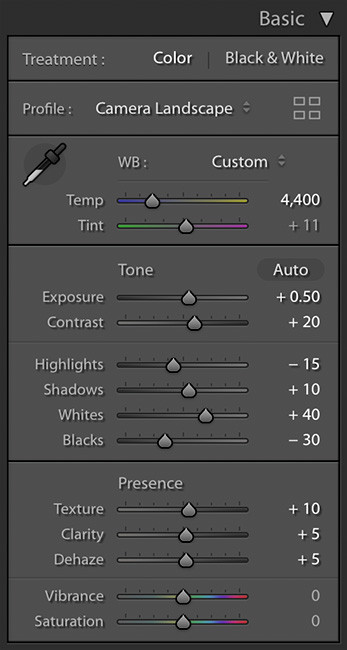
Lightroom adjustments for moon photos:
- Camera Profile: “Camera Landscape” profile often works well for Nikon cameras.
- White Balance: Start with “Daylight” and adjust “Temperature” slider cooler if needed.
- Contrast: Increase Contrast (10-20).
- Highlights: Reduce Highlights slightly (under -15).
- Shadows: Minor Shadows adjustments to avoid flattening image.
- Whites/Blacks: Increase Whites (+20 to +40), decrease Blacks (-20 to -30) for contrast.
- Texture, Clarity, Dehaze: Increase Texture (+10), Clarity (+5 to +10), and Dehaze (+5 to +10) to enhance surface detail.
- Lens Corrections: Enable “Remove Chromatic Aberration” and “Enable Lens Corrections.”
- Sharpening (Detail Panel): Apply sharpening with Radius 2.0, Detail 50, Amount 40, and use Masking to sharpen only edges and reduce noise.
 Lightroom Sliders for post-processing the Moon
Moon Photography FAQs: Addressing Common Questions
Why Photograph the Moon?
The moon is a beautiful and unique celestial object, readily accessible and photographically interesting. It adds intrigue to night skies and offers diverse photographic opportunities across its phases. Moon photography is also a valuable learning experience for nighttime and telephoto techniques.
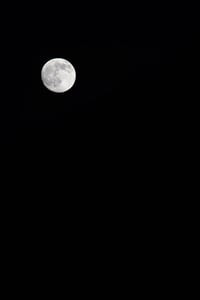
Why Does the Moon Look Smaller in Pictures?
The moon often appears smaller in photos than perceived visually because wide-angle lenses capture a broader field of view, making distant objects like the moon appear smaller in relation to the foreground. Human vision approximates a 50mm lens, so using wider lenses will result in a smaller moon depiction. The “Moon Illusion,” where the moon seems larger near the horizon, also contributes to this perceived size difference.
Moonrise Mesquite Dunes
Alt text: Landscape photograph of moonrise over Mesquite Dunes, Death Valley, illustrating the moon’s relatively small size in wide-angle landscape compositions, captured with Nikon Z6 and 24-70mm lens.
Why Does the Moon Appear as a White Blob?
The moon appears as a white blob when overexposed. At night, cameras often meter for the darker scene, overexposing the much brighter moon. During daytime, moon brightness is closer to the sky, avoiding overexposure issues. Human eyes have greater dynamic range than cameras, allowing us to see both bright and dark areas more effectively.
Which Camera Gear is Best for Moon Photography?
Any camera can photograph the moon. For close-ups, telescopes with camera mounts, compact superzoom cameras (like Nikon P900), or interchangeable lens cameras with super-telephoto lenses are suitable. Super-telephoto lenses, while often costly, offer versatility and high image quality.
How Do I Take Sharp Pictures of the Moon?
Sharp moon photos require a stable setup (tripod), proper focus, and minimizing camera shake. Use optimal lens aperture for sharpness and consider image stacking software to reduce atmospheric turbulence effects.
Summary: Steps to Photograph the Moon
Time needed: 15 minutes
Follow these steps and settings to photograph the moon effectively:
-
Use a Long Zoom Lens: 300mm+ focal length (35mm equivalent) for best results.
-
Set Camera to Manual Mode (M).
Alt text: Camera mode dial icon for Manual mode, indicating the setting for full manual camera control.
-
Set ISO to 100 (Base ISO).
-
Set Aperture to f/11 (Starting Point).
 Nikon 500mm f5.6E PF ED VR
 -
Set Shutter Speed to 1/100th Second (Starting Point).
-
Set Lens to Manual Focus and Focus Manually (using Live View). Disable autofocus after focusing.
 Gaffers Tape
 -
Capture the Moon: Review and adjust settings as needed for optimal results.

