The aurora borealis, or Northern Lights, is a celestial spectacle that tops many photographers’ bucket lists. Capturing its ethereal beauty requires preparation, the right equipment, and know-how. This guide, updated for 2025, provides all the essential techniques to help you take breathtaking photos of the aurora borealis.
Whether you’re a beginner or an experienced photographer, mastering aurora photography involves understanding camera settings, gear recommendations, and strategic planning. Let’s dive into the details and illuminate your path to capturing stunning northern lights images.
Essential Camera Equipment for Aurora Photography
To effectively photograph the northern lights, having the right gear is crucial. This section outlines the necessary equipment, focusing on cameras, lenses, tripods, and accessories that will enhance your aurora photography experience. For specific brand and model recommendations, refer to our detailed guide on star photography cameras and lenses.
Choosing the Best Camera for Northern Lights Photography
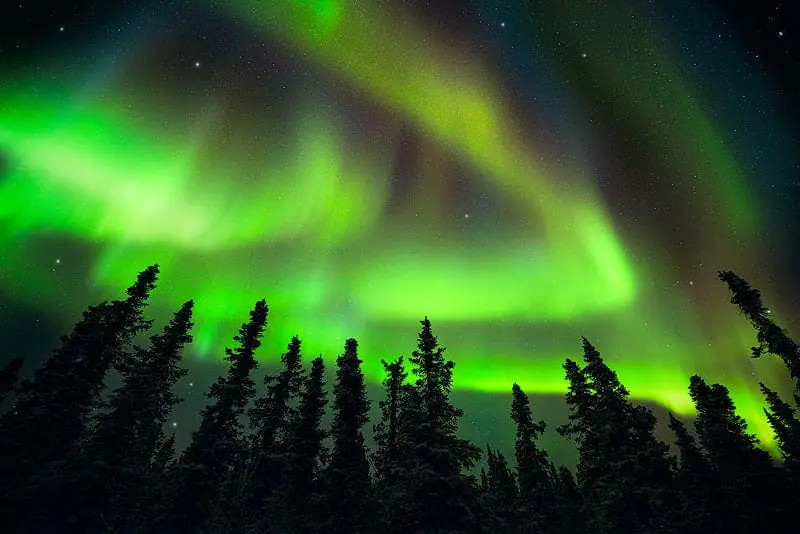 Northern lights display in Alaska, showcasing vibrant green and purple hues dancing across the night sky.
A camera equipped with manual mode is indispensable for aurora photography. Manual mode grants you complete control over crucial settings like aperture (f-stop), shutter speed, and ISO, all of which are adjusted independently to capture the faint and dynamic aurora.
While crop sensor cameras can be used, full-frame cameras are highly recommended for superior image quality in low-light conditions. Full-frame sensors capture more light, resulting in images with less noise and greater detail, essential for night sky photography. The Nikon Z7 is an excellent example of a full-frame camera ideal for aurora chasing.
Pro Tip: Always bring several fully charged batteries – at least 3-5 – for your aurora shoots. Cold temperatures drain batteries quickly, and you don’t want to miss capturing a spectacular aurora display due to power issues.
Selecting the Ideal Lens for Aurora Photography
A wide-angle lens is paramount for capturing the expansive beauty of the northern lights stretching across the landscape. The wide field of view allows you to encompass both the foreground and the vast aurora overhead, creating immersive and dramatic compositions.
For aurora photography, lenses with a minimum aperture ranging from f/2.8 to f/4 are recommended. These wide apertures are crucial for letting in as much light as possible in a short amount of time, which is vital for capturing the often faint aurora.
- Full-frame cameras: Opt for focal lengths between 14mm and 30mm.
- Crop sensor cameras: Choose focal lengths between 10mm and 25mm to achieve a similar field of view.
Shooting at f/2.8 maximizes the light reaching your camera’s sensor, which is essential for capturing detail and minimizing noise. The Nikkor 14-24mm f/2.8 lens is a top choice for night sky photographers due to its sharpness and wide aperture.
The Importance of a Sturdy Tripod for Sharp Aurora Photos
 Photographer setting up a carbon fiber tripod in a snowy landscape under the northern lights, emphasizing stability for long exposures.
A robust tripod is non-negotiable for sharp aurora photography. Long exposure times are necessary to capture the faint light of the aurora, and any camera movement during the exposure will result in blurry images.
Carbon fiber tripods are highly recommended due to their superior vibration dampening and lightweight nature. They minimize vibrations caused by wind or accidental bumps, ensuring sharper images. Cheaper tripods might be usable, but often lack the stability required for long exposures in potentially windy conditions.
It’s also crucial to use a tripod head that locks firmly and doesn’t drift or move during long exposures. Ball heads with independent pan and tilt locks are ideal for precise adjustments and stability. The Feisol Tournament CT-3342 3-Tripod paired with a Really Right Stuff BH-30 Ball head & L-Bracket is a professional-grade setup known for its stability and reliability.
Intervalometer: Is it Necessary for Aurora Photography?
For northern lights photography, an intervalometer is generally not required. Since your exposures will typically be within the 1 to 30-second range, you won’t need the extended exposure times that necessitate an intervalometer.
However, minimizing camera shake is still paramount for achieving sharp images. Instead of an intervalometer, utilize your camera’s Exposure Delay Mode or self-timer. Setting a 5-second delay ensures that any vibrations from pressing the shutter button dissipate before the exposure begins, resulting in sharper, clearer aurora photos.
Planning Your Aurora Photography Shoot for Success
Effective planning significantly increases your chances of capturing stunning aurora images and avoids wasted nights under unproductive skies. This section outlines a three-step approach to planning your aurora shoot, focusing on finding dark skies, clear skies, and optimal aurora activity.
Step 1: Locating Dark Skies Away from Light Pollution
The absence of light pollution is fundamental for seeing and photographing the aurora borealis effectively. Light pollution from cities and towns can severely diminish the visibility of the aurora, washing out its subtle colors and details.
The Blue Marble Light Pollution Map, a collaboration between Google and NASA, is an invaluable tool for identifying dark sky locations. This map clearly indicates areas with minimal light pollution (black zones) and areas with significant light pollution (white and gray zones).
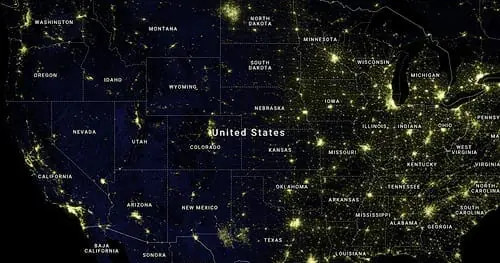 Light pollution map highlighting dark sky areas ideal for stargazing and aurora viewing.
For the most vivid aurora colors and detailed images, always aim to shoot in areas designated as black or dark blue on the light pollution map. Venturing away from urban centers into remote locations will reveal the full splendor of the northern lights.
Step 2: Ensuring Clear Skies for Aurora Visibility
Clear skies are just as crucial as dark skies for aurora photography. Cloud cover can completely obscure the aurora, regardless of its activity level. Checking cloud cover forecasts is an essential step in planning your shoot.
Aim for nights with low cloud cover percentages, ideally between 0% and 30%. You can find cloud cover forecasts on most local weather websites or dedicated meteorological services.
Many weather websites, like NOAA’s website for Fairbanks, Alaska, provide graphical representations of cloud cover forecasts, often depicted as a blue line indicating sky cover percentage. Monitoring these forecasts in the days leading up to your planned shoot will help you select the clearest night possible.
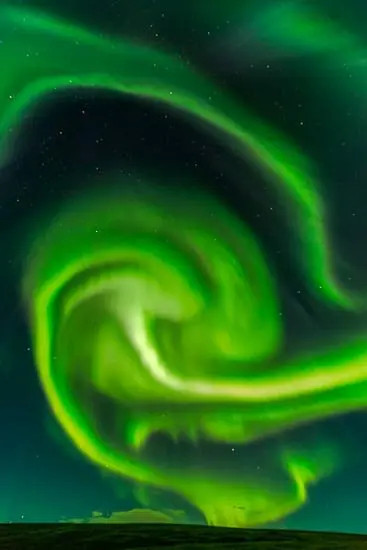
Step 3: Monitoring Aurora Activity for Optimal Displays
Even with dark and clear skies, a vibrant aurora display is not guaranteed. Aurora activity fluctuates and is influenced by solar activity. Checking aurora forecasts is the final, critical step in planning your shoot.
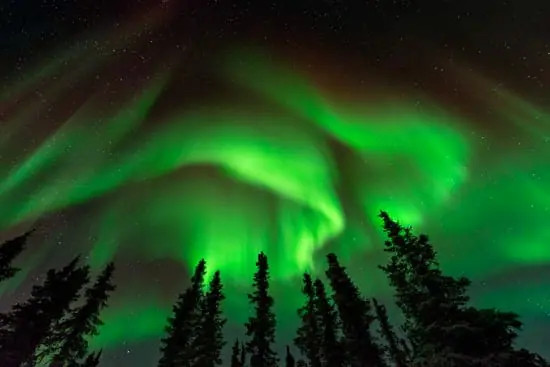
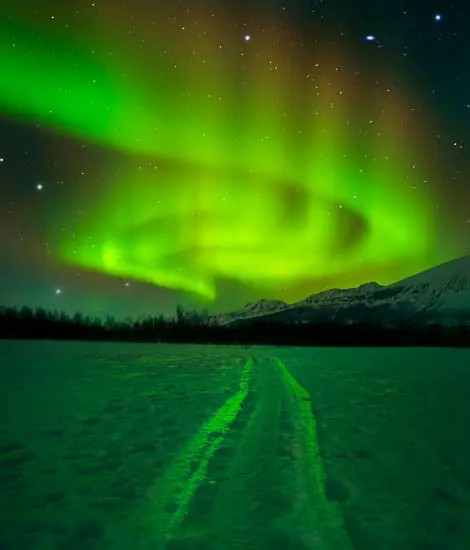
 Vibrant aurora borealis display over Icelandic landscape, showcasing strong green and red colors with reflections in water.
Most countries in the far north have their own aurora forecasting services. A key metric for aurora activity is the Kp-index, which ranges from 0 to 9. A Kp-index of 0 indicates very low activity, while 9 represents an intense geomagnetic storm and potentially spectacular aurora displays.
A Kp-index of 5 or greater is considered a geomagnetic storm. While impressive displays can occur even at Kp 2 or 3, aiming for nights with a Kp-index of 4 or higher is generally recommended for more vibrant and photographable aurora. The photo in this section was captured on a night with an exceptionally high Kp-index of 9.
Here are some reliable aurora forecasting websites:
- Space Weather Live OVATION Auroral Forecast: Offers a visually intuitive forecast of the auroral oval and real-time aurora activity updates.
- Iceland’s Vedur Aurora Forecast: Particularly useful for shooting in Iceland, but also applicable to Norway, Sweden, Greenland, and nearby locations.
- Space Weather Aurora Forecast: Provides a broader, multi-day aurora forecast overview from Space Weather, a reputable source for space weather information.
Regularly checking these forecasts in the days leading up to your planned shoot will maximize your chances of witnessing and photographing a memorable aurora display.
Mastering Focus for Sharp Night Sky Images
Achieving sharp focus in night photography, especially for the aurora, can be challenging due to the low light conditions. Since the aurora and stars are at a great distance, focusing at or near infinity is generally the goal.
While many lenses have an “∞” symbol indicating infinity focus, relying solely on this mark may not always yield the sharpest results. It’s often necessary to fine-tune focus beyond the infinity mark for optimal sharpness.
 Photographer adjusting lens focus ring at night, demonstrating manual focusing technique for aurora photography.
Experimentation and practice are key to mastering night sky focusing. Here’s a reliable method to set your focus for aurora photography:
Method 1: Daytime Focus Pre-Setting Technique
This method is particularly helpful for beginners or when you’re new to night photography, as it simplifies the focusing process once darkness falls.
Step 1: Daytime Setup: Set up your camera and lens during daylight. Use the same lens, focal length, and aperture (f-stop) you intend to use at night. This can be done anywhere convenient, such as at home or near your accommodation.
- Set your aperture to f/2.8 or f/4.
- Zoom your lens to its widest focal length (e.g., 14-25mm).
Step 2: Focus on a Distant Object: Choose an object approximately 50 feet (15 meters) away from your camera and focus on it. Pacing out about 15 large steps from your camera provides a reasonable approximation of this distance.
Step 3: Verify Sharp Focus: Take a few test shots and zoom in on the images to critically assess sharpness. Ensure both the object you focused on and the distant horizon (or the furthest elements in your composition) are sharp.
Step 4: Mark Your Focus Point: Once you’ve achieved sharp focus, use a piece of tape (white tape is easily visible in the dark) to mark the focus ring’s position. Secure the tape to prevent the focus ring from accidentally moving. This marked position represents your infinity focus setting for night sky photography with that specific lens and focal length.
By pre-setting your focus during the day, you eliminate a significant variable when shooting the aurora at night, allowing you to concentrate on composition and camera settings.
Advanced Focusing Techniques
For more advanced focusing methods and in-depth guidance on night sky photography techniques, consider exploring resources like “Photograph the Night Sky,” which covers a range of focusing strategies for various night photography scenarios.
Camera Settings for Capturing the Aurora Borealis
This section provides a quick reference guide to camera settings for aurora photography, with more detailed explanations in the subsequent sections.
Shooting Mode: Manual Mode (M)
Always shoot in Manual Mode. This mode gives you complete control over aperture, shutter speed, and ISO – the three pillars of exposure, essential for capturing the dynamic aurora.
Image Format: RAW
Shoot in RAW format. RAW files retain significantly more image data than JPEGs, providing greater flexibility during post-processing to recover details, adjust white balance, and minimize noise.
Metering Mode: Irrelevant at Night
Metering mode is not critical for night photography because your camera’s light meter is generally inaccurate in low-light conditions. Setting it to Center-weighted average, commonly used for landscape photography, is a safe default.
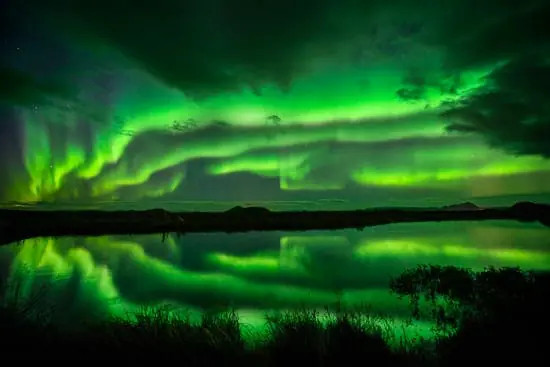
White Balance: Kelvin (3000-5000K)
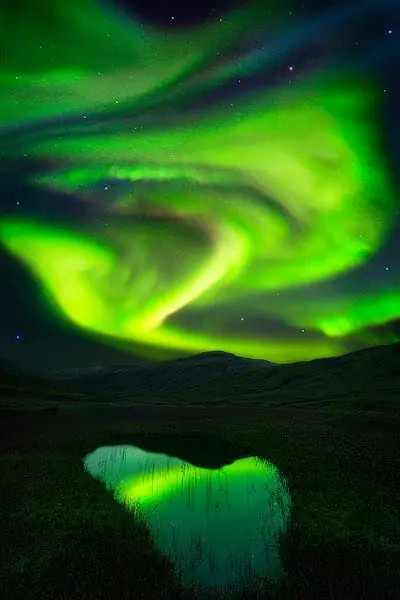
 Northern lights display in Norway, showcasing a range of colors from green to purple under a clear, dark sky.
Set your White Balance to a Kelvin value between 3000K and 5000K. This range helps to neutralize the colors and render the aurora close to how you perceive it with your eyes. Experiment within this range to find the white balance that best matches the aurora’s colors and your creative vision.
Refer to resources like “White Balance Shooting Technique Video” for a deeper understanding of white balance and its impact on your images. The goal is to capture colors that are true to the scene, closely resembling what you see in the sky.
Lens Focal Length: Wide Angle is Key
- Full Frame: 14-50mm
- Crop Sensor: 10-40mm
Wide-angle lenses in these focal length ranges are ideal for capturing the expansive nature of the aurora and incorporating foreground elements into your compositions.
Aperture (f-stop): f/2.8 to f/4
Set your aperture between f/2.8 and f/4. These wide apertures allow maximum light to reach your sensor in a short amount of time, crucial for capturing the often faint aurora while keeping ISO levels manageable.
For a comprehensive understanding of aperture and its role in photography, refer to “Aperture & Depth of Field Guide.”
Shutter Speed: 1 to 15 Seconds (Adjust Based on Aurora Movement)
Use shutter speeds between 1 and 15 seconds. The optimal shutter speed depends on the aurora’s speed and intensity. Faster-moving aurora may require shorter exposures to retain detail, while slower, fainter displays can benefit from longer exposures to gather more light.
For a detailed overview of shutter speed and its effects, consult “Shutter Speed Guide.”
ISO: 500-2000 (Adjust Based on Aurora Brightness)
Set your ISO between 500 and 2000. Adjust ISO based on the aurora’s brightness and your chosen aperture and shutter speed. Start with a lower ISO (e.g., 500-800) and increase it as needed to achieve a well-exposed image without excessive noise.
Refer to “ISO Photography Guide” for a thorough understanding of ISO and its impact on image noise and exposure.
In-Camera Noise Reduction: OFF
Disable in-camera noise reduction settings. These settings typically apply only to JPEGs and can degrade image quality. Noise reduction is better applied during post-processing to RAW files, where you have more control and can achieve better results.
Understanding Aperture Settings for Aurora Photography
 Northern lights display with foreground trees, emphasizing the wide aperture's role in capturing both foreground and sky.
An aperture of f/2.8 is often considered the optimal setting for aurora photography. This wide aperture allows your camera’s sensor to gather a significant amount of light quickly, which is crucial for capturing the faint aurora while keeping your ISO relatively low and minimizing image noise.
While f/2.8 is ideal, you can also experiment with f/3.5 or f/4. These slightly narrower apertures can provide a bit more depth of field, potentially beneficial if you have a prominent foreground and want to ensure sharpness throughout the scene.
Avoid using apertures wider than f/2.8 for aurora photography. Extremely wide apertures can make focusing more challenging at night and may reduce sharpness across the frame. The priority is to maximize light gathering while maintaining image quality and manageable focus.
The key principle is to allow the maximum amount of light to reach your camera sensor in the shortest possible time. This approach enables you to use lower ISO settings, resulting in less image noise and cleaner, more detailed aurora photographs.
Balancing Shutter Speed and ISO for Optimal Exposure
Shutter speed and ISO are intrinsically linked in aurora photography. Adjusting one often necessitates adjusting the other to achieve proper exposure. Mastering the interplay between these two settings is key to capturing well-exposed and detailed aurora images.
After setting your aperture (ideally f/2.8 to f/4) and focusing your lens, shutter speed and ISO become the primary variables you’ll adjust throughout your aurora shoot, depending on the aurora’s movement and brightness.
Question 1: How Fast is the Aurora Moving?
 Fast-moving aurora display with vibrant green and swirling patterns, requiring shorter shutter speeds to capture detail.
The speed at which the aurora dances across the sky directly impacts your choice of shutter speed. During periods of high aurora activity, the lights can move rapidly and dynamically.
Using long shutter speeds in these situations can result in the aurora appearing as a blurred “blob of color” rather than capturing its intricate details and structures. A long exposure averages the aurora’s movement over time, losing the sharp definition you see with your eyes.
To capture the detail and vibrant colors of a fast-moving aurora, use shorter shutter speeds, typically between 3 and 7 seconds. These shorter exposures freeze the aurora’s motion, preserving its dynamic shapes and colors.
When the aurora is moving slowly or is less intense, you can use longer shutter speeds, ranging from 10 to 25 seconds. Longer exposures allow your camera to gather more light, which is beneficial for fainter auroras, while still capturing detail when the movement is slow.
These shutter speed ranges are guidelines. Experimentation is crucial. Taking numerous shots at varying shutter speeds will help you learn what works best for different aurora conditions and develop your intuition for setting the optimal exposure time.
Question 2: How Bright is the Aurora?
This step assumes you have a basic understanding of the photography histogram, a vital tool for assessing exposure in digital photography. Refer to resources like “photography histogram as taught in depth on this page” if you need to refresh your knowledge of histograms.
With your aperture and shutter speed set based on the aurora’s movement, ISO becomes the primary setting for fine-tuning exposure based on the aurora’s brightness. Since the aurora’s intensity can change dramatically throughout the night, you’ll need to adjust your ISO accordingly to maintain proper exposure.
The goal is to use the lowest ISO possible while still achieving a well-exposed image at your chosen aperture and shutter speed. Higher ISO values introduce more noise into your images, so minimizing ISO is generally desirable for cleaner results.
Here’s a step-by-step approach to adjusting ISO:
Step 1: Initial ISO Setting: Start with an ISO of 400-800 and take a test shot.
Step 2: Evaluate Brightness: Review your test shot. If it appears too dark, increase your ISO to around 1200 and take another test shot.
Step 3: Incremental Adjustments: Continue to increase your ISO in increments until you achieve a satisfactory exposure. A typical ISO range for aurora photography is 800-4000, but this can vary depending on the aurora’s intensity and your other settings.
 Correctly exposed aurora image with balanced histogram, showing detail in both highlights and shadows.
Remember that night photography often involves darker images. Your goal is not necessarily to create a perfectly “bright” image in-camera. It’s acceptable, and often preferable, for aurora photos to be somewhat underexposed. You can recover shadow detail and adjust overall brightness during post-processing.
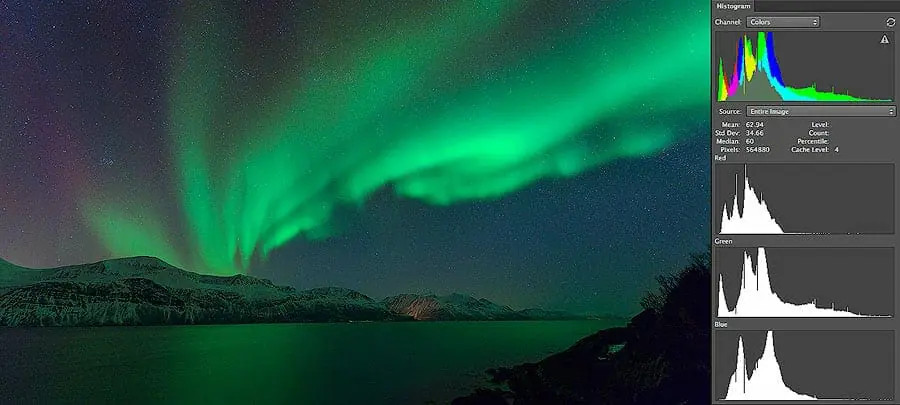
Crucially, monitor your histogram to avoid clipping shadows (losing detail in the darkest areas) or blowing out highlights (overexposing bright areas, especially the green channel of the aurora). Pay particular attention to the color histogram, as the green channel is prone to overexposure in aurora photography.
Image Exposure Examples: Histogram Analysis
The following examples illustrate how to interpret histograms and assess exposure in aurora photography. These images are RAW files exported to JPEG to represent how they appeared on the camera screen after capture.
Example 1: Overexposed Aurora
Camera Settings: 10 Seconds, f/2.8 ISO2500
Overexposing the aurora, particularly the green channel, is a common mistake. An overexposed green channel loses color and detail, resulting in a less vibrant and less defined aurora. In the histogram of an overexposed aurora image, you’ll see the green channel pushed to the right edge, indicating highlight clipping (blown-out highlights).
It’s generally better to slightly underexpose aurora photos to preserve color and detail, especially in the green channel. You can always brighten the image in post-processing, but recovering lost highlight detail is much more difficult.
Example 2: Correctly Exposed Aurora
Camera Settings: 10 Seconds, f/2.8, ISO2000
A correctly exposed aurora image will have a histogram that is balanced, with color and luminance channels falling within the histogram’s boundaries. This indicates that detail is preserved in both shadows and highlights, and no information is clipped.
Notice that even in a correctly exposed night sky image, the histogram will typically be shifted to the left, reflecting the overall darkness of the scene. This is normal and expected. The key is to ensure that the histogram isn’t clipped on either the left (shadows) or right (highlights) side, indicating lost detail.
Final Advice for Aurora Photography Success
The most effective way to improve your aurora photography skills is through hands-on practice and experimentation. Spend time under the night sky, applying the techniques outlined in this guide, and observe what works best for you and your equipment.
Remember these key principles:
- Prioritize Aperture: Always maximize your aperture (ideally f/2.8) before increasing ISO to brighten your image.
- Maximize Shutter Speed (Within Detail Limits): Use the longest shutter speed that still captures detail in the aurora without excessive blurring due to movement.
- Adjust ISO Last: Fine-tune your exposure with ISO, starting low and increasing as needed to achieve proper brightness while minimizing noise.
By consistently practicing and applying these techniques, you’ll develop a strong understanding of aurora photography and significantly improve your ability to capture stunning images of the northern lights.
You might also find these related tutorials helpful for expanding your night sky photography skills: Milky Way Photography Tutorial & Star Trails Photography Tutorial.
Accelerate Your Learning: Hands-On Aurora Photography Workshops
 Promotional image for photography workshops, featuring a photographer teaching under the northern lights.
For the most rapid improvement in your photography skills, consider learning directly from experienced professionals. Hands-on workshops and tours provide invaluable personalized instruction and feedback that can significantly accelerate your learning curve.
While online resources like blogs and videos are helpful, they can’t replace the benefits of in-person guidance and real-time feedback from seasoned photographers who have honed their skills over years of experience.
Workshops and tours cater to all skill levels, fitness levels, and ages. In a focused, immersive environment, you can gain more knowledge and practical skills in a few days than you might acquire through years of self-teaching. The personalized feedback and direct instruction offered in workshops can dramatically enhance your understanding and proficiency in aurora photography.
Explore available workshops and tours here to take your aurora photography to the next level.