Organizing your photos on your iPhone into albums helps you quickly find and relive your memories. If you’re wondering how to move photos to albums on your iPhone, you’re not alone. Many users find the process a bit confusing, especially when trying to declutter or reorganize their growing photo library. This guide will walk you through the simple steps to effectively manage your iPhone photos and keep them perfectly categorized in albums.
Understanding Albums vs. Moments on iPhone
Before we dive into moving photos, it’s important to understand how the Photos app on your iPhone organizes your images. The app automatically groups your photos into “Moments,” “Days,” and “Years” based on when and where they were taken. These are automatically generated and can’t be manually altered in terms of moving photos between them.
Albums, however, are collections you create yourself. Think of them as custom folders where you can group photos based on themes like “Vacation,” “Family,” “Pets,” or anything else that makes sense to you. Crucially, when you add a photo to an album, you’re not actually moving the original photo file. Instead, you’re creating a shortcut or a “pointer” to the original image, which remains in your main photo library and within its original Moment. This means a single photo can appear in multiple albums without taking up extra storage space.
Steps to Add Photos to Albums on iPhone
Adding photos to albums on your iPhone is straightforward. Here’s how you can do it:
- Open the Photos App: Locate and tap the Photos app icon on your iPhone’s home screen.
- Select Photos: Go to your “Library” tab, where you see “Moments,” “Days,” or “All Photos.” Tap “Select” in the top right corner. Now, tap on each photo you want to add to an album. A blue checkmark will appear on each selected photo. You can also tap and drag to select multiple photos at once.
- Tap the “Share” Button: Once you’ve selected your photos, tap the “Share” button in the bottom left corner. It looks like a square with an arrow pointing upwards.
- Choose “Add to Album”: In the Share Sheet that appears, scroll down and find the option “Add to Album.” Tap on it.
- Select an Album or Create a New One: You’ll see a list of your existing albums. You can either:
- Add to an Existing Album: Tap on the album you want to add the selected photos to.
- Create a New Album: Tap “New Album…” at the top of the list. Give your new album a name and tap “Save.” The selected photos will be added to this new album.
After completing these steps, your chosen photos will be added to the album(s) you selected. Remember, the original photos are still in your main library; you’ve just added them to a categorized collection for easier access.
Removing Photos from an Album (Without Deleting the Original)
If you want to remove a photo from an album but keep it in your main photo library (and other albums it might be in), follow these steps:
- Go to the Album: Open the Photos app and tap the “Albums” tab at the bottom. Select the album you want to edit.
- Select Photos to Remove: Tap “Select” in the top right corner. Tap on the photo(s) you want to remove from this album.
- Tap “Remove”: In the bottom left corner, tap “Remove.”
- Choose “Remove from Album”: A prompt will appear asking “Remove from Album?” or “Deleting this item will remove it from iCloud Photos and all albums and shared albums.” Crucially, choose “Remove from Album.” This will remove the photo from only the current album you are in, leaving the original photo untouched in your main library. Do not choose “Delete from Library” unless you want to permanently delete the photo from your iPhone and iCloud Photos.
“Moving” Photos by Removing from One Album and Adding to Another (Workaround)
While the Photos app doesn’t have a direct “move” feature in the traditional sense (like moving files between folders), you can achieve a similar effect if you truly want a photo to only exist in one specific album and not another. This involves a two-step process:
- Remove from the “Source” Album: Follow the steps above to remove the photo from the album you don’t want it in anymore.
- Add to the “Destination” Album: Follow the steps outlined earlier to add the photo to the album where you do want it to be.
This workaround effectively “moves” the photo in terms of album organization, though technically the photo always remains in your main photo library.
Utilizing Smart Albums for Automatic Organization
For a more advanced and automated approach to photo organization, explore Smart Albums. Smart Albums automatically group photos based on criteria you set, such as date range, keywords, location, or even if they are already in an album or not.
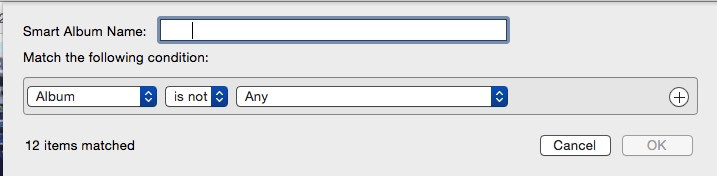 Screenshot of Smart Album creation in Photos App with criteria options
For example, you can create a Smart Album that automatically collects all photos taken in a specific year that are not currently in any album. This can be a powerful tool for identifying photos that still need to be categorized and organized. While Smart Albums don’t directly “move” photos, they offer dynamic and intelligent ways to manage and view your photo library based on different criteria.
Organizing Photos on iPhone Made Easy
Managing your photos and organizing them into albums on your iPhone doesn’t have to be a daunting task. By understanding the concept of albums as “pointers” and mastering the simple steps of adding and removing photos, you can effectively curate your photo library. Whether you’re creating albums for vacations, events, or just everyday moments, taking the time to organize your photos will make it much easier to find and enjoy your memories on your iPhone.
