Moving photos from Google Photos to your device’s gallery is a common need. Whether you’re freeing up cloud storage, ensuring offline access, or simply prefer having your photos locally, this guide provides comprehensive solutions for Android and computer users.
Opening Google Photos on your device is the first step to moving images to your local gallery.
Transferring Photos on Android
Android offers a couple of straightforward methods for transferring photos from Google Photos to your gallery.
Method 1: Using the Google Photos App
This method leverages the built-in functionality of the Google Photos app.
- Open Google Photos: Launch the Google Photos app on your Android device and sign in to your Google account.
- Select Photos: Long-press on a photo to start selecting. You can select multiple photos by tapping on additional images.
- Access Options: Tap the three vertical dots in the top right corner to open the options menu.
- Save to Device: Choose “Save to Device” or “Download.” The photos will be saved to your device’s gallery.
The ‘Save to Device’ option in Google Photos allows for quick downloads to your gallery.
Method 2: Utilizing Google Drive
If your photos are also backed up to Google Drive, you can download them directly from there.
- Open Google Drive: Launch the Google Drive app and sign in.
- Locate Photos: Navigate to the “Recent” tab or the specific folder where your photos are stored. Remember, Google Photos uploads are often found within the “Google Photos” folder in Drive.
- Select Photos: Choose the photos you want to transfer. Multiple selections are possible.
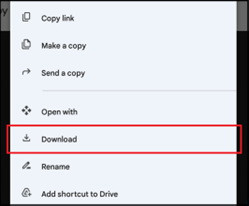
- Download: Tap the three vertical dots next to the selected photo(s) and choose “Download.” The photos will be saved to your device’s gallery.
 transfer google photos to gallery 4
Moving Photos on a Computer
Transferring Google Photos to your gallery via a computer requires a slightly different approach.
Downloading from Google Takeout
- Access Google Takeout: Go to takeout.google.com and sign in to your Google account.
- Select Google Photos: Choose “Deselect all” and then select only “Google Photos.” You can customize the download format and photo/video quality.
- Create Export: Click “Next step” and choose your delivery method (download link via email, add to Drive, etc.). Then click “Create export.”
- Download & Transfer: Once the export is ready, download the file to your computer. Then, connect your Android device and transfer the downloaded photos to your device’s gallery folder.
Using Third-Party Tools
Several third-party file transfer tools can simplify the process. AirDroid is one such option.
- Install AirDroid: Install AirDroid on both your computer and Android device.
- Connect Devices: Sign in to your AirDroid account on both devices and establish a connection.
- Transfer Photos: Use AirDroid’s file transfer feature to select and send the photos from your computer directly to your Android device’s gallery.
AirDroid and other third-party apps can facilitate moving photos from your computer to your phone.
Conclusion
Whether you’re using an Android device or a computer, transferring Google Photos to your gallery is achievable with various methods. Choose the solution that best suits your needs and technical comfort level. From utilizing built-in app functionalities to leveraging third-party tools, you now have the knowledge to manage your photo library effectively.